Using Reports Now that you know how to build reports, you can take a closer look at their functionality. In this section of the chapter, we'll show you what you can do with a report in print preview mode and discuss the mechanics of actually printing a report. Working with Print Preview View You've already seen several of the pieces of the user interface that apply to a report open in print preview mode. The mouse cursor turns into a magnifying glass icon when placed over the report, and the bottom of the report window contains a navigation control, similar to those on tables, forms, and queries (refer to Figure 9.15). Clicking the magnifying glass cursor on the report alternates between zooming in so you can see more details and zooming out so you can see the overall layout of the report. You can use the arrow buttons in the navigation control to move to different pages of the report. You can also type a page number into the navigation control and click Enter to move directly to that page. In addition, a special toolbar is available for reports that are open in print preview view, as shown in Figure 9.16. Figure 9.16. The Print Preview toolbar. 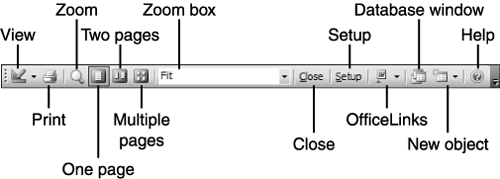 The buttons on the print preview toolbar allow you to perform the following functions: -
View Lets you switch between print preview view and design view. -
Print Sends the report directly to your default printer. -
Zoom Toggles between 100% zoom and "fit to window" zoom. This is the same as clicking the mouse on the print preview window. -
One Page Zooms to display a single page in the print preview window. -
Two Page Zooms to display two pages at the same time in the print preview window. -
Multiple Page Zooms to display multiple pages in the print preview window. You can select the number of rows and columns when you click this button. Figure 9.17, for example, shows a report displayed with two rows and two columns of pages at the same time. Figure 9.17. A report displaying four pages in print preview view. 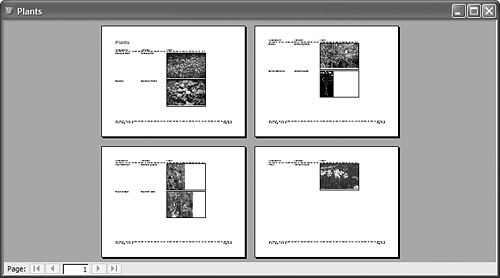 -
Zoom Box Lets you select from a number of predetermined zoom factors ranging from 10% to 1000%. You can also type a zoom percentage directly into the box and press Enter to apply that percentage. -
Close Closes the report. -
Setup Opens the Page Setup dialog box. You'll learn more about Page Setup in the section, "Printing a Report." -
OfficeLinks Lets you export the report to Word or Excel. You'll learn more about OfficeLinks in Chapter 16, "Sharing Data." -
Database Window Displays the main Database window. -
New Object Displays a drop-down list of new object wizards. -
Help Opens the Access help. Printing a Report Before you print a report, you might like to review the page setup settings. To do this, select the report in the Database window and select File, Page Setup . As an alternative, you can open the report in print preview view and click the Setup button on the toolbar. Either action opens the Page Setup dialog box, shown in Figure 9.18. Figure 9.18. The Page Setup dialog box. 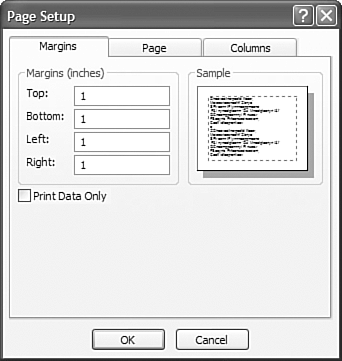 The Page Setup dialog box is divided into three tabs that let you perform the following actions: -
Margins Lets you specify the margins to maintain between the printed data and the edges of the paper. This tab also includes the Print Data Only check box, which suppresses all graphic content from the printout when checked. -
Page Lets you choose between portrait and landscape orientation for the printed report, and lets you select a paper size and source. You can also select a different printer from this tab. -
Columns Lets you control the grid settings when printing a multicolumn report. This tab is useful mainly with mailing labels, which you'll learn about in Chapter 14. Tip  | Checking the Print Data Only check box lets you print a copy of a report's data more quickly. This is useful when you want to verify the contents of the report without worrying about its appearance. |
After you've created your report and set up the page the way you want it, you're finally ready to print the report. You can do that in several ways: -
Select the report in the Database window and select File, Print. -
Select the report in the Database window and click the Print toolbar button. -
Right-click the report in the Database window and select Print from the shortcut menu. -
Open the report in print preview view and select File, Print. -
Open the report in print preview view and click the Print toolbar button. -
Open the report in print preview view, right-click the report, and select Print. As always, Access tries to be flexible by offering you many ways to perform the same action. You might find this overwhelming at times, but when you get used to it, it's very convenient to have common actions at hand no matter where you're working. The Absolute Minimum Reports provide a way to archive your Access data for posterityor at least until the paper turns to dust! In this chapter, you learned the basics of working with reports: -
You can create a report using the AutoReport facility, the Report Wizard, or design view. -
The Report Wizard offers you a flexible way to create a report based on a single table, a query, or multiple tables. -
Print preview view lets you experiment with layout options and see reports onscreen without wasting paper. -
When your report is ready to print, Access offers multiple options for sending it to the printer. |  |