Unit Testing in Action
|
| < Day Day Up > |
|
When I got started writing software, unit testing was a purely ad hoc (and often manual) process. After writing each small chunk of code, I’d run the application and test it by hand to see whether it worked properly. Sometimes I’d have an automated testing tool that could simulate key presses and mouse clicks to make this easier. Sometimes I’d write custom code in a separate module in the program to exercise the code I was planning to ship. But all in all, my unit testing was a chaotic process.
In recent years, unit testing has become a much more structured process for many developers. The major cause for this change was the release of JUnit, a unit-testing framework for Java code written by Erich Gamma and Kent Beck (if you’re doing Java development, you can download JUnit from www.junit.org/index.htm). JUnit lets you construct unit tests in a separate Java module. It runs the tests for you and keeps track of which tests your code passes at any given point.
JUnit has been ported to many other development environments. By now there are dozens of tools, both free and commercial, that owe their basic design to the JUnit project. These are the tools that many of us now automatically think of when you mention unit testing, and they’re the ones that I’ll be using in this chapter.
| Note | For a quick tutorial on using JUnit with Java, see Java Programming 10-Minute Solutions, by Mark Watson (Sybex, 2004). |
Unit Testing Tools for .NET
As I mentioned, the basic unit-testing framework has been ported to many different languages and development environments. In fact, there are at least five unit-testing tools for Microsoft .NET developers:
-
NUnit A free, open-source unit-testing framework. This is probably the best known of the .NET unit-testing tools, and there are several other projects that build on NUnit to offer additional functionality. These include NUnitAddin (http://sourceforge.net/projects/nunitaddin/) and TestRunner for NUnit (www.mailframe.net/Products/TestRunner.htm), each of which integrates NUnit with Visual Studio .NET, and NUnitAsp (http://nunitasp.sourceforge.net/), which extends NUnit to support testing ASP.NET pages. (http://nunit.org)
-
csUnit Another free, open-source implementation. It offers a slightly different set of features from NUnit, including built-in integration with Visual Studio .NET. It also includes project wizards to build new testing projects easily, as well as a user interface that shows more information than NUnit’s interface does. (www.csunit.org/)
-
HarnessIt A commercial product with a price of $199 per user. It uses a pluggable test engine architecture to extend its reach. This allows for easy testing of web applications and remote applications using the same tools that you use for local Windows applications. HarnessIt also offers a way to explore exceptions in detail and good reporting tools. (www.unittesting.com/default.aspx)
-
X-Unity A commercial product with pricing starting at $129 per user. It features Visual Studio .NET integration, a separate development kit for unit tests, and integration with X-Unity’s continuous integration product (see Chapter 13, “Mastering the Build Process,” for more on continuous integration). (http://x-unity.miik.com.ua/)
-
.TEST A commercial product that costs $900. Its claim to fame is that it will actually write many unit tests for you. It uses a rules-based engine to do this, and helps you ensure that your code conforms to various design guidelines as well as letting you write your own custom tests. (www.parasoft.com/jsp/products/home.jsp?product=TestNet)
All of these products offer versions that you can download and evaluate. When you’re ready to start unit testing, you should look at the products within your price range to determine which one works best for you. In this chapter, I’ll use NUnit to demonstrate the principles of unit testing and test-driven development.
| Tip | XProgramming.com maintains an excellent and comprehensive list of unit-testing and related tools for many languages and development environments at www.xprogramming.com/software.htm. Check there from time to time to find new and updated testing tools. |
Using NUnit for Unit Testing
In this section, I’ll work through the mechanics of using NUnit for unit testing. I’ll use the DownloadEngine component as my example component for testing.
First Steps with NUnit
NUnit recognizes classes decorated with the TestFixture attribute as containing unit tests. Although you can put these classes directly into the code that you’re testing, I prefer to create a separate class library project to hold the tests. This makes it easy for me to be sure that I don’t accidentally ship testing code with the final product. So to begin, I’ve created a new C# class library project named DownloadEngineTests.
To use NUnit, you need to set a reference within the test project to the nunit.framework assembly. When you install NUnit, it automatically places this assembly into the Global Assembly Cache and makes it available in the Add Reference dialog box.
You can have any number of test methods within a single test class. Test methods are methods where both of these things are true:
-
The method type is public void.
-
The method is decorated with the Test attribute.
The following code listing shows the new test class with a single test method:
using DownloadTracker.DownloadEngine; using NUnit.Framework; using System; namespace DownloadEngineTests { /// <summary> /// Tests for the DownloadEngine class /// </summary> [TestFixture] public class DownloadEngineTests { public DownloadEngineTests() { // // TODO: Add constructor logic here // } /// <summary> /// Make sure we can set and retrieve /// the default download path /// </summary> [Test] public void TestDownloadPath() { Engine eng = new Engine(); eng.DefaultDownloadFolder = @"e:\Temp"; Assert.AreEqual(eng.DefaultDownloadFolder, @"e:\Temp"); } } } The test here is the TestDownloadPath method. This test first creates an instance of the Engine object exposed by the DownloadEngine project. It then sets the DefaultDownloadFolder property of that object to a fixed string. Finally, it uses the AreEqual method of the NUnit Assert object to assert that the retrieved property will be that same string. If the string has the expected value, NUnit will consider the test to be a success. If the string has any other value, the test will fail.
At this point, you’re ready to run the first test. Compile the test assembly to make sure that you didn’t make any syntax errors.
Nunit lets you run tests from either a console application or a GUI application. For now, I’m going to use the GUI application. By default, it installs to Program Files ![]() NUnit v2.1
NUnit v2.1 ![]() Nunit-Gui. Launch the application and select Open from the File menu. Open the DownloadEngineTests.dll assembly. This will display the DLL name, the namespace name, the class name, and the test name in a tree view. Click the Run button. NUnit will run the tests and display the results, as shown in Figure 5.1. All of the bullets in the tree view will turn green, indicating successful tests.
Nunit-Gui. Launch the application and select Open from the File menu. Open the DownloadEngineTests.dll assembly. This will display the DLL name, the namespace name, the class name, and the test name in a tree view. Click the Run button. NUnit will run the tests and display the results, as shown in Figure 5.1. All of the bullets in the tree view will turn green, indicating successful tests.
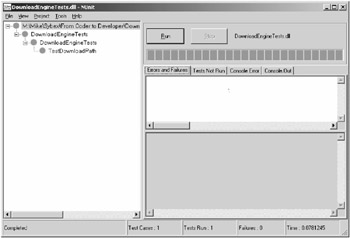
Figure 5.1: First test run with NUnit
Testing the Download Engine
The next step is to write unit tests for the actual downloading functionality. Here are two new tests: one that downloads a file to the engine’s default folder, and one that downloads a file to a specified folder.
/// <summary> /// Download a file to the default folder /// for the download engine /// </summary> [Test] public void TestDownloadToDefaultFolder() { Engine eng = new Engine(); eng.DefaultDownloadFolder = @"e:\Temp"; Download dl = new Download(); dl.SourceUrl = @"http://localhost/DownloadEngine/DLTest.txt"; // delete any existing file try { File.Delete(@"e:\Temp\DLTest.txt"); } catch (Exception e) { // no existing file to delete // not a problem } // perform the download eng.GetDownload(dl); // verify the file's existence Assert.IsTrue(File.Exists(@"e:\Temp\DLTest.txt"), "File not found in expected folder"); } /// <summary> /// Download a file to a specified folder /// </summary> [Test] public void TestDownloadToSpecifiedFolder() { Engine eng = new Engine(); eng.DefaultDownloadFolder = @"e:\Temp"; Download dl = new Download(); dl.SourceUrl = @"http://localhost/DownloadEngine/DLTest.txt"; dl.DownloadFolder = @"e:\Temp\Test"; // delete any existing file try { File.Delete(@"e:\TempTest\DLTest.txt"); } catch (Exception e) { // no existing file to delete // not a problem } // perform the download eng.GetDownload(dl); // verify the file's existence Assert.IsTrue(File.Exists(@"e:\Temp\Test\DLTest.txt"), "File not found in expected folder"); } These tests are pretty straightforward: Each one starts by setting up the required objects. It then deletes any existing file from the target location, downloads the file, and checks that it ended up in the expected place. NUnit’s Assert.True method lets me use any method that returns a Boolean value; in this case, the File.Exists method (from the System.IO namespace) provides an easy way to see whether a file exists after the download finishes.
| Note | Remember the rule to check everything you need into your source code control system? At this point, I added the DLTest.txt file, and a command file to build the necessary folders, to my Vault database. |
When you recompile a class containing NUnit tests, NUnit automatically adds the new tests to the tree view (assuming that you’re using the GUI tester). So all you need to do is switch back to the tester and click the Run button. Figure 5.2 shows the results in this case.
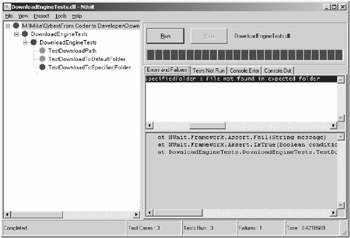
Figure 5.2: Test run with a failing test
One of the new tests passed, but the TestDownloadToSpecifiedFolder test failed. The main bar in the NUnit window is now an angry red. This means that at least one of the tests failed.
| RULE | When a unit test fails, it’s time to stop adding new tests and fix the problem. |
Debugging NUnit Tests
Looking at the NUnit interface, you’ll see that the file didn’t end up in the right place on the hard drive. Why is that happening? The obvious approach to this problem is to set a breakpoint inside the test code and find out. But if you try this, you’ll discover that your breakpoint is never hit. That’s because NUnit launches its tests on a separate thread. You can debug the code that NUnit is testing, but it takes a bit of extra work. Follow these steps to debug a unit test in action:
-
Set a breakpoint in the test code where you want to drop into the debugger.
-
Launch NUnit.
-
Select Debug
 Processes in Visual Studio .NET. This will open the Processes dialog box, shown in Figure 5.3.
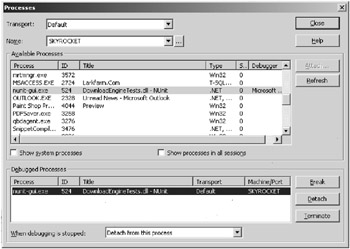
Figure 5.3: Attaching to a process to debug -
Scroll down the Available Processes list to find the nunit-gui.exe process, and then click Attach. This will open the Attach To Process dialog box.
-
Select the CLR debugger and click OK. nunit-gui.exe will now show up in the Debugged Processes list.
-
Select the option to detach from the process when debugging is stopped and click Close.
Now when you run the tests in the NUnit GUI, Visual Studio .NET will stop on the breakpoint and let you debug using all the normal Visual Studio .NET tools.
| Tip | For a less-cumbersome debugging experience, you might like to experiment with the TestRunner or NUnit Addin projects that I mentioned earlier in the chapter. |
Oh, the error? Just a bit of late-night coding stupidity on my part. Here’s the code that I originally saved to handle the DownloadFolder property of the Download class:
/// <summary> /// The folder where the file will be saved /// </summary> public string DownloadFolder { get { return _DownloadFolder; } set { _DownloadFolder = DownloadFolder; } } Of course, with the test failing, it’s easy to see that this code should be changed:
/// <summary> /// The folder where the file will be saved /// </summary> public string DownloadFolder { get { return _DownloadFolder; } set { _DownloadFolder = value; } } With this change, all three of the unit tests pass with flying colors.
Testing an Exception
You can also use NUnit to test an exception—that is, you can test whether a piece of code throws the exception that you think it should. Here’s an NUnit test for the exception that I expect DownloadEngine to throw when it’s given an invalid URL:
/// <summary> /// Make sure an invalid URL throws the proper /// exception /// </summary> [Test] [ExpectedException(typeof(Engine.DownloadException))] public void TestInvalidURL() { Engine eng = new Engine(); eng.DefaultDownloadFolder = @"e:\Temp"; Download dl = new Download(); dl.SourceUrl = @"http://localhost/DownloadEngine/BadFile.txt"; // perform the download eng.GetDownload(dl); } When you want NUnit to check that your code throws a particular exception, you need to add the ExpectedException attribute to the test in question. This attribute has a property that indicates the type of exception that you’re expecting. If the test throws the specified exception, it’s considered as passing.
Testing with Mock Objects
One problem you may face from time to time is how to test parts of a project before other parts are finished. For instance, here’s a little preliminary code from the logic layer of the Download Tracker application:
public bool SaveDownload(string SourceUrl, string DownloadFolder, string FileName) { // Set up the download engine and a download DownloadEngine.Engine eng = new DownloadEngine.Engine(); eng.DefaultDownloadFolder = GetDefaultDownloadFolder(); DownloadEngine.Download d = new DownloadEngine.Download(); d.SourceUrl = SourceUrl; d.DownloadFolder = DownloadFolder; d.FileName = FileName; // Perform the download eng.GetDownload(d); // Save to the database and return the result return _DB.SaveDownload(d); } public DownloadEngine.Download GetDownload(string ProductName) { // Pass the request to the database layer and // return the result return _DB.GetDownload(ProductName); } This code handles moving downloads to the database and back, using an object, _DB, supplied by the database layer code. Although the code is simple, it’s a good practice to write unit tests for everything. After all, you can’t be sure that things will stay simple. But without having yet written the database layer, how can you test this code?
One answer to that question is to use mock objects. A mock object has the same interface as the real object that it’s imitating but contains only test code. To use mock objects for testing, you declare and use interfaces rather than classes in your main code. Then that code can use either the real object or the mock object without changes. In this case, I can begin by declaring an interface that the data access layer will ultimately implement:
namespace DownloadTracker { public interface IDBAccess { bool SaveDownload(DownloadEngine.Download d); DownloadEngine.Download GetDownload(string ProductName); } } Of course, it’s likely that I’ll add more methods to this interface later. But if you’re serious about unit testing (and you should be), writing just enough code to test is always a good idea. That way, you’re more likely to write the tests, instead of postponing them until later.
To use this strategy, ensure that the database layer object is passed into the logic layer rather than declared inside it. It’s convenient to provide a constructor to handle this. Note that the constructor is declared with the interface. This allows me to pass in any object that implements that interface:
public class DTLogic { IDBAccess _DB; public DTLogic() { // // This constructor should not be used // } /// <summary> /// Constructor including data access /// </summary> public DTLogic(IDBAccess DB) { _DB = DB; } When the code is in actual production use, I’ll pass in a real database layer object here. For testing, though, I want to use a mock object. So this means building NUnit test code for the SaveDownload and GetDownload methods that use a mock object. Here’s the code:
using DownloadTracker; using DownloadTracker.DownloadEngine; using NUnit.Framework; using System; namespace DownloadTrackerTests { /// <summary> /// Tests for the main Download Tracker logic /// </summary> [TestFixture] public class DownloadTrackerTests { public DownloadTrackerTests() { } /// <summary> /// Exercise the DTLogic.SaveDownload method /// </summary> [Test] public void TestSaveDownload() { DTLogic DT = new DTLogic(new MockDBAccess()); bool retval = DT.SaveDownload( @"http://localhost/DownloadEngine/DLTest.txt", @"e:\Temp", ""); Assert.IsTrue(retval); } /// <summary> /// Exercise the DTLogic.GetDownload method /// </summary> [Test] public void TestGetDownload() { DTLogic DT = new DTLogic(new MockDBAccess()); Download D = DT.GetDownload("MyProduct"); Assert.AreEqual("MyProduct", D.ProductName); } } public class MockDBAccess: IDBAccess { public MockDBAccess() { // // TODO: Add constructor logic here // } #region IDBAccess Members public bool SaveDownload(DownloadTracker.DownloadEngine.Download d) { // always mock a successful save return true; } public DownloadTracker.DownloadEngine.Download GetDownload(string ProductName) { // return a synthetic object Download d = new Download(); d.ProductName = ProductName; d.Description = "Download containing " + ProductName; return d; } } } Running these tests exercises the SaveDownload and GetDownload methods without requiring a real implementation of the database layer (and, in fact, the tests both pass). There’s an additional benefit here as well: Because the tests don’t make any actual database changes, I don’t need to worry about cleaning up the database in between test runs.
Mock objects come in handy in many situations:
-
The real object doesn’t exist yet.
-
The real object takes a long time to do its work.
-
The real object is hard to set up or clean up after.
-
The real object depends on unreliable resources (such as network connectivity).
-
The real object returns nondeterministic results. For example, if you’re retrieving stock prices, you can’t determine in advance what the correct number will be. This makes it impossible to test the results.
-
The real object requires user input (and so can’t be used in automated tests).
But there are also drawbacks to testing with mock objects. In particular, the need to factor out interfaces can make your code more complex. Also, you need to be careful that the mock object behaves exactly like the real object. Otherwise, your test is worthless.
In some situations, you may want to generate mock objects to replace quite complex real objects. In that case, you should investigate some of the products that exist to automatically create mock objects from real objects. I know of three for .NET:
-
NMock An open-source mock object library. (http://nmock.truemesh.com/)
-
.NET Mock Objects Another open-source mock object library, which includes prebuilt implementations of some Framework mock objects. (http://sourceforge.net/projects/dotnetmock/)
-
POCMock A commercial implementation that lets you create mock objects or add validation code to existing objects. It costs $49.95 to register. (www.prettyobjects.com/english/Products/POCMock.asp)
As of this writing, neither of the open-source projects appears to be actively maintained.
|
| < Day Day Up > |
|
EAN: 2147483647
Pages: 118