Why Rebuild the Kernel?
You might wonder why you would ever need to rebuild or configure the kernel because modules that are not required will not be loaded by the core kernel. That is entirely true. However, there are a number of reasons to manipulate the kernel:
-
The kernel provided by the standard distribution is generic in nature ”it is capable of running on most Intel x86 hardware but not optimized for any particular configuration. You may want to optimize the kernel for your particular hardware for better performance.
-
Certain device drivers are built directly into the kernel itself, and you may want to remove these drivers for security and performance reasons.
-
You may want to add support for your particular hardware devices directly into the kernel.
Now, let s build our very own version of the Linux kernel.
Initializing the Kernel
Before you start to work with the kernel, you must perform two important tasks . First, you need to install the necessary kernel source packages, and second, you need to back up the current kernel and related files so you can revert back to the original version of the kernel quickly.
Let s install the necessary kernel headers and sources.
Try It Out Initializing the Kernel
-
Open the RPM applet (either from the Applications>System Settings>Add/Remove Applica-tions menu, or by executing the system-config-packages application from the command line).
-
Select the Kernel Development package group from the Development category, and press the Details button to install the necessary packages (see Figure 12-1). If you installed the necessary development tools and libraries to build gFTP in Chapter 11, the Development Tools , X Software Development , and GNOME Software Development package groups will be shown as installed. However, if you did not build gFTP, you will need to select the Development Tools package group, in addition to Kernel Development , to build the kernel.
The Kernel Development package group installs the kernel source code in the /usr/src/linux-2.6.5-1.358 directory.
-
Before you can start to configure the kernel, you must back up the existing kernel. That way, if something goes wrong, you can always revert to the original kernel.
The kernel and its related files, but not the modules, are stored in the /boot directory, or partition, if you have set it up that way. You would back up this directory with the following:
# tar -zcvf /root/boot-2.6.5-1.358.20040518.tar.gz /bootUse a combination of the kernel version along with the current date to name the compressed tar archive; this provides you with a unique identifier. If you get in the habit of compiling kernels on a regular basis, this naming convention will allow you to quickly identify which archive to use for recovery, if necessary.
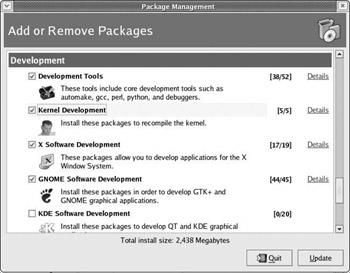
Figure 12-1Now that you have backed up the kernel, it would be nice to create a book disk as well, so you can use it to boot into the system and replace the kernel if something goes horribly wrong. However, unlike previous versions of Red Hat Linux, the Linux kernel used in Fedora version 2.6 has reached the point where it does not fit on a standard floppy disk. Fortunately, you have other options. You can simply use the Fedora Linux installer in rescue mode if you ever run into a problem. Or, you can use one of the many slimmed-down versions of Linux available online to create a boot disk; my personal favorite is tomsrtbt . Insert a clean floppy disk into the drive and enter the following set of commands:
# wget http://www.tux.org/pub/distributions/tinylinux/tomsrtbt/tomsrtbt-2.0.103.tar.gz # tar -zxvf tomsrtbt-2.0.103.tar.gz # cd tomsrtbt-2.0.103 # ./install.s Don't forget to READ the FAQ. Insert a blank writable 3.5" floppy diskette then strike ENTER. About to fdformat /dev/fd0u1722 Double-sided, 82 tracks, 21 sec/track. Total capacity 1722 kB. Formatting ... done Verifying ... done About to dd floppy image 3444+0 records in 3444+0 records out About to verify floppy image Succeeded!
This essentially installs the kernel and other required files to the floppy disk, so you can use this disk to boot into your system at any time.
How It Works
The /boot directory holds the kernel and related files. If you look around at the contents of this directory, you will see a file called vmlinuz-2.6.5-1.358 (or something similar). This is the kernel.
| Note | If you are using Fedora Core 2, your kernel is probably v2.6.5-1.358. In the Linux kernel s versioning scheme, the first digit (2, in this case) represents the major version, and the second digit (6, in this case) represents the minor version. If the minor version number is odd, the kernel is a beta version; otherwise , it is from a release/production branch. The third number (5, in this case) is the kernel patch number, and the final number is the package number. |
By contrast, the kernel modules are stored in the directory /lib/modules/2.6.5-1.358 . If you take a look at the contents of this directory, you ll see that a large number of modules are available. If you are curious to know the exact number of modules here, you can execute the following statement:
# find /lib/modules/`uname r` -name '*.ko' -print wc -l 989 You can use the find command to locate all the modules (that is, files with a .ko extension) in the /lib/modules directory associated with the system kernel. Instead of hardcoding the kernel version, you used the uname command with the -r switch, which returns the system s kernel version.
You are now ready to work with the kernel.
A Small, Lean Kernel
You will build a small, lean monolithic kernel that is ideal for use in routers and firewalls. Unlike the regular kernel that you would typically use in a desktop computer or laptop, a kernel designed for a router or firewall has to have very specific characteristics:
-
It has to be lean so you don t use up a lot of resources.
-
It has to be monolithic; it should not have the capability to load or unload modules.
-
It should disable support for any hot swappable devices, floppy drives , and multimedia components .
-
Advanced networking features should be enabled.
Looking at these characteristics, you might wonder why you would want to disable support for the floppy drive, for example. You certainly do not want any intruders who have potential physical access to this router or firewall server to introduce any files or executables into your server. By disabling the floppy drive altogether, you don t have to worry about this.
Keep these characteristics in mind, and you will end up with a kernel that is lean, secure, and optimized for network performance.
Try It Out Building a Kernel
-
First, you need to change your current directory to /usr/src/linux-2.6.5-1.358 :
# cd /usr/src/linux-2.6.5-1.358 -
From there, you can use the following commands to run the X Window-based kernel configuration editor:
# make xconfig HOSTCC scripts/basic/fixdep HOSTCC scripts/basic/split-include HOSTCC scripts/basic/docproc SHIPPED scripts/kconfig/zconf.tab.h ... HOSTCXX scripts/kconfig/qconf.o HOSTLD scripts/kconfig/qconf scripts/kconfig/qconf arch/i386/Kconfig # # using defaults found in /boot/config-2.6.5-1.358 #After a short time, you ll see the configuration editor appear. The dialog box that you see on your screen will not resemble the one shown in Figure 12-2 until you change the display view to tree view; click the last button on the toolbar.
Note If you don t have the X Window system installed, you can use a text-based editor by executing the following command:
# make menuconfigAs you can see from Figure 12-3, the text-based editor looks a bit different, but supports all of the same configuration options.
For the rest of this configuration section, you will use the X Window configuration editor.
-
From the configuration editor, you can enable or disable a multitude of options and kernel modules. In this example, we plan to build a monolithic kernel; therefore, you need to disable loadable module support. To do this, expand the Loadable module support option ”this brings up the Enable loadable module support option. Click the small checkbox to the right of the option to disable it.
Note If you look through some of the other options, you ll notice the presence of a great number of choices, laid out in a hierarchical manner. Deselecting an option (by clicking) disables all the options listed below. In some cases, however, you will have to manually deselect all the options below the main category one item at a time.
-
That s just the first setting. Now, go through the rest of the configuration ”you can always jump around from one option to another with the mouse.
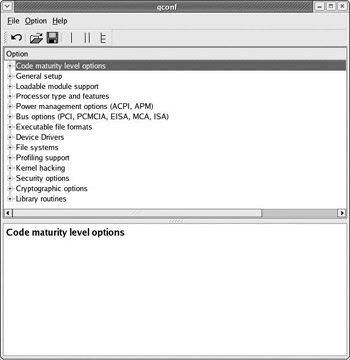
Figure 12-2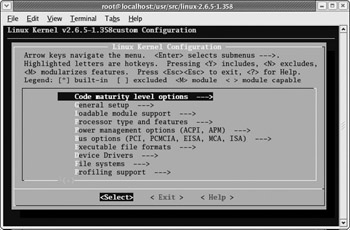
Figure 12-3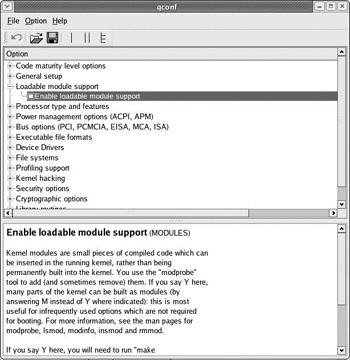
Figure 12-4Use the following recipe, which lists settings that need to be changed only; each following boldfaced option represents a section with further options in the kernel configuration:
Code maturity level options - Prompt for development and/or incomplete code/drivers OFF Loadable module support - Enable loadable module support OFF Processor type and features - Processor family Select from List - Generic x86 support OFF - HPET Timer Support OFF - Symmetric multi-processing support OFF - Toshiba Laptop support OFF - Dell laptop support OFF - /dev/cpu/microcode - Intel IA32 CPU microcode support OFF - /dev/cpu/*/msr - Model-specific register support OFF - /dev/cpu/*/cpuid - CPU information support OFF - High Memory Support OFF
You can determine the processor name and type for your machine by simply searching for the string CPU: in the startup boot messages in the /var/log/messages log file, like so:
# grep CPU /var/log/messages May 22 21:22:02 localhost kernel: Initializing CPU#0 May 22 21:22:02 localhost kernel: CPU 0 irqstacks, hard=02345000 soft=02344000 May 22 21:22:03 localhost kernel: CPU: L1 I cache: 16K, L1 D cache: 16K May 22 21:22:03 localhost kernel: CPU: L2 cache: 128K May 22 21:22:03 localhost kernel: Intel machine check reporting enabled on CPU#0. May 22 21:22:03 localhost kernel: CPU: Intel Celeron (Mendocino) stepping 05 May 22 21:22:10 localhost kernel: microcode: CPU0 updated from revision 0x0 to 0x3, date = 05051999
Based on this information, you should select a processor family that is most closely related to your hardware configuration:
-
If you are using a system with multiple processors, you may want to enable the options italicized in the preceding code, which, in turn , activate source code responsible for utilizing multiple processors.
-
If you are using a Toshiba or Dell laptop, you need to enable the respective options from the preceding list.
Let s continue with the recipe:
Power management options (ACPI, APM) - Power Management support OFF - ACPI (Advanced Configuration and Power Interface) Support - ACPI Support OFF - CPU Frequency Scaling - CPU Frequency Scaling OFF Bus options (PCI, PCMCIA, EISA, MCA, ISA) Legacy /proc/pci interface OFF ISA support OFF PCMCIA/CardBus support OFF Executable file formats Kernel support for MISC binaries OFF
If you are using a laptop, you might want to examine the options listed within the Power management options section; you will see a number of options that, when enabled, will enable your laptop to conserve power more efficiently .
As you will soon see, the Linux kernel supports a vast variety of hardware, from ATA and SCSI to USB and Bluetooth. Because you are looking to create a lean and minimal kernel, you will disable most of this hardware support as you proceed with configuring Device Drivers :
Device Drivers - Memory Technology Devices (MTD) - Memory Technology Device (MTD) support OFF - Parallel port support - Parallel port support OFF - Block devices - Normal floppy disk support OFF - Compaq SMART2 support OFF - Compaq Smart Array 5xxx support OFF - Mylex DAC960/DAC1100 PCI RAID Controller support OFF - Loopback device support OFF - Network block device support OFF - Support for Large Block Devices OFF - ATA/ATAPI/MFM/RLL support - ATA/ATAPI/MFM/RLL support - Enhanced IDE/MFM/RLL disk/cdrom/tape/floppy support - Include IDE/ATAPI FLOPPY support OFF - CMD640 chipset bugfix/support OFF - PCI IDE chipset support - RZ1000 chipset bugfix/support OFF - Generic PCI bus-master DMA support OFF - SCSI device support - ALL OPTIONS OFF - Multi-device support (RAID and LVM) - Multiple devices driver support (RAID and LVM) OFF - Fusion MPT device support - Fusion MPT (base + ScsiHost) drivers OFF - I2O device support - I2O support OFF
You start off by disabling support for the parallel port and the floppy disk. Unless you have a very specific peripheral that requires the parallel port, there is no point in enabling this feature. The floppy disk support, on the other hand, is to enhance the security of your kernel; you don t want users who have access to the physical hardware, where you will run this version of the kernel, to load or extract sensitive information from the system via an easy-to-use floppy disk.
Next , you assume that a typical router machine will have an ATA/IDE setup. So, you disable the drivers for SCSI devices. If your configuration requires support for SCSI devices, enable the necessary options. However, you should be aware that this will increase the size of the kernel greatly.
And finally, before moving on to the next piece of configuration, you should note that the CMD640 and the RZ1000 chipsets have design flaws that could lead to corruption on 486 and Pentium motherboards. If you have a newer machine, you can safely disable these fixes, as previously shown.
On to networking devices:
(continued from above) - Device Drivers - Networking support - Networking support - Networking options - IP: Virtual Server Configuration - IP virtual server support (EXPERIMENTAL) OFF - 802.1d Ethernet Bridging OFF - 802.1Q VLAN Support OFF - The IPX protocol OFF - Appletalk protocol support OFF - IrDA (infrared) subsystem support OFF - Bluetooth subsystem support OFF - TUX: Threaded linUX application protocol ... OFF - Network device support - Bonding driver support OFF - EQL (serial line load balancing) support OFF - Ethernet (10 or 100Mbit) - Sun Happy Meal 10/100baseT support OFF - Sun GEM support OFF - 3COM cards OFF
-
-
- HP 10/100VG PCLAN (ISA, EISA, PCI) support OFF
- EISA, VLB, PCI and on board controllers OFF - Ethernet (1000 Mbit) - ALL OPTIONS OFF - Ethernet (10000 Mbit) - Intel(R) PRO/10GbE support OFF - S2IO 10Gbe Xframe NIC (S2IO) OFF - FDDI driver support OFF - Wireless LAN (non-hamradio) - Wireless LAN drivers (non-hamradio) ... OFF - Fibre Channel driver support OFF - IrDA (infrared) support - IrDA subsystem support OFF - Bluetooth support - Bluetooth subsystem support OFF - ISDN subsystem - ISDN support OFF
This configuration should be relatively easy to understand. We have disabled support for the IPX and AppleTalk network protocols. If you need your router to interact with other servers that communicate via these protocols, you should enable them.
Next, disable all Ethernet cards, except for cards that contain the DEC tulip chip; this is not shown here, but is evident in the configuration. Most of the SMC and Linksys cards on the market utilize this chip, so the configuration should work without a hitch for cards manufactured by these companies. However, if you have a network interface card from another vendor who may not use this specific chip, you should first determine the chip being used:
# grep eth0 /var/log/messages May 22 01:44:14 localhost network: Bringing up interface eth0: succeeded May 22 01:44:28 localhost kernel: eth0: ADMtek Comet rev 17 at 0xe83ec00, 00:20:78:10:BD:C8, IRQ 11.
You can then look up the specific chip at http://web.archive.org/web/20030602115200/www. scyld .com/page/support/network/ to determine whether a corresponding driver exists. If this does not yield any success, you can try to determine whether the default Fedora kernel detects your specific card. If it does, you can use the lsmod command to see what kernel module is being loaded to handle the card, and then enable that option in the configuration. This is trickier than it sounds because you must determine the correct module from a list of all the loaded modules.
Now, let s move on to input devices and other character devices:
(continued from above) - Device Drivers - Input device support - Joystick interface OFF - Event interface OFF - Gameport support OFF - Serial port line discipline OFF - Joysticks OFF - Touchscreens OFF - Misc OFF - Character devices - Non-standard serial port support OFF - Serial drivers - 8250/16550 and compatible serial support - Console on 8250/16550 and compatible ... OFF - Extended 8250/16550 serial driver options OFF - Crash Utility memory driver OFF - IPMI - IPMI top-level message handler OFF - Watchdog Cards - Watchdog Timer Support OFF - Intel/AMD/VIA HW Random Number Generator support OFF - Double Talk PC internal speech card support OFF - Siemens R3964 line discipline OFF - /dev/agpgart (AGP Support) OFF - Direct Rendering Manager (XFree86 4.1.0 and ...) OFF - ACP Modem (Mwave) support OFF - I2C support - I2C support - I2C device interface OFF - I2C Algorithms - I2C PCF 8584 interfaces OFF
We won t discuss support for all of this hardware here because most of the devices are not common in personal desktop systems. In summary, we disable support for joysticks and gameport and serial ports because these are not typically used in a system that is serving as a network router or firewall.
We are not done with device drivers just yet. Let s look at one final section dealing with graphics, multimedia, and USB devices:
(continued from above) - Device Drivers - Misc devices - Device driver for IBM RSA service processor OFF - Multimedia devices - Video for Linux - Video for Linux - ALL OPTIONS OFF - Radio Adapters - ALL OPTIONS OFF - Digital Video Broadcasting Devices - DVB For Linux OFF - Graphics support - Support for frame buffer devices OFF - Console display driver support - VGA text console (NEW) - Video mode selection support OFF - MDA text console (dual-headed) (EXPERIMENTAL) OFF - Sound - Sound card support OFF - USB support - Support for Host-side USB - EHCI HCD (USB 2.0) support OFF - USB Modem (CDC ACM) support OFF - USB Printer support OFF - USB Mass Storage support OFF - Aiptek 6000U/8000U tablet support OFF - Wacom Intuos/Graphire tablet support OFF - KB Gear JamStudio tablet support OFF - Griffin PowerMate and Contour Jog support OFF - MicroTouch USB Touchscreen Driver OFF - X-Box gamepad support OFF - ATI USB RF remote control OFF - Microtek X6USB scanner support OFF - DABUSB driver OFF - USB IBM (Xirlink) C-it Camera support OFF - USB Konica Webcam support OFF - USB OV511 Camera support OFF - USB Philips Cameras OFF - USB SE401 Camera support OFF - USB STV680 (Pencam) Camera support OFF - USB W996[87]CF JPEG Dual Mode Camera support OFF - USB KLSI KL5USB101-based ethernet device support OFF - USB Pegasus/Pegasus-II based ethernet device support OFF - Multi-purpose USB Networking Framework OFF - USB Serial Converter support - USB Serial Converter support OFF - EMI 62m USB Audio interface support OFF - Texas Instruments Graph Link USB ... OFF - USB LCD driver support OFF - USB LED driver support OFF - Cypress USB thermometer driver support OFF
You start by turning off drivers from the Multimedia devices , Graphics support and Sound sections. Then, you step through the USB support section and quickly disable any and all USB multimedia devices, such as digital cameras and scanners . For now, USB modems and network interface cards, which are italicized, have also been disabled. If you are using such devices, however, you should enable them.
We are all done with device drivers. Are you surprised at the amount of support for the vast number of hardware devices? These drivers are bundled with the Fedora kernel. If you have a specific device that is not listed here, you should check the manufacturer s Web site, as you will most likely find it there.
Moving on to filesystems:
File systems - Second extended fs support OFF - Reiserfs support OFF - JFS filesystem support OFF - XFS filesystem support OFF - Minix fs support OFF - Quota support OFF - Kernel automounter support OFF - Kernel automounter version 4 support (also supports v3) OFF - CD-ROM/DVD Filesystems - UDF file system support OFF - DOS/FAT/NT Filesystems - DOS FAT fs support OFF - Pseudo filesystems - HugeTLB file system support OFF - Miscellaneous filesystems - Apple Extended HFS file system support OFF - Compressed ROM file system support OFF - FreeVxFS file system support (VERITAS VxFS(TM) ...) OFF - QNX4 file system support (read only) OFF - System V/Xenis/V8/Coherent file system support OFF - UFS file system support (read only) OFF - Network File Systems - NFS file system support OFF - NFS server support OFF - SMB file system support (to mount Windows shares etc.) OFF - CIFS support (advanced network ...) OFF - NCP file system support (to mount NetWare volumes) OFF - Partition Types - Advanced partition selection OFF - Native Language Support - Base native language support - Codepage 737 (Greek) OFF - Codepage 775 (Baltic Rim) OFF - Codepage 850 (Europe) OFF - Codepage 852 (Central/Eastern Europe) OFF - Codepage 855 (Cyrillic) OFF - Codepage 857 (Turkish) OFF - Codepage 860 (Portuguese) OFF - Codepage 861 (Icelandic) OFF - Codepage 862 (Hebrew) OFF - Codepage 863 (Canadian French) OFF - Codepage 864 (Arabic) OFF - Codepage 865 (Norwegian, Danish) OFF - Codepage 866 (Cyrillic/Russian) OFF - Codepage 869 (Greek) OFF - Simplified Chinese charset (CP936, GB2312) OFF - Traditional Chinese charset (Big5) OFF - Japanese charsets (Shift-JIS, EUC-JP) OFF - Korean charset (CP949, EUC-KR) OFF - Thai charset (CP874, TIS-620) OFF - Hebrew charsets (ISO-8859-8, CP1255) OFF - Windows CP1250 (Slavic/Central European Languages) OFF - Windows CP1251 (Bulgarian, Belarusian) OFF
Older versions of Red Hat Linux, as well as Linux from other distributors , used the famous ext2 filesystem. However, almost all of the new generation of Linux distributions, including Fedora Core, use the ext3 filesystem, which is more efficient, reliable, and is backward compatible with ext2 . As a result, let s disable support for all other filesystems:
Kernel hacking - Kernel debugging OFF - Sleep-inside-spinlock checking OFF Security options - Enable different security models OFF
You disable the different security models, most notably Security Enhanced Linux, or SELinux, because it is not yet stable under Fedora Core.
-
Before you save the configuration, take a quick look at all of the options once again, making sure that any devices and functionality that you need are enabled. When you have finished going through the options, select the Save option from the File menu, and then choose Exit to save the configuration and exit from the editor.
-
We are not quite done yet! Unfortunately, the configuration editor does not properly disable some of the features that we decided that we don t need. So, go ahead and launch the editor as specified in Step 2 and disable the following options:
- Device Drivers - SCSI device support - SCSI device support OFF - I2C support - I2C support OFF - Multimedia devices - Video for Linux OFF
Save the configuration and exit.
-
Only a few more changes are required. First, you must edit the Makefile contained in the /usr/src/linux-2.6.5-1.358 directory, by changing the identifier assigned to the EXTRAVERSION variable, as follows :
EXTRAVERSION = -1.358routerThe “1.358 corresponds to the package number (the last part of the kernel identifier: 2.6.5-1.358 ), and router is what we ve added to distinguish this configuration of the kernel from other configurations. Therefore, our kernel will be installed as 2.6.5-1.358router .
-
Next, you need to create an empty modules directory associated with your kernel, despite the fact that you are building a monolithic kernel. The Makefile assumes that a modules directory exists, or else the compiler will complain with an error message and terminate:
# mkdir /lib/modules/2.6.5-1.358router -
The first step in actually building the kernel is to clean up any remnants of old code, temporary object files, and other unnecessary files:
# make clean
-
Now, build the kernel:
# make bzImage CHK include/linux/version.h UPD include/linux/version.h SYMLINK include/asm -> include/asm-i386 SPLIT include/linux/autoconf.h -> include/config/* HOSTCC scripts/basic/fixdep HOSTCC scripts/basic/split-include HOSTCC scripts/basic/docproc HOSTCC scripts/conmakehash ... LD .tmp_vmlinux1 KSYM .tmp_kallsyms1.S AS .tmp_kallsyms1.o LD .tmp_vmlinux2 KSYM .tmp_kallsyms2.S AS .tmp_kallsyms2.o LD vmlinux AS arch/i386/boot/bootsect.o LD arch/i386/boot/bootsect AS arch/i386/boot/setup.o LD arch/i386/boot/setup AS arch/i386/boot/compressed/head.o CC arch/i386/boot/compressed/misc.o OBJCOPY arch/i386/boot/compressed/vmlinux.bin GZIP arch/i386/boot/compressed/vmlinux.bin.gz LD arch/i386/boot/compressed/piggy.o LD arch/i386/boot/compressed/vmlinux OBJCOPY arch/i386/boot/vmlinux.bin HOSTCC arch/i386/boot/tools/build BUILD arch/i386/boot/bzImage Root device is (3, 1) Boot sector 512 bytes. Setup is 2554 bytes. System is 1146 kB Kernel: arch/i386/boot/bzImage is ready -
Next, install the new kernel and related files in /boot :
# make install make[1]: `arch/i386/kernel/asm-offsets.s' is up to date. CHK include/linux/compile.h Kernel: arch/i386/boot/bzImage is ready sh /usr/src/linux-2.6.5-1.358/arch/i386/boot/install.sh 2.6.5-1.358router arch/i386/boot/bzImage System.map "" -
This step doesn t apply if you followed the recipe previously listed because you disabled loadable module support (back in Step 3). However, if you were configuring a kernel in which loadable module support was enabled, this would be the right time to build and install the loadable modules:
# make modules # make modules_install
-
Now, check your kernel to see how it compares in size with the original kernel. Remember, our goal was to build a small and lean kernel:
$ cd /boot $ ls -s vmlinuz* 0 vmlinuz@ 1176 vmlinuz-2.6.5-1.358 1156 vmlinuz-2.6.5-1.358router
As you can see, you ve reduced the size of the kernel slightly, but because it is monolithic, it already includes all of the modules that we enabled during configuration.
-
The final step in the build process is to modify the boot loader configuration, as written by the installer. First, determine the device identification for the root partition, like so:
$ grep '/' /etc/mtab /dev/hda1 / ext3 rw 0 0 -
Next, edit the /etc/grub.conf file, where you will see the following:
title Fedora Core (2.6.5-1.358router) root (hd0,0) kernel /boot/vmlinuz-2.6.5-1.358router ro root= LABEL=/ initrd /boot/initrd-2.6.5-1.358router.img
Simply replace the root argument, like so:
kernel /boot/vmlinuz-2.6.5-1.358router ro root=/dev/hda1 -
Now reboot. If the kernel was built and installed successfully, you will see two options in the GRUB bootloader screen when your system starts up Fedora Core 2.6.5-1.358 and Fedora Core 2.6.5-1.358router . If you choose the first option, your system will boot up using the original kernel. Otherwise, the system will boot using the lean and optimized kernel that you have just built.
Reverting to the Original Kernel
Unfortunately, if you made any mistakes, or if certain bugs in the source code manifested themselves during the build or compile processes, you may have a situation where the system will fail to boot. In such a case, you have three options that you can try, starting from the easiest to the most difficult:
-
Boot from the original kernel through the GRUB bootloader screen.
-
Boot from the floppy disk.
-
Boot from the Fedora Core CD-ROM #1 in rescue mode.
The first option of booting from the GRUB bootloader is by far the easiest and should allow you to boot properly into the system. Simply select the original kernel from the list and the kernel will load, assuming that this kernel was not overwritten when you built the customized kernel. This is possible only if you failed to give your lean kernel a different identifier, such as 2.6.5-1.358router .
Once you are in the system, you can try to restore an older version of the /boot partition from the tar archive, like so:
# cd / # mv boot boot.notworking # tar zxvf /root/boot-2.6.5-1.358.20040315.tar.gz
Then, try to reboot the system and see what happens.
If this option does not work, insert the floppy boot disk that you created earlier into the machine and start up your system. This is a very reliable option because a slimmed-down kernel is itself stored on the floppy disk. If you can get into the system, you should again attempt to restore the /boot partition:
# mkdir /mnt/sysimage # mount /dev/hda1 /mnt/sysimage # cd /mnt/sysimage # mv boot boot.notworking # tar zxvf root/boot-2.6.5-1.358.20040315.tar.gz
Finally, if both of these options fail to start up your system, you should boot your system in rescue mode using either the Fedora Core DVD or the Rescue CD-ROM. Once you see a splash screen, enter the following command at the prompt:
linux rescue Eventually, you will see the following message:
The rescue environment will now attempt to find your Linux installation and mount it under the directory /mnt/sysimage. You can then make any changes required to your system. If you want to proceed with this step choose 'Continue'. You can also choose to mount your filesystem read-only instead of read-write by choosing 'Read-Only'. If for some reason this process fails you can choose 'Skip' and this step will be skipped and you will go directly to a command shell.
Choose Continue, at which point the Fedora Core installer mounts your filesystems in the /mnt/sysimage directory in read-write mode; you will be able to add and delete files. If this process is successful, you will be able to access your /boot partition via /mnt/sysimage/boot . You can do even better and make the /mnt/sysimage directory your root partition by using the chroot command:
# chroot /mnt/sysimage Now, try to restore the original /boot partition and see if you can boot into your system.
EAN: 2147483647
Pages: 170
- Challenging the Unpredictable: Changeable Order Management Systems
- Data Mining for Business Process Reengineering
- Healthcare Information: From Administrative to Practice Databases
- A Hybrid Clustering Technique to Improve Patient Data Quality
- Development of Interactive Web Sites to Enhance Police/Community Relations