Creating Web Services
If you look back at the business requirements addressed in Chapter 2, "Business Requirements for Interoperability," you can start to see where Web services can be used to achieve interoperability. Chapter 2 ended with the concept of point- to-point interoperability. Figure 5.2 illustrates this concept.
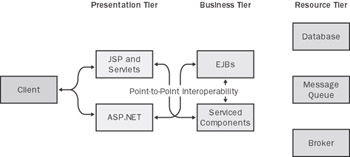
Figure 5.2: Point-to-point interoperability.
As with the .NET Remoting examples in Chapter 4, Web services can be used to meet a requirement to communicate between the presentation tier and the business tier shown in Figure 5.2. This communication can be presentation-based content (such as ASP.NET and JavaServer Pages) calling some business-tier logic (such as hosted classes, Enterprise JavaBeans, and serviced components), or it can be business-tier components calling other business- tier components.
In addition, Web services can extend to the client itself. Many nonbrowser clients (such as a Windows Forms client on the .NET Framework or Microsoft Office installed with the Web Services Toolkit) have the ability to call Web services. All the samples in this chapter will examine communication between a client and a Web service, addressing both the .NET and Java technologies. Figure 5.3 shows this extended model.
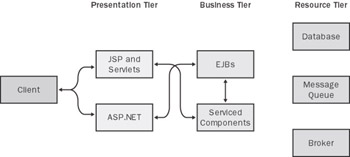
Figure 5.3: Extending point-to-point interoperability to the client.
As Figures 5-2 and 5-3 show, the concepts of "client" and "service" can relate to two situations: one where the client is the presentation tier and the service resides on the business tier, and another where the client is the client software employed by the user and the service is hosted via the presentation tier. All the samples shown in this chapter are perfectly applicable to both situations.
Creating a Web Service in .NET
Web services are an integral part of the .NET Framework and Microsoft's .NET strategy as a whole. As a result, the process of creating a Web service using .NET integrates with both the development tools and the hosting environment provided by the .NET Framework. For example, Visual Studio .NET includes functionality to allow the direct reference of Web services and the creation of proxies without the developer having to run external tools or be involved with the potential complexities of WSDL. Likewise, a new Web service can be created directly from the IDE, which in turn will configure the underlying Internet Information Services (IIS) implementation.
For these samples, we'll show two ways of creating and hosting the .NET Web service. Option 1 will show how Visual Studio .NET can be used to create a Web service from scratch. For developers who haven't used Visual Studio .NET yet, I recommend following this section. For developers who are already familiar with creating a Web service in Visual Studio .NET, or for those who aren't using the IDE during the course of this book, Option 2 shows how to compile and host the same pregenerated sample Web service.
Regardless of which option you choose, you should ensure that you have followed the "Installing ASP.NET" and "Configuring ASP.NET Security" sections in Chapter 1, "Microsoft .NET and J2EE Fundamentals." This will ensure that the installation and security settings for underlying products are configured correctly for this sample code.
Option 1: Creating the Web Service Using Visual Studio .NET
To start, launch the Visual Studio .NET application and create a new project. A dialog box will appear, as shown in Figure 5.4.
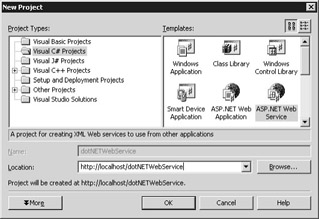
Figure 5.4: Creating a new ASP.NET Web service in Visual Studio .NET.
Select Visual C# Projects, and click the ASP.NET Web Service icon to select the project type. In the Location text box, enter the URL of this test service: http://localhost/dotNETWebService . Click the OK button to create the new project.
The project that is created should look similar to the one shown in Figure 5.5. Typically, a default Web service gives you several files automatically generated within the solution ”as shown in Solution Explorer, to the upper right of the IDE window.
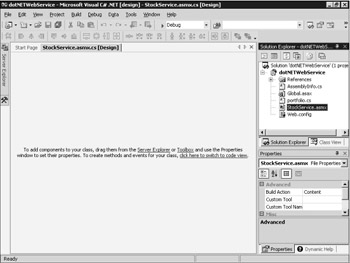
Figure 5.5: A new Web service in Visual Studio .NET.
The main file that we're interested in is Service1.asmx because it contains the exposed classes for the Web service. Notice that in the main window, you have the option to either drag components from Server Explorer or the Toolbox or switch to code view. Visually dragging components (such as timers, processes, database connections and tables, and stored procedures) from the IDE is a powerful way of dynamically creating code. For now though, let's switch to code view to look at the Web service code that's been generated for us.
You should see a class that looks similar to the following:
public class Service1 : System.Web.Services.WebService { public Service1() { // CODEGEN: This call is required by the // ASP.NET Web Services Designer InitializeComponent(); } #region Component Designer generated code ... #endregion // WEB SERVICE EXAMPLE // The HelloWorld() example service returns the string // Hello World. To build, uncomment the following lines // then save and build the project // To test this web service, press F5 // [WebMethod] // public string HelloWorld() // { // return "Hello World"; // } } This class, Service1 , implements System.Web.Services.WebService . Within this class is a constructor, some component designer “generated code (typically used to describe the layout of any visual components that have been dragged to the editor window), and a sample WebMethod that's commented out.
To get the interoperability sample up and running quickly, we'll remove the default class that's been created for us and use two classes from the samples directory. These classes take the stock recommendations and purchase examples from Chapter 4 and expose them by using Web services.
To replace this default class, go to Solution Explorer in the IDE, right-click the Service1.asmx file, and select Delete. This will remove the class from your project. To add the sample classes, right-click the dotNETWebService project and then select Add and Add Existing Item. Browse to the C:\Interoperability\Samples\Point\WebServices\dotNET\WebService.IDE directory and select the Portfolio.cs and the StockService.asmx file in this directory. When you add these files, ensure that you select StockService.asmx and not StockService.asmx.cs (because this gets added automatically). You might need to change the filter on the Add Existing Item dialog box to ensure that the correct files are selectable.
Once this is done, open the StockService.asmx file in Solution Explorer and view the code, as depicted in Figure 5.6.
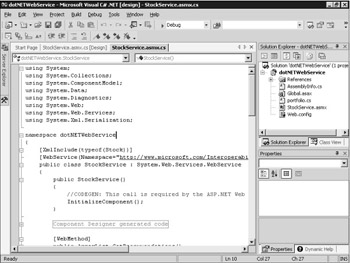
Figure 5.6: Viewing the StockService.asmx file in Visual Studio .NET.
As with the automatically generated class we removed, the StockService class implements the System.Web.Services.WebService interface but also includes a namespace attribute (set to http://www.microsoft.com/interoperability ). This is used to uniquely identify any types and methods that are exposed via this Web service. For example, two Web services that both expose a Stock object can be made unique by setting a separate namespace for each. If no namespace is set for a Web services project, http://tempuri.org is used.
You might also notice a second attribute named XMLInclude . This is used to expose the Stock data type in the WSDL document. We'll expand on this as we move through the sample.
Within the code itself, the GetRecommendations and BuyStocks methods are both annotated with a [WebMethod] declaration. This attribute is used to expose these methods as Web services.
Before this Web service can be used, it must be compiled. This can be done within the IDE by selecting Build Solution from the Build menu.
Option 2: Creating the Web Service Using the NAnt Script
Creating the Web service using the supplied NAnt script involves first compiling the sample code, and then using the Internet Information Services administration tool to create a virtual directory for the Web service.
The files for the prebuilt Web service can be found in the C:\Interoperability\Samples\Point\WebServices\dotNET\WebService.Nant directory. Using a command prompt, navigate to this directory and run the NAnt build script by typing nant .
The files that make up the Web service will be compiled, and a DLL will be created in a bin subdirectory.
Next, launch IIS by selecting the program from Start\Programs\Administrative Tools. Drill down through the computer entry and the Web Sites folder, and right-click Default Web Site. Select New\Virtual Directory from the menu. This will display the Virtual Directory Creation Wizard. Navigate through the wizard and for the Virtual Directory Alias, enter dotNETWebService , as shown in Figure 5.7. Note that the alias is case sensitive.
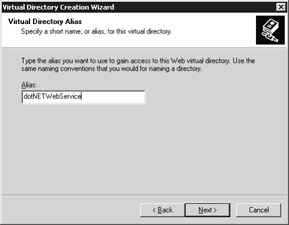
Figure 5.7: Creating a new virtual directory in IIS.
Click the Next button to proceed, and for the directory, enter the location of the prebuilt Web service sample files. If you accept the defaults during installation, this will be C:\Interoperability\Samples\Point\WebServices\dotNET\WebService.Nant, as shown in Figure 5.8.
Click the Next button and accept the rest of the defaults to complete the wizard. The sample code has now been compiled, a virtual directory in IIS has been created, and the .NET Web service is ready to be tested .
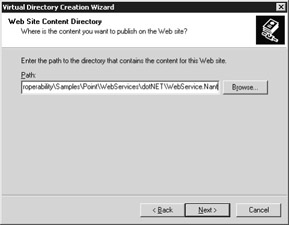
Figure 5.8: Setting the Web site content directory for the .NET Web service.
Testing the .NET Web Service
Regardless of whether the Web service was created using the IDE or built using the NAnt script, we can test it by opening a new browser window to http://localhost/dotNETWebService/StockService.asmx . The default presentation interface, shown in Figure 5.9, is automatically generated from the underlying Web service files in a similar way that an interface was created for components by using .NET Remoting and hosted through Component Services on Windows Server 2003.
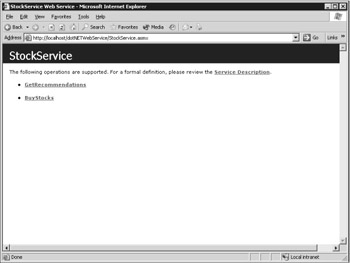
Figure 5.9: The Web service presentation interface.
Click the GetRecommendations link to display the description for the method, and then click the Invoke button. This will execute the GetRecommendations method of the Web service, returning the XML that will be passed back to the calling client, as shown in Figure 5.10.
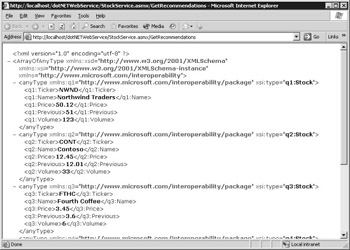
Figure 5.10: Viewing the XML output from the invoked Web service.
As you can see, the ArrayList containing the stock information is returned by serializing into XML. Notice that all the types in the XML document use XML Schema Definition (XSD), as noted by the XMLSchema declaration toward the top of the document.
This browser-based interface for consuming Web services is a useful feature to test exposed methods and view the XML result without having to build a client. However, the client that you will eventually build must use an exposed WSDL document to call these methods. To view the WSDL that's used in this sample, type ?WSDL at the end of the Web service URL, like this: http://localhost/dotNETWebService/StockService.asmx?WSDL .
Figure 5.11 shows the WSDL contract, which is a lot more descriptive than the previous user interface. As mentioned earlier, this is the contract that the client will use to understand which methods and types the Web service exposes.
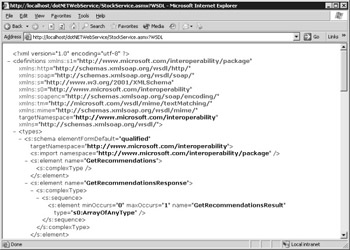
Figure 5.11: Viewing the WSDL document in Microsoft Internet Explorer.
Consuming the .NET Web Service Using a .NET Client
The sample .NET Web service is now up and running. The first client that we'll look at is a .NET client to consume this Web service. As with creating the Web service itself, you again have two options for building this client. Developers who haven't used Visual Studio .NET but want to see how Web services are consumed within a project should follow Option 1. For developers who are familiar with how Visual Studio .NET works, a NAnt script has been created to automatically generate a client, which is outlined in Option 2.
Option 1: Creating the .NET Client Using Visual Studio .NET
As we did when creating the Web service itself, let's first look at how to consume Web services by using the Visual Studio .NET IDE. In the samples directory, open the dotNETClient.sln Visual Studio .NET solution file from the C:\Interoperability\Samples\Point\WebServices\dotNET\dotNETClient.IDE directory. As you can see in Figure 5.12, the solution contains one main class, Client.cs. This class calls the expected methods to get the stock recommendations and make a sample stock purchase, as before.
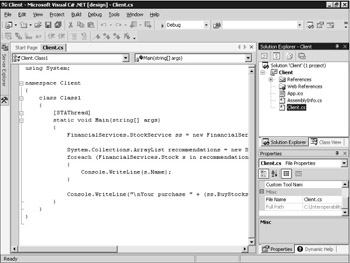
Figure 5.12: Working with the .NET client in Visual Studio .NET.
To complete this sample, we need to add a reference to the Web service created in the last step. To do this, right-click the Web References folder in Solution Explorer and select the Add Web Reference option. Figure 5.13 shows the dialog box that appears. This dialog box enables you to view the WSDL contract for the Web service that you want to consume.
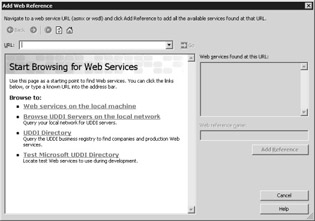
Figure 5.13: Browsing for Web services within Visual Studio .NET.
In this dialog box, enter the URL of the WSDL you used earlier when viewing the document via Internet Explorer ( http://localhost/dotNETWebService/StockService.asmx?WSDL ) and click the Go button. Figure 5.14 shows the dialog box that will appear. Behind the scenes, Visual Studio .NET downloads the WSDL contract and displays the services that it finds published. A description is also given for each method in the service, which matches the sample code you saw.
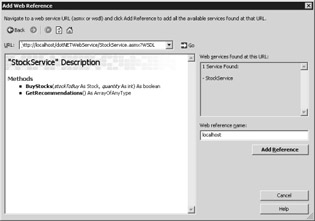
Figure 5.14: Viewing the StockService Web reference.
In the Web reference name field, type FinancialServices . This is the name of the namespace that will be used for the proxy files that will be automatically generated. To select this service and return to the main editor window, click the Add Reference button. Within Solution Explorer, you now have a reference to the Web service, labeled FinancialServices .
To complete the sample, compile the client and run it. If all executes successfully, the output should display in a console window:
Northwind Traders Contoso Fourth Coffee Alpine Ski Woodgrove Bank Your purchase completed Press ENTER to continue.
As with the examples in previous chapters, this client sample lists the stock recommendations and makes a sample stock purchase. The Web service BuyStocks method writes the trade into the Windows Application Log, which can be examined to ensure that the Web service was called correctly.
Option 2: Creating the .NET Client Using the NAnt Script
To create the .NET client using the NAnt script, navigate to the C:\Interoperability\Samples\Point\WebServices\dotNET\dotNETClient.Nant directory. From the command line, type nant run to build and run the sample code.
The NAnt script performs two operations. The first is to generate the Web service proxy file by using a tool named WSDL.EXE. We'll cover this shortly, in the "Consuming the Java Web Service Using a .NET Client" section. The second operation is to run the client executable. Upon a successful build, the list of returned stocks will be displayed:
Northwind Traders Contoso Fourth Coffee Alpine Ski Woodgrove Bank Your purchase completed
This client lists the stock recommendations and makes a sample stock purchase. In addition, the Web service BuyStocks method writes the trade into the Windows Application Log, which can be examined to ensure that the Web service was called correctly.
Consuming the .NET Web Service Using a Java Client
As mentioned earlier, we'll explore the Java samples by using GLUE 4.0.1 Professional. To allow the tools to be run from the command line, your system PATH was updated to include the C:\Interoperability\Tools\Glue\bin directory when the sample code was installed. Before compiling and running the Java sample code here, it's recommended to confirm this setting.
To prepare to build the Java client sample, from a command prompt, navigate to the C:\Interoperability\Samples\Point\WebServices\dotNET\JavaClient directory. The first thing you need to do is build the proxy files for the .NET Web service. This procedure, although run from the command line, is similar to the Add Web Reference operation in Visual Studio .NET.
| Note | What are proxy files? GLUE and Visual Studio .NET interrogate the WSDL contract when generating the proxy files to see which methods and types are exposed by the Web service. An interface (also known as a proxy ) is then built based on the exposed methods and types, which can then be referenced by the client code. This gives the developer of the client a natural way to program against the Web service as though it were a local object or class. When the term proxy (or Web service proxy ) is used in this book, it refers to these automatically generated files. |
To generate the proxies using GLUE, you'll use a tool named wsdl2java. As the name suggests, the tool takes a WSDL file and generates the required Java classes. To use wsdl2java in this sample, run the following command from the JavaClient directory:
wsdl2java http://localhost/dotNETWebService/StockService.asmx?WSDL
Alternatively, you can also use the WSDL target with the provided Ant script, which performs the same task.
This generates the same files and is used by the overall build process when compiling the client. The output of both command-line instructions displays the four files that are created:
write file IStockServiceSoap.java write file StockServiceHelper.java write file Stock.java write file StockService.map
The Stock.java class is the representation of the Stock object, which is similar to its .NET equivalent. In addition, notice that this class looks very similar to the Stock.java file that was created when you generated classes from the XSD document in Chapter 3. If we go back and look at the WSDL that's exposed by the .NET Web service, you'll notice a schema definition for the Stock class:
<s:schema elementFormDefault="qualified" targetNamespace= "http://www.microsoft.com/interoperability/package"> <s:complexType name="Stock"> <s:sequence> <s:element minOccurs="0" maxOccurs="1" name="Ticker" type="s:string" /> <s:element minOccurs="0" maxOccurs="1" name="Name" type="s:string" /> <s:element minOccurs="1" maxOccurs="1" name="Price" type="s:float" /> <s:element minOccurs="1" maxOccurs="1" name="Previous" type="s:float" /> <s:element minOccurs="1" maxOccurs="1" name="Volume" type="s:int" /> </s:sequence> </s:complexType> </s:schema>
The wsdl2java tool uses the same principles to extract this XSD type from the WSDL and generate the required Java class.
The IStockServiceSoap.java file is an interface that exposes the methods that you'll call in the Java client. StockServiceHelper.java is used to bind the URL that you called to the interface itself. The map file is generated in case you want to use these types with other Web services in the environment.
Now that you have the proxy files, let's look at the Client.java class, which is the actual code you'll run. First, you have the required imports for the class:
import java.util.ArrayList; import java.util.Arrays;
The ArrayList and the Arrays class handle the response returned from the Web service itself.
In the main class of the code, you can see that the first task is to handle the binding, which you perform with the following line of code:
IStockServiceSoap FinancialServices = StockServiceHelper.bind();
After the binding is created, you call the GetRecommendations method from the Web service. You should already be familiar with this method if you examined the .NET client.
ArrayList recommendations = new ArrayList(Arrays.asList( FinancialServices.GetRecommendations()));
Note that the return type of the GetRecommendations method is an array of objects ( Object[] ). This brings us back to the familiar problem of type mapping between .NET and Java. There is no natural equivalent in XSD to ArrayLists in either .NET or Java. Objects of type ArrayList that are published get exposed as type Object[] . The .NET or Java client has to make the necessary provisions to convert the Object[] type to the correct ArrayList .
In the .NET client example, this was handled by passing the Object[] type as a constructor to the ArrayList , which is a feature of that collection object:
ArrayList recommendations = new ArrayList(FinancialServices.GetRecommendations);
In Java, you use the Arrays.asList method to convert between object arrays ( Object[] ) and ArrayLists :
ArrayList recommendations = new ArrayList(Arrays.asList( FinanicalServices.GetRecommendations()));
In both examples, we could have worked with the Object[] types throughout the sample, but converting them allows us to take advantage of a more functional set of classes. The remainder of the code displays the stock recommendations and makes the stock purchase, as with the other samples that we've looked at:
for (int f=0; f<recommendations.size(); f++) { System.out.println(((Stock)recommendations.get(f)).Name); } System.out.println("\nThe purchase "+ (FinancialServices.BuyStocks((Stock)recommendations.get(2),295) ? "completed" : "failed")); As with the .NET sample code, you need to cast each element of the stock recommendations array into an object of type Stock .
Build and run the code by entering ant run at a command prompt within the Java client directory. This will re-create the proxy files, and you'll see a similar output to that of the .NET sample:
Northwind Traders Contoso Fourth Coffee Alpine Ski Woodgrove Bank The purchase completed
You've now seen how to create a Web service by using Visual Studio .NET and then consume that service with a client written in both.NET and Java. Now let's look at the reverse ”creating the Web service in Java and creating two similar clients.
Creating a Web Service in Java
To host Web services for Java, GLUE can be run by using one of two modes: standalone or hosted . In standalone mode, GLUE uses its own application server to take the Java classes and to handle the creation of WSDL and the incoming HTTP requests from clients. This gives you a clean and easy approach to hosting Web services, especially for this sample code. Hosted mode, which we'll look at in more detail in Chapter 6, allows the classes to be hosted in a third-party J2EE application server.
Hosting a Web service in GLUE using the standalone mode approach is usually a two-step process. First, you need to create and compile the classes to be hosted. Second, you write a class that configures the hosting based on the GLUE libraries.
To do this, navigate to the Java Web service sample in C:\Interoperability\Samples\Point\WebServices\Java\WebService. In this directory, three classes will make up the Web service. Stock.java is the stock object that's passed between the Web service and the client. StockService.java contains the GetRecommendations and SellStocks methods that we've been using. Publish.java, the class that configures the hosting of the Web service, is worth taking a look at before we run the sample:
import electric.registry.Registry; import electric.server.http.HTTP; public class Publish { public static void main( String[] args ) throws Exception { HTTP.startup("http://localhost:8004/JavaWebService"); Registry.publish("StockService", new StockService()); } } As you can see, the required packages are imported, and then two lines make up the actual class. The HTTP.startup method is used to configure the root of the Web service. And the Registry.Publish method is used to publish the StockService class under a path of the same name.
If you build and run this class, which can be done by entering start ant run at a command prompt, you can see the service in action. Compile and run the sample in this directory.
As the message implies, the GLUE HTTP server is now listening on port 8004. As with the Visual Studio .NET example, you can test this before consuming the Web service with a client application, by looking at the WSDL that's exposed. Within Internet Explorer, navigate to http://localhost:8004/JavaWebService/StockService.wsdl , as shown in Figure 5.15.
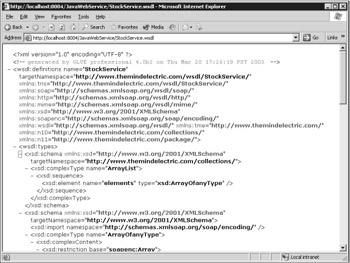
Figure 5.15: Viewing the WSDL document generated by GLUE.
You now have the WSDL that describes the Web service exposed by the GLUE HTTP server. When navigating through the WSDL, you might notice that some of the namespaces and types are slightly different than the one created in .NET, but both platforms essentially expose the same types and methods.
Consuming the Java Web Service Using a Java Client
For the Java Web service, we'll use both a Java and a .NET client to show how this WSDL is consumed by the two platforms. We'll first look at the Java client sample code, which can be found in the C:\Interoperability\Samples\Point\WebServices\Java\JavaClient directory.
As expected, the client is very similar to the one that called the .NET Web service in the previous example ”with the exception that the URL is different and the method is SellStocks , not BuyStocks (currently the primary difference between the two). If you want to examine the proxy files for the client, you can again run the wsdl2java tool, this time with the URL of the Java Web service hosted through GLUE:
wsdl2java http://localhost:8004/JavaWebService/StockService.wsdl
You can also use the WSDL target with the provided Ant script to generate these proxy files. Now build and run the sample by entering ant run at a command prompt to display the expected recommendations and sell stocks result.
Consuming the Java Web Service Using a .NET Client
To conclude the chapter's introductory Web service interoperability samples, let's consume the Java Web service hosted by using GLUE with a .NET client. Instead of creating the Web reference using Visual Studio .NET, as we did in the first option of the previous .NET client example, we'll use a command-line tool named WSDL.EXE to create the proxy file.
Navigate to the sample code in the C:\Interoperability\Samples\Point\WebServices\Java\dotNETClient directory. The Client.cs class in this directory is of course very similar to the code that you viewed in Visual Studio .NET earlier. Here, we'll use the WSDL.EXE, a command-line tool, to generate the proxy or Web reference. WSDL.EXE is a tool that accompanies the .NET Framework as part of the SDK. To run WSDL.EXE from the command prompt, pass it the URL of the WSDL for the Java Web service:
wsdl http://localhost:8004/JavaWebService/StockService.wsdl/out:FinancialServices.cs /namespace:FinancialServices
This same effect can be achieved by using the WSDL target with the included NAnt script. Notice that the code also passes an /out parameter to the tool, which specifies the name of the file that's generated, and a /namespace parameter, which creates a namespace for the service class. The WSDL tool generates a FinancialServices.cs class, which upon closer inspection is actually the same as the class generated by the Visual Studio .NET Add Web Reference option ”both classes use the same APIs to generate the code.
When running the WSDL tool, you might notice the following warning:
Warning: one or more optional WSDL extension elements were ignored. Warnings were encountered. Review generated source comments for more details.
GLUE 4.0.1 uses a WSDL extension element to offer some optimizations for Java clients. Because these do not get interpreted by the tool, the warnings are displayed and commented in the generated proxy file.
| Tip | When should you use WSDL.EXE and when should you use Visual Studio .NET? If using both WSDL.EXE and Visual Studio .NET produces the same proxy file, what's the reasoning behind using one over the other? The proxy file that WSDL.EXE creates is static ” meaning that unless you run the WSDL.EXE tool again, this file will never be overwritten. Although the same process is used for the proxy file in Visual Studio .NET, it tends to be a little more dynamic ” in theory, the proxy file can be updated on the fly as the IDE sees fit. If you plan to make any modifications to the proxy file (such as adding authentication or modifying the methods), using WSDL.EXE is the best approach because you can guarantee that the file will remain under your control. |
Within the client class itself, notice how the object array ( Object[] ) is exposed by using the GLUE Web service and subsequently converted to a System.Collections.ArrayList :
System.Collections.ArrayList recommendations = new System.Collection s.ArrayList( ss.GetRecommendations().elements);
Using the standard mapping within GLUE, if you expose a return type of java.util.ArrayList , the type gets mapped to an ArrayList of the class that you're calling. (For this example, this is FinancialServices.ArrayList .) The custom ArrayList class implements a field named elements , which returns the list as type Object[] . To convert this elements method to a System.Collections.ArrayList type, call it as part of the constructor, as shown in the previous code.
To conclude this set of samples, compile and run this sample, which can be done by entering nant run at a command prompt, to show the .NET client calling the Java Web service.
EAN: 2147483647
Pages: 132