Drawing Automation
| [ LiB ] |
Drawing Automation
This section describes how to add automation to any channel automation.
How To
To draw channel settings automation values in an automation track:
-
In the project window's Track List area, select the track for which you want to create automation events.
-
In the bottom-left corner of the selected track, click the Show/Hide Automation button (plus sign) to reveal the first automation subtrack.
-
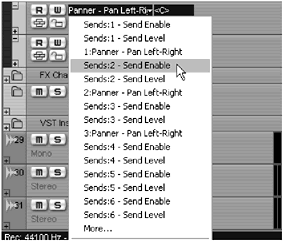
Select the desired parameter you want to automate from the Parameter field (see Figure 13.6). If the parameter you want to automate doesn't appear in this list, click the More option to display a dialog box revealing additional automatable parameters available for this track, select the one you want and click OK to return to the subtrack. At this point, the Parameter field should display the selected parameter.
Figure 13.6. Selecting an automation parameter.
-
If there are currently no automation values that have been added to this parameter, a blue (or black, if the Read Automation button is not enabled) horizontal line appears next to this subtrack in the Event Display area. Click the Draw tool to select it.
-
To add a handle, click near the location inside this lane where you want to add an automation value. The line automatically becomes blue if it wasn't before, because adding automation will automatically enable Read Automation. If you want to create a ramp between two points, release the mouse. However, if you want to create a curve, drag your mouse to the next desired location and value (see Figure 13.7).
Figure 13.7. Creating a ramp between two separate points (left) and a curve by dragging your mouse (right).

-
Repeat Step 5 to add more automation handles along this parameter's subtrack.
Note that an automation handle is added at the location where you click, as long as you are using the Pencil or Draw tools and stay inside the subtrack's boundaries.
If you want to create automation events to another parameter for the same channel, you can either select another parameter from the Parameter field to display a new parameter in the same subtrack or click the Append Automation Track button as displayed in Figure 13.8. When the new subtrack is visible, repeat Steps 36 from the previous list.
Figure 13.8. Appending automation subtracks.
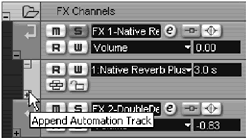
Note that choosing a different parameter in a subtrack that already contains automation does not remove or cancel the automation it holds. When a parameter contains recorded automation events, an asterisk appears after this parameter's name in the Parameter field of the automation subtrack (see Figure 13.9). Using asterisks , you can spot quickly which parameters contain automation already. This makes editing and troubleshooting much more efficient.
Figure 13.9. Parameters with recorded automation events appear with an asterisk in the Parameter field.
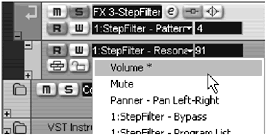
After you've recorded automation on a track, you can select the Show Used Automation option available in the Track List's context menu [right-click (PC)/Ctrl-click (Mac)]. You can add automation to several parameters by using a single subtrack, changing the parameter's name to view, or adding new automation, and after you are done, reveal all automation subtracks containing events. Remember that each parameter has its own subtrack.
Under the Line tool are several shapes of line tools: the Line, Parabola, Sine, Triangle, and Square tools. As described in Chapter 8, these tools can be used to create automation values, such as pan effects. However, using the Parabola and Line tool, you can create consistent automation curves instead of drawing handles freely .
Figure 13.10. Using the Parabola to create consistent automation curves.
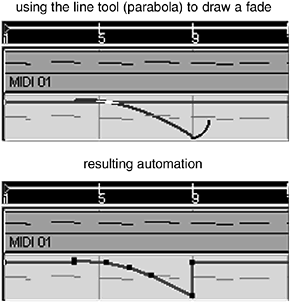
Similar to drawing individual automation handles using the Draw tool, adding handles with the Line tool will automatically activate the Read Automation button and activate the automation.
How To
To add automation using the Line tools:
-
Select the desired line shape you want to use.
-
Select the desired track and expand its automation subtracks.
-
From the Parameter selection field, select the desired parameter for which you want to create some automation handles. You may also append the automation subtracks if you want.
-
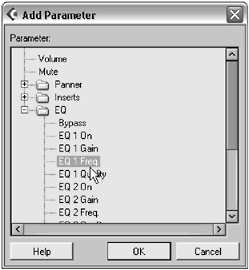
If the parameter you want to automate doesn't appear in this list, click the More option to display a dialog box revealing additional automatable parameters available for this track (see Figure 13.11), select the one you want, and click OK to return to the subtrack. At this point, the Parameter field should display the selected parameter.
Figure 13.11. The Add Parameter dialog box.
-
Click and drag the cursor in the automation track to add automation points. The options pertaining to the shapes, frequency, amplitude, and starting point of the Line tool are the same as the ones described in Chapter 8.
| [ LiB ] |