Audio Menu Options
| [ LiB ] |
Audio Menu Options
After an audio clip is recorded and its event displayed on the audio track, most of the operations you can apply to this event can be found in one of two places: the Audio menu in the Project window or in the context menu [through right-click(PC)/Ctrl-click(Mac)] of the same window.
The Audio Editing options are found in the Audio menu in the Project window and under the Audio submenu option in the context menu of the Project window when an audio object is selected in the window. These options relate to editing functions of audio objects on a track and display the currently available options depending on the object selected.
Spectrum Analyzer and Statistics
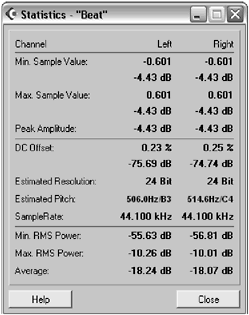
The two first options in this category are the Spectrum Analyzer and Statistics functions, which are available only in Cubase SX. These functions allow you to look at and analyze an audio object to find problem areas, such as identifying a noise frequency or determining if there is any DC offset in an audio file. A DC offset can occur when a sound card adds DC current to a recorded audio signal. This current results in a recorded waveform that is not centered on the baseline (-infinity). Glitches and other unexpected results can occur when sound effects are applied to files that contain DC offsets. The Statistics dialog box in Figure 10.2, for example, reveals that this value is set at -75.69 dB on the left and -74.74 dB on the right; in other words, not at minus infinity. From the information the Statistics dialog box provides, you can correct the situation by applying the Remove DC Offset process to the audio object, increasing the dynamic range of your digital audio file.
Figure 10.2. The Statistics dialog box.
How To
To use the Spectrum Analyzer (Cubase SX only):
-
Select the audio object you want to analyze. If you select a part with multiple events or regions inside, Cubase opens an analysis window for each object inside the part.
-
The Spectrum Analyzer's Analysis Options dialog box appears. Because the default settings give the best results in most cases, leave these settings as is and click the Process button.
-
The various options inside the Spectrum Analyzer result window allow you to view the content of the analysis in different ways. Clicking the Active check box analyzes another audio object and replaces the current analysis window with the new analysis. Otherwise, a new window opens, and this window remains open until you close it.
How To
To use the Statistics function (Cubase SX only):
-
Select the audio object you want to analyze. If you select a part with multiple events or regions inside, Cubase opens an analysis window for each object inside the part.
-
The Statistics dialog box opens showing you the results of the statistics (see Figure 10.2). Close the dialog box when you are finished reviewing the information.
Detect Silence
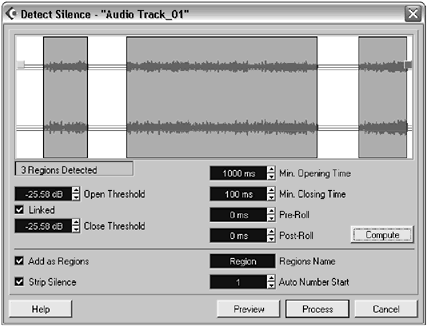
The main purpose of the Detect Silence function (see Figure 10.3) is to create different regions from a long audio event that may contain silent parts . For example, if you record a vocal track, the singer might sing in certain parts and be silent in others. If you chose to record the performance from beginning to end, you end up with a recording that contains both usable and useless content. To automate the region creation process, the Detect Silence function allows you to set an audio level threshold below which events are considered as silent. Then, in the same dialog box, you can determine how long this silence has to be before considering it a silent part. After you have set up your preferences appropriately and are satisfied with the result displayed in the preview area, you can create sequentially numbered regions that appear in both your Media Pool and in the Project window, replacing the current object with the newly created regions. This operation does not remove any audio content from the original audio clip; it merely creates regions that hide the unwanted portions of your audio. This said, by default the Strip Silence option found in the Detect Silence dialog box is selected. This will cause Cubase to hide (strip) any silent sections to disappear from the current Project.
Figure 10.3. The Detect Silence dialog box.
How To
To create regions using the Detect Silence function:
-
Select the audio event or region (this doesn't work on parts) for which you want to create regions.
-
Select the Audio > Detect Silence option from the context menu [right-click(PC)/Ctrl-click(Mac)] or select Detect Silence from the Audio menu.
-
The Detect Silence dialog box appears (Figure 10.3). Start by setting the Open Threshold level by clicking and dragging the green box found to the left of the display area. You should set this low enough to make sure that the content you want to keep becomes part of the region, but high enough that the noise or silence is left out of the region.
-
Set the Minimum Opening Time to an appropriate value in milliseconds. Remember that 1000 milliseconds is equal to one second. How you set this up will depend on the actual content you are trying to process.
-
Repeat the same operation for the Minimum Closing Time field.
-
Click the Compute button to preview where the regions will appear and click the Preview button to hear the result.
-
If you are not satisfied with the result after previewing, continue tweaking the settings in this dialog box until you are satisfied with the preview's results.
-
Make sure the Add as Regions and the Strip Silence check boxes are selected. This creates the regions and removes the silence from the regions it creates.
-
If you want to give a specific name and number to the regions this function creates, you can use the Regions Name field to enter a new name and the Auto Number Start field to adjust the number of the first region Cubase creates.
-
Click the Process button to create the new regions and hide the silent (unwanted) portions of the audio clip.
Converting Audio Objects
As discussed earlier, it is possible to convert one object type to another in the Project window. For example, changing an event into a part, changing a part into several events, or creating a part with several selected events in order to move them as a unit. You might also want to have the flexibility of using event envelopes over portions of audio found in an audio part; since audio parts don't have envelopes associated with the part itself, converting the part to separate events might offer the flexibility you are looking for. This said, there's nothing stopping you from using event envelopes on events inside the Audio Part editor, but it's just one window away, and sometimes, that's too far.
How To
To convert one audio object type into another:
-
Convert an event into a region. Select the event or events. In the Project window's context menu under the Audio submenu, select the Event as Region option.
-
Convert an event into a part. Select the event or events. In the Project window's context menu under the Audio submenu, select the Event to Part option.
-
Convert a region into a part. Select the region or regions. In the Project window's context menu under the Audio submenu, select the Event to Part option.
-
Convert a part into independent objects (regions or events). Select the part or parts. In the Project window's context menu under the Audio submenu, select the Dissolve Part option.
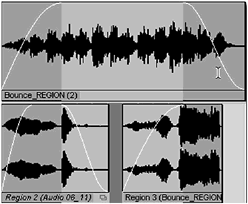
Bounce Selection
Let's say you've just used the Detect Silence function, and you've created a region that excludes the silent parts of the original content. You might want to create a new audio file with only the content of this new region. In this case, use the Bounce Selection function to create a new file or audio clip from the selected object on your track. You can also create a new audio file from a part containing several objects inside. We discussed the possibility of creating the perfect take out of portions of different takes using the Set to Region and To Front options with events and regions. After you are satisfied with this final take, it is possible to select the resulting events or regions, glue the objects together, creating a part with multiple objects inside, and then bounce all the events to a new file. You can also use the Bounce Selection option to bounce the audio and its effect to a new track.
How To
To bounce audio objects to a new file:
-
Select the objects you want to bounce to a new file.
-
You may adjust the fade handles (see the next section for more details) if you want to include these fades in the new file.
-
From the context menu or the Audio menu, select the Bounce Selection option.
-
Cubase asks you if you want to replace the current selection in the Project window with the newly created file. Select Yes if you want to do so, or No if you simply want the file to appear in your pool.
Working with Fade Envelopes
In Cubase, you can create two types of fades and crossfades. You can opt to have Cubase process fades in real time using the fade envelopes, or you can process these fades, creating small fade segments that are seamlessly integrated into your project. Either way, you get the same result. However, using realtime fades means your computer calculates these fade curves every time you play the project. If you are short on computer resources, you might want to opt for the processed version (more details later in this chapter). This section describes how to use realtime fade envelopes found on region and event objects.
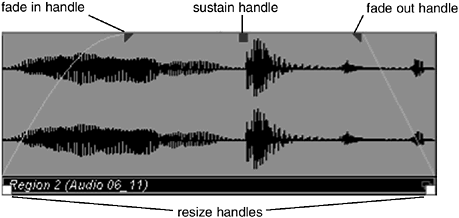
When selecting a region or an event on an audio track, you will notice the appearance of little boxes and triangles . Those found at the bottom of an object are resize handles that can be used to resize an audio region, event, or part. However, the ones found on the top corners of the event and region objects are meant to control the fade-in or -out properties of this object, and the handle found in the middle is used to control the overall sustain level (amplitude) of the object between the fade-in andout. In Figure 10.4, this handle is shown at its maximum value (default). Clicking this blue box with the Selection tool controls the overall output level of this object. This offers a different form of automation because this envelope (similar to an Attack-Sustain-Release envelope) moves along with the event, whereas track automation is not associated with the object on the track.
Figure 10.4. Control handles found on region and event objects in the Project window and Audio Part Editor.
You can control the fade curve for both the fade-in and fade-out on region and event objects.
How To
To change the fade curve type of an audio object:
-
Select the event or region you want to edit.
-
Adjust the fade-in or fade-out by using the appropriate handles.
-
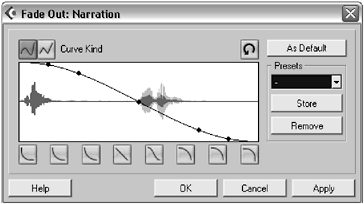
To modify the fade type, select Open Fade Editors in the Audio menu or Audio submenu of the context menu, or double-click on the fade-in part itself. This brings up both Fade-in and Fade-out dialog boxes (see Figure 10.5).
Figure 10.5. The Fade-out dialog box
-
Select the spline ( logarithmic curve) or linear curve type you want to use with your object.
-
You can choose from different curve types below the display or use these as a starting point, editing the curve by clicking and dragging the handles inside the display.
-
If you want to store this curve for later use, click the Store button, type in a name, and then click OK.
-
Click the Apply button to accept your changes and then click OK.
-
Repeat this operation for the other fade curve if necessary.
If you want to apply a default type of curve to all the objects in your project, you can use the Auto Crossfade Settings button found besides the track's name in the Inspector area. After you've changed the default crossfade setting, all new fades will use this curve setting unless you change it on an object.
How To
To change the default crossfade (fade) settings:
-
Click the Auto Crossfade Settings button to the left of any track's name in the Inspector area.
-
The Auto Fades dialog box appears. Click the Fades tab.
-
Select the appropriate settings on this tab. These settings are applied by default afterward.
-
Click the Crossfades tab.
-
Select the appropriate settings on this tab as well.
-
Selecting the Auto Fade-in, Auto Fade-out, and Auto Crossfade options applies the same settings to all subsequent fades in your project from this point forward.
-
Clicking the As Default button saves your settings as the default value for subsequent projects.
-
If you do not want your fade settings to be the same on every track, deselect the Use Project Settings check box. However, if you do want all the tracks to use these settings, keep the check in the box.
-
Click OK.
You can also apply a fade to objects on several tracks at once using the Range Selection tool. When your range crosses the start point of an object, a fade-in is created over that range (see the lower-right region in Figure 10.6). When your range crosses the end point of an object, a fade-out is created over that range (see the lower-left region in Figure 10.6). When your range doesn't cross either the start or end position, a fade-in and -out will respectively begin and end at the borders defined by the Range Selection tool (see the upper region in Figure 10.6). Notice that all the curve types for the fade-ins and -outs are identical. This is because the project uses a default auto fade setting.
Figure 10.6. Using the Fade to Range function.
How To
To apply a fade over selected objects in a range:
-
Click the Range Selection tool in the toolbar or in the Project window's context menu.
-
Drag a selection box over the desired range.
-
Select the Adjust Fades To Range function from the Audio menu, or press A (default key command), or select the same function in the context menu's Audio submenu.
If, after all this, you decide you don't want a fade on this event or region, you can either move the handles back to their default position (no fades) or select the events and then choose the Audio > Remove Fades function.
Finding Your Objects
As your project starts to grow, you will want an easy way to find events in the pool. When the pool gets crowded, it can be time-consuming to look for this object's name in the pool. That's why you can use the Find Selected in Pool function, which does just that: finds the selected event from the Project window in the Pool.
How To
To find a selected object in the pool:
-
Select the object you want to find.
-
Then select the Audio > Find Selected in Pool function.
This brings up what you were looking for, highlighted in the pool.
| [ LiB ] |