Audio Processing Options
| [ LiB ] |
Audio Processing Options
Audio processing, as with audio fades, can be applied to audio in two different ways: You can apply effects that are processed in realtime, or you can apply processing while Cubase is not playing the project. In the former case, to automate the effects, you can change the parameters or change the effects altogether. In the latter case effects are not applied while the file is being played , but calculated beforehand, and then playing the rendered processed file (or portion of the file) each time you play the project. Processing audio in non-realtime offers a CPU- intensive friendly method of processing audio since the CPU doesn't have to process the audio every time you press play. When adding a realtime effect or process, the audio passes through an insert, send, or master effect that is processed by your computer. The effect itself is not saved to an audio file, although the effect's parameters are saved as part of your project. Every time you play the project, the computer starts processing once again. This is why you can change parameters easily. On the other hand, it can add a serious load on your computer that can slow it down to a grind when your realtime processing needs exceed the computer's capabilities.
Processing files offline, changing the portion of the audio and saving this processing with the file, allows you to create the effects without changing the original file's content and does not require any processing time during playback because the files are simply read from the hard disk. The disadvantage is that you cannot automate this processing by using automation in real time. There are many instances, however, where automation is not needed. When you want to optimize a file or add an effect to a portion of an audio clip, event, region, or slice, processing this portion and writing the effect to a file might be more effective than using realtime effects, not to mention reducing the load imposed on your computer. Pitch shifting and time stretching operations are notoriously known to be heavy computer resource consumers, so using them in offline processes is highly recommended.
You can apply realtime effects and processes through the insert effects and FX channels (which are insert effects on a special audio track). You can apply processes and plug-in effects through the Plug-ins or Process submenus found in the Audio menu, or through the same submenus in the Project window's context menu.
Using Audio Processes
In audio terminology, any effect applied to an audio signal is referred to as an audio processing . However, in Cubase, processes refer to a specific type of processing. In fact, all processes found under the Process function in Cubase are meant to change audio without adding effects to it, such as reverbs , chorus, and delays.
You can apply processing to an entire selected audio event or region in the Project window, or apply it to a portion selected by using the Range Selection tool. You can also apply processing to the same elements that are found inside a part after you open them in the Audio Part Editor. Selecting an event or region in the pool applies the processing to the entire selected object. Finally, you can apply a process to a selected portion of an event or region in the Sample Editor. All processes in any of these situations are found in the Process's submenu in the Audio menu or in each window's Process submenu options.
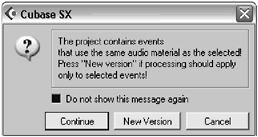
Because some objects may be shared (used more than one time in the project's time line) when applying a process to one of them, Cubase asks if you want to create a new version or change all the instances of this object across the project's time line. If you opt to create a new version, the selected object is the only one affected by this process, and the processed version of the object replaces the original content in the Project window (not on your hard disk). If you want all the shared instances of this object (event or region) to change, then you can select the Continue button (see Figure 10.7). This replaces the currently selected object rather than creating a new version, which causes all shared occurrences to change as well in the project.
Figure 10.7. Cubase can replace the selected object or create a new one.
About Pre- and Post- CrossFade Options
In some processes, you will find a Pre-CrossFade and Post-CrossFade option under the More button in the Process's dialog box. These options allow you to apply the process gradually over time (pre-crossfade) and end the process also gradually over time (post-crossfade). As displayed in Figure 10.8, this process would take 410 milliseconds before completely implemented, and it would start reverting from processed signal to nonprocessed signal over the last 217 milliseconds of the object. So, if this were applied to the Gain process, for example, it would take 410 ms to reach the Gain setting in the Process window and would go back to the original gain over the last 217 ms of the object being processed.
Figure 10.8. The Pre- and Post-CrossFade options.

To access these options, you can click the More button found in the Process' dialog box and check the options you want to apply after setting the parameters to the desired value. If you don't want to see these options (but still apply them if the options are selected), click the Less button.
Envelopes
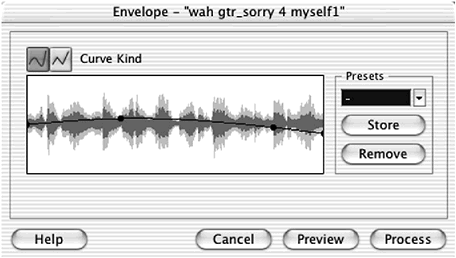
The Envelope process (see Figure 10.9) creates a volume level envelope by using a fade-like display to control the amplitude of the signal.
Figure 10.9. The Envelope process dialog box.
How To
To apply an envelope process to a selected object:
-
Select the desired object.
-
Select the Envelope process from the Process option in the Audio menu.
-
Select the type of curve you want to use for the envelope.
-
To add handles, click along the envelope line where you want to insert the handle and drag it to the desired position.
-
To remove handles, drag the handle outside the display area.
-
To store or remove a preset, click the Store or Remove buttons .
-
To preview the result, click the Preview button. You can make changes to the envelope as you are previewing. To stop the preview, click the Stop button.
-
When satisfied with the settings, click the Process button. Click Cancel if you want to cancel the process.
Fade-in and Fade-out Processes
The controls in the fade-in and fade-out processes are identical to the auto fade controls described earlier. The only difference is that fade processes are saved with the audio in a new file. You can apply this process using the Fade options available in the Process menu, rather than using the fade envelopes on events and regions in the Project window.
Gain Process
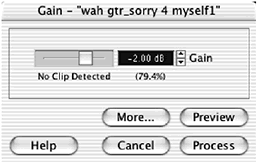
The Gain process adds or removes gain from the currently selected object or objects. Moving the slider to the right adds gain, whereas moving the slider to the left reduces it. You can also enter the desired amount of gain in the Gain field by typing in the appropriate value. When clicking the Preview button, Cubase indicates if this gain change causes the object to clip (digital distortion), as displayed in Figure 10.10. If this occurs, reduce the gain until Cubase displays "No Clip Detected."
Figure 10.10. The Gain process dialog box.
How To
To apply a Gain process to a selected object:
-
Select the desired object.
-
Select the Gain process from the Process option in the Audio menu.
-
Make the appropriate adjustments in the dialog box.
-
To store or remove a preset, click the Store or Remove buttons.
-
To preview the result, click the Preview button. You can make changes to the envelope as you are previewing. To stop the preview, click the Stop button.
-
When satisfied with the settings, click the Process button. Click Cancel if you want to cancel the process.
Merge Clipboard Process
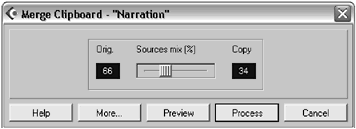
This process merges the audio content that has been previously copied to the clipboard with the currently selected object. Besides the Pre- and Post-CrossFade options available under the More button of this dialog box, the Merge Clipboard process (see Figure 10.11) specifies a mix ratio between the audio selected for processing and the audio on the clipboard through a percentage slider. On the left side, you can see the proportion of the original (selected) object and on the right side, the proportion of the audio previously copied in the clipboard.
Figure 10.11. The Merge Clipboard process dialog box.
How To
To merge the content of the clipboard with a selected object:
-
Select the desired object.
-
Select the Merge Clipboard process from the Process option in the Audio menu. This implies that you have previously selected audio in the Sample Editor and have copied this content to the clipboard.
-
Make the appropriate adjustments in the dialog box. To preview the result, click the Preview button.
-
When satisfied with the settings, click the Process button.
Noise Gate Process
The Noise Gate process (see Figure 10.12) removes sound from an audio signal that is below a threshold level by muting it. Imagine a gate that opens when a signal is strong enough (above threshold) and closes when the signal is not strong enough (below threshold). You can use this to silence portions of an audio signal during silent passage. For example, you can use a noise gate to remove a guitar amplifier 's humming noise from a recording during passages where the guitar player is not playing. A noise gate does not remove the noise when the guitarist is playing because the signal will most likely be loud enough to pass the threshold, but the noise at that point should be less noticeable because it blends in with the guitar sound. If the noise level is too loud even when the guitarist is playing, you should consider using a noise reduction plug-in or rerecording this part.
Figure 10.12. The Noise Gate process dialog box.
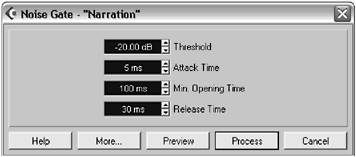
The attack time represents the time it takes for the gate to open, letting the sound through, and the release time represents the time it takes for the gate to close after the signal goes below the threshold level. The minimum opening time defines the minimum amount of time the signal has to be over the threshold before the gate can close again.
How To
To apply a Noise Gate process to a selected object:
-
Select the desired object.
-
Select the Noise Gate process from the Process option in the Audio menu.
-
Make the appropriate adjustments in the dialog box. To preview the result, click the Preview button. If the signal you are processing is stereo, you can select the Linked Channels check box to determine how the Noise Gate process will treat the signal.
-
When satisfied with the settings, click the Process button.
Normalize Process
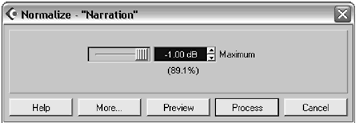
Normalizing an audio signal affects its overall amplitude level by adjusting its highest peak to the value set in the Normalize process dialog box. It is similar to the Gain process in the sense that it acts on the level of the signal, but instead of calculating the level generally , it brings these levels up in proportion to the highest peak found in the signal, making sure that there is no clipping in the signal as a result of the level change. You can set the level value you want to assign to the highest peak level in this object by adjusting the slider or entering a value in the Maximum field.
How To
To apply a Normalize process to a selected object:
-
Select the desired object.
-
Select the Normalize process from the Process option in the Audio menu.
-
Make the appropriate adjustments in the dialog box (see Figure 10.13). To preview the result, click the Preview button.
Figure 10.13. The Normalize process dialog box.
-
When satisfied with the settings, click the Process button.
Phase Reverse Process
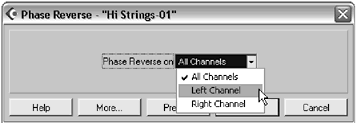
Reversing a phase does not change the shape of a sound file, but it changes the direction this shape takes. For example, the slopes going up will now go down and vice versa. When you mix different sound files, phase cancellation can occur. This produces a hollow sound. Inverting the waveform on one of the files can prevent this phase cancellation from occurring. In other words, if the phase of the current audio file does not sound correct, changing the direction of the phase might fix the problem. A good way to detect this problem is to occasionally monitor the audio in mono. If you can barely hear the signal, then you might have phase cancellation occurring. In Cubase, you can reverse the phase of both channels in a stereo file, or only one or the other. You should preview the result before applying this process.
How To
To apply a Phase Reverse process to a selected object:
-
Select the desired object.
-
Select the Phase Reverse process from the Process option in the Audio menu.
-
Make the appropriate adjustments in the dialog box (see Figure 10.14). To preview the result, click the Preview button. Note that this dialog box will not appear if you are processing a mono audio file.
Figure 10.14. The Phase Reverse process dialog box.
-
When satisfied with the settings, click the Process button.
Pitch Shift Process
The Pitch Shift process changes the pitch of a selected object throughout the duration of this object or applies a change of pitch that varies through time by using an envelope to determine when the pitch is shifted upwards or downwards.
At the top of the Transpose tab (see Figure 10.15), you will find a keyboard layout that can help you set the relationship between the pitch of the original audio content and the pitch-shifted one. In this example, the original content played a pitch equivalent to D3, so the pitch shift base area is set to D3, making this note appear red on the keyboard display. Clicking another note changes the pitch shift settings automatically to match the value needed to get this pitch. In this case, B2 is pressed and displayed in blue on the keyboard. If you want to create a multivoice effect, creating several pitch shifts simultaneously , you can enable the Multi Shift option, which adds other notes to the process. Remember that the base note, unless selected as a shifted note as well, will not be part of the multishifted signal. You can use the Listen Key or Listen Chord button to hear the notes you selected.
Figure 10.15. The Pitch Shift process' Transpose tab.
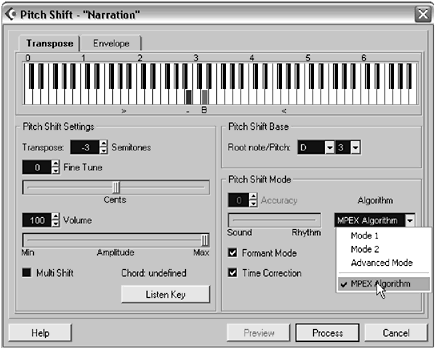
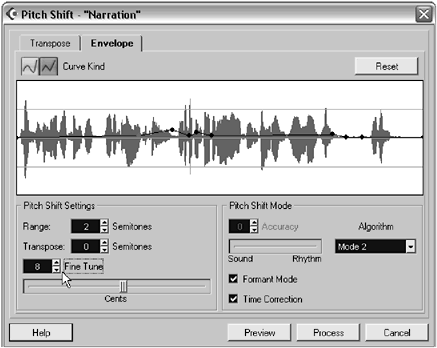
The Pitch Shift Mode area sets accuracy values. For example, moving the accuracy slider toward the left favors sound quality over rhythmic accuracy. Moving it toward the right does the opposite . In other words, the content being shifted determines how this setting should be applied. If you are shifting vocal content, you should check the Formant Mode option, which helps to keep the qualities associated with voice when shifting it. The Algorithm drop-down menu offers three types of algorithms in Cubase SL and a fourth type in Cubase SX (MPEX Algorithm). When you want to preview the result, you should use the Mode 1 algorithm and avoid the MPEX algorithm because it is not designed to preview pitch shifting in real time. However, when processing to file, you should always use the best quality possible (better quality algorithms only take longer to process).
The Time Correction option changes the pitch without changing the time it takes to play the shifted content. If this option is not selected, events shifted upwards play faster and events shifted downwards play slower.
Clicking the Envelope tab at the top of the dialog box reveals the envelope settings for this process (see Figure 10.16). Using an envelope rather than a keyboard changes how the audio is shifted through time. In this example, the Pitch Shift Setting's Range field is set to two semitones, which means that at the top of the display area, events are shifted upward by this amount and downward at the bottom. The Transpose value setting represents the currently selected handle's value. In this case, the area found under the cursor, and from that point forward is transposed upwards by two semitones. So, using these settings, the pitch shift transposes the first portion of the audio two semitones below the current note at the beginning of the object, and halfway through pitch shifts two semitones above the current note played by the original file. The Pitch Shift Mode options are identical to the Transpose tab. Notice, however, that the accuracy settings are not available in both tabs when the MPEX Algorithm is selected.
Figure 10.16. The Pitch Shift process' Envelope tab.
How To
To apply a Pitch Shift process to a selected object:
-
Select the desired object.
-
Select the Pitch Shift process from the Process option in the Audio menu.
-
Make the appropriate adjustments in the dialog box. To preview the result, click the Preview button.
-
When satisfied with the settings, click the Process button.
DC Offset, Reverse, and Silence Processes
These three processes offer very different results; however, they do not offer any settings. The purpose of the DC Offset process was explained earlier in this chapter in the "Spectrum Analyzer and Statistics" section. This process removes any offset that might be present in your audio signal. If you have SX, it might be a good idea to look at the statistics of a file. If you need to remove a DC offset, run the process on the file. The Reverse process simply reverses the data horizontally, making it sound as if it is playing backwards . The Silence process brings all the samples in a selection to a zero value, creating an absolute digital silence.
Stereo Flip Process
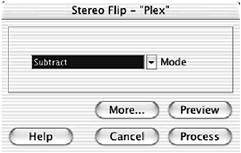
The Stereo Flip process (see Figure 10.17) can be applied on stereo objects only because it manipulates the stereo channels of the selected object. You have four modes available in this process, which are available in the Mode field. For example, you can merge both channels together to create a mono sounding file, or subtract the left channel from the right channel to get a karaoke -like effect.
Figure 10.17. The Stereo Flip process dialog box.
How To
To apply a Stereo Flip process to a selected object:
-
Select the desired object.
-
Select the Stereo Flip process from the Process option in the Audio menu.
-
Make the appropriate adjustments in the dialog box. To preview the result, click the Preview button.
-
When satisfied with the settings, click the Process button.
Time Stretch Process
Time stretching changes the duration of a selected object without changing the pitch or rhythmic integrity. In the Time Stretch process dialog box (shown in Figure 10.18), there are several ways you can attain that goal.
Figure 10.18. The Time Stretch process dialog box.
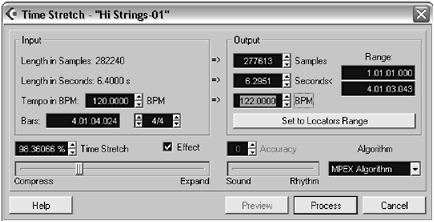
In the Input area, you will see information on the selected object, such as the Length in Samples field, Length in Seconds field, and a field where you can enter the tempo in BPM if you know it. You can also enter the number of bars and time signature. So, if you want to know the BPM (beats per minute), you can listen to the segment, count how many bars and beats pass, and enter the time signature of the event. Cubase calculates the tempo automatically. You can then use the Output area to determine the result of the Time Stretch process.
Let's look at some practical examples. If you want to change the tempo of a drum loop by using this process, you need to find out how many bars are in the loop as well as the loop's time signature of the selected audio content. Then enter the new BPM in the Output area's BPM field. This also determines the correct amount of samples, seconds, and range this new processed file will cover. If you are preparing a TV jingle and your spot has to be exactly 29.5 seconds, you can enter this amount in the Output area's Seconds field. Now, let's say your current object is just short of a five-bar area, between Bars 12 and 17. If you want it to cover this range, set the locators to Bars 12 and 17, select the object, and apply the Time Stretch process. When this dialog box opens, click the Set to Locators Range button to enter this value as the output length (five bars in this case).
This process changes the quality of the audio to a certain degree. The more time stretching you apply, the worse your result is. Optimally, you should stick within a plus or minus ten percent range; otherwise , you might hear some undesirable artifacts in the sound. In fact, if you don't select the Effect check box found to the right of the Time Stretch percentage, you can only apply a plus or minus 25 percent change. If, on the other hand, you want to create an effect, check this option to change the factor anywhere between 10 and 1,000 percent.
As with the pitch shifting process, you can adjust the focus of the accuracy toward the sound quality or the rhythmic accuracy. The algorithms used also influence the end result. Higher algorithms take more time to process but yield better results. You will also find an algorithm specifically designed for drum tracks.
On the other hand, if you are trying to adjust the tempo of an audio drum loop to match your project's tempo, you might want to consider using hitpoints to create slices in the Sample Editor. You will find more about this in the next chapter.
How To
To apply a Time Stretch process to a selected object:
-
Select the desired object.
-
Select the Time Stretch process from the Process option in the Audio menu.
-
Make the appropriate adjustments in the dialog box. To preview the result, click the Preview button.
-
When satisfied with the settings, click the Process button.
Using VST and DirectX Plug-Ins
VST or DirectX (PC version only) plug-in effects, as you saw earlier in this book, can be added as an insert, or used as a send effect through an FX Channel track. When doing so, you are processing the audio in real time, as described at the beginning of the section discussing audio processing options. You can also apply VST or DirectX plug-in effects available on your computer to a file directly if you want to affect only a portion of a track or if you don't want to add an additional load on your computer's processor.
Remember that when you apply one of these effects to a selected object, the processed result is saved in a special file, leaving your original file intact. This new file is seamlessly integrated into your project. In other words, you won't even feel or see it's a different file, besides the fact that this portion is processed.
Because VST and DirectX plug-in effects vary from one computer to another, we will not discuss the specific settings of these plug-ins, but understand that you can use these effects in an offline process (non-realtime) the same way as you would use them in an online process (realtime). The only difference is that you can't automate changes in the effect during the offline processing time.
How To
To add a plug-in effect to a selected object:
-
Select the desired object.
-
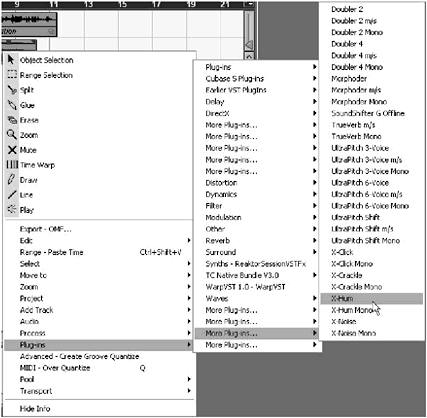
Select the desired plug-in from the Plug-ins submenu in the Audio menu (see Figure 10.19). DirectX effects are available under the DirectX submenu.
Figure 10.19. The Plug-ins submenu options; the More Plug-ins submenu holds additional plug-ins when the current submenu can't display them all.
-
Make the appropriate adjustments in the dialog box. To preview the result, click the Preview button.
-
When satisfied with the settings, click the Process button.
Optimizing Projects After Processing
When you process several files using offline processes, a number of additional files are created on your hard disk in the Edit folder. These files are necessary to preserve the original audio clip intact while providing the option to change an applied process. For example, as described earlier in this chapter, you can change the settings of a process, or with Cubase SX, you can also change the parameters or replace a process with another process. For each offline process line created in the Offline Process History dialog box of a selected object, there exists an equal number of processed files representing the portion of this object that has been processed on your hard disk. This makes it very convenient , but you should also realize that asking Cubase to move back and forth from one file to another and managing several tracks with multiple edited portions costs you in overall performance.
If you start noticing that your performance meter for the CPU or the hard disk starts to creep up, causing Cubase to feel slow or unresponsive , you should consider performing the following steps to help get things back to a more fluid working environment:
-
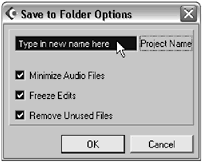
Use the Save Project to New Folder option in the File menu. When Cubase prompts you to enter a name for the new project's version, make sure to check all the options in the Save to Folder Options dialog box (see Figure 10.20). The Minimize Audio Files option will copy only the used portions of audio files used from the Pool in the Project to the new folder. For example, if you've only used 30 seconds of a 2-minute recording, only this 30 seconds will be copied over. The Freeze Edits renders a new version of the audio events with all the edits currently found in the Offline Process History dialog box for each event that has been processed up until now, while the Remove Unused Files option will not save events that are not used in the Project, even if they are found in the Pool.
Figure 10.20. The Save to Folder Options dialog box.
-
If you don't want to save your entire project to a new folder, you can select audio events that contain the most editing done through offline processes and choose the Freeze Edits from the Audio menu. Cubase asks you if you want to create a new file or replace the existing one. Choose the appropriate option. Either way, this improves the performance because Cubase doesn't have to skip from one file to another.
-
Make sure that your disk is defragmented regularly to avoid slowing down your computer because of inefficient disk reading caused by fragmented files.
| [ LiB ] |