The Transport Panel
| [ LiB ] |
The Transport Panel
The Transport panel is a multitask floating panel. There are 10 areas on the Transport panel, each of which allows you to control an aspect of your session in progress. By default, Cubase will display the Transport panel; however, you can use the F2 key on your keyboard to display or hide this panel. This section steps you through the different areas and their available options on the Transport panel. Now let's look at each item found on the multifunctional Transport panel.
Performance
The performance item offers the same information as the VST Performance panel (F12 to quickly access this panel). Here, the information is nicely displayed in a smaller format and moves wherever you move the Transport panel (Figure 4.24), making it much easier to monitor your computer's performance while working on a project. The performances monitored here are the CPU load (on the left) and hard disk load (on the right). When one of the two performance bars reaches the top and stays there, causing the red LED to light up in the display, you should think of reducing the load specific to that performance. For example, VST effects and instruments can use up a lot of CPU power. Try freezing a track played by a VST instrument to free up some processing power (see Chapter 5 for more on this). If you have extensive disk access, try disabling audio tracks that are not currently in use. Muting them doesn't mean they are not read by Cubase, simply that they are muted (see Chapter 9 for more on this).
Figure 4.24. The performance indicator in the Transport panel.

Record Modes
The Record mode section allows you to set the Linear Record mode (top) and the Cycle mode (bottom) as shown in Figure 4.25. The Linear Record mode offers three options: Normal, Merge (which are the same for audio, but act differently with MIDI), and Replace. All three options will determine how Cubase will handle overlapping recorded events.
Figure 4.25. The Record mode and Cycle mode options on the Transport panel.

-
Normal Record mode means that when you record MIDI events over existing MIDI parts, Cubase will create a new part, which will overlap the existing MIDI part without changing the previous content or location of these parts . As for audio recording, it implies that a new event is created over the existing audio event.
-
Merge Record mode means that when you record MIDI events over existing MIDI parts, Cubase will merge the new content and the existing content into a new merged part.
-
Replace Record mode will remove any existing event or part over the period overlapping with a new recording on a specific track. This would have the equivalent result of a typical punch-in/punch-out operation on a standard analog multitrack recorder.
How To
To change the linear record mode on the Transport panel:
-
Click on the drop-down menu next to the current visible option in this portion of the Transport panel (by default, this should be set to Normal).
-
Select the desired mode from the drop-down menu.
The Cycle record mode (see bulleted list) offers four options, which determine how MIDI and audio will be recorded during a cycle recording. A cycle recording occurs when the Cycle button is active on the Transport panel. When you are in Cycle mode, Cubase will continuously play the content found between the left and right locators. Each time Cubase starts again at the left locator, it is called a lap . How the events are handled during a recording lap depends on the cycle record mode. For audio cycle recordings, the way the events are recorded will also depend on the cycle recording preferences found in Preferences > Record > Audio Cycle Record Mode options under the File menu (PC) or Apple menu (Mac). The following two modes apply only to MIDI recording.
-
Mix. Each time a lap is completed, the events recorded in the next lap are mixed with the events from the previously recorded lap. This is the perfect mode to build up a rhythm track, adding each musical part over the previously recorded one. All events are recorded inside a single part.
-
Overwrite. Each time a lap is completed, the events recorded in the next lap will overwrite (replace) the events that were previously recorded. Use this when you are trying to get the perfect take in one shotjust make sure to stop recording before the next lap begins, or your last take will be overwritten. If you stop playing at the end of a lap and stop recording in the middle of the next lap, without having played a note in that lap, you'll be OK. Overwrite will only "overwrite" when there are new events recorded during the current lap.
The following two modes apply to audio recordings as well, but are also found under the same cycle record mode selection drop-down menu.
-
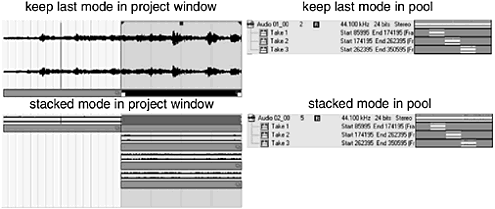
Keep Last. This mode will keep whatever was recorded in the last completed lap. So if you start playing a lap but stop before it's done, it will not keep that lap. However, if you complete a lap and stop halfway during the next lap, as with the overwrite, the last completed lap will be the one kept. This is a good mode to use when you'd like to record different takes until you get the perfect one. The main difference with overwriting is that in the case of audio recordings, each lap you recorded is still available in your project. Depending on your audio cycle recording preferences, this can mean that Cubase has created regions each time a lap is completed, keeping the last region as the active and visible one onscreen.
-
Stacked . This is a great way to use cycle recording when you are not as proficient as you would like to be with your playing skills. Every time you complete a lap, an event is created and Cubase continues recording, creating a new event on the same track, lap after lap, stacking up events. Once events are stacked, you will only hear the last one recorded, but you can use the best moments of each take to compile an edited version of the part you were trying to record.
Figure 4.26. Comparing the Keep Last and Stacked cycle recording modes.
How To
To change the Cycle recording mode on the Transport panel:
-
Click on the drop-down menu next to the current visible option in this portion of the Transport panel (by default, this should be set to Mix MIDI).
-
Select the desired mode from the drop-down menu.
Below the Linear and Cycle Record modes you will find the Auto-quantize Toggle button (AUTO Q). When this option is enabled (button is lit and the text next to the button reads "ON"), MIDI recordings will snap to the current grid and quantize values without additional steps. For example, use this option when you want to make sure that what you record through MIDI is tight with the current groove of a song.
Locators
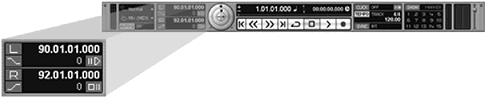
This section of the Transport panel allows you to numerically edit and monitor your left and right locators, move your project cursor to the locator's position, as well as set Punch-in/Punch-out and Pre-/Post-roll options (see Figure 4.27).
Figure 4.27. The Locators' options on the Transport panel.
How To
To position your project cursor at the locator's position:
-
Click on the L or R found on the left of the locator's address in the Transport panel. Note that you can achieve the same thing by pressing the key 1 (for left) or 2 (for right) on the numeric keypad.
How To
To change your locator's position in the Transport panel:
-
Above and below each digit found on the Transport panel, there is a sensitive area. Clicking on this sensitive area will cause your cursor to change to an arrow with a plus or minus sign. If you click above, the value will increase; if you click below, the value will decrease. Once a series of values is selected, you can also use the scroll wheel on your mouse to increase or decrease these values.
-
Or you can click on a value and enter a new position for this value by using your keyboard.
NOTE
 NOTE
NOTE
Most numeric value fields such as the left and right locator position in the Transport panel can be adjusted in the same way. For example, you can change the value of a selected MIDI event in the Key editor by using the scroll wheel of your mouse. Similarly, in most instances where you will see time or bar/beat values, each digit can be edited separately or as a whole. For example, if you click in the beat value of a bar/beat location, and then change a 2 to a 1, only the position of the beat will be affected. Moving the scroll wheel of the mouse will have the same effect. Experiment with these behaviors because they will help you get a better feel for the software's flexibility.
You can also change the left and right locators' position by using the position of the project cursor as a new left or right locator position.
How To
To change your locator's position to the current project cursor position:
-
To set the left locator, hold the Ctrl(PC)/
 (Mac) key and click in the ruler at the desired location where you want to position your locator.
 -
To set the right locator, hold the Alt(PC)/Option (Mac) key and click in the ruler at the desired location where you want to position your locator.
Below the L and R in this portion of the Transport panel are the Punch-in and Punch-out buttons, which transform the left locator into a punch-in point (where a recording will begin) and the right locator into a punch-out point (where a recording will stop). For example, you could start your recording at bar one of your project, but the actual recording process will only begin at bar three and stop recording at bar four if your left locator is set at 3.01.01.000 and your right locator is set at 4.01.01.000 while the Punch-in and Punch-out buttons are active. This can be useful to replace events between these two locations (left and right locators) while making sure what is before or after doesn't get edited. Perhaps the most effective way to use the punch-in and -out is along with the preroll and postroll fields.
The preroll and postroll functions found to the right of the punch-in and punch-out functions respectively, allow users to determine a time value before Cubase goes into record mode at the punch-in location (preroll), and the time it continues playing after it goes out of record mode at the punch-out location (postroll). This allows you to configure an automatic punch-in and punch-out on a selected track, while having Cubase play back the project before it starts recording, giving you time to prepare yourself to record the line you want to replace.
This said, you don't need to use the preroll or postroll functions in the context of punch-in/-out, but it is probably the most common use for it. In essence, use the preroll or postroll functions when you want Cubase to start its playback slightly before the left locator and finish slightly after the right locator.
How To
To set up automatic punch-in and -out with a preroll and postroll:
-
Set your left locator to the appropriate time location where you want to punch into your existing events.
-
Set your right locator to the appropriate time location where you want to punch out of the record mode.
-
Enable the Punch-in and Punch-out buttons on the Transport panel. If you want Cubase to replace all existing events from a specific location, leave the Punch-out button disabled.
-
Set a value for the preroll. This is the amount of time, bars or beats depending on the ruler format displayed, that Cubase will play before the left locator. If the amount of time exceeds the amount of time that it normally takes for Cubase to reach the left locator's position from the beginning of the project, it will simply pause for that equivalent amount of time. For example, if you enter a value of 10 bars and you want to punch in at bar 5, then Cubase will count five bars before bar one and will then start to play until it reaches bar 5, at which point it will go into record mode.
-
If needed, set the postroll time as well (found below the preroll time).
-
Disable the Click button in the Transport panel; otherwise , Cubase will use the metronome's precount setting rather than the preroll setting.
-
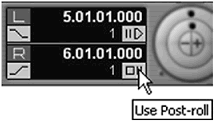
Enable the Preroll/Postroll options on the Transport panel (see Figure 4.28).
Figure 4.28. The Preroll and Postroll functions enabled on the Transport panel.
-
If you want Cubase to stop automatically after the punch-out time, select File > Preferences from the menu bar. Then select the Transport option and check the Stop after Automatic Punch-out option.
-
Press play or record. Cubase will go into Play mode until it reaches the punch-in time and then switch to Record mode. If you have enabled the Punch-out button, it will revert to play mode at that location. If you have checked the Stop after Automatic Punch-out option, it will also stop playing after the postroll time value entered.
Shuttle, Jog, and Nudge
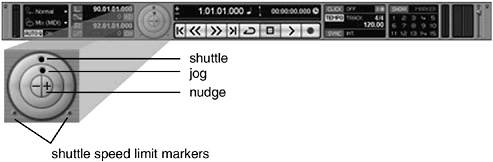
The nudge, jog, and shuttle wheels (SX only) are useful editing tools that allow you to move quickly within a project while listening to the audio/MIDI. Here's an overview of these functions:
-
Shuttle wheel (outside ring): By moving the ring to the right or the left, you cause the project cursor to move forward or backward in time. The farther away from the center position you move the wheel, the faster the playback will be. The maximum shuttle speed is indicated by the small markings on the lower half of the shuttle, on each side of the ring itself. To stop or slow down the shuttle, bring the ring back toward the center or press the Stop button (or press the spacebar). You can move the wheel by clicking on the ring itself and moving your mouse to the left or right.
-
Jog wheel (middle ring): By holding down the mouse button over the jog wheel and moving it toward the right or left in a circular motion, the project cursor will move forward or back in time. Contrary to the shuttle wheel, you can turn the jog wheel as much as you want. This is a great tool to look for specific cues in a project. The speed at which you move is determined by the speed at which you move your mouse, so typically, you would use a jog wheel when you are looking for something, going slowly over events. When you stop moving the mouse, the jog stops.
-
Nudge frame buttons (inside the jog wheel): These two buttons will move your project one frame ahead (plus sign) or one frame behind (minus sign), no matter what your time display may be. The frame format, however, is determined by your project's frame rate preferences. Obviously, if you don't work with video, nudging the project cursor a frame won't necessarily be useful to you if you're used to work with bars and beats.
Figure 4.29. The shuttle, jog and nudge functions on the Transport panel.
Main Transport
The main Transport buttons allow you to navigate through your project as a regular transport control panel would. In the upper portion, it displays the current location of the project cursor in two customizable formats. When you change the time format on the left, it will also change the time format in the project's ruler. The time format on the right does not have the same effect; it is there only to provide better information about time and position in a different format. Between the two formats is a toggle button, which allows you to switch the position of the two current displayed formats. In Figure 4.30, the time is displayed in bars and beats (left) and in time code (right). The small plus and minus sign on the left of the time display allows you to nudge the position of the project cursor one unit at a time. Below the time display is a project cursor overview display (blue line), which enables you to monitor the location of the project cursor as your project moves along. You can click on the line to grab your project cursor and move it to any location you desire in the project, or click anywhere in that area to make your project cursor jump to that location immediately.
Figure 4.30. The Main Transport buttons and the project cursor location indicator.

How To
To change the time format displayed in a project by using the Transport panel:
-
Click on the drop-down menu to the format icon of the left time display in the Transport panel.
-
Select the desired time display format.
The Transport Control buttons allow you to do the following (from left to right):
-
Go to the previous marker or beginning of the project in the absence of markers.
-
Rewind:. You can adjust the winding speed factor in Preferences > Transport > Wind Speed Factors area of the File menu (PC) or Apple menu (Mac).
-
Fast Forward: See note above.
-
Go to the next marker or the end of the project in the absence of markers.
-
Enable/Disable Cycle mode: When this button is enabled, Cubase will play continuously the events found between the left and right locators. You can quickly enable or disable this by either clicking on the button to toggle its position or by using the forward slash (or divide sign) on the numeric keypad on your keyboard.
-
Stop: When you press stop after playing the project, the cursor stops and stays at this location. If you press stop a second time, it will go to the previous stopping point.
-
Play.
-
Record: In most cases, pressing record will also engage the Play button and start recording from the current project cursor location until you press stop, unless you have enabled the punch-in/punch-out functions or preroll/postroll functions. Cubase will only record on tracks that have been armed (made record-ready) for recording.
Click, Tempo, and Sync Controls
In this portion of the Transport panel, you have control over three aspects of your project (see Figure 4.31):
-
Click. This button enables or disables the metronome click. Ctrl(PC)/
(Mac)-click will bring up the metronome setup dialog box. When the metronome click is enabled, the word click is lit, and the field next to the button displays the word ON. You can also enable or disable the Precount option by clicking on the button to the right of the Click button in the same area of the Transport panel. The Precount option will count a certain number of beats before it actually starts playing or recording. The exact number of beats it will count before the starting point is user -defined and will be discussed in Chapter 7. -
Tempo. This button allows you to enable or disable the Tempo track. This is the equivalent of the Master track, familiar to Cubase VST users. Ctrl(PC)/
(Mac)-click will bring up the tempo map window, which will also be explained further in Chapter 5. When the tempo map is disabled, you can change the tempo setting of the project by clicking on the tempo and using your mouse's scroll wheel to increase or decrease the tempo. Enabling the tempo map also allows you to change the tempo of a project in time. Otherwise (when master is disabled), the tempo will remain fixed at the BPM speed displayed in this area. To the right of the Tempo button, you will find the current project's tempo and time signature. Figure 4.31. The Click, Tempo, and Sync options on the transport panel.
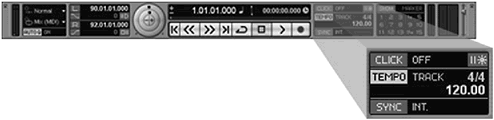
-
Sync: This button allows you to enable or disable the synchronization functions. Ctrl(PC)/
(Mac)-click will bring up the synchronization setup dialog box, which will be explained in Chapter 12. When this button is enabled, the type and status of sync Cubase receives is displayed on the right of the button. If you don't need to sync with other devices, this area will most likely display INT, telling you that the sync is provided internally.
NOTE
ABOUT THE TEMPO TRACK
The tempo track (formerly known as the Master track) is a special hidden track that holds your tempo changes and key signatures. All the tempo changes that you make in the tempo track window or the project's browser editing window will play back when you activate the Tempo button on the Transport panel. However, the time signature will be heard even if the button is not activated. This is logical, since your time signature needs to be activated in order for MIDI elements to lock with bars and beats throughout the project.
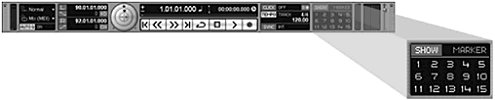
Marker
We discussed markers earlier in this chapter. The Transport panel displays (by default) a series of shortcuts that allow you to:
-
Open the Marker window by pressing on the Show button (see Figure 4.32).
Figure 4.32. The Marker options in the Transport panel.
-
Jump to a specific marker by clicking on the corresponding number in the Transport panel's marker area.
-
Set the current project cursor location as a marker by Alt(PC)/Option(Mac)-click on the desired marker number.
MIDI and Audio Activity
The MIDI and audio activity displays (see Figure 4.33) enable you to see if MIDI is coming in (red activity color), or going out (green activity color ), or if the audio is coming in or out (green for both input and output) of Cubase from and to external devices. If you're not hearing anything (MIDI or audio), try taking a look at these activity meters first. If you see activity here, then the problem might be outside Cubase. If you don't see activity here when you should, it's possible that Cubase is not receiving or transmitting MIDI or audio properly. Note that MIDI or audio metronome activity will not be displayed in these activity output meters .
Figure 4.33. The MIDI activity input and output monitors on the Transport panel.

If you are not seeing any MIDI activity when sending messages from an external controller, make sure the selected MIDI track's MIDI out and in ports are configured properly.
MIDI events recorded and sent to a VST instrument will not show up in the MIDI activity monitors. However, if you are not seeing any MIDI activity when playing recorded MIDI events that are supposed to go to an external device, chances are this is caused by one of two reasons:
-
There is no MIDI present in your project.
-
You have not set the track(s) containing MIDI events to play on a physical MIDI port such as your MIDI interface.
For example, if your external instruments are not receiving MIDI data, try loading a Virtual instrument (VST instrument) and route your MIDI track to that VSTi's MIDI port. If you hear the MIDI going into the VST instrument, then try reassigning the previous MIDI output port to this track. If you still don't hear MIDI coming from your external instrument, your problem is probably somewhere else.
-
Make sure your MIDI connectors and cables are connected properly. If they are, try switching them around to see if one of them is faulty.
-
Are the MIDI ports you're trying to use properly configured in the device setup dialog box?
-
Is your MIDI interface installed properly?
-
Is the MIDI thru active in Cubase? To check this out, select File > Preferences > MIDI in the menu bar.
Audio Level Control
To the extreme right of the Transport panel is a small fader, which mirrors the stereo output bus fader. Adjusting the level of this fader will affect the audio level the same way as if you were to open the mixer panel and adjust the stereo output bus fader. You should also see this control move if you have recorded any automation on this particular bus. When you click on this audio level control, a larger fader will pop up to help you control the level (see Figure 4.34).
Figure 4.34. Audio level control fader on the Transport panel.
| [ LiB ] |