Project Window Options
| [ LiB ] |
Project Window Options
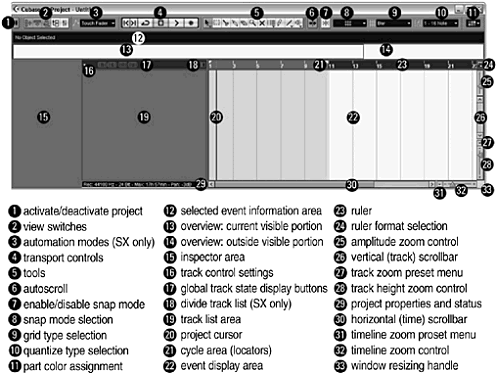
Now that you have created a new project and set its properties, let's take a closer look at the project window in front of you. In Figure 4.1, you can find a quick reference to all the components included in this project window.
Figure 4.1. The project window's multiple areas, tools, buttons , and shortcuts.
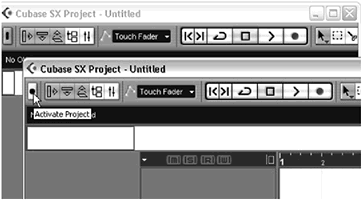
The rectangular button found in the upper left corner of the project window is the active project indicator. Since you can have more than one project open at the same time, the project that contains a blue button with a small rectangle inside indicates the active project. A project that is open but not currently active will display a circle inside a grayish button. In Figure 4.2, the active project is currently displayed behind the inactive project. You can have many projects open simultaneously , but only one active project at a time.
Figure 4.2. Active and inactive project windows inside Cubase.
Project Window Display Buttons
The display buttons found in the upper-left corner of the project window (see Figure 4.3) quickly display or hide certain areas of the project window or open different windows easily from the project window.
Figure 4.3. The project window Display Option buttons.

-
Show/Hide Inspector. Shows the inspector area of a selected track. The inspector area displays information on the track's settings. Each type of track will display information relating to its particular type.
-
Show/Hide Event Information bar. Shows information for a selected part in the upper portion of the project window. You can use this area to modify this information.
-
Show/Hide Overview. Displays your entire project, spanning from the left to the right of your project window. The current visible portion of your project is displayed by a blue outline in the overview bar. You can use the overview to jump to another section of your project or to zoom to a region in this project. The total time displayed in the overview depends on the Length field value in the project's preferences (Shift-S).
-
Open Media Pool. Opens the project's Media Pool window.
-
Open Mixer Panel. Opens the project's Default Mixer panel.
Project Cursor Selection Buttons
In the middle of the project window, you will find a series of tool buttons (see Figure 4.4) that you can also find by right-clicking anywhere inside the project window. Most of these buttons are not new to Cubase SX/SL; however, there have been a few changes made in this toolbar since previous versions. Let's take a look at what each tool does.
Figure 4.4. The project window Cursor Tool Selection buttons.

-
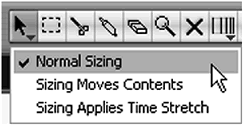
Object Selection and Sizing tool (see Figure 4.5): Selects events or parts by clicking on these events or by dragging a box over several events or parts when using the tool in normal sizing mode. (This is the default tool in Cubase.) The small arrow on the bottom-right corner of the button indicates that there are different modes to this tool. In fact, there are three sizing modes available. Normal Sizing resizes a part's start or end position. The second mode, Sizing Moves Contents, resizes the start or end position, but moves the content inside the part in the direction of your resize. The third selection/sizing mode is the Sizing Applies Time Stretch mode, which time-stretches the events inside a part to correspond to the new size of the part. These modes will be further discussed in Chapter 9.
Figure 4.5. The Object Selection drop-down menu.
-
Range Selection tool. Allows you to click and drag over multiple tracks and multiple parts and then you can apply different range-specific editing processes, such as delete, cut, insert, or crop to the selected range. These editing functions will also be discussed in Chapter 9.
-
Split tool. Splits a selected part or parts anywhere, depending on the grid selection setup.
-
Glue Tube tool. Joins an event or a part to the next event or part in the same track, creating either a continuous event (if you use the glue tube after splitting an event in two) or a continuous part containing two events if you either glue two nonconsecutive events or two parts together.
-
Eraser tool. Erases one or several events/parts from a track. For example, if one event is selected, it will only erase one event.
-
Magnifying Glass tool. Zooms in to your project by dragging a box around the area you want to view more closely or simply you can click to zoom in one step closer. You can also zoom out by using the Alt(PC)/Option(Mac) key and clicking or by double-clicking to move back a step.
-
Mute tool. Mutes an event or a part on a track, or multiple parts or events, if more than one is selected. This is an alternative to erasing a part or an event. Muted events are not heard during playback; however, they can be unmuted later. If you need to mute all the parts or events on a track, you would be better off using the Track Mute button, which will be discussed later in this chapter.
-
Time Warp tool. Provides a way to insert tempo changes for musical events to match up with video sequences. You can also use time warp when you need to figure the tempo of something you just recorded without knowing what the tempo was originally. As its name suggests, it warps or transforms linear time, the time of sound cues and digital audio recording, into musical time, the time of MIDI files and tempo-based events. And vice versa (see Figure 4.6). More on this in Chapter 9.
Figure 4.6. The Time Warp Tool modes.

-
Draw tool: Draws in a part on a track or a series of automation points.
-
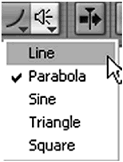
Line tool: As with the selection and sizing tool, the line tool offers different operation modes (see Figure 4.7). Adds automation by creating a line between two points. The parabola, sine, triangle, and square modes allow you to create different types of automations, creating automation points that recreate the shape of the selected mode. For example, using the line tool in sine mode to add automation on a pan would create a panning automation shaped like a sine wave. These editing modes will also be discussed in Chapter 11.
Figure 4.7. The Line modes drop-down menu.
-
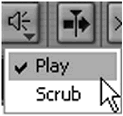
Play/Scrub tool: Offers two modes to choose from. The play mode allows you to listen to an audio event or part from the point where you click until the moment you release the mouse. The scrub mode allows you to drag your cursor back and forth over an audio event or part to monitor the audio in the direction and speed your mouse is moving (see Figure 4.8).
Figure 4.8. The Play and Scrub drop-down menu.
Project Transport Control Buttons
In Cubase SX/SL, there are two sets of transport controls. The project window itself holds the same controls as the transport panel, with the exception of the fast forward and rewind buttons: Go to Previous Marker, Go to Next Marker, Cycle Mode Toggle button, Stop, Play, and Record. The transport panel is a floating panel (you can move it around inside Cubase) and for space ergonomics purposes, it is possible to hide the transport panel and use the project window's transport controls if you want to do so. New to this version is the possibility to customize all the tools that appear in the toolbar, so if you don't want to see the Transport Control buttons there, you can hide them from view in the project window. To find out how to do so, go to Appendix D.
Figure 4.9. The project window's Transport Control buttons: Stop, Play, Record, and Cycle mode selection.

Another button related to transport is the Auto-scroll button found to the right of the Scrub button (see Figure 4.10). This button when active (blue state) will follow the position of the project cursor in time as the project moves forward, refreshing your display every time the project cursor moves past the right edge of the window. If you do not want for this to occur, you can deactivate the auto-scroll function.
Figure 4.10. The Auto-scroll or Follow Song button in its active state.

Project Editing Setup Buttons
When working on a project, you will be recording and editing events and parts in tracks. Moving events around is a task that you will probably do quite often. Determining exactly where you want to move it is your decision, but helping you in determining the accuracy of this movement is Cubase's task. This is done through a magnetic grid. How this grid works depends on how you want it to.
On the project window's toolbar, to the right of the Follow Song or Auto-scroll button (by default) is the Snap to Grid Toggle button. This button will restrict the movement of parts and events in your event display area to the settings found in the fields to the right of the Snap button. In other words, in its active state (blue) it uses the snap mode in the next field (to the right) to determine what becomes magnetic. Cubase offers seven modes from which to choose.
-
Grid. A grid is defined by the grid setting found in the field to the right of the grid mode. In Figure 4.11, this is set to Use Quantize, which is the field to the right of the grid setting. In the same figure, this is set to 1/8 Note. In other words, an 1/8 magnetic grid will be available when the grid mode is selected. If, on the other hand, your project displays time values rather than bars and beats, increments of milliseconds would be displayed rather than note subdivision values. In the case of time code display, a frame count will be displayed instead. This makes it easy to snap events to any kind of grid, depending on the project at hand. The snap to grid mode is the default snap mode in Cubase.
Figure 4.11. Grid and quantize controls.

-
Events. The start and end of parts or events, as well as markers on marker tracks, become magnetized. So when you move a part, it will snap to the previous or next event as you move closer to it. This makes sense when you need to make sure there are no spaces between events or parts on a track, rather than aligning events to a grid as described previously.
-
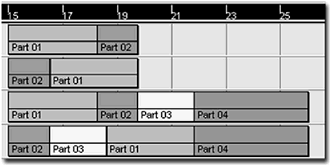
Shuffle. Moves events or parts that are adjacent to other parts by switching places with them. In Figure 4.12, tracks 1 and 2 are before-and-after shuffle examples with two consecutive parts. Tracks 3 and 4 are before-and-after shuffle examples with four consecutive parts. As you can see, the Part 01 is the part being shuffled around in both examples.
Figure 4.12. Using the grid in Shuffle mode.
-
Magnetic cursor. When this snap mode is active, the project cursor (play line) becomes magnetic. Moving an event or a part close to it will cause the part to snap to the cursor's position.
The other grid modes are combinations of these four previous modes.
-
Grid + Cursor. The grid and cursor become magnetized when moving events or parts.
-
Events + Cursor. Events and parts edges, as well as the cursor, become magnetized when moving events or parts.
-
Events + Grid + Cursor. The events (or parts), the grid, and the cursor become magnetized when moving events or parts.
The grid setting field to the right of the snap mode field enables you to set a value that will determine how far apart each vertical time line in the grid will be magnetized. For example, having a grid set at 1/1 implies that there will be one vertical timeline with every bar, to which events, parts, and automation will stick when you move or create something in this window. A 1/16 grid implies that there will be such a line 16 times in each bar. Note that this value will only become active if the grid is part of the snap mode you selected. For example, choosing the magnetic cursor as the only snapping element will make changing the grid value useless. Also, the values in this field will vary depending on the project's ruler display.
-
If the time is displayed in bars and beats, the grid will display a choice of bars, beats, or quantize value.
-
If the time is displayed in seconds, the grid will display a choice of millisecond increments.
-
If the time is displayed in frames , the grid will display a choice of subframe, frame, or second increments.
-
If the time is displayed in samples, the grid will display a choice of sample increments.
When using a bars and beats display in the ruler along with a grid snap mode that uses the quantize value as its setting to determine which values are magnetized, you can select the quantize value in the field to the right of the grid settings field. In other words, the quantize value fieldas with the grid setting fieldbecomes active and relevant when the snap mode selected makes use of a grid.
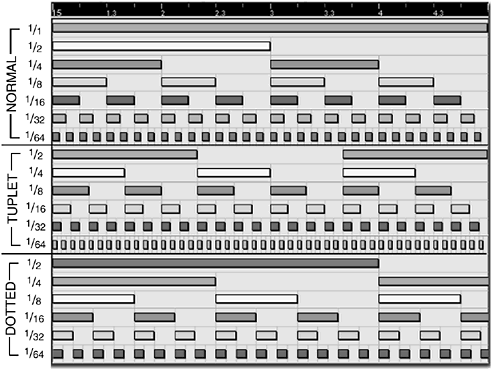
Quantize ValuesQuantize values divide each bar in fractions equivalent to a note value. Typically, a 1/4 quantize value indicates that there will be a grid line at every quarter note. There are three groups of quantize value fractions: normal, tuplet and dotted . The normal fractions (1/2, 1/4, 1/8, 1/16 and so on) represent note values that can be divided by two. For example there can be four quarter notes in each 4/4 bar, eight eighth notes per 4/4 bar and sixteen sixteenth notes per 4/4 bar. Tuplet notes can usually be divided by three. For example, a 4/4 T value means that you can have up to six quarter note tuplets per 4/4 bar, twelve eighth notes per 4/4 bar, and so on. In other words, for every two notes in normal quantize value you have three notes in tuplet quantize value. A dotted quantize value represents one and a half normal quantize value. For example, three quarter notes are equal to two dotted quarter notes. In Cubase, these quantize value differences are indicated with a T for tuplets, following the quantize value and a D for dotted, also following the quantize value. In Figure 4.13, a piano roll example of different quantizing values shows the different lengths and proportions each note (and silence) takes when changing the quantize value's grid. Figure 4.13. Example of quantize value lengths and grid size in a 4/4 bar. |
Figure 4.14 shows you a simple little option that lets you define colors for each part in the Arrange window's Track View section by clicking on the Part Colors option. If this item is checked, the files and segments will be displayed with the colors of their respective parts. You can click on a part or select a track and then use one of the colors in the Part Colors option to apply it to your selection. Although adding colors to parts might help you in organizing your events on tracks, they will not add anything to the events because they are merely visual references.
Figure 4.14. The Part Color drop-down menu.
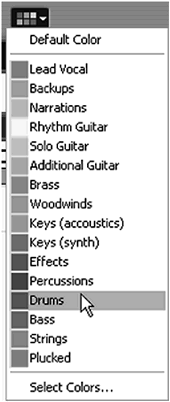
This option can be very useful when working with many tracks. You can group tracks by color or assign a name to each color so that you know what is what later on. For example, your rhythm section can be different shades of green, your wind section different shades of blue, and so on.
How To
To create your own custom colors and associated color names :
-
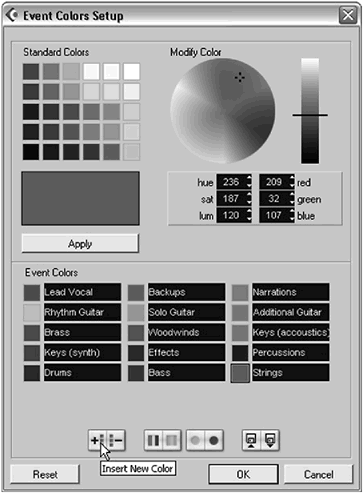
Click on the Select Colors option at the bottom of the Part Colors option drop-down menu. The Event Colors Setup dialog box will appear as shown in Figure 4.15.
Figure 4.15. You can customize colors and add names to reflect what each color should represent in the Event Colors Setup dialog box.
-
Select a color to edit in the Part Colors area.
-
Type in a new name for that color by clicking inside the field next to a color swatch.
-
If you want to change the default color, change the color by using the Color Picker option.
-
Repeat the previous steps for another color if you want to create more custom colors and associated names. The buttons found below the Event Colors allow you to insert/remove color swatches and associated names, increase/decrease the color palette's intensity, increase/decrease the color palette's brightness, or load/save color presets.
-
Click OK when you are done.
Now that you have created custom colors and names associated with these colors, you can apply these colors to events and parts in your project.
How To
To assign a color to parts and events:
-
In the project window, select the part(s) or event(s) for which you want to assign a color.
-
Select from the Events Colors drop-down menu one of the colors.
| [ LiB ] |
