Exporting Your Final Mix
| [ LiB ] |
Exporting Your Final Mix
After you are satisfied with your mix and want to render a final mixdown, you can use the Export Audio Mixdown function found in the File > Export > Audio Mixdown. This function does not export MIDI tracks, as mentioned earlier, but does export VSTi and Rewire channels, so the following steps assume that you have already converted your MIDI tracks into audio tracks. You can also use the Export Audio Mixdown function to render a selection, a track containing effects or a VSTi.
How To
To export your final mix as an audio file:
-
Mute the tracks you don't want to include in your audio mix and unmute those you want to include.
-
Position your left locator where you want to begin the audio mix and the right locator where you want to end the audio mixdown.
-
If you want to export the automation when rendering a mixdown, make sure all the appropriate Read Automation buttons are enabled.
NOTE
 SUBZERO!
 It is important to make sure that the output bus used for the rendering of any audio mixdown does not clip at any time during playback, because this clipping will cause distortion in your final mixdown. So, make sure that your levels stay below zero at all times and that the clip indicator in this bus does not light up.
-
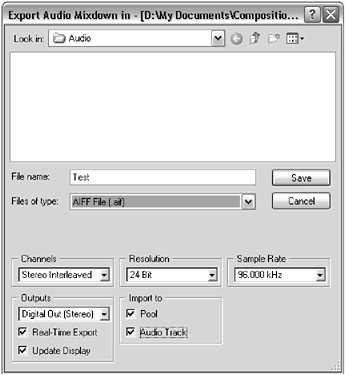
Select Export > Audio Mixdown from the File menu. The Export Audio Mixdown dialog box appears, as shown in Figure 15.3.
Figure 15.3. The Export Audio Mixdown dialog box.
-
In the Export Audio Mixdown In dialog box, choose the proper folder in which to save the file. By default, Cubase will display the project's folder.
-
In the File name field, enter a name for the file you want to export.
-
Choose the number of Channels, word length Resolution, and Sample Rate you want to use for your exported file. SX users can also select a multichannel mixdown if the output bus is multichannel. For example, you can select the N. Channel Interleave option if you want to create a single file containing all the channels assigned to a surround bus. If your bus is configured as a 5.1 surround setup, the N. will stand for 6 channels interleaved. Also, the N. Channel options are available only if you select a file type (see below) that does not compress the audio content.
NOTE
 SPLITTING STEREO FILES
 Note that the Stereo Split (or N. Channel Split in SX), found in the Channels area of the dialog box, creates a left and a right mono file rather than a single stereo interleaved file. This might be useful if you need to use this file in another audio application that does not support stereo interleave files, such as older Pro Tools versions.
-
Select the appropriate settings in the Files of type and Coding fields that you want to use for this file. If you are preparing an audio mixdown to burn on a CD, for example, chances are you will need to select a WAV or AIFF format. For Web distribution, MP3, Ogg Vorbis, RM, or WMA will be more appropriate. The Wave64 format (SX only) should be selected when you expect the resulting file will be upwards of 2 GB.
-
Under the Outputs section, select the appropriate bus you want to mix down. SX users can also mix down specific channels, such as VSTi or audio channels.
-
Check the Real-Time Export option when one of your VST plug-ins requires this to have time to update correctly during the mixdown process or if you are using a third party Rewire-compatible application which is not loaded inside Cubase, but as an external application. This is not always required, but if your audio mixdown doesn't sound after rendering to file, redo the mixdown and check this option.
-
Check the Update Display option if you want to monitor the levels during mixdown. If a clip occurs, you will be able to see it and adjust the levels appropriately to avoid the problem.
-
If you want to import this file into your Media Pool or add it as a new track in your project, check the appropriate options in the Import To section.
-
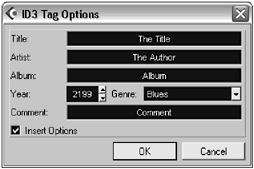
Click Save when done. Cubase will display the ID3 Tag Options dialog box, which enters embedded information (such as the ones discussed in the Broadcast Wave options earlier).
-
Enter the appropriate information in each field.
-
Check the Insert options if you want to include the information in the file.
If you have checked the Import to Audio Track option, Cubase creates a new audio track and names it Mixdown . After the newly created track is in place, make sure to mute the source tracks for this new track (containing the audio mixdown). If you have chosen not to import the audio rendering of your mix back into your project, you can proceed with your work as usual, continuing whatever work needs to be done, or save and close your project and start working on the mastering of your album, as discussed later in this chapter.
File Format Options
You can export your final mix in two different lossless formats: WAV and AIFF. Both are standard formats and compatible with Mac and PC computers. You need to have your files in either of these formats to create an audio CD. But you need to leave the WAV format at its default "PCM/uncompressed Waves" format if you want to be able to import it back into your project. SX users can also use the Wave64 or .W64 file format, which supports file sizes above 2 GB.
The Internet and the Web have been quite helpful to musicians in allowing them to publish their material online and use it as an effective distribution medium and a way to promote their skills. This is one of the reasons why other Web- related exporting formats are now available and also considered standards in the industry. Among those, Cubase supports RealNetworks RealMedia format, Microsoft Windows Media format, MP3 format (from MPEG Layer 3), and Ogg Vorbis compression format. There are obviously a few other formats available, but they were not supported by Cubase at the time this book was written.
NOTE
WHAT IS OGG VORBIS?
Ogg Vorbis is an audio compression format that is roughly comparable to other formats used to store and play digital music, such as MP3 and other digital audio formats. It is different from these other formats because it is completely free, open , and unpatented.
Although not all artists realize it, MP3 is what is known as a "lossy" format. Thus, much of the sound data is removed when MP3 files are created. This results in a file with sound quality inferior to that of a CD. Vorbis is also a "lossy" format, but uses superior acoustic models to reduce the damage. Thus, music released in Vorbis sounds better than a comparably sized MP3 file.
Also, artists should be concerned about licensing terms for formats. If you decide to sell your music in MP3 format, you are responsible for paying Fraunhofer a percentage of each sale because you are using their patents. Vorbis is patent and license-free, so you never need to pay anyone in order to sell, give away, or stream your own music.
To find out more about this format, you can visit http://www.vorbis.com.
Because these formats were developed with the Web in mind, they make it easy to stream or distribute content over a low-bandwidth system. As a result, a certain amount of data compression is applied to these file formats. The more you compress the files, the smaller they are, and this is also directly related to sound qualitythe smaller the file, the worse the sound quality. All these compression algorithms are lossy, meaning that they remove data from the original file when saving it into this new format and by doing so, they reduce sound quality as well.
There is a big difference between data compression, which is used to compress the size of a file, and dynamic compression, which is used to control the dynamics of the audio signal. The dynamic compression does not influence the size of the file. You will have a chance to experiment with this and will have to find a compromise that you need to be comfortable with in the end. Keeping this in mind, remember that there are more people using 56 Kb modems to download and listen to music than there are people with high-speed access. This is changing rapidly ; however, until the time comes when everyone has high-speed access to the Internet, make sure your potential customers will not be discouraged by the size of your file.
The next two sections describe particularities related to RealMedia, Windows Media, and MP3 format conversion when exporting your files for Web distribution.
RealMedia and Windows Media
RealNetworks was one of the first companies to develop an algorithm to compress and deliver audio and video files over the Internet by using a streaming technology. Today, Microsoft has joined RealNetworks in the leadership race to establish the most popular streaming standard for distribution of audio and video content over the World Wide Web. Microsoft's version of streaming media technology is called Windows Media format .
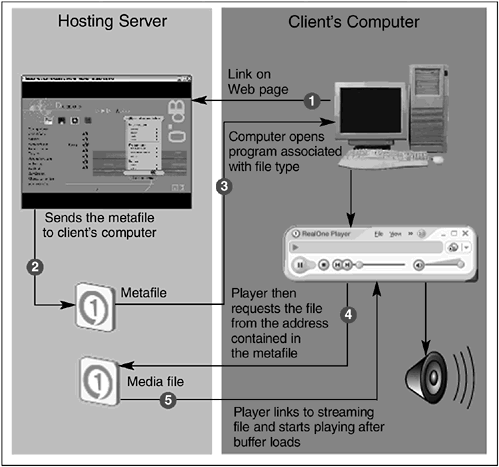
The principle behind streaming technology is the same, no matter which format you use. The idea is to make available to Internet users a compressed file that varies in quality and size, depending on the settings you choose when compressing this file. The streaming client (a compatible player) resides on the end user 's computer. When you click on a link, the reference file associated with this link tells the client's computer to load the player into memory and start streaming the content from the server to the workstation. The player starts playing the content as it arrives rather than waiting for it to be completely downloaded, thus reducing the waiting period before a user can listen to the content of this file.
For this to work properly, a reference (or go-between) file is often created (see Figure 15.4). This reference file is known as a metafile , and it contains a simple piece of information: the location of the media file itself. Because a metafile is so small since it only contains a link to a content file, it is downloaded quickly into your computer. After the metafile is downloaded, the computer loads the player associated with this type of file and then reads the address, telling the server to start sending packets of data. The packets of data are stored into a buffer memory until the buffer memory is filled up. Once filled up, the player begins to play the actual content. The time it takes to fill up the buffer memory depends on the connection speed a user has, the connection speed of the server, the traffic over the Internet at that moment, and the size of the media file itself. For example, filling the buffer for a 100 Kb file is quicker than if the file is 100 Mb. But after this buffer is loaded, the file begins to play while your Internet connection stays active, continuing the transfer of the rest of the information for this file.
Figure 15.4. How information flows as streaming media over the Internet.
Now that you understand the basics of how streaming works, choosing the Attributes or Coding options to use when exporting an audio mixdown will be easier. You will notice that when the File of Type field displays Real Media or Windows Media formats, options appear below that let you select the type of streaming content you want to create. As a rule of thumb, whenever higher quality settings are chosen, you can bet it will take more time to compress and will end up generating larger files. With RealAudio files, for example, choosing a 56K Modem Coding option means that the stream created will be suitable for Internet users navigating with a standard 56K Modem. The resulting file will therefore be optimized for a 34 kilobits-per-second stream of data. You should know that this will definitely not offer the best sounding audio quality, but it will give you the possibility of reaching a larger audience than if you choose a higher quality coding.
How To
To export a file for RealPlayer or Windows Media Player compatibility:
-
Proceed in the same way as you would for any other type of file (as described earlier in this chapter), up until you reach the format of the file you want to export. From there, you proceed as follows .
-
Next to the File of Type field, select RealAudio File G2 (.rm) or Windows Media Audio File (.wma) as your file type.
-
Next to the Coding field (RealAudio) or Attributes (Windows Media), select the appropriate format for your content.
NOTE
 REALAUDIO SPECIFIC OPTIONS
 Remember that the compression you apply here influences both the file size and the quality of the end result. If you are targeting the general public, then using a 34 kBit/s (Kilobits per second) format is more suitable. On the other hand, if you are targeting people who have high bandwidth access, such as businesses or other users you know are using a faster connection, you can select a higher bit rate.
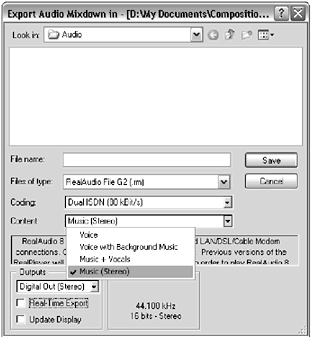
Make sure to select the bit rate and the appropriate type of codec compression: If you have music, you should use the Mono or Stereo Music presets. If you have mostly voice content with no music, use the Voice presets.
The RealNetworks codec treats those two types of audio information in a very different way, so making the right selection here is paramount. If your content contains both musical and vocal content, go for the music presets.
Choosing mono music over stereo music adds definition, as it uses the additional space to allow a wider range of frequencies, whereas the stereo music is encoded in stereo and offers a stereo image with less high frequencies, as those are reduced to allow for the stereo information to fit in the same amount of bits per second.
Finally, below the Coding field, an information box tells you what this RealPlayer preset is most appropriate for, such as the example in Figure 15.5 in which the "56K Modem (34 kBit/s) Music (Stereo)" preset has been chosen.
The RealAudio options in the Export Audio Mixdown In dialog box.
-
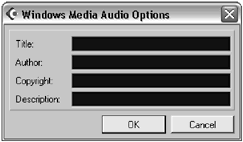
Click on the Save button. This brings up either the RealAudio Options dialog box, as shown in Figure 15.6, or the Windows Media Audio Options dialog box, as shown in Figure 15.7.
Figure 15.6. The Real Audio Options dialog box.
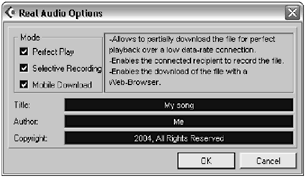
Figure 15.7. The Windows Media Audio Options dialog box.
-
Enter the appropriate Title, Author, and Copyright information for your song. This information appears in the user's Player window when a file is being played . If you are using the RealAudio format (this does not apply for Windows Media), check the appropriate Mode options. When you add a check to an option, a short description of what this feature does appears to the right of the option.
-
Click OK. This can take several minutes if your project is long or your computer is slow.
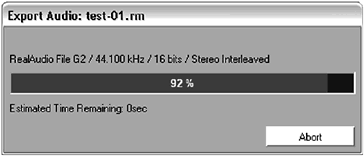
While the file is being rendered in the selected format, a progression dialog box appears (see Figure 15.8), as with any other exporting feature. To avoid errors during the mixdown process, do not use your computer to do other tasks until the process is completed.
Figure 15.8. The Export Audio progression dialog box monitors the progression or aborts the process.
NOTE
ABOUT WINDOWS MEDIA PRO
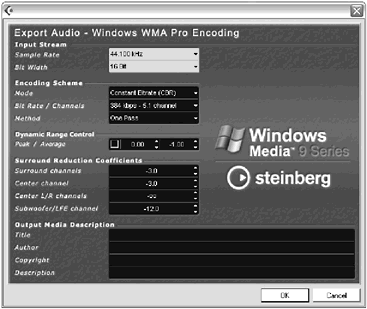
An extension of the Windows Media Audio format developed by Microsoft, WMA Pro files can be decreased in size with no loss of audio quality, depending on the advanced audio codecs and lossless compression used. WMA Pro features the possibility of mixing down to 5.1 surround sound. Note that PC users with Windows XP will be the only ones able to hear this type of format in surround since other Windows OS do not support surround files. They will simply hear a stereo version of the file instead. For specific information on settings found in the corresponding dialog box, start the HTML Help in Cubase, select the Index tab, and look for the WMA Pro files topic.
The Windows Media Pro dialog box.
MP3
Exporting a mixdown to MP3 format is similar to RealAudio (RA) or Windows Media (WMA) format in that they are meant to be sent over the Internet and then played on a computer. This format has literally changed the face of audio distribution, allowing for high-compression algorithms that reduce file sizes without compromising audio quality too much when using higher bit rates.
Cubase SX allows you to save a mixdown in MP3 format (available as an upgrade for Cubase SL users). As with RA and WMA, the smaller the files, the lower the quality. Compare this as an example: The compact disc standard of 44.1 kHz, 16-bit, Stereo in Wav format uses a bandwidth of 172.3 kilobytes per second, whereas an MP3 file compressed at 320 kbps (the highest quality available with the MP3 codec from Steinberg) uses only 39 kilobytes per second of bandwidth. This is because a one-minute file in WAV or AIFF CD compatible (44.1 kHz, 16-bit, Stereo) format uses 10.09 megabytes of disc space, whereas the MP3 file at 320 kbps uses only 2.29 megabytes, making it easier to transfer over the Internet or store on limited storage mediums, such as memory sticks or MP3 players. The MP3 standard relies heavily on algorithms that compress the information and then on the computer's processor to decompress this information as it plays back, as does any other file compression algorithm (ZIP, ARJ, Stuff It, and so on). The difference being that MP3 algorithms are specifically designed for audio content.
How To
To export a file for MP3 compatibility:
-
As with RA and WMA, proceed with the export process as was demonstrated earlier in this chapter until you reach the format of the file you want to export. Then proceed as follows:
-
Next to the Files of type field, select MPEG Layer 3 (.mp3) as your file type.
-
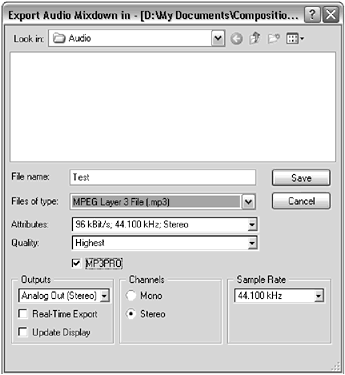
Next to the Attributes field, select the appropriate format for your content as shown in Figure 15.10.
Figure 15.10. Selecting the attributes for your MP3 files in the Export Audio Mixdown In dialog box.
-
In the Quality field, select the Highest option, which takes more time to compress but yields better results.
-
Click the Save button. The ID3 Tag Options dialog box appears (see Figure 15.11). If you've entered information in the Broadcast Wave preferences, this information appears here automatically.
Figure 15.11. The ID3 Tag Options dialog box.
-
Make the necessary changes and click OK to start generating the file.
More on OMF
As you already saw in Chapter 7, the OMF Exporting option (available in SX only) allows you to save in a platform and application friendly format. It's friendly in the sense that this is a standard supported by more applications than the current .CPR or Cubase Project file might be. In other words, if you stay within Cubase, you won't need to use the OMF export format, but if your project needs to be added to another application, such as Final Cut Pro, or AVID, and so on, exporting to OMF format will save everyone lots of time since most of the project settings will be available in the OMF version of your project. This implies that you won't have to reimport and position all the audio content in another application. However, if the other user does not own the same plug-ins as you do, the FX won't be accurate.
Exported OMF file will keep references to all audio files that are played in the project (including fade and edit files) and will not include unused audio files referenced in the Pool. It won't contain any MIDI data either, so it's important that you convert all your MIDI parts into audio events before exporting to OMF. If your project contains a video file, the only thing that will be included in the OMF file is the start positions of Video Events. You will need to manually import video files later in the other OMF application.
How To
To export a project to an OMF format:
-
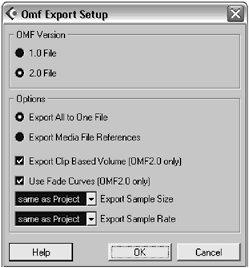
Select Export > OMF from the File(PC)/Cubase(Mac) menu. The OMF Export Setup dialog box appears.
-
Select the desired OMF File version, depending on which OMF version is supported by the application in which you plan to import the file later on. You might want to check with the studio where you need to bring this file before you make a selection here.
-
Select whether you want to include all audio data used in the project inside the OMF file (Export All to One File) or use references to external files only (Export Media File References). If you choose the latter option, make sure to include all media files along with the OMF file on the backup copy that you bring to the other studio. If you know that you can save everything in an OMF file that will fit onto a CD or DVD-R (or DVD-RAM), you might be better off creating a self-contained, all-in-one OMF file to avoid any missing files later on.
-
If you are exporting to a 2.0 compatible OMF file, you can choose to include the fades and volume settings for each event. To do so, check the Export Clip Based Volume option.
-
By default, the current project sample size and sample rate are selected for the OMF export, but you can specify another resolution and sample rate for the exported files.
-
Click OK and specify a name and location in the file dialog that appears.
Figure 15.12. The OMF Export Setup dialog box.
| [ LiB ] |