Interactive Texturing Maya allows you to not only assign textures to your objects, but also to paint them in real time. Although this sounds like an ideal way to texture everything, in practice it is limited in its value because of the awkward man-machine interface. Most of the time, you'll paint features that are required to be in specific locations, and then take the resulting 2D image to a paint program such as Photoshop for further editing. Interactive texturing requires a fast video card operating in shaded, hardware-textured mode so that you can see the results of your paintstrokes. Note that you can paint channels other than color, such as transparency. However, interactive shaded views do not display attributes other than color, so you must remember as you paint that you are directly editing transparency, for example, rather than color thus, white means opaque and black means clear. Tutorial: 3D Paint Tool In this tutorial, we'll paint on the cylinder in the scene to create a unique color design on it. The cylinder is a NURBS primitive, so it already has inherent texture mapping across its surface. All we need to do is start the 3D paint tool, and we'll be painting! -
To ease the painting process, we'll isolate the cylinder. Select the cylinder, then choose Display Hide Hide Unselected Objects. Center and zoom on the cylinder by using the a hotkeyframe all.   -
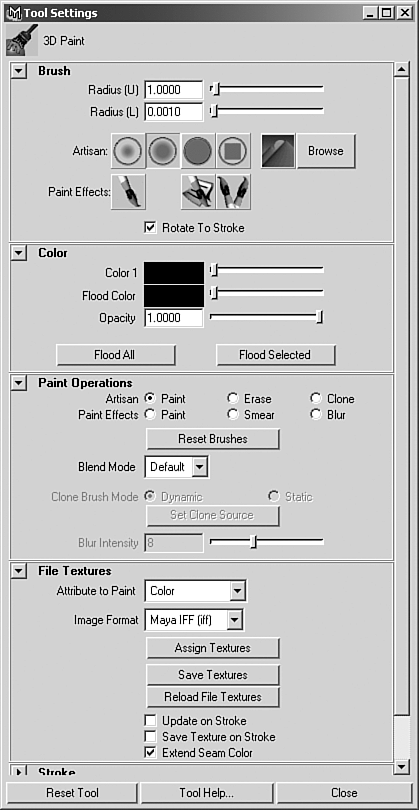
Activate 3D painting with Hotbox Texturing 3D Paint Tool option box. This will bring up the interactive paint dialog, as shown in Figure 8.21. Reset the dialog with the Reset Tool button at the bottom of the dialog. Note that the cursor now appears in the 3D view as a paintbrush, but if you try to paint the cylinder at this point, you will see a red X appear over it, indicating that it is not ready for painting. Figure 8.21. The 3D Paint dialog.  -
Go to the File Textures section of the 3D Paint dialog. This section will allow you to size and assign a new bitmap to any channel you want. Make sure that color is the selected Attribute to Paint, and click the Assign Textures button. A bitmap sizing dialog will appearset the values to 256, and click the Assign Textures button on this dialog. Now a 256x256 pixel map has been assigned to the color channel of the material assigned to the cylinder. This new bitmap has been pre-filled with your previous solid color, so you may not notice an immediate difference. If you hold your mouse over the cylinder, you'll now see a circle cursor. -
You can choose from many pen and paint styles that are available in Visor. Bring up Visor with shift+V. Make sure "Paint Effects" is the selected tab. Choose the "Markers" folder and pick the marker named "defaultPaint.mel." Now you can paint on the cylinder. -
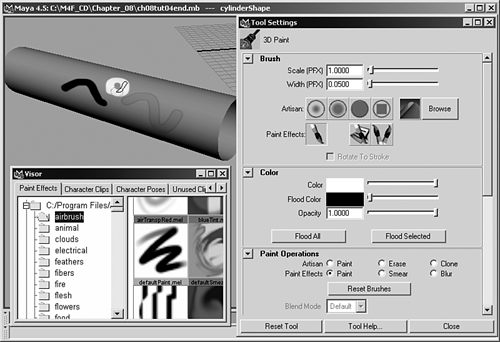
You can easily adjust the color of the markers in the 3D Paint dialog, under the Color section, using the color swatch/slider. Try adjusting this to various colors as you mark up your cylinder, as shown in Figure 8.22. Figure 8.22. Painting on the cylinder with various marker colors.  -
Besides simple markers, you can also paint in 2D using the various other paint effects materials. You'll find these in the other folders in your Paint Effects tab in Visor. We'll explore using and editing Paint Effects in 3D in more detail in Chapter 13, "Paint Effects." For now, try switching to the blue feathers ("down4.mel") in the Feathers folder. You can size your brush by holding down the b key as you LMB-drag left and right. You can also size the brush by entering a value into the scale attribute of the 3D Paint dialog. As you apply blue feathers to the color channel in real time, these paint effects are applying only flat 2D image changes to the texture's color bitmap. Next, paint some more with the other presets offered in Visorit's fun! After you've tried painting the color channel for a while, render an image to see result. The shininess and all other attributes other than color remain the same, but the solid red color is now painted ( defaced ?) with your handiwork. -
Get out of 3D paint mode by switching to the cursor (hotkey: q ). Hide the current object (hotkey: Ctrl+h ). Unhide the cone by selecting it in the Outliner and then choosing Hotbox Display Show Show Selection. Use the a hotkey to center and zoom on the isolated cone. Invoke 3D Paint with the option box again, and assign a 256x256 map to this object as in Steps 2 and 3 previously. -
Now, we'll apply a background color of white to this cone by setting the Flood Color (below the Color setting in the 3D Paint dialog) to white, and clicking the Flood All button. -
In Visor, choose the "Fun" folder, and pick cracks.mel. Now, paint some loop-de- loops on the conethe crack direction will change based on your stroke direction. Orbit around the object to paint on its sides. You'll find that many of the complex paint effects presets work this way. Finish painting the cone using other crack colors by changing the Color attribute in the 3D Paint dialog. Finish painting with the q (cursor) hotkey, and close the Visor and 3D Paint dialogs. -
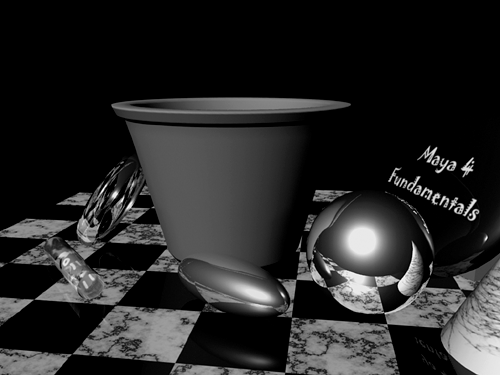
Unhide the other objects with the Oulinerselect them in the Outliner (using shift to select multiple items), and then unhide them with Hotbox Display Show Show Selection. Now you can render a frame after repositioning the Perspective view to something that encompasses the entire frame, as shown in Figure 8.23. The painted cone may appear more readily in the reflection from the chrome sphere.  Figure 8.23. The rendered resultonly the color channel of the red plastic cylinder and gray cone has changed.  -
If you select one of the painted objects, bring up the Attribute Editor, and navigate to the color channel of the material assigned to the object, you can find the bitmap created by Maya from your paint work. Note that if you want to load the book's sample textures, you'll need to redirect these image pointers to the images provided on the CD-ROM.   |
