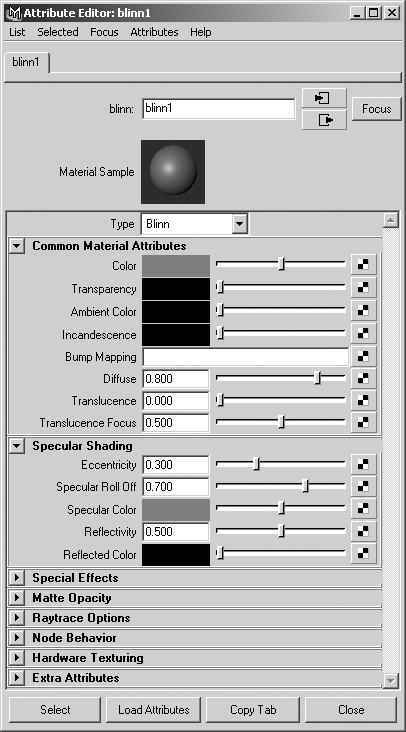
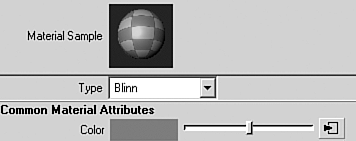
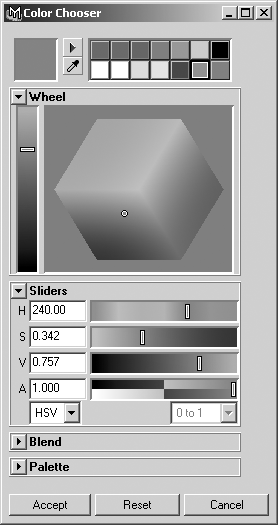
| Having reviewed the major material types, now take a look at the variables available in the material you'll most commonly use: Blinn. The other primary materialsPhong, PhongE, and Lamberthave many of the same variables . To edit material settings, double-click on any material in Hypershade's top or bottom tabs. Usually you create a blank Blinn material in the Work Area of the bottom tab panel, and then double-click it to open the Attribute Editor with the material type loaded. Refer to Figure 8.3A as we travel down the Attribute Editor and discuss its sections. Figure 8.3A. A basic Blinn material in the Attribute Editor.  Notice the material name at the top of the Attribute Editor, which Maya sets to blinn1 for a default starting name . Maya increments the number if you create more Blinn materials. You should edit this text to something more descriptive, though, to help you navigate through your scene materials. The image next to Material Sample shows a rendered sample sphere that updates as you change the values for the attributes. You use the Type drop-down list to change a material to any other type; if the new material type has different parameters, however, it automatically has the default settings, and the name is reset to the default name. Next is the Common Material Attributes section, followed by the Specular Shading section. These two sections, displayed by default, are used the most in material editing. The other sections remain closed unless you click to expand them. Note that the first four variables under Common Material Attributes have a color swatch, a slider, and a checkered button. You can brighten or darken these variables with the slider, but you must click the color swatch (which opens the Color Chooser) to fine-tune a color. Use the checkered button to override a solid color with a texture. note Once you apply a texture, the color is no longer editable and the slider becomes locked, as shown in Figure 8.3B. The checkered button is replaced with a right-pointing arrow, and the color in the swatch is meaningless. Figure 8.3B. Applying a texture will make the "checker" button icon change to a connection icon, and the slider and swatch no longer are editable. 
These are the Blinn attributes in the Common Material Attributes and Specular Shading sections: -
Color The base color of the surface. -
Transparency Adjusts the surface opacity. As soon as it's raised above 0 (black), Maya changes the sample background to a checkerboard to help gauge the transparency effect. You can use colors to create a tinted glass effect. -
Ambient Color Adds to and blends with the color value. It's a good idea to leave this value set to 0 (black) except for special effects, as it diminishes the contrast and 3D depth in your rendered results where it's applied. -
Incandescence A simulation of emitted light. At low values, it tints and self-illuminates the material, and at high values, it overtakes the material's color and becomes self-illuminated. Keep in mind that the rendered material might look like it's luminous, but it doesn't cast light into the scene; you have to simulate that by adding lights. -
Diffuse Intended to simulate a material scattering light, but it works like a scaling factor on the color. By default, it's set to 0.8, which dulls down the color value you've set. Often animators apply "dirt maps" in this attribute to add realistic dirt and wear that darken a surface. You'll coordinate your diffuse and specular settings, because a "dirty" object wouldn't generally be shiny. -
Translucence A special attribute that lets you see shadows cast onto the back of a surface, useful for simulating materials such as frosted glass. This effect relies on the light sources around and behind the object you're applying the translucent material to. -
Translucence Focus This controls how light scatters from the surface. Lower values make the light scatter heavily and results in a soft, blurry translucence. -
Eccentricity The width of the highlight, simulating how polished or rough the surface appears. -
Specular Roll Off The brightness/intensity of the highlight. -
Specular Color The color of the highlight; usually set to white or a gray value. -
Reflectivity The brightness of reflections on the object. Reflections can be raytraced or use texture maps. If no texture is assigned to the Reflected Color attribute, you need to enable raytracing to see any results from this setting. You can enable raytracing in the Render Globals window (unless you're using reflection maps). -
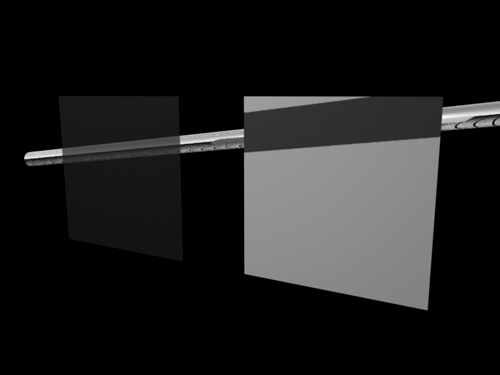
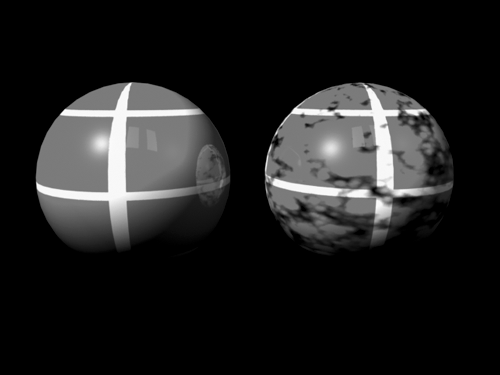
Reflected Color For Blinn, the color swatch and slider have no effect. However, when a texture map is applied, it appears to be reflected by the material. Usually, you use one of the environmental texture types. Environment textures are used to simulate an environment surrounding the scene; when applied to a material's Reflected Color attribute, they're used to fake reflection. This technique is often used to get a shiny, reflective effect without the slower rendering caused by raytracing the actual surroundings. Also, sometimes there are no surroundings to reflect; for example, flying logo effects are often set in a black void. Take a look at the following figures to see the differences between some of these attributes. In Figure 8.4, Transparency is applied to the square on the left so that you can see the object behind it. The square on the right has Translucence applied, so it allows only light and shadow to come through. Figure 8.4. Transparency versus Translucence. The red is backlit by a shadow-casting light.  Figure 8.5 shows spheres with similar reflective materials applied, but the sphere on the right has a fractal map applied to its Diffuse attribute. The effect is apparent only where the map is darker, which causes a "dirt" effectmeaning the sphere is darker and its reflections are less intense in those areas. Figure 8.5. The Diffuse attribute can darken the color and diminish reflectivity.  In Figure 8.6, the Reflectivity attribute is always at 1 (100%), but varying approaches are used to get different effects. The leftmost image has nothing applied to the Reflected Color attribute. The next image has a chrome environment map in the Reflected Color attribute, which creates the impression of a background despite the sphere's actual surroundings. In the third image, raytracing is enabled but the Reflected Color attribute is disabled, so a perfect reflection is computed. The rightmost image shows the effect of combining raytraced reflections with environmental texture mapping to produce real reflections that have priority over the environmental (Reflected Color) reflections. Figure 8.6. Using different approaches with the Reflectivity attribute.  The Color Chooser The Color Chooser appears whenever you click on a color swatch. The 14 color buttons at the top are a clipboard. To select the color for a color button, you simply click on it. To replace a color button, RMB-click it. Use the eyedropper tool to pick a color anywhere in the window. A color spectrum appears in the Wheel area. Generally, the best way to select a color is to use the sliders below the wheel (see Figure 8.7). The sliders can be set to RGB (red-green-blue) or HSV (hue-saturation-value) mode in the list box at the bottom of the Sliders section, but HSV mode is often the most useful. Pick the color tint first in the hue slider, and then select the color's intensity, as compared with gray, in the saturation slider. Finally, adjust the darkness , or black mix, with the value slider. At the bottom is the alpha slider for setting transparency, but it's rarely, if ever, used. Figure 8.7. Maya's Color Chooser in HSV mode.  Tutorial: Creating Solid Materials The most basic materials have a solid color and a consistent surface. In this tutorial, you'll use Hypershade to create some solid-colored surfaces and apply them to objects. Load the scene file noted below the CD icon so that you have a starting point for the sample world you're adding materials to.  Pottery For the pot, you'll apply a pottery material created by using a dark orange color in a Lambert material. -
Open Hypershade with Shift+T . Make sure the Create Bar and both tab panels are showing. Right-click the bar at the top of the Create Bar and choose Create Materials. MMB-drag a Lambert material type to the bottom tab panel. Double-click the new material and the Attribute Editor should appear with the new material loaded. If this doesn't work, you can RMB-click on the new material and choose Attribute Editor.  -
Rename the material from lambert2 to pottery . Set the color to dark orange in the Attribute Editor by clicking the swatch next to the Color value, and setting the color in the Color Chooser. We set the Hue to 33 , Saturation to .8 , and Value to .7 . Click the Accept button in the Color Chooser. -
Select the flower pot object in the scene, RMB-click the edited material in Hypershade, and choose Assign Material to Selection. You should see the pottery object in the Shaded view become dark orange. Plastic For plastic materials, you'll use the Blinn material with bright highlights: -
In Hypershade, MMB-drag a Blinn material to the bottom tab panel. Open the Attribute Editor as before, and rename the material from blinn1 to red_plastic . -
Set the color swatch to bright red. You can click the red color button in the Color Chooser, or use the HSV sliders to get a red you like. -
In the Specular Shading section of the Attribute Editor, make the shine level bright and tight by setting Eccentricity to 0.1 and Specular Roll Off to 1.0 , and dragging the Specular Color slider all the way to the right to get a pure white. The material sample sphere at the top of the Attribute Editor should look like shiny red plastic. -
Select the cylinder in the scene. In Hypershade, RMB-click on the red plastic material, and choose Assign Material to Selection. You should see the cylinder turn red in the Shaded view. Metal Creating metal requires a trick. The sliders in the Attribute Editor imply an upper and lower limit that doesn't really exist. You can type in any value in most of the numeric entries, and the slider will adjust its ranges. In some cases, you can get useful and unique results from "overdriving" a value in this way. -
MMB-drag a new Blinn material type from the Create Bar to the bottom tab panel. Open the Attribute Editor for this new material, and name it gold . -
In the Color Chooser, set the color swatch to dark brown (HSV: 40 , 0.8 , 0.2 ), and click Accept. Under the Specular Shading section in the Attribute Editor, leave the settings at their defaults: Eccentricity at 0.3 and Specular Roll Off at 0.7 . -
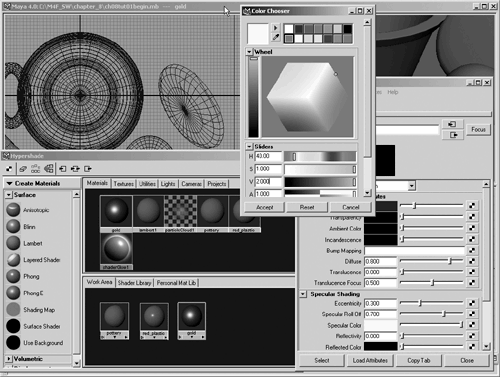
To get the metal look, click the Specular Color swatch and set it to orange, but with a value higher than 1 (HSV: 40 , 1.0 , and 2.0 ), as shown in Figure 8.8. Figure 8.8. Setting the highlight color for a gold material.  -
Select the oblong sphere object in the scene, RMB-click on the gold material in Hypershade, and choose Assign Material to Selection. The object in the Shaded view should turn gold. -
Try a test render to see what the materials really look like. RMB-click in the Perspective view, and render by clicking Hotbox Render Render Current Frame. -
A Render View window appears and the image is rendered. Leave tzhis window open. Reflective Raytraced Metal The gold looks metallic, but what if you want it to reflect its surroundings? There's a Reflectivity slider in the Attribute Editor, but you won't see any results unless you enable raytracing in the renderer or apply an image to the Reflected Color attribute. -
In the gold material's attributes, raise the reflectivity value to 1.0. Click the clapboard icon to the left in the Render View window, and the image will re-render. However, the gold remains non-reflective. Set the reflectivity value back to 0.5. -
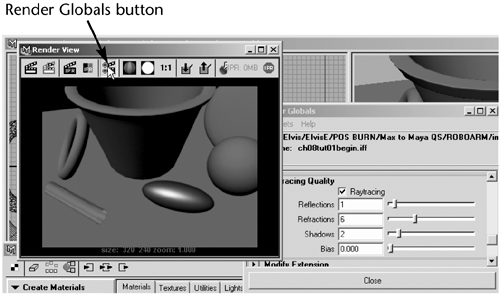
Click the Render Globals button, shown in Figure 8.9. In the Render Globals window, find the Raytracing Quality section, select the Raytracing check box, and close the Render Globals window. Render again by clicking the clapboard icon, and you should see reflective effects in the gold object. Orbit the Perspective view and render from some different angles to see the effect. Notice that the red plastic material is also reflecting. The default setting for Reflectivity is 0.5half reflective. You need to change this value when you don't want reflections on materials. Figure 8.9. Open the Render Globals window to enable raytracing for reflections and refractions.  tip You can zoom and pan the rendered image with the mouse as in any 3D panel. You can also zoom and pan the swatches in either tab panel in Hypershade.
Refractive Raytraced Glass You can also have transparent materials that refract light. That is, light passes through the objects but is bent, so you see a distorted view of what's behind the refractive object. -
MMB-drag a Blinn material to the bottom tab panel. Open the Attribute Editor and name the material glass . -
Set the Color to black and the Transparency to white. As soon as you begin to raise the Transparency value, you'll see a checkered background appear behind the swatch in the Attribute Editor and in Hypershade, which means the material is transparent. Set the Eccentricity to 0.1 , the Specular Roll Off to 1 , and the Specular Color to white. -
Now open the Raytrace Options section in the Attribute Editor. Select the Refractions check box, and set the Refractive Index to 1.5 . This is similar to glass. Most materials have an index between 1 and 2. Select the ring object to the left of the pot in the scene, RMB-click on the glass material in Hypershade, and choose Assign Material to Selection. Duplicating Materials You can start with an existing scene material and then duplicate it so that you can use the old material as a starting point for an unassigned new material. -
Select the gold material in Hypershade, in either tab panel, and press Ctrl+d to duplicate. A new material named gold1 appears. -
In the Attribute Editor, rename the material as chrome . Change the Color to dark blue by setting Hue to 240 in the Color Chooser. Set Specular Color to white by changing Saturation to . You now have a bluish metal look. Crank the Reflectivity to .85 , and assign the material to the large sphere in the scene. Render the Perspective view image. The sphere looks like a mirror, reflecting the scene around it. -
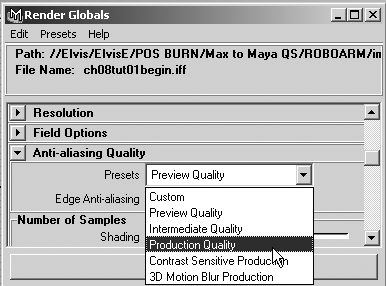
Render the Perspective view. If it looks a bit fuzzy in the refractive and reflective areas, that's because the quality is set low for faster response. To turn the quality up, open the Render Globals window. In the Anti-aliasing Quality section, select Production Quality in the Presets drop-down list, as shown in Figure 8.10. You might also want to increase the resolution; currently, it's only 320x240 pixels. In the Presets list box, select Full 1024, which gives you a 1024x768 resolution image. This setting takes quite a bit longer to render than before, but behold the final image! To see the image at full scale, click the 1:1 button in the Render View window. You can load the final scene from the file noted below the CD icon.  Figure 8.10. Turning up the rendering quality level in the Render Globals window.  |
