| You've seen some of the basic methods of modeling with NURBS in the previous chapter, starting with primitives: editing components of those primitives, projecting curves onto surfaces, and building surfaces based on curves. Now you'll follow up those techniques with other kinds of complex surface creation: revolves, lofts from existing surfaces, and sculpting surfaces by rebuilding and editing CVs. These techniques will be your basic toolkit for NURBS modeling. Refining the House Now that you have the primary parts of the house built, it's time to add some details to make it more realistic, starting with the porch. If you worked through Chapter 5, you can continue with your current scene file. If you skipped Chapter 5, or want to start fresh, you can load the scene file from the CD-ROM.  Tutorial: Adding to the Porch The next stage in creating the porch is constructing the rails, steps, and porch roof. -
Hide all the layers in your scene by clicking the V toggle next to each layer in the Layer Editor under the Channel Box. The viewports should have nothing in them. Frame all objects in all viewports (hotkey: Shift+A ) to see if anything remains unassigned to the four layers created in Chapter 5. If so, you can easily assign them to the correct layer. Switch to the Front view. Zoom into the scene origin (where the bold lines intersect) until you can easily work with the grid. If the grid is not displayed, turn it on (Hotbox Display Grid). To create the poles for the porch's side rails, you'll use a Victorian-style design that adds to the ambience of this spooky shack . To do this, you'll draw a profile curve and then revolve it to get a lathe effect.  -
Switch to the CV Curve tool (Ctrl+c+LMB-click CV Curve option box). Under the CV Curve Settings section, click the Reset Tool button, and then close the dialog box. -
Grid snap (hotkey: x ) the first CV at the scene origin. Snap another CV a couple of inches to the left of the origin point. Begin to create the profile curve for the rail by placing CVs as you move up the Y axis, as shown in Figure 6.1. Don't worry about the size of the curve in relation to the house; you can always scale the surface you end up with later. Be sure not to cross the Y axiskeep all points on the left side of the bold line. At the end of the profile curve, make sure you snap the last CV onto the Y axis, above the first CV you placed, so that when revolved, the top of the pole will be closed because the Y axis is the axis of revolution. Press Enter to complete the profile curve. Figure 6.1. The initial profile curve that will be revolved to create railing posts.  -
Usually, after you create this type of curve, you edit it before creating a surface with it. The first edit you'll make is to the bottom of the pole, where you want a hard corner at the lower-left point. Right-click on the curve, and choose Control Vertex. This puts you in Component mode, where you are editing CVs. Click on the bottom CV you placed at the scene origin point, and press the Delete key. -
Right now, the curve is rounded all the way through, but for this pole, you want some sharp edges on it. This is where the CV Hardness tool comes in handy. When you begin creating a CV curve with its degree set to 3 Cubic (the default choice in the CV Curve Tool dialog box when you create a curve), Maya sets a Multiplicity value (the pull strength) of 3 to the starting and ending CVs. The arcs between these CVs have a Multiplicity value of 1. When you change a CV's hardness, the Multiplicity value is changed. -
Select the second downward-pointing tip's CV point (shown in Figure 6.2), or other points you want to be sharp edges, and use the Edit NURBS Curve marking menu (Alt+c+LMB-click CV Hardness) to sharpen the point. Figure 6.2. The rounded tip is hardened to a point.  -
To create a surface from this profile curve, you need to perform a revolve. Get out of Component Selection mode (hotkey: F8 ), and select the curveit should be displayed with a solid green line. Open your NURBS Surface marking menu (Ctrl+Alt+z+LMB-click Revolve option box), reset the settings (Edit Reset Settings), and then click the Revolve button. To get a look at the surface, make sure the surface is selected, set the detail to high (hotkey: 3 ), and then go back to Four View mode (hotkey: spacebar tap ). Frame the selected object in all four views (hotkey: Shift+F ), and it should look like Figure 6.3. You can orbit the surface in the Perspective view set to Shaded mode (hotkey: 5 ) to inspect the results. Figure 6.3. The newly revolved surface. 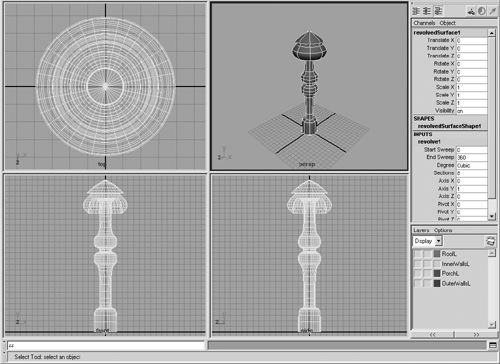 tip The CV Hardness tool works only if there are two CVs on each side with a multiplicity of 1 (that is, CVs other than the start and end points). When you're creating a curve, you can always press Backspace to delete the last point you placed or press Insert to move the point. tip Now that you can see the surface created from your profile curve, you might think it looks different than you expected. If you have history enabled (the button with the scroll icon at the far right of the Status Line), you can select the original curve and alter the revolved surface in real timea good way to work with a surface because you get instant results when the surface is simple and your CPU is fast. You can also interactively modify the revolution axis. To do this, under Inputs in the Channel Box, select revolve1, which is the revolve input node. Then activate the Front view, and press t . You will see three handles appeartwo for moving the endpoints and one to translate the entire axis. If you move them around, you can see how the axis orientation affects the revolve. -
In the Front view, select the profile curve, right-click, and choose Control Vertex. All the purple CVs appear, and you can move them to adjust the shape until it looks similar to Figure 6.4. To make it easier, you can configure Maya so that you can select only CVs: Bring back the Status Line if you currently have it hidden (Hotbox Display UI Elements Status Line), then click the Select by Component Type button (hotkey: F8 ), and make sure all the filters are deselected except for the far-left button points (check the Status Line in Figure 6.4). After you finish tweaking the pole CVs to look like the pole in Figure 6.4, press F8 to get out of Component Editing mode. Now delete the revolved surface history to make its design permanent: With the surface and curve selected, click Hotbox Edit Delete by Type History. Open the Outliner and delete the profile curve because it's no longer linked to the revolve. Figure 6.4. The modified revolve, a Victorian railing post. 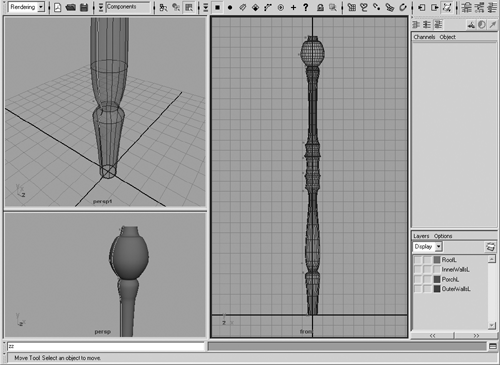 tip The extra views shown in Figure 6.4 are Shaded (persp panel) and X-Ray Wireframe on Shaded (persp1 panel). The X-Ray and Wireframe on Shaded view options are in Hotbox Shading Shade Options. The view must be in Shaded mode to see these options (hotkey: 5 ). These view options can help you see objects you're adjusting more clearly. -
Name the pole PorchPole , and save your scene as ch06tut01a . -
Next you need to position the pole on your porch. Display the OuterWallsL and PorchL layers in the Layer Editor below the Channel Box. Maximize the Front view. Move the pole so that it's 1 inch (one grid square) above the top of PorchFloor. To do this, press w to enter Move mode, and then press and hold x (for the grid snap) before clicking on the object to move it into position. Your movements will snap to the grid. -
Depending on the pole's size, you might need to scale it to fit. We used a height of 4 feet. Your grid is set to 1-inch divisions, so you could count them to scale to 4 feet, but there's an easier way to do it. The Distance tool creates a measuring tape with locators as movable endpoints that display the calculated distance. To use it, click Hotbox Create Measure Tools Distance Tool, and click and drag the tool in the Front view ( roughly placed; you'll fix it in the next step). The measurement should then be displayed (if it's not, make sure Show Dimensions for the current panel is active). Confirm that you are in Move mode (hotkey: w ), and then press and hold x while you click the first locator to the grid, 1 inch above PorchFloor. Move the other locator, with snap, to a point 48 units directly above the first locator. This gives you a guide as to how tall the pole should be. -
Now that you have a visible goal with the Distance tool, you can scale your PorchPole to the correct height. This scaling will be an approximate adjustment made in the viewport; in this case, close is close enough! Switch to Scale mode (hotkey: r ), and click and drag from the center (yellow box) of the Scale transform axis; the pole should scale uniformly upward because its pivot point is 0,0,0 (see Figure 6.5). If it doesn't scale uniformly, use the Channel Box (hotkey: Shift+C if it isn't already displayed), and change Scale X and Scale Z to match the adjusted Scale Y. When you've finished scaling the pole, delete all parts of the Distance tool. You'll find the distance dimension nodes in the Outliner (hotkey: Shift+O ) as locator1, locator2, and distanceDimension1. Figure 6.5. Scaling the pole to match a measured height. 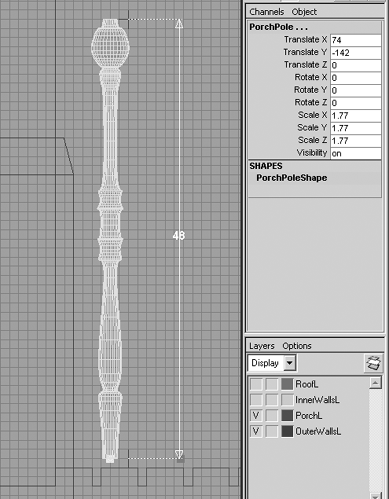 -
The PorchFloor currently looks like a corrugated panel hovering in the air, so you need to add a frame and some supports. To do that, you add some cubes around the porch floor and scale them to fit. Create a NURBS cube (Ctrl+z+LMB-click Cube), and name it PorchPanel . -
The PorchPanel cube is too small and not scaled the way you want. In the Channel Box, set Scale X to 68 , Scale Y to 4 , and Scale Z to 2 . -
Position the cube on the positive-Z axis side of the porch. Look at the Top view and the blue axis of the icon in the panel's lower-left corner. Press and hold x while moving the cube to snap its position to the grid. Use Figure 6.6 as a guide for placement. Figure 6.6. The positioned side frame for the porch. 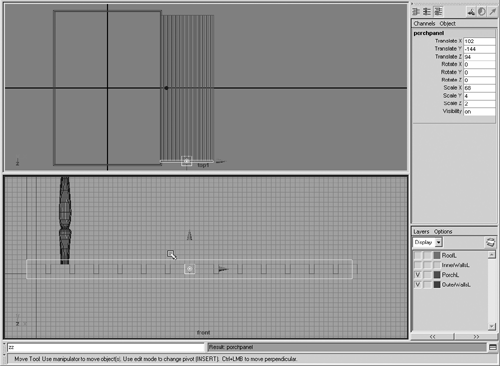 tip Sometimes it's helpful to view your scene in other panel layouts, such as in the scaling operation in the next step. With Maya's predefined layouts, you can easily switch to a two-view setup and have the Front and Top views stacked (Hotbox Panels Layout Two Panes Stacked ). After you display the new layout, you can switch what's in a viewport (Front, Side, and so on) by making the view active (hotkey: right-click over the panel), and then clicking and holding on the center AW in the Hotbox. A marking menu with the Orthographic and Perspective view options opens, where you select the view you want. note Remember: If you deselect a cube and want to select it again, you must first pick one of the sides and then select the top node in the group (press the up arrow). If the Outliner is open, you can avoid this step by selecting the cube by name. -
Switch the Top pane to Perspective view in Shaded mode so that you can easily select the two small planes at the ends of the stretched cube and delete them (you might need to temporarily hide the porch and wall layers to get at the face that touches the house foundation). The open-faced ends of the frame will be covered with vertical posts, so it's not a problem to delete both ends. -
Select the PorchPanel cube. Open the Duplicate Options dialog box (Edit Duplicate option box), reset its settings, and then click the Duplicate button. The copy will be directly on top of the original, so switch to the Move tool and translate it along the Z axis a few units. If you lose track of the duplicate, you can find it in the Outliner with the name PorchPanel1. -
Position the duplicated PorchPanel on the opposite end of the porch in the same manner as your original, using x to grid snap as you move it. The house is aligned to the X axis, so Translate Z is set to 94 for the duplicate because the original cube's Translate Z was set to 94 . tip When moving objects, the default is to move the object in world coordinates. This is a Move tool setting, adjusted by double-clicking the Move icon. You can use the Reset Tool button in the Tool Settings window if you need to reset the Move tool to its default settings. -
Duplicate PorchPanel one more time, and in the Channel Box, set Rotate Y to 90 . Move the new panel, PorchPanel2, to the front of the porch. Grid snap the pivot point to the bold X axis line in the Top view and then translate along the X axis until PorchPanel2 is directly in front of PorchFloor. It should not be overlapping, but there shouldn't be a gap. Scale the length of PorchPanel2 so that it meets the other two panels: Set Scale X to 190 , as shown in Figure 6.7. You can save your scene again as ch06tut01b.mb , as good practice for keeping a backup. If you want to compare your work to the book file, load the file noted below the CD icon from the CD-ROM.  Figure 6.7. The porch front railnow the porch is framed. 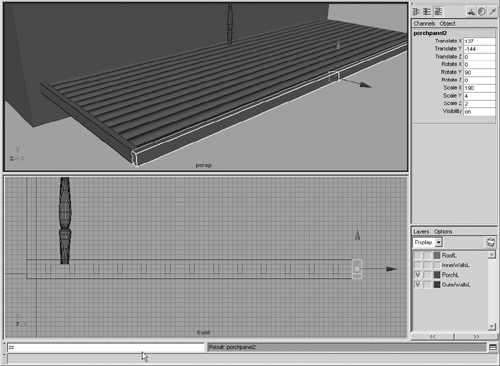 Tutorial: More Porch Details All the PorchPanels are created. The next thing you need to do is create the legs that hold the porch up. -
Switch back to the standard Four View mode (Hotbox Panels Saved Layouts Four View). Create another NURBS cube and name it PorchLeg . Set Scale X and Z to 6 and Scale Y to 20 .  -
In the Top view, move PorchLeg to the porch's lower-right corner. Snap it in position so that it's sitting on the corner, as shown in the Top view of Figure 6.8. In the Front view, move PorchLeg along the Y axis until its top is 3 inches above the porch (refer to the Front view of Figure 6.8). Make sure the bottom of the porch leg is even with the bottom of the house foundation. You can temporarily drag the leg right toward the house to check it, and then use Undo (hotkey: z ) to undo the movement. Figure 6.8. The porch leg after using the Rebuild Surface function. 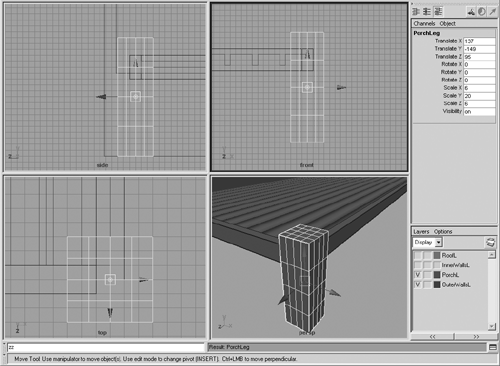 -
The porch leg is rather simple, so you'll modify some of its CVs to give it more complexity. If you switch to the CV Component Selection mode (hotkey: F9 ), you'll see that there are no CVs in the middle of the cube's surfaces to allow sculpting. However, the Rebuild Surface function enables you to change the options for a surface that's already created. First, make sure you're not in Component mode (hotkey: F8 to exit). Open the Rebuild Surface Options dialog box (Alt+z+LMB-click Rebuild option box) and reset the settings (Edit Reset Settings). To add more detail to the cube, you need to change its number of spans. The options Number of Spans U and Number of Spans V set the number of divisions on your surface. The default is 4, which works fine for your purposes. Select the 1 Linear radio button for both the Degree U and Degree V settings. Click the Rebuild button, and the cube changes to display more curves (and therefore more CVs) on its six planes, as shown in Figure 6.8. -
Switch back to the CV Component Selection mode (hotkey: F9 ), and scale or position the top three rows of CVs, as shown in Figure 6.9, to make the porch leg look like a carved pole. Use the Front and Top views and turn on the Status Line so that you can limit component selections to points onlythe far-left selection mask button (see Figure 6.9). Figure 6.9. The modified porch leg. 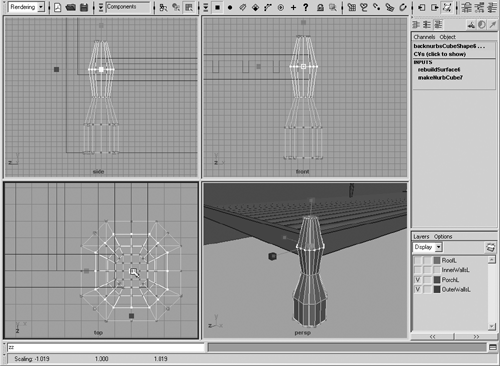 trap It is easiest to deform the post by selecting horizontal rows of CVs in the Front view, and then scaling them to a new size. If you select more than one row of CVs to scale, you can accidentally adjust their height in Y because the Scale function bases its pivot on the center of the selection. If the position of the bottom row of CVs is adjusted in Y, it will no longer match the base of the foundation, so it's best to select and edit single rows of CVs only. -
Next you need to duplicate the porch leg and make four copies: Open the Duplicate Options dialog box (Hotbox Duplicate option box), change the Translate Z setting to 47 , and enter 4 in the Number of Copies text box. Click the Apply button, and four copies of the leg will be created, lining up evenly along the edge of PorchFloor (see Figure 6.10). Notice that the dialog box stays open; that's because in Maya, the Apply button performs the function without closing the dialog box. Reset the Duplicate Options dialog box (Edit Reset Settings) so that future duplications create a single copy, and close the dialog box. Figure 6.10. The duplicated porch legs in place. 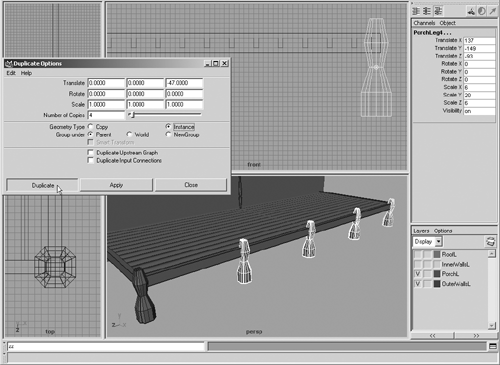 -
You need to duplicate and position two more porch legs. Select and duplicate the original PorchLeg (hotkey: Ctrl+d ). Measuring the distance from Foundation to the edge of the porch leg yields 64 inches, and you want to position a porch leg in the center of the Foundation and PorchLeg. Make sure the PorchLeg you just created is still selected, and in the Channel Box, click in the box for the Translate X value. The entire value should turn blue, and when you begin typing, the current value disappears. Type in -=32 , and then press Enter. The current value will be decremented by 32 to equal 105. These relative-value entry functions work in any variable. You can use -=, +=, /=, and *= for the different math functions. -
Repeat Step 6 on the other corner post. -
In the Top and Front views, move and snap the PorchPole directly on top of one of the legs. Duplicate (hotkey: Ctrl+d ) the PorchPole and snap-move (press and hold x before moving the pole) to place a pole on top of each leg, as shown in Figure 6.11. Figure 6.11. All poles positioned. 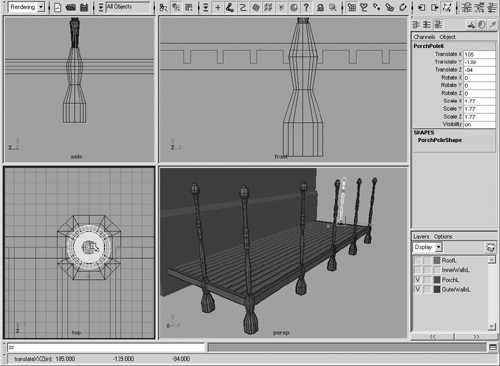 -
To complete the railing, you need to create the handrails. Create a NURBS cube (Ctrl+z+LMB-click Cube), and size it as follows : Scale X to 36 , Scale Y to 1 , and Scale Z to 4 . Move it over to the porch area by setting Translate X to 86 , Translate Y to -97.5 , and Translate Z to 94 . Name the cube HandRail . You'll now put HandRail objects between the two leftmost poles of the porch and the front of the house. -
Adjust the railing width (Scale X) so that it fits with the PorchPoles. Scale and move the cube so that it's between the house and the left rear pole, as shown in Figure 6.12. When placing the HandRail between the house and the pole, avoid letting the edge of the HandRail penetrate the walls. Figure 6.12. The HandRail after modifying CVs; now it's a sculpted board. 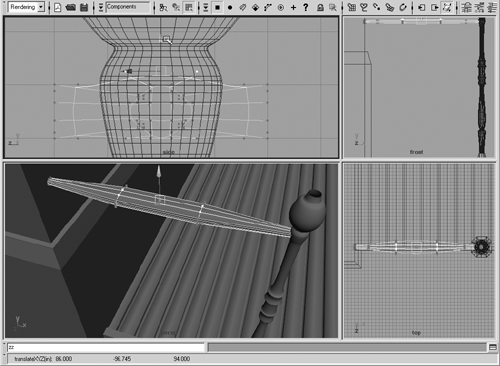 -
To add some detail to the HandRail, again start by rebuilding the surface for more CVs. Select the HandRail object, and in the Rebuild Surface Options dialog box (Alt+z Rebuild option box), select the 3 Cubic radio button for both the Degree U and Degree V settings, and reduce the number of spans to 3. These settings create more CVs to give you more control over the shape and also change the degree so that the cube adds roundness between CVs. Move the CVs to create boards that flare out in the middle, as shown in Figure 6.12. Also, pull the handrail's end CVs slightly so that the end of the HandRail fully intersects the pole, almost to the center (see the Top view in Figure 6.12). -
Duplicate the HandRail and move it along the Y axis until it's about 8 inches from the PorchFloor. An easy method is to put the HandRail on the porch floor, and then enter +=8 for Translate Y in the Channel Box. -
Shift-select the two handrails and duplicate them. Then move them along the X axis until they are between the next two poles. Scale the new rails as necessary to fit them between the poles (we set Scale X to 31 ). You might need to select the CVs on one side and pull them along the X axis. -
Duplicate one of the handrails to serve as a vertical slat. Change the duplicate's Rotate Z to 90 , and rename it as RailBar . Adjust Scale X and move the RailBar in Z so that it neatly intersects both top and bottom HandRails, as shown in Figure 6.13. Place the RailBar at the side of the house. We set Translate X to 68 , Translate Y to -116.5 , and Translate Z to 94 . Now move the RailBar out exactly 7 inches by typing +=7 for the Translate X value in the Channel Box (see Figure 6.13). Press Enter to finish the calculation and move the rail into place. Figure 6.13. The RailBar just before repositioning in X. 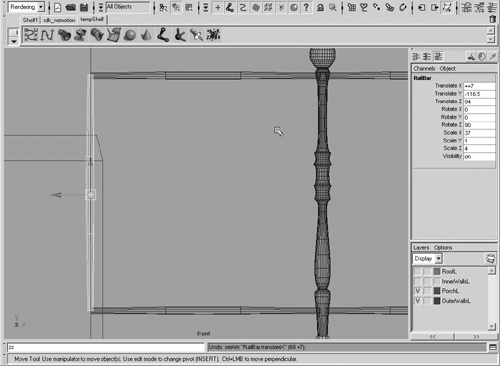 -
Duplicate the RailBar (hotkey: Ctrl+d ) and move it by typing +=8 for the Translate X value in the Channel Box. Duplicate the new RailBar and move it eight more units, and then repeat once more. Your settings might not be exactly the same, but the objective is. Try to evenly space the four RailBars between the pole and the side of the house (see Figure 6.14). Between the two side poles, position a duplicated RailBar and copy it twice with similar spacing as before. This gives you three bars between poles and four bars between the house and the pole, as shown in Figure 6.14. Figure 6.14. Seven vertical RailBars more or less evenly spaced . 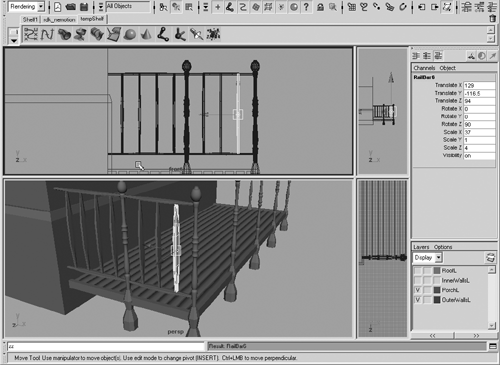 -
Now with all the RailBars positioned on the left side of the porch, you can select all the HandRails and RailBars and duplicate them to the opposite side of the porch. An easy way to select them is to open the Outliner and Ctrl-click to select the 11 objects that start with HandRail or RailBar. You can also select them by Shift-clicking on a single side of each cube object, and then pressing the up arrow so that each selected side becomes the complete selected object. Shift-select anything you missed, press the up arrow again if necessary to include all parts of all cube objects, and then duplicate the objects with Ctrl+d. In the Channel Box, change Translate Z from a positive to a negative value (for example, from 94 to 94), and the instance-duplicated rails will move to the opposite side of the porch, as shown in Figure 6.15. Figure 6.15. The handrails and railbars from one side of the porch have been duplicated and placed on the opposite side. 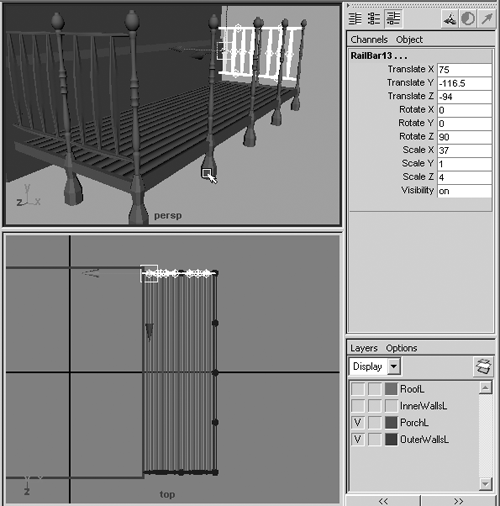 -
Next, you need to place rails along the front of the porch. Shift-select a pair of HandRailsa bottom and a top. Press the up arrow to make sure you have the complete objects. Duplicate them and rotate them on the Y axis by 90 you can do that in the Channel Box while both objects are still selected. -
Position the duplicated HandRails between two of the poles at the front of the porch, and scale them to fit. We set Translate X to 137 , Translate Y to 97.5 , and Translate Z to 71 . Scale X was set to 46 so that the rails would reach from pole to pole. -
Duplicate a vertical RailBar, and change its Rotate X setting to 90 . Position the duplicated RailBar at the center of the corner post, and enter -=8 for Translate Z. Your first RailBar on the front was positioned at Translate X 137 , Translate Y -116.5 , and Translate Z 86 . Next, duplicate the RailBar four times by using the Duplicate Options dialog box, setting Translate Z to 8 and Number of Copies to 4 (see Figure 6.16). Figure 6.16. First railbar selected, showing the Channel Box settings. The duplication to fill in the rest of the gap has already been performed. 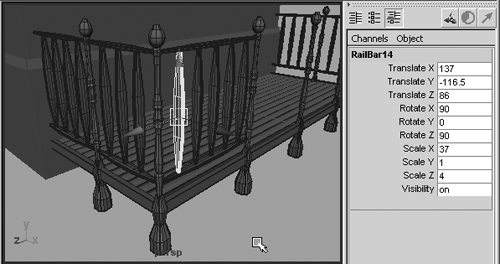 note We've used the Wireframe on Shaded mode for clarity in some of the figures. To enable this mode, choose Shading Shade Options Wireframe on Shaded on the menu. -
Having completed one section of the front rails, you'll fill the next two gaps similarly. The last gap will be left open for the porch entrance . Shift-select a portion of each RailBar and HandRail of the just-completed sectiona top, a bottom, and five vertical rails. Press the up arrow to select the entire cube object for each piece. Duplicate the selection, and move it to the next set of poles. Position them accordingly , and repeat once more (see Figure 6.17). Figure 6.17. At this point, all the rails are in place.  -
Hide all the layers in your scene by clicking the V next to each layer in the Layer Editor. Drag and select all the poles, handrails, and bars. Group them together (hotkey: Ctrl+g ), and name the group PorchRailings . With the group still selected, Shift-select the remaining PorchPanels and PorchLegs, and assign them to the PorchL layer.  -
Save your scene again (hotkey: Ctrl+s ). Tutorial: Creating the Stairs Now that you have finished the porch, you can make some stairs to lead up to it. You'll do it like a carpenter two side supports and two stairs. -
Display the PorchL layer. Switch to the Front view and activate the EP Curve tool (Ctrl+c+LMB-click EP Curve option box). Set the Curve Degree to 1 Linear.  -
Snap the first edit point so that it's 3 inches lower than and 3 inches to the right of the PorchPanelsthe position of the x in Figure 6.18. Place another point 2 inches above the first. Start grid snapping the next edit point 8 inches across and the next edit point 6 inches down. Create another step 8 inches over and 6 inches down, and you should be at the horizontal level of the PorchLeg. Then place a point 4 inches to the left. Snap the last point to the starting point, as shown in Figure 6.18. Press Enter after placing the last point to close and complete the shape. Center the pivot point on the curve (Hotbox Modify Center Pivot). Figure 6.18. The last point has been placed for the stairs' support curve. 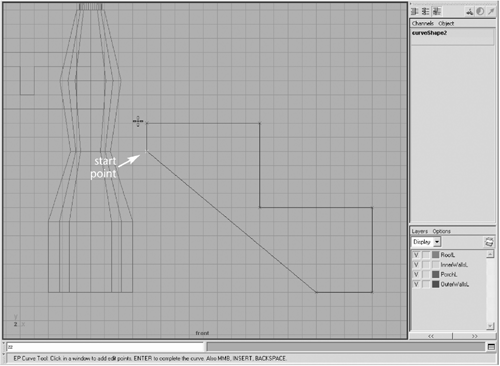 -
Switch to the Side view, and move the curve in front of the gap in the porch at the front, as shown in the Side view in Figure 6.19. Be sure not to move the curve in the Y direction because you already have it aligned correctly on that axis. Next, you'll zero the transforms by using the Freeze Transformations command, which leaves the object in place but resets all the transform values. Freeze the transformations for the curve with Hotbox Modify Freeze Transformations. Figure 6.19. The CV curve has been lofted and a front face has been put on the loft. 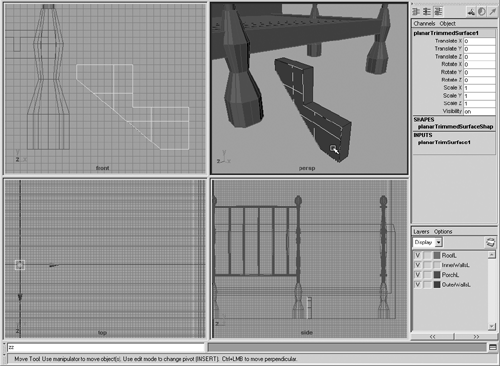 -
Open the Duplicate Options dialog box, and reset the settings. Duplicate (hotkey: Ctrl+d ) the curve, and then set Translate Z to 2 in the Channel Box. -
Select both curves and loft them together (Ctrl+Alt+z+LMB-click Loft) to create a surface between the two curves. -
Select one of the curves and apply a planar trim (Ctrl+Alt+z Planar option box). In the Planar Options dialog box, reset the settings, and change the Degree to Linear. Click the Planar Trim button. This creates a trimmed flat surface with the boundary as the curve, as shown in Figure 6.19. -
Select the curve on the other side and create another planar surface. Now the stair support object is complete. -
To delete the history for the curves, trims, and loft, marquee-select them all and then click Hotbox Edit Delete by Type History. With all parts still selected, group them together (hotkey: Ctrl+g ), and name the group StepFrame . Now delete the original curves you used to create the loft and trims by Shift-selecting them and pressing Delete. (You can also use the Outliner: Expand the group listing in the Outliner to see the curves that are part of the group, and then select and delete them.) -
For StepFrame, change Translate X to 3 so that it's touching the front of the porch panel. -
Duplicate StepFrame and translate it along the Z axis until it's next to the PorchLeg on the other side of the opening at the front of the porch, as shown in the side view of Figure 6.20. We set Translate Z for the StepFrame1 duplicate to 37 , but your value could vary because you're placing the step supports by "eyeballing" them. Figure 6.20. Positioning the step. 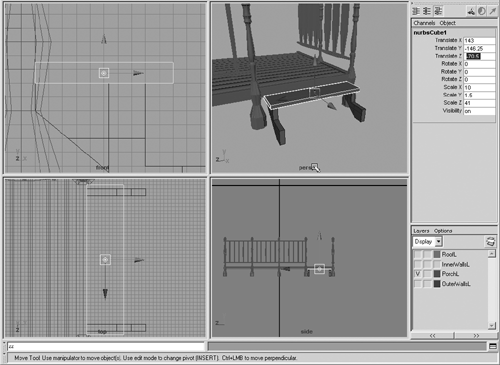 -
Create a cube and name it Step . -
Next, you'll scale and place the step on top of StepFrame. Set Scale X to 10 , Scale Y to 1.5 , and Scale Z to 41 . Maximize the Front view (hold the mouse cursor over it and tap the spacebar), and set Translate X to 143 so that the step lines up with the edge of StepFrame and PorchPanel. Then set Translate Y to 146.25 so that the step is positioned on top of StepFrame. -
In the Side view, center the step on StepFrame by setting Translate Z to 70.5 (see Figure 6.20). -
Duplicate Step and place it on the next edge down. We used the following settings: Translate X to 151 and Translate Y to 152.25 . -
Add the Steps and StepFrame to your PorchL layer. Then open the Outliner and select all the surfaces in PorchL and group them together (hotkey: Ctrl+g ). This will make your scene a lot easier to work with in the Outliner. Name the group PorchGroup . -
Save your scene again (hotkey: Ctrl+s ).  Building a Chimney for the House Next you'll add a chimney to the shack. You'll create it by editing a NURBS cube in some new ways. Tutorial: Creating the Chimney The porch is complete, but the house needs more detailing, so next you'll add a chimney to the back of the house. -
Hide the layer PorchL. Make all other layers visible except for RoofL.  -
Create a NURBS cube (Ctrl+z+LMB-click Cube), and name it Chimney . -
To move the cube behind the house, set Translate Y to 89 and Translate X to 100 . -
Make the cube the rough proportions of the chimney: Set Scale X to 40 , Scale Y to 140 , and Scale Z to 40 . -
Now you're going to move the pivot point to the chimney base. With the cube selected, switch to the Move tool (hotkey: w ), and press Insert on your keyboard. The manipulator handles will no longer have arrows on their ends, which indicates you're in Pivot Editing mode. In the Front view, click and drag the pivot to the bottom of the chimney, grid snapping (hotkey: x ) it near the center of the base. Press Insert again, after you have positioned the pivot, to get out of Pivot Editing mode. -
The chimney doesn't reach the roof, so you need to scale it more along the Y axis. Instead of changing the values in the Channel Box, switch to the Scale tool (hotkey: r ), and drag the green Y axis handle up. Notice that the chimney now scales in Y from the base upward. This is caused by moving the pivot pointthe object scales from the pivot point. Set Scale Y to 225 so that the chimney is about a foot or two above the roof. tip Depending on where you want an object to rotate or scale from, you might find it helpful to repeatedly reposition the object's pivot point. -
The Chimney cube is fairly rough, so you need to modify its shape to look more like a real chimney. There are not enough CVs on the cube, so open the Rebuild Surface Options dialog box (Alt+z+LMB-click Rebuild option box). Change the Number of Spans U to 6 and the Number of Spans V to 6 . Check to make sure the 3 cubic radio button is selected for both Degree U and Degree V, as shown in Figure 6.21, and click the Rebuild button. There should now be enough curves to modify the chimney. The chimney is made cubic so that we can bend it in a later tutorial. Figure 6.21. Adding more divisions to the Chimney cube. 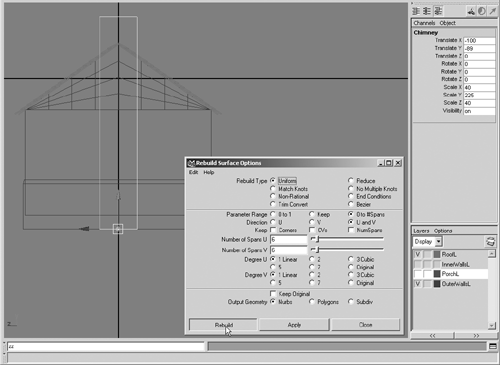 -
Delete the cube's top and bottom planes. You don't need the bottom plane because it's not going to be visible, and you will change the top of the chimney later. It's easier to select these parts if you use the Perspective view in Shaded mode. In Shaded mode, you can click anywhere on a surface to select it; in Wireframe mode, you must select the edge of an object. -
Make sure the entire chimney is selected by selecting a side and pressing the up arrow. The Channel Box displays "Chimney" when the entire object is selected. Switch to CV Component Selection mode (hotkey: F9 ). In the Side view, marquee-select the bottom three rows of CVs. Increase Scale Z for the CVs by moving the blue modifier handle. You can see the Scale factor in Maya's Help Line; a Scale Z of about 2 should work. -
Next, select the row of CVs above the first three rows you just modified (see Figure 6.22). Move this row along the -Y axis about a foot (12 units), down toward the base of the chimney (shown in progress in Figure 6.22). Figure 6.22. Editing the chimney CVs to make a steeper angle. 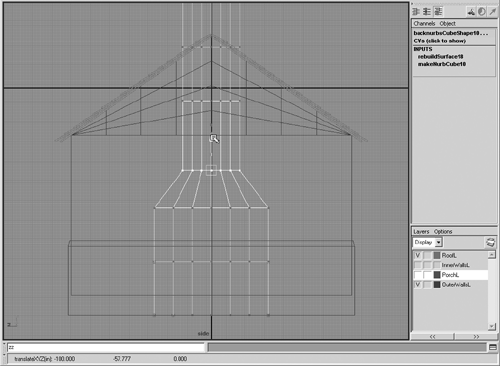 -
In the Front view, select the back column of the first three rows of CVs. Move them along X by about 8 inches, as shown in Figure 6.23. Figure 6.23. Pulling out the rear of the chimney. 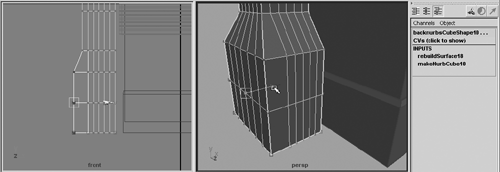 -
Select the top row of CVs and uniformly scale them down; aim for about 3 to 4 inches of reduction to make a chimney that narrows in at the top. Exit Component Selection mode (hotkey: F8 ). -
Create a layer, name it ChimneyL , and assign the Chimney cube to the layer. -
Translate the chimney so that the end facing the house is about 6 inches inside the inner wall; to do that, change Translate X in the Channel Box to 82 . -
Open the Outliner, select all the geometry in your scene, and delete the history (Hotbox Edit Delete All by Type History).  Tutorial: Intersecting the Chimney and Back Walls Now you'll use more projection curves to cut holes in the walls so that the chimney pokes through. -
To trim off the part of the house walls that overlap the chimney, first hide the RoofL layer. Select the back outer and inner walls that are going through the chimney, and then Shift-select one of the two chimney sides that's penetrating the walls (not the flat side, but the two sides with the angled kink in them).  -
You need to intersect these surfaces so that you can trim them (Alt+z+LMB-click Intersect Surfaces option box). In the Intersect Surfaces Options dialog box, change the Create Curves option to First Surface, and click the Intersect button. Curves have now been created on both of the back walls, exactly where they intersect with the chimney, as shown in Figure 6.24. Select the two back walls again, select the other side of the chimney, and intersect them again. Figure 6.24. The two lines created on the inner and outer walls by the intersect.  -
Select the outside back wall. With the intersections defined, you can now perform a trim (Alt+z+LMB-click Trim Tool). A white grid should appear; if not, click on the back wall. This grid defines areas that can be trimmed, with bold white lines tracing the outline of the chimney. note The Trim tool works by letting you select surfaces to keep, and then discarding the surfaces that aren't selected when you complete the trim by pressing Enter. The trim relies on curves that completely intersect the surface and divide it into parts. -
Click on the wall on one side of the chimney. A yellow diamond appears, indicating your selection of the area you want to keep. Click on the wall on the other side of the chimney. Another diamond should be placed where you click, as shown in Figure 6.25. Notice that the original diamond turns blue. Press Enter to delete the center section that's not selected. Next, select the inside wall and trim it the same way. The walls have now been trimmed from the chimney. You're cutting away only the wall because the chimney will have an inside opening for the hearth; the roof and floor intersect the chimney, but in places that won't be seen in the animation. Figure 6.25. The Trim tool, with surfaces selected to keep. 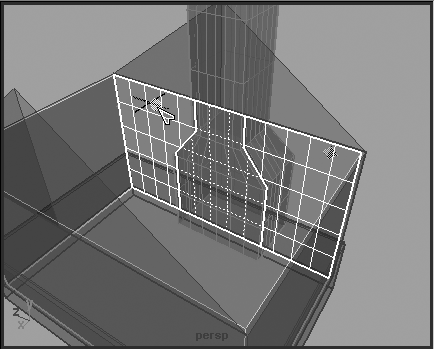 -
To trim the Foundation, select the back wall of the foundation, which is a single piece because you attached the surfaces when you finished building the foundation. Shift-select one of the sides of the chimney, just as you did for the back wall. Intersect those surfaces, and then repeat for the other side of the chimney. This creates the trim lines. -
Trim the foundation with the Trim tool. Select the two sides of the foundation to keep, and the center piece should be deleted when you complete the trim by pressing Enter (see Figure 6.26). Figure 6.26. The inserted chimney with completed holes cut for the inner and outer walls and the foundation. 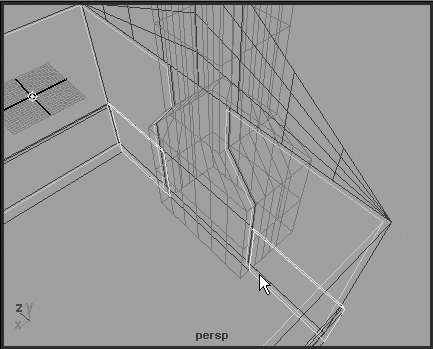 -
Save your scene as ch06tut05a.mb . It's a good idea to do occasional saves to back up your work and also so that you can revert to an earlier stage of the project, if necessary. That's why you change the filename with each save.  Tutorial: Tweaking the Chimney With the chimney created and inserted into your house, you'll add some more detail to it in this tutorial. First, you'll create a lip at the top of the chimney by putting some target rectangles above the chimney peak, and then tell the chimney to simply loft through these new shapes . You'll need four squares to do thisthe outer lip requires two squares, and the inner lip requires two squares. -
Hide all your layers except for ChimneyL.  -
Create a NURBS square (Ctrl+z+LMB-click Square). Set its Translate X to 82 to center it on the chimney, and its Translate Y to 66 to put it at the top point of the chimney. Scale the square so that it is about 2 inches outside the edges of the chimney top. Because the top of the chimney was tapered in, setting Scale X and Scale Z to 40 should be about right. -
Duplicate the square and translate it along the Y axis (above the chimney) by 4 inches. tip Much as the NURBS cube object is made of six planes, the NURBS square is made of four curves. You must select part of the object and press the up arrow to select the entire object. -
Duplicate the top square and set X and Y scale to 30 in the Channel Box so that it's smaller than the top inlet of the chimney. Next, duplicate that square and move it down the Y axis by 4 inches. With your four squares created, you are ready to create surfaces. You will loft four times to create the completed lip. For each side, you'll loft from the top line of the chimney to each of the four lines. -
First, you need to pick the top isoparm on one of the chimney's sides: Select a chimney side, right-click on it, and then choose Isoparm. Now you can pick the top isoparm line of the chimney. Shift-select each of the parallel curves of the squares for that side of the chimney. Be sure to follow the intended order of the curves' creation: lower outer, upper outer, upper inner, lower inner (the Perspective view in Figure 6.27 illustrates this order and how you are creating the lip starting at the top of the chimney). Then loft by clicking Ctrl+Alt+z +LMB-click Loft option box, setting the Surface Degree to Linear in the Loft Options dialog box, and then clicking the Loft button. You should see the new surface, as shown in Figure 6.27. Repeat on each side of the chimney. Figure 6.27. One of the four sides is now lofted. The four rectangles used to create the lip are visible. 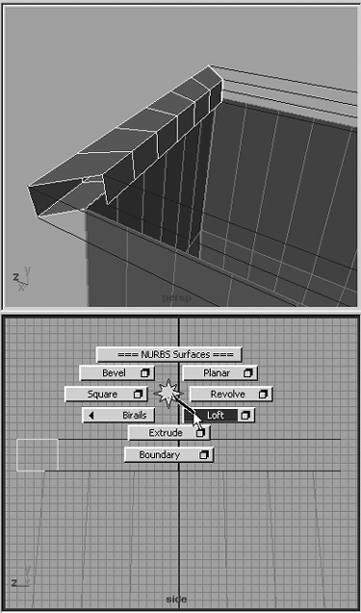 -
Now you'll attach the four sides of the chimney lip together. Connecting the first two is easy. Select one lofted section and Shift-select a piece next to it. Attach them together with Alt+z+LMB-click Attach option box. In the Attach Options dialog box, make sure the Attach Method is Connect, Multiple Knots are set to Keep, and Keep Originals is unchecked. Click the Attach button, and the two lofted surfaces should become one. -
For the other lofts, you need to select an isoparm for each part to attach them. The isoparms must be touchingthat is, positioned at the joint of the two pieces. First, select the newly attached surfaces if they aren't currently selected, and then right-click and choose Isoparm. Now you can select an isoparm on the surface and drag it to the edge that will be connected. Shift-select an adjacent loft, right-click again, choose Isoparm, and then Shift-select an isoparm on this object and drag it to the connecting edge, as shown in Figure 6.28. Because selections aren't included in the remembered commands, attach the surfaces by repeating the last command (hotkey: g ). Repeat these steps to attach the last lofted piece. Now the lip is a single object. Figure 6.28. All four lips are lofted and the last piece is about to be attached. The isoparm for one loft is in place, and the other is being dragged into position. 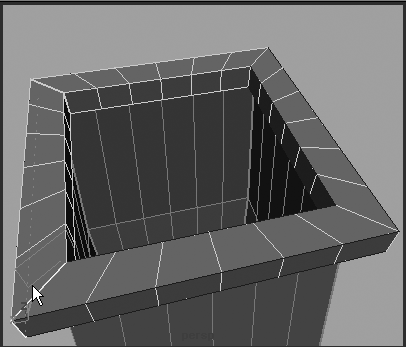 -
Next, create a NURBS cylinder (Ctrl+z+LMB-click Cylinder option box, reset the settings, and click the Create button). Name it ChimneyPipe , and set Scale X and Z to 8.5 and Scale Y to 14 . Move the cylinder to the center of the chimney's top edges, just as you did with the square in Step 2. We used 82 , 80 , and for Translate X, Y, and Z. -
Align the bottom of the cylinder to the bottom of the lip. You can move with grid snapping on (press and hold x ) to make it easier (see Figure 6.29). Figure 6.29. A cylinder being placed in the middle of the chimney's top. Grid snapping while observing the red and blue transform handles makes placement easier.  -
To create a planar surface between the cylinder and the lofts, select the bottom isoparm of the cylinder by selecting the cylinder, right-clicking, and choosing Isoparm, and then selecting or click-dragging to get the yellow isoparm at the bottom of the cylinder. Next, you need the other shape to connect to. Shift-select the bottom inner rectangle. Only one side turns green, so press the up arrow to get the entire rectangle, and the cylinder's isoparm remains selected. You might find it easier to select the rectangle in the Outliner. Next, open the Planar Trim Options dialog box (Ctrl+Alt+z Planar option box). Reset the settings, and click the Planar Trim button. Because you used snapping when placing the cylinder, it should be flush with the lip's lower inner edge, and the planar operation will produce a flat surface between the cylinder base and the rectangle (see Figure 6.30). Figure 6.30. The marking menu that created the planar trim. 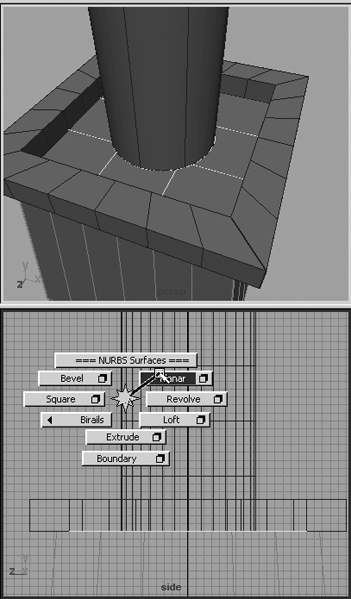 trap If the operation did not work, it's probably because the two selected edges aren't planar with each other. Even though they looked like they were, they must be exact. Move the cylinder's pivot point to its base, snapping it to its own bottom curve (hotkey: c ), and then moving the manipulator onto the curve. You will know it's snapped when the manipulator slides back and forth perfectly on the bottom of the cylinder. Now snap the cylinder base to the same grid point as the edge of your loft. If the loft edge isn't exactly at a grid point, you can select the last curve you made for your loft and snap it to the same grid point as the bottom of the cylinder. Now try to perform the planar trim. If it doesn't work, it's probably because the curves still aren't planar; some of the points might have been moved out of position. -
You've finished detailing the chimney for now. Zoom one of the viewports out (hotkey: a for Frame All), and marquee-select the entire chimney. Press the up arrow to select all the parentsthe top transforms of the squares, cubes, and groups. With everything selected, delete the history (Hotbox Edit Delete by Type History). Assign all the new chimney parts to the ChimneyL layer: Open the Outliner and select all the new parts you created, and then MMB-drag their names in the Outliner onto the item named Chimney. -
Save your scene (hotkey: Ctrl+s ).  Going Further If you'd like to practice your skills more and experiment with other tools, try adding more features to your house, such as trim on the side of the house. It's amazing how those small touches can make your scene look more complex. | Adding More Elements to Your House The last details you'll add to the house are a door and some windows . In addition to modeling these objects, you'll need to create openings so that they can open and close. Tutorial: Making a Door Opening Before making the actual door, you'll make an opening that determines the door's size. -
Create a NURBS cube (Ctrl+z+LMB-click Cube). In the Channel Box, set Scale X, Y, and Z to 13 , 96 , and 48 . Move and position the cube so that it penetrates the inner wall, outer wall, and foundation; in relation to the house, it should be next to the gap in the porch railings. We used 68 , 94 , and 67 for Translate X, Y, and Z.  -
When you have your cube positioned, perform the Intersect Surfaces function on all its sides with the foundation and walls: First, select the inner walls, and then Shift-select the outer walls and the side of the foundation that runs through the cube. Next, Shift-select one of the cube's four sides that's going through the walls and foundation, and intersect them (Alt+z+LMB-click Intersect Surfaces option box). In the Intersect Surfaces Options dialog box, select the Both Surfaces radio button next to Create Curves. Click the Intersect button to create the six curvesone on each surface for each of the three lines, as shown in Figure 6.31. Repeat this process, selecting a different side of the cube each time, until you have gone all the way around it. To select the bottom part of the door, you might need to hide the PorchL layer. Figure 6.31. Shaded view in X-Ray mode to view the three curves created with the intersect. 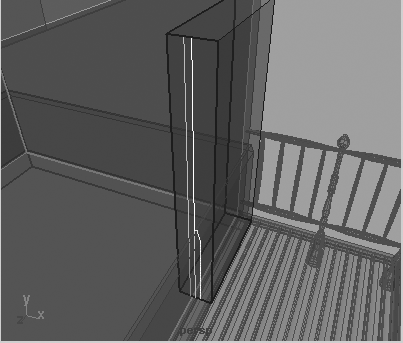 -
Next, trim the cube from the foundation and walls: Select the foundation, and then use the Trim tool (Alt+z+LMB-click Trim). Click on the foundation side that's near but not inside the door, and press Enter. The section of the foundation that had the intersecting cube should now be gone. Trim one of the walls now, repeating the process you used for the side of the foundation. When you select the outer wall, it will have a horizontal split caused by the intersection created when you added the foundation. So for this object, select the top and bottom half to keep them before pressing Enter to perform the trim of the door hole. -
The doorway for your door is now trimmed out. Select the front and back planes of the cube and delete them (see Figure 6.32). You now have an entrance to the house! Figure 6.32. The inner and outer walls and foundation have been trimmed, and the front and back of the door hole intersection cube have been deleted. 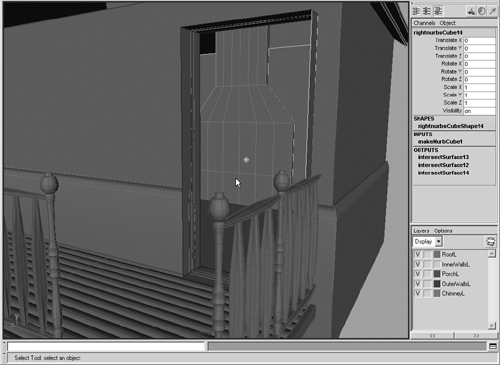 -
The sides of your cube are sticking out of the walls, but we knew that would happenthat's why you had the intersection create curves on both surfaces. With all the curves on the cutting cube, you can trim the edges and cap the openings of the door hole. Before you trim it, open the Trim Tool Options dialog box (Alt+z+ LMB-click Trim option box), and change Selected State to Discard. Now the selected items are the ones that are discarded, which makes it easier to trim the sides because there are many pieces to keep. Click the Close button. -
Click one of the sides you want to trim. Click on each side that's extruding from the wall, placing a diamond on it to signify its selection. Press Enter and watch the sides trim away. Repeat for each of the four sides. -
Hide all the layers when you're finished, and you will see some surfaces left behind. They are the remains of the cube, which is now your perfectly cut-out door frame. Add them to the OuterWallsL layer by selecting the remaining surfaces, right-clicking on the OuterWallsL layer, and choosing Add Selected Objects.  note If the surface looks like it has holes in it after a trim, select the surface and increase its display detail level to maximum by pressing 3 .
Tutorial: Making a Door Now it's time to create the actual door. The easiest method is to create a cube and use it as the door. You can then project curves on the door, trim it, and add detail to it. -
Create a NURBS cube, and set Scale X, Y, and Z to 2 , 96 , and 48 to match the door frame cutting object created earlier. Name the object Door .  -
Center the door in the door frame you made earlier. Translate X, Y, and Z are set to 67 , 94 , and 67 . Reduce the size a little so that Scale Y is 95.5 and Scale Z is 47.5 ; this creates a small gap for the door. -
Create a layer and name it DoorL . Make sure the entire door remains selected. Add the door you just created to this layer by right-clicking on the layer and choosing Add Selected Objects on the shortcut menu. Toggle the visibility for this layer to off. -
To create the doorknob, you'll create the profile curve for it and then revolve a surface around it. Use the CV Curve Tool for the creation (Ctrl+c CV Curve option box). In the dialog box, be sure to set the Curve Degree to 3 Cubic so that you can make curved lines. Use the Front view to draw the profile. If you want to make a hard corner, place three sequential points in the same place. If you want a softer corner, put two sequential points in the same place. Use Figure 6.33 as a guide for drawing your doorknob profile. After you've created the curve, center the pivot point (Hotbox Modify Center Pivot). To move the pivot to the base of the doorknob (where it will attach to the door), press Insert to toggle the pivot adjustment, and then snap-move the pivot to the rear center point (see Figure 6.33). This sets the start point for the revolve axis. Don't forget to exit Pivot Editing mode by pressing Insertit might be confusing if you can't see the pivot manipulator because nothing will seem to react to your selections and moves in the panels. Figure 6.33. A doorknob profile, ready to revolve. 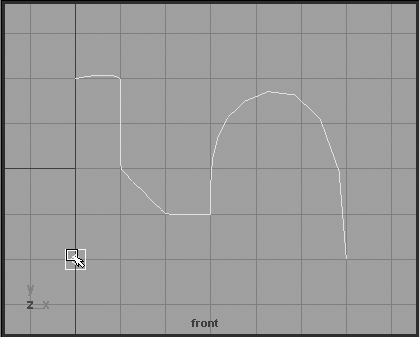 -
With the curve selected, perform a revolve on the surface (Ctrl+Alt+z Revolve). The surface revolves and creates an unexpected shape, however, because it revolved the curve along the wrong axis. You can change the axis by modifying the revolve input because you have history enabled. In the Channel Box under Inputs, in the Revolve section, change Axis Y to and then set Axis X to 1 to correct which axis the curve revolves along. -
Tweak the source profile curve, if you like, to get the revolved doorknob looking the way you want. The revolved surface will react immediately to changes in the curve. Set the pivot for the surface to the center rear of the doorknob, as shown in Figure 6.34. Figure 6.34. The doorknob shown in maximum detail in the Shaded view. 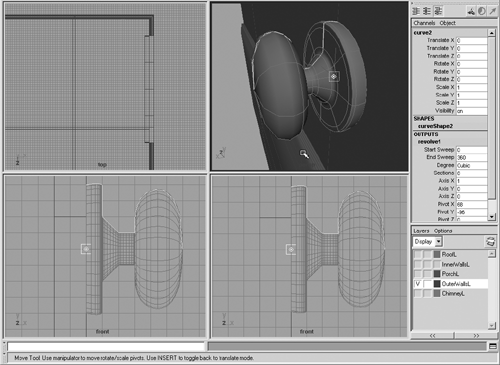 -
Name the doorknob surface DoorKnob . -
Display the DoorL layer and position the handle on the door. You might need to scale the DoorKnob so that it's proportional to the rest of the door. When it's in position, delete the doorknob's history as before. -
Duplicate the doorknob and place it on the opposite side of the door. Simply change Scale X to a negative equal value, and then move the doorknob into position. Now the door has doorknobs on both sides. -
Select all the parts of the door in the Outliner. Group them together (hotkey: Ctrl+g ), and name the group Door . Add the door and doorknob to the DoorL layer, and delete the doorknob's profile curve. -
Next, you want to change the position of the door's pivot so that it can rotate from the point where a hinge would be. First, hide all layers but the DoorL layer. Next, select the Door group and press Insert to adjust the pivot. The transform gizmo changes, indicating Pivot mode. -
Switch to Perspective view and zoom close to the door's front corner. Now you'll snap-place the pivot directly to the door's lower-right front edge, using Snap to Curves (hotkey: c ). While still in Pivot Editing mode, press and hold c, and then MMB-click and hold on one edge of the door. The pivot snaps to the edge. While still holding the MMB, drag to the corner point, as shown in Figure 6.35. Press Insert to get out of Pivot Editing mode. Now you can rotate (hotkey: e ; use the red circle to rotate constrained to the Y axis) the door. It should hinge as expected and take the knobs with it.  Figure 6.35. Curve-snapping works by holding down c, MMB-clicking on a curve, and then dragging along the curve. 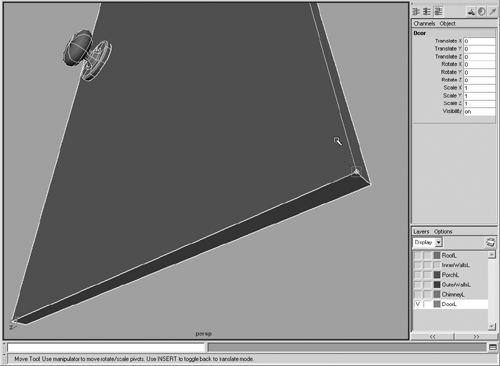 Tutorial: Making Windows The last major stage of modeling your NURBS house is making some windows. You'll create the window frame by making a window frame profile curve (like the profile of wood molding) and then lofting it around a rectangle. Adding dividers and a glass pane are then a simple matter of sizing cube objects. -
Hide all layers except for InnerWallsL and OuterWallsL. Switch to the Front view so that you can see the side of your house. Create a NURBS square (Ctrl+z Square). Next, set Rotate X to 90 , Scale X to 48 , and Scale Z to 36 (see Figure 6.36). Move the square along the -Z axis in the Top view so that it's outside the walls.  Figure 6.36. The window's shape, placed on one side of the house. 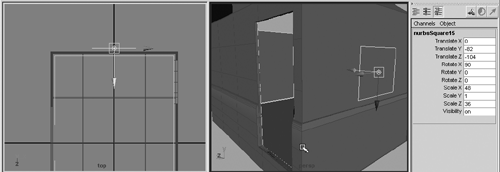 -
In the Top view, create a profile curve for the window that you will loft to create the frame. Use the EP Curve tool with the Curve Degree set to 1 Linear. Draw a frame profile like the one shown in Figure 6.37 by using snapping. Figure 6.37. The window frame profile shape. 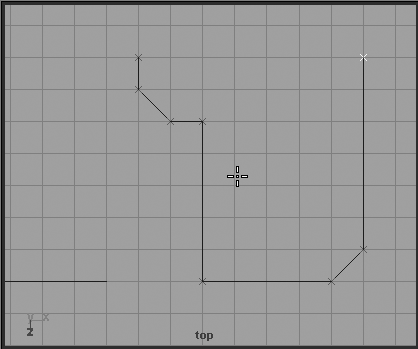 -
Center the pivot for the new curve. Move the curve to the base of the square next to the lower-right corner using curve snap (hold down c , then MMB-click on the rectangle shape, and drag to a corner). You are going to rotate the curve by 45 degrees and duplicate it around the square. The small leg piece of the L-shaped curve should face inward, as shown in Figure 6.38. You are creating corner curves to loft around the square, making the frame for the window. Duplicate, move, and rotate each curve to the separate corners of the square. Figure 6.38. Four window frame profile shapes positioned at the four corners of the rectangle.  -
Now select each of the four curves in sequence. Open the Loft Options dialog box (Ctrl+Alt+z Loft option box), and reset the settings. Set Surface Degree to Linear, and select the Close check box. Then click the Loft button, and the window should appear, as shown in Figure 6.39. Figure 6.39. The lofted window.  -
You can add detail to the window frame with a vertical and horizontal divider. Create a cube and set Scale X to 48 . Place it at the center of the window. Duplicate it and set the duplicate's Rotate Z to 90 and Scale X to 36 . This creates a cross frame, evident in Figure 6.40. Figure 6.40. Two windows added to the house, with holes cut.  -
Next, create a NURBS plane (Ctrl+z Plane option box, reset the settings, and click the Create button). Set Scale X to 48 , Scale Z to 36 , and Rotate X to 90 in the Channel Box. Position the plane where the glass in the window would be, centered on or behind the cross bars created in Step 5. Name the plane Glass . -
To create the hole in the walls, you want to project the original window square onto the walls to prepare a trim. Select the square, press the up arrow to get all sides of the square, and then Shift-select the inner and outer walls adjacent to it. In the Front view, project the curve (Alt+z Project Curve on Surface). You now have a curve projected onto the walls. Trim each wall out (Alt+z Trim). Now the walls have holes in them. -
Select all the parts of the window, including the square you used to project the curves. Group them together and name the group Window . Center the pivot of the group. With the history of the original square shape, you can now move the window, and the holes in the wall will move with it. That way you can move it if you aren't happy with its placement. Move the window so that it's positioned on the wall. -
When you get the window positioned, delete its history, duplicate it, and move and rotate the window to a place on the house's front. -
Open the Outliner (hotkey: Shift+O ), and expand the Window1 entry to see the group listing. You should be able to find the four square sides, named topnurbsSquare, leftnurbsSquare, and so forth. Click and drag over the four names to select them. You should see the front window square shape selected. Now you can use the project curve method from Step 7 to cut a hole for this window in the inner and outer walls. -
Create a layer and name it WindowsL . Add the windows to the layer, and make the other layers visible. The house is complete! -
Save your scene as Windows .   |