| In Chapter 2, we showed you how to switch from Wireframe to Shaded mode (hotkeys: 4 and 5 ) and how to change the detail level of NURBS objects (hotkeys: 1 , 2 , or 3 ). There are some other display options that can help you see your object more clearly or speed up interaction. If you choose Shading Shade Options in the panel's menu, you'll find options to display Wireframe on Shaded Objects and X-Ray mode. These options can be helpful when you need special, slower rendering display modes in Shaded mode to help solve a problem. Wireframe on Shaded Objects can help you visualize curvatures better and see the effects of editing an object's shape more clearly. X-Ray mode makes the shaded objects in the 3D view semi-transparent . You can see through all objects without giving up the three-dimensional look of Shaded mode. Other options speed the interactivity of shaded views. Under Shading Interactive Shading on the panel menu, you'll find four options for degrading the display update when you are moving scene elements. As soon as you stop transforming objects or changing the view, the full shaded view returns. Often, complex scenes bog down the 3D shaded views so badly that you cannot easily move objects; the shaded view stops the movements constantly to refresh the display. That mode is called Normal in the Interactive Shading options. The other optionsWireframe, Bounding Box, and Pointsswitch the display to view the scene in those visual styles during viewport or object changes. Another interactivity speedup is under Display Fast Interaction. When it's enabled, the shaded views simplify objects and textures under certain conditions to speed up the display. This option is very popular and saves time without being too intrusive in its degradation of the displayed image during changes. Tutorial: Create, Select, Transform, Duplicate! Now you can apply some of what you've learned to a brief, simple tutorial. You'll use a little bit from each of this chapter's sections to build a door object. -
Start with a blank, empty workspace in Maya. Confirm that your history is on by making sure the Construction History button in the Status Line is activated. Choose Create Nurbs Primitives Cube to create a cube object at the origin point that will be your door.   -
The object is named nurbsCube1, which you can see at the top of the Channel Box. Click on the name so that you can rename it as door . -
Right-click in the Perspective view to activate it without deselecting the cube object. Press 5 to switch to Shaded mode. -
Switch to Scale mode (hotkey: r ), and scale the box vertically (in the Y direction) by dragging on the green box that's the manipulator handle. Scale it repeatedly if necessary to achieve a height of roughly 16 units. trap NURBS cube objects are already "groups" of six sides. If you accidentally deselect the cube by clicking elsewhere in the view, it takes two steps to reselect the entire cube: First select one side of the cube, and then press the up arrow to navigate to the top of the group hierarchy, selecting all six sides automatically. You can also select it in the Outliner. -
Click on Scale X in the Channel Box, and then MMB-drag left and right in the Shaded view to see how Maya's Virtual Slider works. You can adjust any parameter this way. Set Scale X to roughly 8 . -
Having roughed in the size of the door, type in the values 8 and 16 in the Scale X and Scale Y entries in the Channel Box. This is how you set a numerical value precisely. Remember, you must press the Enter key after typing in the value! -
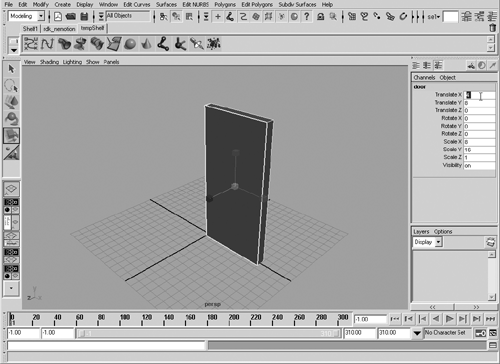
Set Translate X for the door to 4 units, and Translate Y to 8 units, so that it's placed on the origin point, as shown in Figure 3.10. Figure 3.10. The door in position.  -
Create a cylinder with Create Polygon Primitives Cylinder. In the Channel Box, change the name from pCylinder1 to knocker_stub . Then open the Inputs section by clicking on the polyCylinder1 text just below the Inputs label, where you'll see five creation parameters: Radius, Height, and three subdivision settings. Set Radius to .25 and Height to 0.5 . -
Next you'll put the knocker stub into position. Switch to Move mode and position the cylinder horizontally at the center of the door and vertically three-fourths of the way up the door. You'll also need to move the knocker stub outward a little so that it protrudes from the door. Position it by changing the values in the Channel Box to 4 for Translate X, 12 for Translate Y, 0.75 for Translate Z, and 90 for Rotate X. -
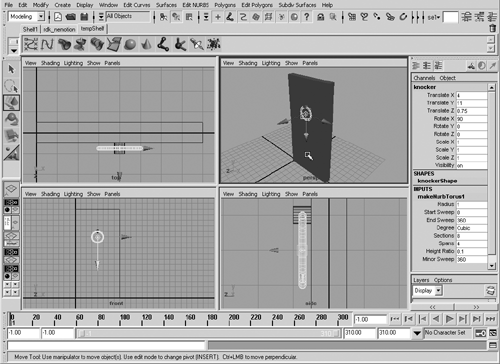
Create a torus with Create NURBS Primitives Torus , and rename it knocker in the Channel Box. Click the make NurbTorus1 label under Inputs to open the Inputs section, and set the Height Ratio to 0.1 . Position the torus by changing the transform settings in the top section of the Channel Box: Translate X to 4 , Translate Y to 11 , Translate Z to .75 , and Rotate X to 90 . To check what the knocker looks like in other views, tap the spacebar to switch to Four View mode, and then check the other views to see the relative positioning of the objects, as shown in Figure 3.11. Figure 3.11. The door with all its parts .  -
Next you'll adjust the pivot points for the knocker and the door. Start with the knocker, which should still be selected. Then switch to Move mode (hotkey: w ) and press the Insert key to switch to Pivot Editing mode (you must always be in Move mode before attempting to change the pivot). The transform icon on the knocker switches to look like the move transform, but without arrows on the ends of the three axes. Use the Front view, and zoom close to the knocker. Now, while in Move mode, click directly on the vertical green line of the pivot point. This constrains your movements to the vertical (Y-axis) direction. Now you can raise the pivot point until it's centered on the cylinder that is the knocker stub. Press Insert to exit Pivot Editing mode. -
With the knocker still selected, switch to Rotate mode (hotkey: e ) and click on the red circle to rotate constrained to the X-axis. You can now knock on the door with the knocker. Rotate the knocker so that it's slightly off axis, for a natural look. -
Select the door next. Click on any one of the six sides of the cube object that makes up the door, and then press the up arrow to select the entire door object. You should still be in Rotate mode, and you'll notice that the rotational handles are on the center of the door. You don't want the door to rotate on its center point; the hinges should be at the left edge of the door's front. Engage Pivot Editing mode by pressing Insert. Note that you are automatically in Move mode with the pivot, despite being in Rotate mode overall. Pivots can only be moved, not rotated ! -
Next you'll place the pivot point precisely at the bottom corner of the door by using curve snapping. Each corner edge of the door is considered a snappable curve when in Curve Snap mode. Go to Perspective view, and orbit the view to a position in front of and to the left of the door. Hold down the c key, MMB-click directly on the door's upper front edge, and then MMB-drag to the left. The pivot will be constrained to the front edge of the door and slide easily to the far left, where the pivot should be located. Press Insert to exit Pivot Editing mode. -
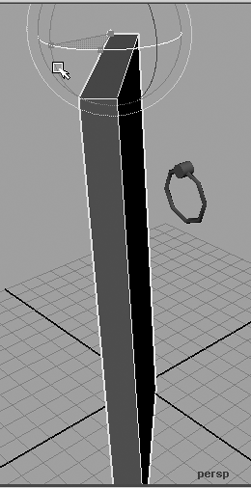
Test the door rotation by clicking on the green circle (to constrain the rotation to the Y axis) and dragging. The knocker stub and knocker do not turn with the door (see Figure 3.12), however. They need to be parented to the door so that they rotate when the door rotates. Press z to undo your rotation. Figure 3.12. Rotating the door on the corrected pivot point; the knocker is not following the door's rotation.  -
Go to Select mode (hotkey: q ), select the knocker, and then Shift-select the knocker stub. The stub will be green and the knocker will be white. Now choose Edit Parent, or simply press the hotkey p . Now when you select the knocker stub, the knocker is also selected. Also, any time you transform the knocker stub, the knocker follows as though it's part of the knocker stub. -
Select the knocker stub (the knocker seems to be selected, too, but if you check the Channel Box, you'll see that only the knocker stub is selected). Shift-select the front panel of the door, and press the up arrow key to select the entire door. Then parent the knocker stub to the door (hotkey: p ). Now you can select any side of the door object, press the up arrow to select the entire door, and then switch to Rotate mode. Rotate with a Y constraint (click and drag on the green circle of the rotation manipulator), and you'll see that the entire assembly rotates as one (see Figure 3.13). Success! If you test it, you'll find that you can still correctly rotate the knocker regardless of the door's angle. Figure 3.13. All the parts now rotate togethera linked hierarchy!  -
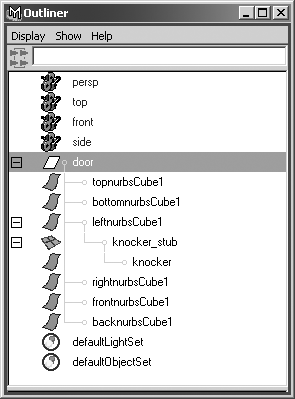
Open the Outliner (Window Outliner). Click the + to the left of the door object to expand it. You'll see the six sides of the door cube; one side has a + next to it, indicating that it's the side the knocker stub is parented to. Open this object and the knocker stub to see that the knocker is embedded four levels deep in the hierarchy: door , l eftnurbsCube1 , knocker_stub , knocker . This display gives you a visual cue to the hierarchy, as shown in Figure 3.14. Figure 3.14. The Outliner displays the full hierarchy you created.  You can explore the scene further and observe the parenting effects for object transforms of the door's parts. If you'd like to load a completed file, find the scene file on the CD-ROM (noted below the CD icon) and load it.  Going Further Explore all of Maya's display modes to see the advantages of each one. Test the interactive speedup options to learn what they do to the Shaded view and to recognize the look. You might also want to test the duplication options to learn some of the possibilities they offer. | |
