| After the character is bound to its skeleton, you are ready to animate with it. Because of all the built-in links and IK handles we've created, animating the character is a snap. We can simply pose the five handles (feet, hands, and waist), and IK and skinning will do the rest for us. The only part we need to be careful about is "planting" the feetwe'll need to take care to frame any time period where the foot is planted with two identical keys so it does stay put. Also, because we'll be using Trax later to make this walk cycle repeat, we only need one full step. However, we must be careful to get the character to take one full step and end up in a position identical to an earlier starting position. We need a "tileable" walk cycle! To make the creation of animation keys simpler, we'll use Maya's AutoKey feature. This feature acts only on objects that have at least one key on them already, so you can designate the objects you want to animate by setting a 0 frame key as you start animating. Tutorial: Character AnimationA Short Walk Now that our character is set up, we'll animate a walk cycle. As you animate, try to think of a walk as a kind of controlled fall. One leg is lifted and put forward, then the body shifts its center of gravity forward until it topples onto the outstretched leg, freeing the other leg to swing forward. For each leg that is put forward, the opposite arm moves forward to give the body some counter balance to the weight of the lifted leg. -
In the Range Slider, set the playback end time to 120 to allow for a longer animation. The end time will be pushed out to 120 automatically. This gives four seconds at the default 30 fps playback rate.   -
To make selection easier, we'll hide the joints and IK handles, and block selection of surfaces. This will allow us to pick only on the NURBS curves that make our selection rings. Choose Display Hide Hide Kinematics All, and the joints and IK handles will disappear. Next, in Selection Mask options, you can disable (mask) selection of surfaces, as shown in Figure 11.16. Figure 11.16. Masking selection of surfaces so that you can select only the rings.  -
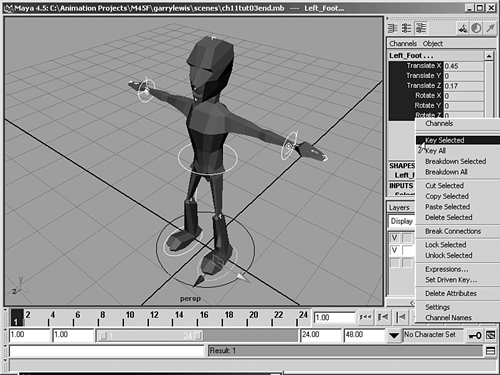
Select the selection rings for the waist, hands, and feet. Then click and drag in the Channel Box from the Translate X to the Rotate Z entries. Right-click over the darkened entries and choose Key Selected, as shown in Figure 11.17. Now that these items have keys at frame zero, you can use Maya's AutoKey feature. Enable this by clicking the key icon at the bottom right of the Maya interface; the button turns red to indicate that you are in AutoKey mode. If you move or rotate the circles, animation keys will be created. Figure 11.17. Creating keys for the translate and rotate of the selection rings.  -
Set the Time Slider to frame 10. In the Front view, bring the arms down to the sides of the character. In the Side view, bring the waist ring down to add a tiny bit of crouch to the character's posture . Raise the control circles for the hands enough to add some natural-looking bend to the arms. Bring the waist circle slightly forward to anticipate the first step. Select the same five rings, select Translate and Rotate channels in the Channel Box, and Key Selected as before. This is our starting pose, with frame 10 as a starting point, so we want keys for all five rings. -
Set the time to frame 30. Stay in the Side view for all of the initial animation. Select the waist and both hand rings. Move them out a little less than 1/4 of the character's height. Move the right foot forward, to a position somewhat less than 1/2 of the character's height. Now raise the left hand and put it slightly forward, about one hand's length. Bring the other hand slightly back. -
You can scrub animation in Maya by either dragging the LMB on the timeline, or by the preferred method of holding the k key while LMB-dragging anywhere in the viewport. Scrub the frames and you'll see that it's a start, but the right foot slides rather than lifts. We need another key. tip Remember that any animated object has some parameter that is progressing between two keys. Therefore, if you want something to stay motionless for a time, you need to create two identical keys separated in time. You usually need to flatten their curves in the Graph Editor because by default the keys will interpolate according to a spline, which can yield unexpected results. -
Set time to frame 24. Raise the right foot ring up about the distance of 1/2 of the foot's length. Now scrub the animation for a better look. -
Set time to frame 45. Select the waist and both hands, and bring them forward to a point that is about 1/4 the character's height beyond where the right foot is planted. Now, select the left foot and bring it to a point one full step in front of the right foot, somewhat less than 1/2 of the character's height. Now bring the right hand forward to offset the left foot, with a swinging forward stance. Take the left hand back so that it hangs down slightly behind the character's torso. -
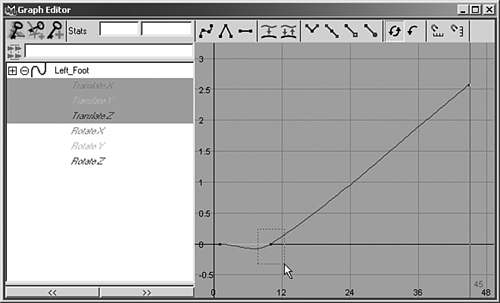
Scrub the Time Slider, and you'll see that the character appears to float over the first 30 frames. We had expected the left foot to remain fixed until frame 30! But we didn't set a key to keep it there. Select the left foot selection ring, and bring up the Graph Editor with Hotbox Window Animation Editors Graph Editor. Make sure the left foot circle is selected. With the Graph Editor active, use hotkey a to frame all. Now you can see the problemmovement is beginning at frame 10 for this item. Click and drag to select the Translate X, Y, and Z entries at left. Then, marquee-select the keyframed area around frame 10 on the graph, as shown in Figure 11.18. Now change frame time for these selected keys from 10 to 30 at the top of the Graph Editor dialog, and set the tangents to flat tangents with the horizontal-bar icon button. Close the Graph Editor. Figure 11.18. Editing keys in the Graph Editor.  -
Scrub the time again. The left foot now travels properly, but never lifts up. Fix this by setting the current frame to 40, and raising the foot up about 1/2 of the foot's length. Scrubbing now reveals that the animation looks good. -
Now we'll add another step. Go to frame 60, select the waist and both hands, and move them about 1/4 of the character's height in front of the striding left foot.Reverse the position of the two hands. Take the right foot from behind the character to a point one full step in front of the character. Again, we see a sliding foot, caused because we expected the right foot to remain fixed to the floor between frames 45 and 60. Set the time to frame 45, select the right foot, and move it. This creates a key for the foot at frame 45. Then bring up the Graph Editor, and select the Translate X, Y, and Z entries at left. Frame all with hotkey a . -
The blue or z-axis curve slopes upward. We need it to stop moving (stay horizontal) between frames 30 and 45. Do this by selecting the dot that indicates the key at frame 30, and noting the value for the key displayed at the upper left of the Graph Editor. Now select the key at frame 45 and change this key's value to the same number. Now marquee-select both keys and set them to flat tangents (the horizontal line button). Close the Graph Editor. -
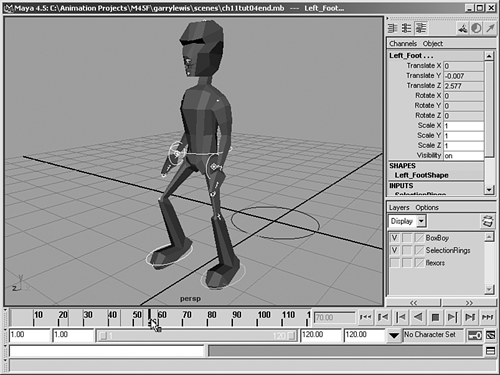
Now scrub the time, and you have a situation just like that in Step 8the right foot drags without lifting between frames 45 and 60. Go to frame 54, and raise the right foot about 1/2 a foot length above the ground. Scrub time, and you should see good walking motion now, as shown in Figure 11.19. You might notice that one full stride occurs between frames 30 and 60. Figure 11.19. Walking at last.  -
Now that you are done animating, switch off Autokey. Otherwise, you may inadvertently create new animation, particularly when scrubbing time and adjusting the position of objects in the scene. It's a good idea to be aware of when you've engaged Autokey; then create your animation and exit Autokey mode. With a minimum of keyframing , we've created a couple of footsteps from our starting neutral pose at frame 10. With a loop of animation occurring between frames 30 and 60, we can use Maya's Trax feature to repeat the walk for us automatically.   |


