Writing Multiple-Document Interface Applications
|
Many Windows applications allow you to work with multiple documents at the same time, with each document displayed in its own window. This type of application is called a Multiple-Document Interface (MDI) application. Examples of MDI applications are Microsoft Word and Microsoft Excel. In contrast, Microsoft Notepad and Microsoft Paint are Single-Document Interface (SDI) applications because there can only be one document open at a time.
In the .NET Framework, writing MDI applications is easy. Basically, you have a form that acts as the parent form. From this parent form you allow the user to create other forms, which will become the child forms of the parent form. The parent form is also called the MDI container. For a form to be an MDI container, you must set the Form class's IsMdiContainer property to True, like the following:
Me.IsMdiContainer = True
For a child document, usually you extend the System.Windows.Forms.Form class to get a new class that represents a child document. This child class also has its own user interface, menus, and so on.
To create or open a new child document, such as when the user clicks the New or Open menu item from the File menu in a typical Windows MDI application, you write the following code inside the MDI container. In this example, doc represents a child form and Me refers to the MDI container itself:
Dim doc As New System.Windows.Forms.Form() doc.MdiParent = Me doc.Show()
That's the least you need to do to create an MDI application. However, there are features you may want to add, so read on.
The MDI container needs to monitor its children. For example, it needs to know for sure how many child documents are currently open and which one is the active document. When the user closes a child document, the MDI container needs to know it. Also, when another child document is activated, the MDI container may want to do something in response.
The Form class is rich enough to cater for these needs. For example, the Closed event triggers every time a user closes a form (and consequently, a child document extending the Form class). You might want to do something when a child document is closed—for example, delete a tab page associated with that child document. To know the number of child documents, you do not need to have a counter that you increment when a new child document is created and decrement when a child document is closed. The Form class's MdiChildren property represents an array of Form objects. You can obtain the number of child documents from the Length property of the MdiChildren property:
Dim childCount As Integer = Me.MdiChildren.Length
It is also often the case that you need to override the OnMdiChildActivate method so that you can customize what the MDI container needs to do when a child document is activated. To override this method, you write the following:
Protected Overrides Sub OnMdiChildActivate(ByVal e As EventArgs) MyBase.OnMdiChildActivate(e) ... End Sub
Note that you should call the OnMdiChildActivate method of the base class. Failure to do this will result in failed menu merging. (You can read more about menu merging in the later "Menu Merging" section.)
Now that you know the basic things to do to write an MDI application, the next few sections discuss related topics.
Setting the Parent-Child Relationship
The relationship between an MDI container and its child document is one of the most important things to think about when designing an MDI application. The questions are always as follows: How well do you want the child to know the parent? Do you want the child to be independent from its container so that the child document can be reused in other MDI applications? Or, do you not care if the child document depends on the MDI container?
Let's discuss these two options carefully.
Code reuse is one of the main objectives of object-oriented programming. Therefore, if you can write a child document class that does not need to know about its container, it will be a good thing because it means the child document can be used in other MDI applications. However, developing this kind of MDI application is more difficult because there is no direct way to call a method or access a property in the MDI container. For example, if the container assigns a tab page for each MDI document, as shown in Figure 2-1, the tab page's text is normally the same as the title of the child document. If the child document's title is changed, the tab page's text must change too. How does the child document tell the tab page associated with it—which resides in the MDI container—that its title has changed?
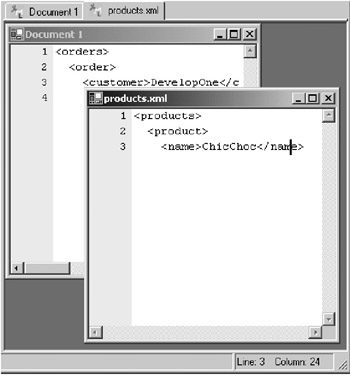
Figure 2-1: Tab pages are often associated with child documents.
Thanks to delegates, however, you can create a custom event raised from the child document. A child document can use this custom event to notify something to its container without the child document needing to know anything about the container.
| Note | Chapter 1, "Creating a Custom Control: StyledTextArea," discusses creating custom events. |
The second option to the parent-child relationship is to let the child know about its parent by passing a reference to the parent. This really makes programming easier because now the child has access to certain properties and methods in the parent. However, the child will then have to know about the parent's type.
The XML editor project in this chapter takes the first approach, retaining the child document independence of its container. It is not the easiest design, but it promotes code reuse.
Setting Menu Merging
In an MDI application, some functions are only available when there is at least one child document open. For example, the Save function saves a child document into a file. When there is no child document open, then there is nothing to be saved. Ideally, the menu or button that executes this function should also only be available if it makes sense to call that function. The Save menu item under the File menu should only be visible if there is at least one child document open in the MDI application. When the application first starts, the Save menu item should not be visible. Also, after all child documents are closed, the Save menu item should disappear.
In the .NET Framework, the menus to execute functions that manipulate child documents should reside in the child document class itself, not in the MDI container. On the other hand, functions that can be executed without at least a child document open lie in the MDI container class. These functions include the Open function, which opens a document, and the Exit function. The menus to these functions should be available at all all times. Figure 2-2 shows an example of the File menu in an MDI application when no child document is open, and Figure 2-3 shows the File menu in the same application when at least one child document is open.
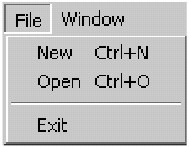
Figure 2-2: The File menu when no child document is open
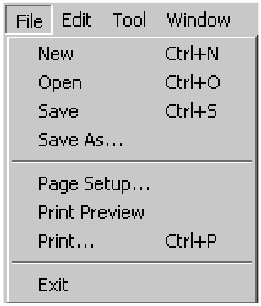
Figure 2-3: The File menu when at least one child document is open
Now the question is this: How do you do that?
There are at least two answers. The first is through showing and hiding menu items. The second is through menu merging. The first approach is messy, and the second is elegant and easy. Therefore, this project uses menu merging. Before discussing menu merging, however, let's briefly discuss menus and menu items in the .NET Framework.
It is hard to find a decent Windows application that has no menu. Menus make it easy to access certain functionality in the application and, in most circumstances, minimize the use of controls such as buttons. Using menus is often preferable to button controls because menus take less space and make your application look more organized.
In the System.Windows.Forms namespace, all menu-related controls are child classes of the Menu class. This class is an abstract class, however, so you cannot instantiate it. The Menu class has three child classes: ContextMenu, MainMenu, and MenuItem.
The ContextMenu class represents shortcut menus that can be displayed when the user clicks the right mouse button over a control or area of the form. Shortcut menus typically combine different menu items from a MainMenu of a form that are useful for the user given the context of the application.
The MainMenu class represents the "conventional" menu on the top part of your form. It is a container for the menu structure of a form. A menu is composed of menu items represented by the MenuItem class. Each menu item is normally a command for your application or a parent menu for other submenu items.
The Form class has the Menu property to which you can assign a MainMenu object to bind the MainMenu object to the form.
The first thing you need to do to have a menu in your form is create a MainMenu object that will be bound to the form:
Dim mainMenu As New MainMenu()
However, nothing is visible in the MainMenu object until you add a menu item. You also must set the Text property of the MenuItem object. An ampersand (&) character in the Text property value indicates the character to be underlined when a user presses the Alt key. Adding a MenuItem object to a MainMenu or another MenuItem object is done by calling the Add method of the MenuItemCollection of the Menu object. You can access this collection from the MenuItems property of the Menu class. For example:
Dim fileMenuItem As New MenuItem() mainMenu.MenuItems.Add(fileMenuItem)
You can add another menu item to a menu item to form a hierarchical structure of menu items. The menu item added to another menu item becomes a submenu of the latter menu item.
The interesting part of the MenuItem class is that it has several constructors, some of which allow you to create a MenuItem object and pass a handler for an event as well as assign a shortcut for the menu item. For example, the following is a menu item called fileOpenMenuItem. You construct it using the constructor that accepts a string for the Text property value, an event handler, and a shortcut:
Private fileOpenMenuItem As New MenuItem("&Open", _ New EventHandler(AddressOf fileOpenMenuItem_Click), Shortcut.CtrlO) | Note | Those familiar with design patterns will recognize a Command pattern here, in which a command (the pointer to the fileOpenMenuItem_Click function) is encapsulated in an object (fileOpenMenuItem). |
To add a separator to a menu, you add a hyphen to its MenuItems collection, such as the following:
fileMenuItem.MenuItems.Add("-"); // add a separator With an MDI application, some menu items are in the MDI container and some are in the child document class. The technique to work with menu items in both the MDI container and child documents is the same. However, you need to set the MergeOrder property of the menu items that belong to the same menu.
For instance, the MDI container has a File menu item (a menu item whose Text property is set to File) added to the main menu. Added to this File menu item are the New item, the Open item, a separator, and the Exit item. The File menu item in the child document class has the Save, Save As, Page Setup, Print Preview, and Print menu items. When a user opens a child document in the MDI application, the menu items under the File menu item in the child document must merge with other menu items under the File menu item in the container.
This is surprisingly easy to do. All you need to do is set the MergeOrder and MergeType properties of the MenuItem objects.
The MergeOrder property indicates the relative position of the menu item when it is merged with another. The MergeType property indicates the behavior of the menu item when its menu is merged with another.
The MergeType property can have one of the following members of the System.Windows.Forms.MenuMerge enumeration:
-
Add: This adds the MenuItem to the collection of existing MenuItem objects in a merged menu.
-
MergeItems: This merges all submenu items of this MenuItem with those of existing MenuItem objects at the same position in a merged menu.
-
Remove: This excludes the MenuItem in a merged menu.
-
Replace: This replaces an existing MenuItem with the MenuItem at the same position in a merged menu.
For example, Listing 2-15 constructs the menu items in the File menu item in an MDI container.
Listing 2-15: Creating the Menu Items in an MDI Container
Dim fileMenuItem As New MenuItem() Dim fileNewMenuItem As New MenuItem("&New", _ New System.EventHandler(AddressOf Me.fileNewMenuItem_Click), Shortcut.CtrlN) Dim fileOpenMenuItem As New MenuItem("&Open", _ New EventHandler(AddressOf fileOpenMenuItem_Click), Shortcut.CtrlO) Dim fileExitMenuItem As New MenuItem("E&xit", _ New System.EventHandler(AddressOf Me.fileExitMenuItem_Click)) fileMenuItem.Text = "&File" fileMenuItem.MergeType = MenuMerge.MergeItems fileMenuItem.MergeOrder = 0 mainMenu.MenuItems.Add(fileMenuItem) fileOpenMenuItem.MergeOrder = 101 fileNewMenuItem.MergeOrder = 100 fileExitMenuItem.MergeOrder = 120 fileMenuItem.MenuItems.Add(fileNewMenuItem) fileMenuItem.MenuItems.Add(fileOpenMenuItem) Dim separatorFileMenuItem As MenuItem = _ fileMenuItem.MenuItems.Add("-") separatorFileMenuItem.MergeOrder = 119 fileMenuItem.MenuItems.Add(fileExitMenuItem) And, Listing 2-16 constructs the menu items in the File menu item in the child document class.
Listing 2-16: Constructing the Menu Items in the Child Document
Dim fileMenuItem As New MenuItem() Dim fileSaveMenuItem As New MenuItem("&Save", _ New EventHandler(AddressOf fileSaveMenuItem_Click), _ Shortcut.CtrlS) Dim fileSaveAsMenuItem As New MenuItem("Save &As...", _ New EventHandler(AddressOf fileSaveAsMenuItem_Click)) Dim filePageSetupMenuItem As New MenuItem("Page Set&up...", _ New EventHandler(AddressOf filePageSetupMenuItem_Click)) Dim filePrintPreviewMenuItem As New MenuItem("Print Pre&view", _ New EventHandler(AddressOf filePrintPreviewMenuItem_Click)) Dim filePrintMenuItem As New MenuItem("&Print...", _ New EventHandler(AddressOf filePrintMenuItem_Click), _ Shortcut.CtrlP) Dim fileSeparatorMenuItem As New MenuItem("-") fileMenuItem.Text = "&File" fileMenuItem.MergeType = MenuMerge.MergeItems fileMenuItem.MergeOrder = 0 fileSaveMenuItem.MergeOrder = 113 fileSaveAsMenuItem.MergeOrder = 114 fileSeparatorMenuItem.MergeOrder = 115 filePageSetupMenuItem.MergeOrder = 116 filePrintPreviewMenuItem.MergeOrder = 117 filePrintMenuItem.MergeOrder = 118 fileMenuItem.MenuItems.Add(fileSaveMenuItem) fileMenuItem.MenuItems.Add(fileSaveAsMenuItem) fileMenuItem.MenuItems.Add(filePageSetupMenuItem) fileMenuItem.MenuItems.Add(filePrintPreviewMenuItem) fileMenuItem.MenuItems.Add(filePrintMenuItem) fileMenuItem.MenuItems.Add(fileSeparatorMenuItem) You do not have to do anything else. All menu items will merge beautifully when a child document is created in the MDI container.
Setting Child Document Layout
Arranging child documents cannot be easier in the .NET Framework. You do this in a single line of code by calling the LayoutMdi method of the System.Windows.Forms.Form class. This method accepts a member of the System.Windows.Forms.MdiLayout enumeration. Its members are as follows:
-
ArrangeIcons: This arranges all MDI child icons within the client region of the MDI container.
-
Cascade: This cascades all MDI child windows within the client region of the MDI container.
-
TileHorizontal: This tiles all MDI child windows horizontally within the client region of the MDI container.
-
TileVertical: This tiles all MDI child windows vertically within the client region of the MDI container.
Figures 2-4, 2-5, and 2-6 show the layout of the child documents after calling the LayoutMdi method by passing a different member of the MdiLayout enumeration. Specifically, Figure 2-4 shows a Cascade layout, Figure 2-5 shows a TileHorizontal layout, and Figure 2-6 shows a TileVertical layout.
Figure 2-4: Cascade layout
Figure 2-5: TileHorizontal layout
Figure 2-6: TileVertical layout
Building a Status Bar
The MDI container in an MDI application normally has a status bar, represented by the System.Windows.Forms.StatusBar class. It is a nice addition to the bottom of the form to display messages. To be useable, a status bar must have one or more status bar panels. The System.Windows.Forms.StatusBarPanel class represents each status bar panel. You must add a status bar panel to the StatusBarPanelCollection of the StatusBar object. The Panels property represents this collection. This code constructs a status bar having two status bar panels:
Dim statusBar As New StatusBar() Dim statusBarPanel1 As New StatusBarPanel() Dim statusBarPanel2 As New StatusBarPanel() statusBar.Panels.Add(statusBarPanel1); statusBar.Panels.Add(statusBarPanel2);
To get the appearance that you want, you set the BorderStyle and AutoSize properties of the StatusBarPanel. The text to display is the value of the Text property of the StatusBarPanel object.
In an MDI application, there is often a need for the child document to display a message in a status bar. However, an MDI application normally only has one status bar, which is in the MDI container. How do you write a message on the status bar without sacrificing the independence of the child document of the MDI container?
The answer to this question is simple. You just declare a reference variable of a status bar in the child document class. When a child document is created, you pass the object reference to the status bar in the MDI container to the child document. Now the child document has access to it. There is one thing to remember, though: Because you cannot guarantee that an MDI container always passes a status bar to a child document, every time you want to write to the status bar from within a child document, you need to check that the status bar is not null.
Tab Control and Tab Pages
As you saw in Figure 2-1 of this chapter, an MDI application often has a tab control, represented by the System.Windows.Forms.TabControl class. A tab control is a bar that spans horizontally at the bottom or at the top of the client area of an MDI container. A child document is often associated with a tab page, represented by the System.Windows.Forms.TabPage class. When a child document is created, a tab page is added to the tab control. When the child document is closed, the tab page associated with it is also destroyed.
Each tab page in the tab control can have an image as well as text. The text displayed is the value of the Text property of the TabPage object. To display an image, however, you need to assign an ImageList object to the TabControl, then select an image in the ImageList by setting the ImageIndex property of the TabPage control. Therefore, tab pages in the same tab control can have different images.
This code creates a TabPage object and adds it to a TabControl called tabControl:
Dim tabPage As New IndexedTabPage() tabPage.Text = "New Document" tabPage.ImageIndex = 1 tabControl.Controls.Add(tabPage) 'Activate the new tabPage tabControl.SelectedIndex = tabControl.TabCount - 1
Note that the last line of the code selects the recently created tab page by setting the TabControl object's SelectedIndex to the TabCount property minus 1. The TabCount property returns the number of tab pages. In this example, the code uses TabCount minus 1 because SelectedIndex is zero-based. Therefore, the first tab page is tab page number 0, and the last tab page is numbered (TabCount – 1).
As mentioned previously, because a tab page is associated with a child document, it must be destroyed when the child document is closed. With the Closed event in the System.Windows.Forms.Form class, this is not a difficult task. You can wire the Closed event with an event handler. This event handler gets called when a child document is closed. However, there remains a problem. The Closed event passes a System.EventArgs object. It does not tell you which child document has closed. The event simply notifies that a child document has been closed.
Often you need to maintain a unique number assigned to both a tab page and an associated child document. When a child document is closed, you simply check all the child documents for this unique number and delete any tab page having a number not found in any child document. This is the approach that this project takes. You will see the code that does this in the "Implementing the Project" section.
Creating a Toolbar
A toolbar is a horizontal bar containing buttons that your user can click to perform certain functions. Generally, each individual button on the toolbar duplicates a function that can also be invoked from one of the menus. However, a toolbar's buttons are always visible and can be invoked by a single click. A toolbar also tends to give the impression that your application is user-friendly.
In the .NET Framework, the System.Windows.Forms.Toolbar class represents a toolbar. The System.Windows.Forms.ToolBarButton class represents a toolbar button. Each button normally displays one of the images in the ImageList object passed to the toolbar. Therefore, after the toolbar is instantiated, you assign an ImageList object to its ImageList property, such as in the following code:
toolBar.ImageList = imageList
Then, use the ImageIndex of each individual toolbar button to assign an image in the ImageList control:
toolBarButton1.ImageIndex = 0 toolBarButton2.ImageIndex = 1 toolBarButton3.ImageIndex = 2 toolBarButton4.ImageIndex = 3
Of course, you then have to add the toolbar buttons to the ToolBar control:
toolBar.Buttons.Add(toolBarButton1) toolBar.Buttons.Add(toolBarButton2) toolBar.Buttons.Add(toolBarButton3) toolBar.Buttons.Add(toolBarButton4)
And, add the ToolBar control to the form:
Me.Controls.Add(toolBar)
An astute reader will notice that it is not that simple in an MDI application. Remember that the toolbar always resides in the MDI container and some of the functions that need to be performed are methods of the child document class. How do you invoke the function inside the child document object from the MDI container?
Although this is certainly an issue, fortunately it is not a big one. In fact, you can attack the problem with a number of approaches. However, always remember that you do not want to compromise the child document class independence of the MDI container.
The following are your options:
-
You can make the child document class's methods public. Because the MDI container has access to each instance of its child document, it can always call these public methods. However, this approach might not be desirable if you do not want to expose those methods to the outside world.
-
You can invoke those methods by clicking the menus in the child document objects. When a child document is created, its menus are merged so the user can click on them to invoke what they are meant to do. With a toolbar, you can send the same key combination to the current application to invoke a function inside the child document. For example, the user would press Alt+F followed by the O key to open a document. With a toolbar, you can send this key combination to the application using the Send method of the System.Windows.Forms.SendKeys class. For example, to send Alt+F followed by O, you write the following:
SendKeys.Send("%FO")
Another issue when using a toolbar is detecting which toolbar button is being clicked. When a toolbar is clicked, the event handler will accept a ToolBarButtonClickEventArgs object. This class has the Button property, and you use it as in Listing 2-17.
Listing 2-17: Using the Button Property
Protected Sub toolBar_ButtonClick(ByVal sender As Object, _ ByVal e As ToolBarButtonClickEventArgs) ' Evaluate the Button property to determine ' which button was clicked. If e.Button.Equals(newToolBarButton) Then fileNewMenuItem.PerformClick() ElseIf e.Button.Equals(openToolBarButton) Then fileOpenMenuItem.PerformClick() ElseIf e.Button.Equals(saveToolBarButton) Then If Me.MdiChildren.Length > 0 Then . . .
|
EAN: 2147483647
Pages: 82