| There are two ways to back up SSI data using your SMS-based application. The first method is to select Server Specific Info from the list of available resources when doing a file system backup. The second way is to simply select a full file system backup of the entire NetWare server ”the SSI data is included by default. TIP If you have a server crash and SSI files are not available, you can try the recovery procedure outlined in the "Recovering a Crashed SYS Volume or Server" section in Chapter 11 .
NOTE If your backup software doesn't show SSI as an available resource, check with the vendor before assuming that these files are being included in a full system backup.
If your backup program doesn't support SSI, you can create the SSI files using SBCon. Use SBCon to schedule two jobs that execute daily (or frequently so you have up-to-date SSI files): one job that backs up and another that restores the SSI data. The restore step is necessary to create the actual SSI files on the SYS volume so your regular backup application can then back up these files to tape. Otherwise , the backup process simply creates the SSI files in server memory and then writes them to tape directly. The downside of this method is that SBCon uses the same tape as your backup software, which is sometimes not possible due to formatting requirements, unless you have two tape drives on your server. NOTE When SSI data is backed up, a copy of SERVDATA.NDS is created in SYS:SYSTEM , but not the other SSI files.
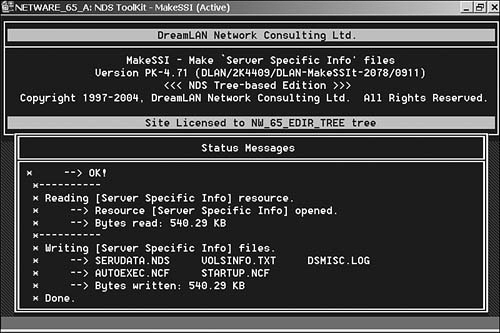
An alternative to the previous method is to use the MakeSSI utility from DreamLAN Network Consulting. This NLM is specifically designed to create the previously mentioned SSI data files (see Figure 8.18). Run the NLM just prior to your backup schedule so you can back up the SSI files to tape, ensuring you have a set of SSI files that matches the data backed up on tape. See www.dreamlan.com/makessi.htm for more information about the NLM. Figure 8.18. Creating NetWare SSI files using MakeSSI. 
NOTE Although SSI is a file system TSA resource, the actual backup and restore of SSI data is performed by the DSBACKER.NLM , which is auto-loaded by the file system TSA as needed.
As there is no file system TSA for Windows, the procedure to create SSI files for Windows servers is slightly different than that for NetWare. The two files that make up the SSI data on Windows are created using the install.dlm as follows : - Start install.dlm from NDSCons.
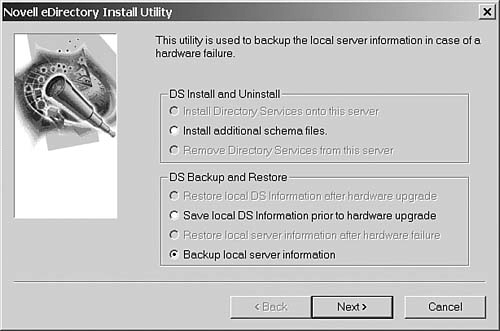
- Select the Backup local server information option (see Figure 8.19) and click Next.
Figure 8.19. Creating Windows SSI files using install.dlm . 
- Enter a username and password that has Supervisor rights to the tree.
- Select the directory in which the two SSI files will be created. The default is drive :\Novell\NDS\DIBFiles .
- Click Finish to create the files.
- The content of dsbacklog.log is displayed for your information. Click Done to exit.
You should then back up $svnds.bak and dsbackup.log as part of your regular file system backup procedure. Restoring a Failed NetWare eDirectory Server The information presented in this section explains how to restore NDS/eDirectory (prior to eDirectory 8.7) for a specific NetWare server after you have a hardware failure that involves the SYS volume. The procedure is not applicable when you are upgrading or replacing server hardware ”instead, refer to the "Upgrading/Replacing Hardware on NetWare" section in your eDirectory 8.6. x documentation. TIP You can also use the NetWare Migration Wizard, which can be downloaded for free from download.novell.com , to upgrade or replace NetWare server hardware while maintaining the NDS /eDirectory information.
Following are steps to restore a crashed server or a SYS volume in a multiserver tree where DS information is replicated: WARNING These steps assume you have a current backup of the SSI data for the failed server. If you do not, you can try the procedure outlined in the "Recovering a Crashed SYS Volume or Server" section in Chapter 11, or refer to TID #10010922 entitled "Removing a Crashed Server from the NDS Tree" that covers how to recover from a server crash. However, the TID tells you to delete the Server and Volume objects, which will render all your Directory Map, Print Queue, etc. objects non-functional, and you'll have to manually recreate these objects after a restore. When you don't have SSI data to work with, and the procedure in Chapter 11 doesn't help you, the information in this TID may be used.
- Don't panic!
- Don't delete the NCP Server or Volume objects for the failed server from the DS. Leave them intact to preserve references that other objects (such as Directory Map objects) may have to these objects as well as any DS trustee assignments made. If the NCP Server or Volume objects are deleted and you have objects that depend on them, you'll need to re-establish the relationships through a selective DS restore.
WARNING As discussed in Chapter 2 and elsewhere, when an object is missing its mandatory attributes, it will turn into an Unknown object. Because of this, you need to pay special attention when doing a partial DS restore so that any dependent object(s) are also restored, otherwise the restored object may not be functional. - From your most recent tape backup of the failed server, restore the "Server Specific Information" files to another server. These SSI files, SERVDATA.NDS , DSMISC.LOG , VOLSINFO.TXT , STARTUP.NCF , and AUTOEXEC.NCF , will be restored to a subdirectory, named after the failed server in the DOS "8.3" naming format, under SYS:SYSTEM . For example, if the server was called TEST-NW6A, the SSI files will be restored to SYS:SYSTEM\TEST-NW6.A .
- If the failed server held a Master replica of any partition, go to another server in the replica ring that has either a Read/Write or Read-Only replica and use DSRepair to promote that replica to a Master. (You can use the information recorded in DSMISC.LOG to determine what replicas were stored on the failed server and which servers are in the respective replica rings.) Repeat this step for every Master replica stored on the failed server. You then need to clean up the replica rings to remove the downed server from the lists. (Refer to the "Replica Ring Inconsistency" section in Chapter 11 for detailed steps.)
TIP After your replica ring cleanup, you should spot-check the DSTrace output on a number of servers to see whether the replica rings are okay and verify that everything is synchronizing correctly. You don't want to install a server into a tree that's not fully synchronized. NOTE You can't use NDS Manager or ConsoleOne to perform the task in Step 4 as they require the Master replica to be up and all servers in the replica ring to be available. You must use DSRepair for this step. - If the failed server contained any non-Master replicas, you need to clean up the replica rings following the procedures given in the "Replica Ring Inconsistency" section in Chapter 11.
- Install the new server hardware or new hard drive (if it was only the SYS volume that had failed). Do not yet connect the new server to your network ; leave it in an isolated environment.
- Install the NetWare operating system on the new hardware as per your standard procedure to set up the LAN and disk driver and create the volumes . (Use VOLSINFO.TXT to determine how many volumes you had on the crashed server, their names , and whether additional name spaces are required.)
When prompted for server name and server ID (in NetWare 5 and higher; internal IPX network number in NetWare 4), enter the same server name and addressing information. (Use the AUTOEXEC.NCF included with the SSI for these data.)
When you reached the point of installing DS information, create a new (temporary) tree. This allows you to complete the OS re-installation with the minimal amount of trouble.
The reason behind creating a temporary DS tree at this point is that the GUI installation program in NetWare 5 and later doesn't have the option (that is available in NWCONFIG.NLM ; and in INSTALL.NLM in NetWare 4) for you to restore DS data using SSI information. You could , however, not create a temporary tree by aborting out of the GUI setup when prompted for DS information and use NWConfig to restore the DS data and manually copy the server files. But it can get confusing and is a lot more extra work ”something you don't need during a disaster recovery. Also, the up side of this technique is that you can build the server off-site (or have a hot standby server pre-built) and then bring it in to replace the crashed server.
- After the server OS installation is complete, restart the server ( but keeping it off the production network ) to ensure everything is working okay. Apply any server updates, such as Support Pack, that you have previously installed and then restart the server again to ensure the updates haven't messed anything up.
WARNING Do not restore file system data until after eDirectory has been restored. When file system data is restored, the process looks for the trustee objects in eDirectory. If an object that is a trustee does not exist in the eDirectory database (such as in a new installation before eDirectory has been fully restored), the rights assignments for that object will not be restored. Log in from a workstation to test the server LAN card configuration, exercise the hard drives, and so on. After you're satisfied that the hardware is working correctly, create a directory off the root of your SYS volume and place the five SSI files there. The most important file is SERVDATA.NDS . Log out from the workstation after you've copied the files.
If your new server's hardware configuration is different from the crashed server's (such as different network card, thus different driver), make a backup copy of the new STARTUP.NCF and AUTOEXEC.NCF files as they will be overwritten when you restore the SSI data.
NOTE If your set of SSI files is small enough, you can place them on a diskette instead. - At the server console, load NWCONFIG.NLM (or INSTALL.NLM in the case of NetWare 4) and use the Directory Options selection to remove DS from this new server.
- Connect the server to your production environment. Bring up your server and load NWConfig (or Install) and select the Directory Options menu.
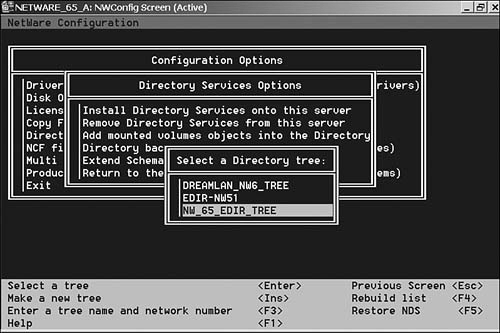
- Select the Install Directory Services onto this server option. At the screen to "Select a Directory tree," press F5 (the option to Restore NDS, as indicated at the bottom right of the screen; see Figure 8.20).
Figure 8.20. Restore SSI data by pressing F5. 
TIP Do not select a tree by pressing Enter . A new window comes up with two options: A: (the default) or "Press <F3> to specify a different path ". If your SSI files are on a diskette, insert the disk and continue with the restore. Otherwise, press F3 and specify the path to where the SSI files were copied to in Step 8.
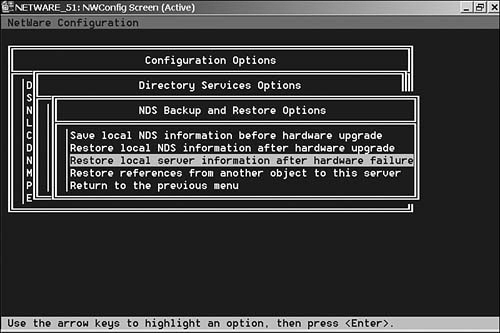
Alternatively, you can use the Restore local server information after hardware failure option from the Directory backup and restore options menu to restore the SSI files, as shown in Figure 8.21.
Figure 8.21. Restore SSI data via the Restore local server information after hardware failure option. 
After you enter the path and press Enter, the SSI files will be copied to the SYS volume. DSMISC.LOG , VOLSINFO.TXT , and AUTOEXEC.NCF are copied to the SYS:SYSTEM directory; STARTUP.NCF is copied to the DOS partition. DS information is restored at this point, using the data contained in SERVDATA.NDS . Unlike a traditional DS restore using SMS, TSANDS.NLM is not required for this. Once this is complete, DS is fully functional on the server, except that the partitions and replicas have not yet been re-established.
- You may also need to re-establish licensing information. For NetWare 4, you reinstall the license(s) using INSTALL.NLM .
- Prepare the restored directory for integration into the original tree by executing the following DSRepair commands in the order specified:
-
DSREPAIR -SI (Repairs replica numbers on partition objects); option is not available for eDirectory 8.5 or below -
DSREPAIR -RD (Local database repair) -
DSREPAIR -RN (Repairs network addresses) -
DSREPAIR -SR (Requests local schema switch); command-line option is not available for eDirectory 8.5 or below but can instead use Advanced options menu, Global schema operations, Reset local schema. This is a cleanup process. It's okay to see error messages displayed during the cleanup.
- Use DSTrace to verify that the schema has synchronized fully. From the server console, type
SET DSTRACE = ON (Activates the NDS transactions screen) SET DSTRACE = +SCHEMA (Displays schema information) SET DSTRACE = +IN (Monitors inbound synchronization traffic)
Watch for the message "All processed = YES" on the trace status screen. Once the schema is synchronized, you are ready to re-establish replicas.
- With the information recorded in the DSMISC.LOG file, re-establish the original replicas using NDS Manager or ConsoleOne. We recommend you place the replicas on the new server before file system restore so that any external references that might result from file system trustee assignments are minimized.
- If the new server's hardware configuration is not identical to that of the old server's, you'll need to change the restored AUTOEXEC.NCF and STARTUP.NCF files to match the new settings, using the backup copies you made in Step 8. After making the changes, restart the server to ensure the changes are okay.
- At this point, you can restore the file system from your most recent backup. You should be careful when restoring the SYS volume data to ensure that you don't overwrite any new Support Pack files with older ones. If you've made modifications to your AUTOEXEC.NCF, make certain the older copy from your restore operation does not overwrite it.
REAL WORLD: Disk Space Problems When restoring files to a volume that was nearly full before the backup, you may run into insufficient disk space issues during the operation. This is especially true when volume compression is used. Although SMS -compliant backup software can back up and restore compressed files in their compressed format, that's not the default in most backup software. Because of this, chances are good that you'll restore previously compressed files in an uncompressed format. Because compression is a background OS process, files are not compressed until the compression start time is reached. You can, however, flag files as Immediate Compress, but that's an extra manual step. Afterward, you must remember to unflag them or else they'll always be compressed again immediately after access, causing unnecessary high server utilization. Another volume- related issue that you can get caught with during a restore is that of suballocation. Again, because it is a background process, files are not suballocated as they are restored. Therefore, if you're restoring many (small) files, you can run out of disk space before the restore is completely finished. To work around these two problems, it is best to either maintain at least 15 “20% free disk space on each volume, or make certain the replacement drive capacity is larger. |
- After the file system restore is complete, restart the server one more time to ensure that the restore didn't overwrite any important system files. Perform a spot-check on some of the restored directories and files for trustee assignments, file ownership, and so on. Also spot-check DS objects to ensure you don't have any Unknowns. Bindery-based objects and any DS objects (such as Print Queues) that depend on object IDs should restore correctly because of the SSI information. In the event that Print Queue objects, for example, are not recovered correctly, you need to recreate them.
- Install, if necessary, any additional server-based add-on products.
This procedure should work with NetWare 4.10 but we have not tested it in that environment. Also, there's a bug in TSA410.NLM for NetWare 4.10 wherein replica information is not recorded in the DSMISC.LOG file. A workaround is to use MakeSSI (discussed in the previous section) on NetWare 4.10 servers as MakeSSI creates a PARTINFO.LST file, which is equivalent to the DSMISC.LOG file, as far as recording replica information goes. Also, you need to use the most recent TSA410.NLM as older versions (before v4.14) don't support SSI. Restoring a Failed Windows eDirectory Server The information presented in this section explains how to restore eDirectory 8.5 or 8.6 (but not 8.7 or later) for a specific Windows server after you had a hardware failure that involves the disk hosting eDirectory. The procedure is not applicable when you are upgrading or replacing server hardware ”instead, refer to the "Upgrading/Replacing Hardware on Windows NT/2000" section in your eDirectory 8.6. x documentation. NOTE Unlike the case with NetWare servers, you cannot use the NetWare Migration Wizard to upgrade or replace Windows server hardware as the Wizard is for NetWare-only.
The steps to restore a crashed Windows server or a damaged disk hosting eDirectory in a multiserver tree where DS information is replicated are very similar to that for NetWare outlined in the previous section. Instead of repeating the same information, we point out the differences in the procedure where applicable: -
The Windows SSI information consists of two files, $svnds.bak and dsbackup.log , and are located in drive :\Novell\NDS\DIBFiles by default. -
To remove Directory Services from a Windows server, use install.dlm . From NDSCons, select install.dlm , click Start, click Remove Directory Services, and click Finish. You will need to authenticate as a user that has Supervisor rights to the tree. TIP If the Remove Directory Services option is grayed out, you can remove DS as follows. First, shut down eDirectory using NDSCons, Shutdown. Then manually remove all files in drive : \Novell\NDS\DIBFiles , including subdirectories. Restart eDirectory using NDSCons, Startup.
-
To restore eDirectory information using SSI files, again use install.nlm . From NDSCons, select install.dlm , click Start, click Restore Local Server Information after a Hardware Failure, click Next. Specify the path to the $svnds.bak and click OK. -
To prepare the restored directory for integration into the original tree, execute the following DSRepair commands: -
From NDSCons, select dsrepair.dlm , enter “si in the Startup Parameters field, click Start to repair replica numbers on partition objects. DSRepair's GUI will not be displayed and will automatically exit when repair is completed. -
From NDSCons, select dsrepair.dlm , click Start. From the Repair menu, Local Database Repair. From the Servers menu, Repair All Network Addresses. From the Schema menu, Reset Local Schema. -
To verify that the schema has synchronized fully using DSTrace, from NDSCons, select dstrace.dlm , click Start. Choose Edit, Options, click Clear All and mark Schema, Inbound Sync Detail, and Inbound Synchronization, then click OK. Watch for the message "All processed = YES" on the trace status screen. When restoring file systems on the Windows server, ensure you do not overwrite the current eDirectory files with the older versions from your backup. Changes to NetWare SSI Data Due to some internal database structure changes in eDirectory 8.7, Server Specific Information backups created by file system TSAs or third-party backup tools are not supported for NetWare 5.1 and 6.0 servers running eDirectory 8.7 or 8.7.1. In eDirectory 8.7.3, SSI is now supported using the hot backup functionality. As in previous versions, file system TSA calls the DSBACKER.NLM to create the backup, but now DSBACKER.NLM also calls BACKUPCR.NLM to create a backup using the Backup eMtool functionality. NOTE As BACKUPCR.NLM makes use of eDirectory Backup eMTool to create SSI data, this means you need to have iManager installed and RBS configured in order to create SSI data on NetWare servers.
Table 8.2 lists recommendations for creating and restoring SSI data depending on the NetWare and eDirectory versions. Table 8.2. Recommended Backup and Restore Methods for NetWare SSI Data | EDIRECTORY VERSION | NETWARE VERSION | BACKUP/RESTORE METHOD | | 8.6 or earlier | Any version | Refer to the "Restoring a Failed NetWare eDirectory Server" section in this chapter. | | 8.7 | 5.1 & 6.0 | Back up and restore only using the Backup eMtool. (SSI backups performed using file system TSAs cannot be successfully restored.) | | 8.7.1 or later | 5.1 & 6.0 with pre-SP3 | Back up and restore only using the Backup eMtool. (SSI backups performed using file system TSAs cannot be successfully restored.) | | 8.7.1 or later | 6.0 with SP3 or later | Back up using either the Backup eMtool, file system TSA, or third-party tools. Restoration needs to be done using the Backup eMTool. |
The main differences in SSI data created by NetWare 6.0 with eDirectory 8.7.1 and later are as follows: -
Larger file size ” The former method of SSI backup contained only a small portion of the database. Now, because the backup file contains all the information about all directory objects on the server, it is much bigger. It will be roughly the same size as the database. -
User-defined file location ” In former versions of SSI backup, only one file, SERVDATA.NDS , was created in the SYS:SYSTEM directory. Because the file was smaller, it was not critical where the data was placed before copying off to tape. With eDirectory 8.7.1 and later you can use a file system TSA to create a full backup of the database. Instead of five files in former versions of SSI backup, only three files are involved (see Table 8.3). For one of these, SSIBACK.BAK , the file location is user definable. -
Restore using Backup eMTool ” The SSI data can only be restored using the Backup eMTool. Table 8.3. NetWare SSI Files for eDirectory 8.7.1 and Later | FILE NAME | DESCRIPTION | LOCATION | | SSIBACK.BAK | This backup file is the same as the full hot backup created with the Backup eMTool. | User definable. The default is SYS:SYSTEM . | | Because of file size, werecommend it be relocated onto a volume other than the SYS volume. | | SSIBACK.INI | A text file containing the path where the SSIBACK.BAK file is located. For example: DATA1:/BACKUPS/SSIBACKUP.BAK . | SYS:SYSTEM | | SSIBACK.LOG | A high-level view containing information about previous backups. The log file contains a history of all backups, records backup start time and end time, and contains information about possible errors during the backup process. | SYS:SYSTEM |
|