| Prior to Oracle 10g RAC, customers who purchased the RAC option had to depend on third-party vendorssuch as Veritas, Sun, HP, and IBMfor cluster communication and management support. Depending on what flavor of cluster support you selected, your install and management responsibilities could differ from one to the other. Having different vendors for cluster management and the database was problematic and introduced many obstacles for administrators, such as multiple vendors to contact for support and licensing management. This, as you can imagine, could lead to finger-pointing among vendors if serious problems occurred. Oracle 10g RAC now eliminates these issues with the introduction of Cluster Ready Services. Cluster Ready Services is a new feature, introduced with Oracle 10g RAC that provides high-availability services for cluster communication and management. CRS is the first true portable clusterware that is integrated within the 10g RDBMS kernel and offers all the features of traditional operating-system cluster-management support such as node connectivity, membership, messaging, and recovery. With CRS, users can expect quick, consistent, and reliable clusterware support with no dependencies on any platform-specific clusterware. Starting with Oracle 10g, CRS is required to be installed and running prior to installing Oracle 10g RAC. Because CRS is tightly integrated with 10g RAC, there is no need to purchase additional cluster-management support from third-party vendors, making Oracle support your one-stop shop for cluster support. However, users who wish to continue using third-party clusterware for cluster support will still be able to utilize all the benefits of CRS. When enabled, CRS can interact and coordinate cluster-management services with vendor clusterware. Likewise, CRS also supports third-party cluster file system support for physical file storage as well as generic raw devices or Automatic Storage Management (ASM), as discussed in Chapter 4. Cluster Ready Services Architecture The incorporation of CRS and 10g RAC provides high-availability support for the instances in the cluster as well as any supporting applications. CRS enables this support by defining individual resources to monitor. A CRS resource is a named process or entity whose availability is maintained and monitored by the CRS clusterware. Each resource is automatically created and registered to CRS either during installation or manually by a standard command line interface. Each defined resource within CRS has a profile built in, which includes metadata about the specific resource. This resource metadata is stored in the Oracle Cluster Registry (OCR) and describes management information for CRS such as how to start, stop, and check the health of the resource. Out of the box, CRS automatically manages the following resources across each node of a cluster: Within this group, CRS classifies each resource into one of two distinct subgroups to manage: nodeapps and database-related resources. Nodeapps are specific resources that pertain to the individual node within the cluster; each node will have its own set of the resources. Nodeapps include the Global Services Daemon (GSD), Oracle Notification Services Daemon (ONS), virtual IPs (VIPs), and the RAC Database Listeners. The second group, database-specific resources, pertains to the resources that are shared among all nodes in the cluster. The database-specific resources include the database, instances, and any services that are configured for the specific instances. The GSD, ONS, and VIP nodeapps are created and registered with OCR during the installation of RAC. The database listener, database, instance, and service CRS resources can be created either during the RAC installation process or afterward by using manual tools such as SRVCTL, DBCA, and NETCA. The heart of the CRS technology relies on three main components that run as daemons on UNIX platforms or as services in Windows environments: The CRSD daemon. CRSD is the main engine for all high-availability operations and provides management for application resources. CRSD will start, stop, and fail over application resources as well as spawn separate processes to check the application resource health if needed. It maintains its configuration data within the OCR. Running OCSSD in Single-Instance Mode with ASM The OCSSD is also used in single-instance environments to fully utilize Automatic Storage Management (when used). Failure of the OCSSD in a single-instance environment will not cause a full system reboot as noted with a RAC environment. |
As reported in metalink note: 277274.1, if the CRSD daemon detects any failure with the VIP (Virtual IP) and the VIP can not be restarted, CRSD will stop all dependent resources, including the listener, the ASM instance (if it exists), and the database instance. Because CRS will gracefully stop all dependent resources, no errors will be evident in the ASM or database alert log. To verify whether the VIP experienced an error, review the CRSD log files within the $CRS_HOME/crs/log directory for the following message: ora.nodename.vip on nodename went OFFLINE unexpectedly
To resolve this issue (logged as BUG #3718601), the root cause of the failure of the VIP must be uncovered. The trace file for the VIP will be found in the ORA_CRS_HOME/racg/dump directorythe file will be named ora.nodename.vip.trcwhere nodename is the name of the node. The problem is very likely to be due to current known issues with timeouts of the VIP under a high load. A possible workaround for this timeout issue is to increase the timeout values for the VIP from its default setting of 60 seconds to 120 seconds. This can be accomplished by the following: 1. | cd $CRS_HOME/bin
| 2. | Create a .cap file for each .vip resource on each node, such as:
./crs_stat -p ora.ccpfna.vip > /tmp/ora.ccpfna.vip.cap
| 3. | Update the .cap file using the following syntax and values:
./crs_profile -update ora.ccpfna.vip -dir /tmp -o ci=120,st=120
(Where ci = the CHECK_INTERVAL and st = the SCRIPT_TIMEOUT value.)
| 4. | Finally, re-register the new file using the -u option:
./crs_register ora.ccpfna.vip -dir /tmp -u
|
The OCSSD daemon. OCSSD facilitates cluster communication among all nodes within the cluster. It provides basic node-management services such as node membership, cluster locking, and split brain protection. If third-party clusterware is installed, OCSSD can integrate to provide the same services for cluster management. The EVMD daemon. EVMD provides event notification in case CRS detects any errors that have occurred. It will create another process, EVMLOGGER, to facilitate any event-logging activities if needed.
Of these processes, OCSSD and EVMD (likewise for EVMLOGGER) run as the oracle user ID, while CRSD runs as root. If for some reason the CRSD or the EVMD processes experience any failure, they will restart automatically. However, any failure with OCSSD will lead to a full system reboot. Installing Cluster Ready Services Before installing CRS and 10g RAC, DBAs and system administrators must familiarize themselves with the capabilities of CRS. Following are a few key items to consider prior to installing 10g CRS: CRS is shipped on a separate CD-ROM within your 10g CD pack. You must use this CD to install CRS, not the 10g Database CD. Installing CRS is mandatory prior to installing 10g RAC. CRS is not required and cannot work with any release prior to Oracle 10g. CRS should never be disabled with 10g RAC. CRS must be installed in its own unique location (for example, CRS_HOME), not within any existing ORACLE_HOME. CRS can run either on top of third-party clusterware or without any third-party clusterware. Shared disk or raw file locations for the Oracle Cluster Registry (OCR) and voting file must be configured prior to installing CRS. Due to the nature of these files, they must be placed on shared devices, either on cluster file systems or shared raw devices. As part of the CRS install, you will be prompted to provide two locations for these files. On average, both files should grow to about 100MB each. Note that in 10g Release 1, neither the OCR nor the voting file for Oracle clusterware can be stored in ASM. Ensure that user equivalence has been established on all nodes within the cluster. Within the Oracle 10g OUI (which actually first appeared with 9.2.0.5), Oracle will first attempt to use SSH and SCP. If these two are detected then the OUI will use these for all user equivalence needs. If SSH and SCP are not detected, then the OUI will revert back to RSH and RCP as used in previous versions of the OUI. For proper user equivalence, the oracle user should be able to perform a remote login to each node in the cluster (including node connections to itself) without the need for a password. Moving the OCR Location After Installation If you ever run into the situation that you need to move your OCR location, stop your CRS stack on all nodes (using init.crs stop), edit your ocr.loc with the new setting for ocrconfig_loc, restore your OCR from one of the automated backups using ocrconfig restore, use ocrcheck to verify your new environment, and then reboot your server to restart the CRS stack. |
Once CRS has been installed, the OCR location is referenced in /var/opt/oracle/ocr.loc using the ocrconfig_loc parameter for UNIX environments and in HKEY_LOCAL_MACHINE\Software\Oracle\ OCR\using the ocrconfig_loc parameter for Windows environments. The following network interfaces must also be configured prior to installing CRS: Public Interface Private Interface Virtual Interface (must be Public)
These network interfaces must also be configured within your /etc/hosts file on each node with unique names that are easy to remember for each. During the install, you will be prompted for these entries: The CRS stack is started by running the root.sh file at the end of the CRS install. This step must be executed successfully on each node of your cluster. Only one CRS stack (CRS daemons) can be running per node of your RAC cluster. The supported method to stop the CRS stack is to shut down the node or use the /etc/inittab/init.crs stop command. The only supported method to restart the CRS daemons is a complete server reboot. The manual method to start the CRS stack, /etc/inittab/init.crs start, has caused some abnormal behavior that leads to bug #3214576. Manual CRS restart is not supported until 10.1.0.4 or higher.
After you have configured all necessary components for your cluster (namely shared storage, network, and interconnect components), you can begin the CRS install. Again, CRS is shipped on a separate CD-ROM. You will need to mount this CD, run runInstaller, and follow the prompts from the OUI. You will find the CRS install to be fairly straightforward and error-free, assuming that all components are configured properly. The following is a brief example of correctly installing the new 10g CRS: 1. | After starting runInstaller, the CRS install main page appears, as shown in Figure 15.1. Specify the unique CRS_HOME for the CRS install.
Figure 15.1. Initial screen for the 10g CRS install. 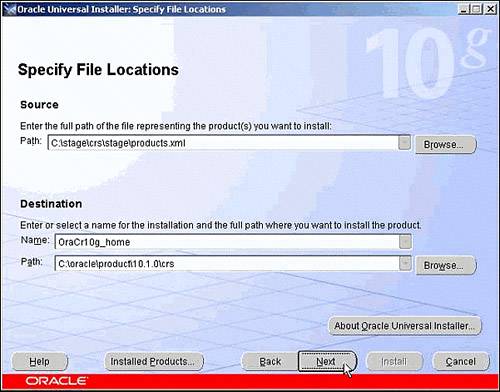
| 2. | After specifying the CRS_HOME, choose the language desired, as shown in Figure 15.2.
Figure 15.2. Language selection for the 10g CRS install. 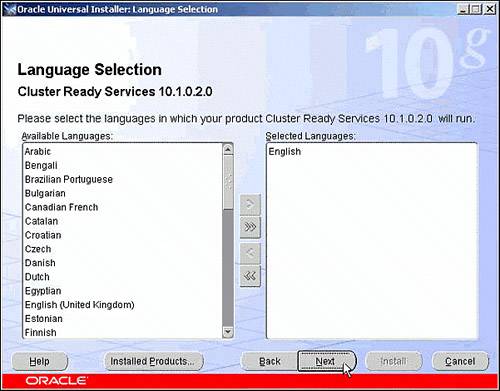
| 3. | On the Cluster Configuration page, specify the cluster name and your public and private node names for both nodes, as shown in Figure 15.3.
Figure 15.3. Cluster configuration for the 10g CRS install. 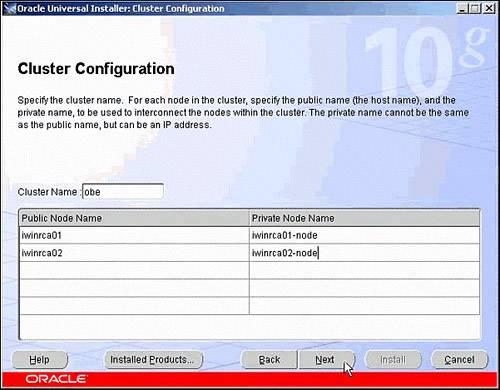
| 4. | On the Specify Network Interface Usage page, you will see a list of clusterwide interfaces (see Figure 15.4). Select the correct public and private interface and click next.
Figure 15.4. Network interface configuration for the 10g CRS install. 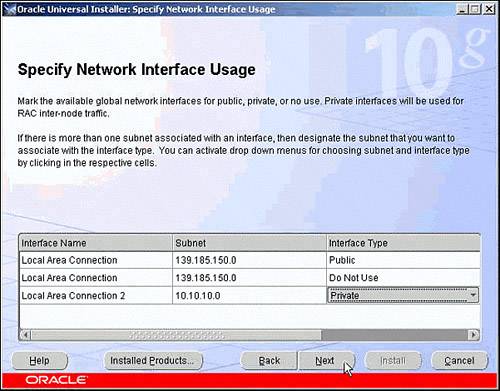
| 5. | If using Oracle Cluster File System (OCFS), you can format specified files for data and software storage. For ASM storage, do not format any logical drives, as shown in Figure 15.5.
Figure 15.5. Disk-formatting options for the 10g CRS install. 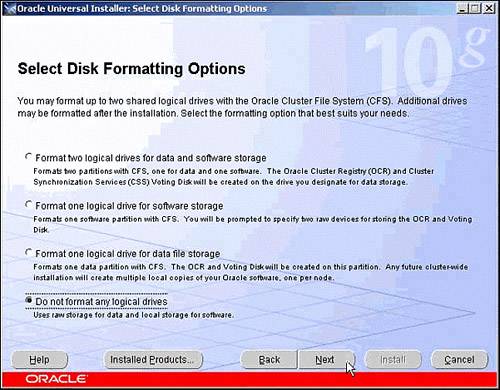
| 6. | On the Disk Configuration page, select the location for the OCR and voting disk, as shown with Figures 15.6 and 15.7.
Figure 15.6. OCR configuration for the 10g CRS install. 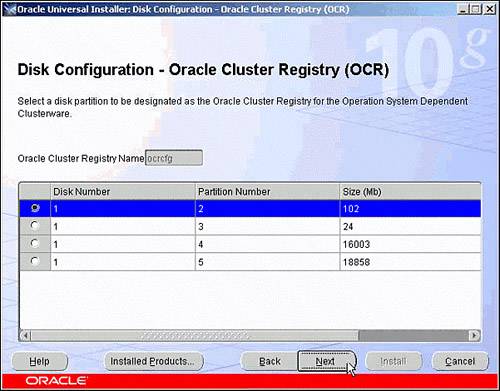
Figure 15.7. Voting-disk configuration for the 10g CRS install. 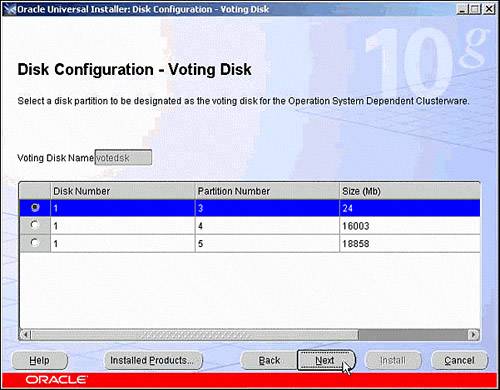
Starting with 10g Release 1, Oracle does not support the use of third-party clusterware for failover and restart of Oracle resources. When running 10g RAC, CRS should never be disabled.
| 7. | On the Summary page, shown in Figure 15.8, review the options you chose in the previous steps and then click the Install button to run the installer.
Figure 15.8. Overall summary for the 10g CRS install. 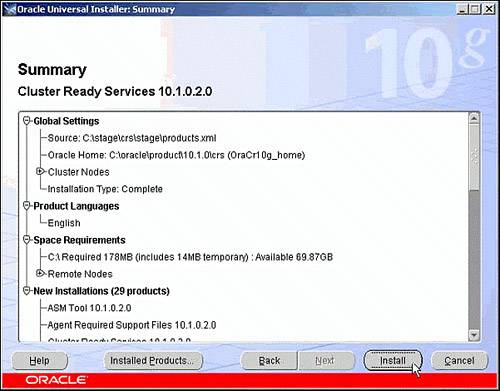
|
Installing CRS with a 10g Database Already in Place Using ASM If you are trying to install CRS with a single-instance 10g database already in place using the new Automatic Storage Management feature, you will notice that an OCSSD daemon will already exist, running out of the pre-existing ORACLE_HOME. The OCSSD is needed for communications between the database and the ASM instance. With CRS, however, there should be only one OCSSD process, which will manage both RAC and non-RAC instances running out of the new CRS_HOME. Due to this, you will need to stop and remove the pre-existing OCSSD process by running the $ORACLE_HOME/bin/localconfig.sh script (for Windows, it's localconfig.bat). This script should be executed on all nodes that will become cluster members and also have a pre-existing non-RAC ORACLE_HOME using ASM. Stop all databases and ASM instances, log in as root, and run localconfig.sh. This will remove the entry from inittab and OCR. After you complete the script, you will be able to complete the new CRS install. |
Depending on your cluster file system of choice, you will have the option of installing the CRS_HOME in a local or shared environment. Installing in a shared environment is very much like installing in a single environment where you have several shared mounts on which to install your files. These shared mounts can be accessed from all nodes in your cluster. However, you also can install locally on one node. If installing locally, you will be pleasantly surprised to learn that the 10g OUI will actually push the new CRS_HOME files to all other nodes in your cluster. This new method eliminates the need for separate installs on each node. If installing locally, be sure to note the location of all CRS_HOME log files for future reference. All CRS-related error and diagnostic files will be generated and stored locally on each node. To verify that your CRS_HOME install was successful, you can use a few utilities from the CRS_HOME/bin directory. The first utility, olsnodes, will display each node name in your cluster on which CRS is currently running. Here's an example: oracle@ccpfna> $CRS_HOME/bin/olsnodes ccpfna ccpfnb ccpfnc ccpfnd
Re-running The CRS Root.sh If you experience any issue while running the CRS root.sh, there is no need to de-install and re-install CRS. Once the problem affecting the execution of the CRS root.sh has been fixed, root.sh can be executed again. |
Installing 10g CRS With Veritas or Fujitsu Cluster File System Currently when installing 10g CRS on a Solaris cluster that does not have Sun Cluster installed, but has Veritas or Fujitsu clustering, you could hit a possible bug (3412743) in which the CRS daemons never start on the node. Basically, Veritas and Fujitsu clusters are incorrectly identified as a nonclustered Sun Cluster boot which prevents the CRS daemons from starting. The workaround is to modify the $CRS_HOME/css/admin/init.cssd before running the CRS root.sh: [before SunOS definition] VENDOR_CLUSTER_DAEMON_CHECK="PSEF | $GREP 'dlmn[o]n' 1>$NULL 2>$NULL [after SunOS definition] VENDOR_CLUSTER_DAEMON_CHECK="null_ command"
This bug and workaround is also pointed out in the Veritas Storage Foundation 4.1 for Oracle RAC Installation guide. Before running the CRS root.sh you need to perform the following steps: Log in as root user Navigate to $CRS_HOME/css/admin Run the following command: # patch init.cssd < /opt/VRTSvcs/rac/patch/init.cssd. patch
Once either one of these steps has been completed you can then run the CRS root.sh to start the CRS daemons. |
When you have verified that CRS has been successfully installed and started on all nodes, you can proceed with the RDBMS install. Troubleshooting the CRS Install While running root.sh, you may experience errors if you do not have the proper environment configured. If you run into any errors during your CRS install, you will need to review the following directories under your CRS_HOME for trace file information: $CRS_HOME/css/log. Includes log and trace files for the OCSSD resources. $CRS_HOME/css/init. Includes core dumps for OCSSD. $CRS_HOME/crs/log. Includes log and trace files for CRSD resources. $CRS_HOME/crs/init. Includes core dumps for CRSD. $CRS_HOME/evm/log. Includes log and trace files for the EVMD and EMVLOGGER resources. $CRS_HOME/evm/init. Includes core dumps for EVMD. $CRS_HOME/srvm/log. Includes log and trace files for the OCR.
Oracle support has also published a MetaLink document that details the process of properly cleaning up from a failed CRS install: Note #239998.1, "10g RAC: How to Clean Up After a Failed CRS Install." After you identify the issues to be resolved and follow the steps described in this MetaLink Note, you will be able to correct the problem and restart the install process. |