Lesson 7: Animating the Astronaut and Lunar Rover
|
| < Day Day Up > |
|
As in the previous lesson, here you will model two fragments. The first fragment is animation of the astronaut's motion on the Moon's surface; the second is the rover's motion with the astronaut on board.
By this time, all your models should be ready, so no complicated modeling will be required. Moreover, if you did all the previous lessons, you will have no difficulty creating these two simple animations. Therefore, we will not describe the evident things in detail.
Animating of the Astronaut
The base of this fragment will be the ready scene of the second fragment in Lesson 6. We will touch it up a little.
-
Load your scene, or load our scene from the CD-ROM (named
 lesson07(Start).max in the Lessons\Lesson07\Scenes folder).
 -
The time parameters are already specified, so don't change them.
-
Unhide all objects. Go to the last frame of the animation.
What should to be changed? It is necessary to remove the animation of some objects — namely, the particle systems simulating the gases of the jet engine and the dust. The pebbles (Pebbles object) should remain where they fall, so start editing from them.
The Pebbles object will become the system of particles. Make a copy by converting it to the Editable Mesh type of objects using the Snapshot operator.
-
Select the Pebbles object and apply the Snapshot operator (Fig. 7.1):
-
Main menu à Tools à Snapshot
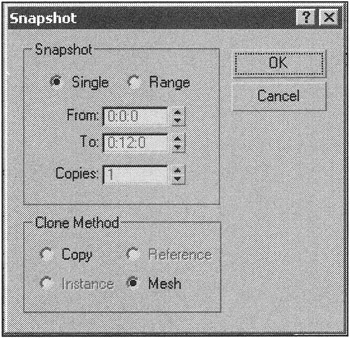
Figure 7.1: Parameters for creating the Snapshot of the Pebbles system of particles -
The result will be a geometric object named GPebbles01 — this is the name given by 3ds max.
-
Remove the source Pebbles object.
-
Select and remove all systems of particles, deflectors (Deflectors), gravity (Gravity), auxiliary objects, and the object of the Mesher type.
-
Go to the last frame and select all objects.
-
Select and remove all animation keys on the time scale.
| Attention | If your keys are set in the last frame, first select and remove the keys in the previous frames. Only then should you remove the keys in the last frame! |
Now you have to break the link between the Camera Target and the LUNAR SHIP object. This link was made to animate the camera's tracing of the lunar module.

-
Select the Camera01.Target object and break the link using the Unlink Selection command.
You also could remove the lens effects (they are incorrect now), but we don't recommend that you do this. These effects will be used for other purposes later.
So, the scene is "clean." Now you have to hide some objects (e.g., mountains) and parts of the objects (e.g., some polygons of the Moon's surface and pebbles), leaving only those necessary (Fig. 7.2).
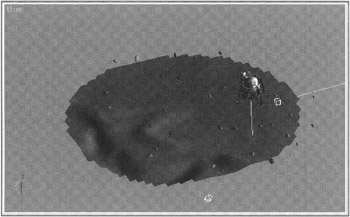
Figure 7.2: Scene preparation
-
Select the required objects. If necessary, convert them to the base type (e.g., editable poly), select the "redundant" polygons, and hide them:
-
Control panel à Edit Geometry à Hide Selected
-
-
Merge the lunar rover:
-
Main menu à Merge
-
Position the rover at a distance from the lunar module on a sufficiently even surface. Turn it in the direction opposite to the coordinate center (Fig. 7.3). This is important for further animation; our scene will be the basis for the next fragment.
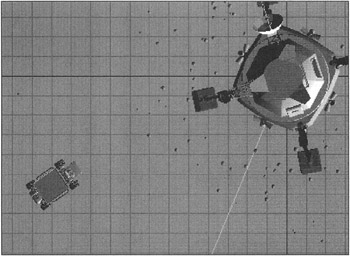
Figure 7.3: Positioning the lunar rover
-
Load your character:
-
Main menu à Character à Insert Character
-
Problems may occur here, but the developers of 3ds max advise you not to change the system units without utter necessity. (This recommendation was considered in the previous lessons.) The result looks approximately as shown in Fig. 7.4. The errors occur because of a lack of coincidence between the system units in the current scene and those being loaded.
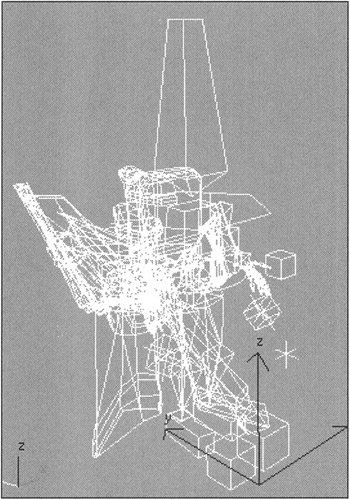
Figure 7.4: Incorrect loading of the character
We'll help you solve this problem without going into details.
-
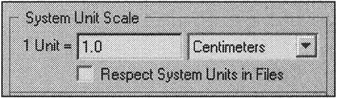
Before the character is loaded, deactivate the coincidence check of the system units:
-
Main menu à Customize à Units Setup à System Unit Scale à uncheck Respect System Units in Files flag
-
-
After the character is loaded, check this flag again. This will ensure that all future objects are created in single units.
-
Unlock the character, keeping the selection on:
-
Main menu à Character à Unlock
-
-
Select the Character01 object and adjust its size as necessary by scaling all coordinates, guided by the rover (Fig. 7.5).
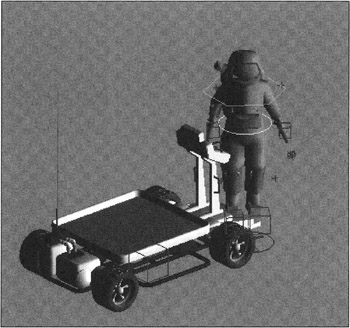
Figure 7.5: Scaling the character
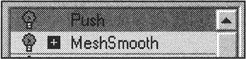
| Tip | To simplify animation playback in the viewport, select the SpaceSuit object and deactivate the MeshSmooth and Push modifiers by "switching off" the lightbulb to the left of each modifier's name in the stack. |
Now, load the animation files for the character. We prepared two such files: one for step and another for jump. Let our astronaut take a step, two jumps, and then another step.
-
Select the Character01 object and load the
step(0-60).anm file from the CD-ROM (Lessons\Lesson07\anim folder):-
Control panel à Insert Animation
-
-
In the appearing dialog, select Replace Animation and press the Merge Animation button.
| Note | This animation was created for our character with the object names used here. If you completed Lesson 4 and created your own character with other object names, then your names may not coincide. You will have to open the Object Mapping rollout and reassign the objects' correspondence. |
Play the animation in the viewport. Your character should take a step. So far, neither his position nor orientation matter.
Load the jump(0–90).anm (twice) and step(0–60).anm files successively, not substituting but adding the animation (Paste to Existing Animation) to the required frame with shift (Relative). For example, the parameters for the first jump should be like those shown in Fig. 7.6.
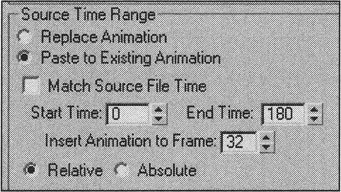
Figure 7.6: Parameters for animation of the first jump
| Note | Unfortunately, when the animation files are loaded, you will have to deal with the frames. To simplify the process, switch to the frames in the time settings (Time Configuration). To determine the number of the frame from which the next animation reel must be loaded, select any animated object of the character (e.g., _BODY). You will see the animation keys of this object on the time scale. Use these keys as guidelines. |

Note that the names of our files contain the frame numbers. Actually, this is the animation time in frames. The files being loaded were made with a frequency of 30 frames per second, but the current scene uses 15 frames per second. During the loading, 3ds max takes this into account by scaling the time.
How reasonable is this process? Select any animated object and note that the keys on the time scale have different sizes. The keys of a lesser size are set between the frames, so they are called Subframe keys. Therefore, the smoothness of the animation remains intact, and no keys disappear.
![]()
How can the character's animation be edited if there are many animated parameters? If you want to animate the parameters' values, your only option is the animation curve editor. If the parameters of several objects need to be changed simultaneously, do this by merging the curves. Select the required tracks from the objects list (left mouse button with the <Ctrl> key pressed). After several keys are selected on these curves, you can edit them simultaneously. Fig. 7.7 shows an example of simultaneous editing of the animation curves, governing the movement on the Y axis of the Foot_L and Foot_R objects.
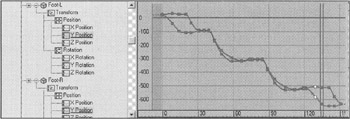
Figure 7.7: Simultaneous editing of different tracks' keys in the curve editor
This task is rather painstaking, so we strongly recommend that you create the "correct" animation from the beginning.
The time spans, however, have to be edited frequently. Another editor — Dope Sheet (key chart) — is convenient for these purposes.
-
Open the Dope Sheet:
-
Main menu à Graph Editors à Track View — Dope Sheet
-
| Tip | It may help to position the editor's window at the bottom of the screen by moving it to the time scale. This stops the window from "floating." |
From all the features of this editor, we will consider the most necessary one in our case: the option for simultaneously working with the keys of several tracks.

-
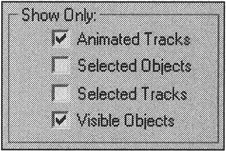
Open the Filters dialog and set the option to display only Animated Tracks.
-
Switch to the key editing mode (Edit Keys).
-
Activate the Modify Subtree mode.
-
Select the tracks corresponding to the upper levels of the objects. If necessary, expand the tree of the Character01 object by pressing the "+" symbol to the left of the object's name, or reduce the tree by pressing the "-" symbol.
You should have an image similar to the one shown in Fig. 7.8.
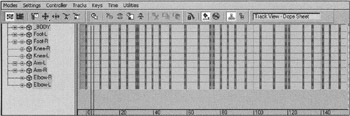
Figure 7.8: Dope Sheet window, prepared for editing the keys of several objects
| Note | The figure shows the pressed Snap Frames button. This allows any subframe keys to move to the nearest frame when the main keys are moved. We think that in this case, this is the correct solution. Release the button if you don't like the result. |
To edit keys, two groups of tools can be used: those for editing keys and those for time. When the keys are edited separately, the tools of the first group should be used. For simultaneous editing of several keys (as in our case), use the tools of the second group. Consider the main operations of these tools.

-
You can remove the keys by eliminating their time spans. Selecting these using the Select Time command, then apply the Delete Time command.
-
If necessary, you can copy the keys using the Copy Time and Paste Time commands.
-
Using the Insert Time command, you can insert a span among the keys. Be aware that this is not a "pause" but a slowing of time!
-
Using the Scale Time command, you can either accelerate or slow the animation by scaling the selected time span.
-
Finally, using the Reverse Time command, you can reverse the animation playback.
Note If you opened the Undo window during your experiments, you likely noticed that all these operations were described in one phrase: Move Keys. Just so; all these operations simply move the keys on the time scale.
-
Move the Character01 object to the position corresponding to the start of the motion.
-
Make the astronaut move on the surface of the Moon. You will have to animate the movement of the Character01 object on the vertical axis. Do this using the animation record (Auto Key).
Now, create his footprints. It's this easy:
-
Make one footprint — an object of the Plane type — slightly above the surface (Fig. 7.9, a).
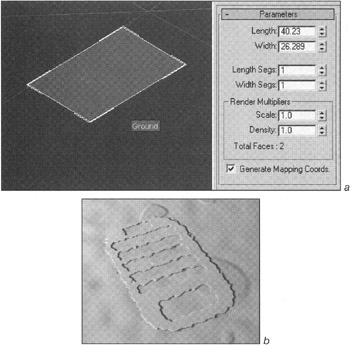
Figure 7.9: Modeling a footprint -
Deactivate the shadow cast by this object:
-
Context menu à Properties à Cast Shadows

-
Use the Ground And Stones material as the source material for the footprints by changing it as follows:
-
Substitute the texture merged on the Bump channel for the image from the step.tga file.
-
Set a big Amount value (100–150) for this channel.
-
Transfer the same texture on the Opacity channel with copying (not inheritance!). Invert the image in the texture's properties:
-
Material editor à texture parameters à Output rollout à Invert flag

-
Here is the step we created (Fig. 7.9, b). On close examination it leaves much to be desired, but at a distance it looks rather good.
-
Duplicate the footprints and place them where the astronaut's feet touch the Moon's surface.
After you have the footprints, it is necessary to animate their appearance in accordance with the astronaut's motion. It is convenient to do this in the Dope Sheet.
-
Select all footprints and open the Dope Sheet.
-
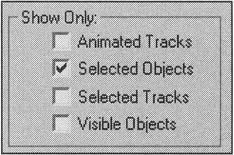
In the Filters dialog, set the track display for only Selected Objects.
-
Select all tracks of the objects and add the Visibility Track:
-
Dope Sheet editor menu à Tracks à Visibility Track à Add
-
-
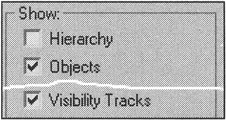
In the filters, set the display for only Objects and the Visibility Tracks.
-
Substitute the animation controller for the visibility track of the Step01 object with the Boolean Controller:
-
Dope Sheet editor menu à Controller à Assign
-
There are only two states for this controller: "1" and "0". This is what we need. A blue line on the track corresponds to the state "1". You can toggle the state of the key using the right mouse button.
-
Set two keys on the track using the Add Keys tools. The first key should be set in the negative frame of the active segment, the second one in the zero frame. The first footprint should be visible at once.

-
Copy the controller into the clipboard using the Copy command:
-
Dope Sheet editor menu à Controller à Copy
-
-
Select all visibility tracks and assign the controller from the clipboard to them:
-
Dope Sheet editor menu à Controller à Paste
-
-
Make the footprints appear in the required frames by moving the keys (Fig. 7.10).
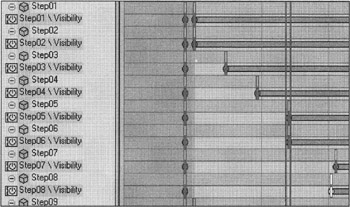
Figure 7.10: Animating the footprints
| Tip | It is convenient to activate synchronization of the time slider and the cursor position (Dope Sheet editor menu à Settings à Sync Cursor Time). |
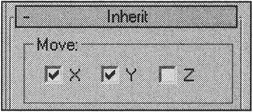
You can obtain the camera's tracing of the astronaut by linking (Select and Link command) the target of the camera to the _BODY object. To make the camera perform only horizontal movements, deactivate inheritance (Inherit) of the Z-axis movement in the linkage parameters:
-
Control panel à Hierarchy à Link Info à Inherit à uncheck Z in the Move group
-
Unhide all objects.
-
Select the objects-bones and exclude them from rendering:
-
Context menu à Properties à uncheck Renderable flag

-
The last touch is to adjust a light halo around the spacesuit, which is visible in lunar photos. It would be nice if you created dust coming from under the astronaut's boots. We let you rack your brain for solutions to these tasks.
Everything is ready for rendering!
You can find our scene (lesson07(part1).max) on the CD-ROM in the Lessons\Lesson07\Scenes folder.
|
| < Day Day Up > |
|
EAN: N/A
Pages: 136