| It is easier to implement the RUP at the beginning of a project to avoid adding the complexity of transitioning from your current process to the RUP in the middle of the project. The following five steps will help you when introducing the RUP product in the beginning of your project: -
Assess. Assess what issues your team has been facing in the past, what impact they have on your business, and which issues are of the highest business priority to address for the future. Clearly articulate expected business benefits, ideally through a business case. -
Plan. Plan the rollout activities, such as customization of the process, training (that is, structured lessons) and mentoring (that is, an expert project member working side-by-side with the project team doing on-the-job-training), and purchase of required tools. Focus on Just-In-Time (JIT) training to ensure motivated students, rather than broad rollout of training, since you learn faster if you know you will put the knowledge into practice soon. -
Configure and customize. Do necessary configuration and customization of the process, tool environments, and training material. Do only customizations that are motivated from a business perspective, that is, are aligned with the business case. -
Execute. Deploy the process and tools in your project, train and mentor project members , and run your project. Focus the team on project results, and use mentors to ensure that usage of the process and tools are aligned with business objectives. -
Evaluate. Evaluate project performance and compare it to expectations as expressed in the business case. Identify opportunities for future improvements. Let's have a closer look at each step. Assess It is important to have a clear view of the objectives for change. Why are you introducing the RUP? To understand the objectives, make a prioritized list of the problems you currently are facing and their impact on your business, such as "requirements creep causes schedule slips," "unreliable build process reintroduces defects that already have been fixed," "brittle architectures make maintenance costs go up," "ad hoc and manual test processes lead to poor quality,"and so on. The better you can quantify the value of potential process improvements in terms of increased quality, reduced time-to-market , and lower cost, as well as the effect those improvements will have on the bottom line, the better you can focus your process improvements on the high-priority areas. It will help you in motivating people to change (since they will understand the benefits to them and the organization), in getting funds to make necessary investments (since management will see tangible improvements resulting from the investment), and in getting buy-in from key stakeholders (since they will see how it benefits the organization). It will also help you to determine and prioritize which process improvements to make, that is, what parts of the RUP to adopt in what order. Ideally, a RUP implementation should be motivated through a clear and concise business case. Let's look at two examples. Project Mercury Project Mercury is about to start. In a previous project, the team had major problems with requirements creep and the architectural structure. The combination of these two problems was considered the main cause of a three-month slip. Project Mercury is a very important project, and time is of the essence. A similar slip in this project would cost the company roughly $200K, and if the performance continues at current levels, the estimated cost to the department is expected to be roughly $300K per year. After analyzing the RUP, the project manager decides that the project would greatly benefit from deploying the Requirements, Analysis & Design, and Project Management disciplines. To support the new process, the team decides to invest in requirements management tools and visual modeling tools. It is decided that it would be too risky to introduce too much change at once, so no changes are made to areas such as testing and Change Management. Project Genesis Project Genesis is about to start, and a new project team is recruited with project members from a variety of backgrounds. Different team members have experience from different processes (including ad hoc) and tools. The development manager wants to ensure that the team shares the same view of how to develop software and that they use modern best practices and tools. The development manager expects these improvements to lead to roughly 5 percent productivity increase and 15 percent lower defect count on released products (based on experiences from past process improvement initiatives), which in turn would lead to bottom-line improvement of $170K per year. They decide to standardize on the RUP and one uniform set of tools. It is decided that all team members would use the RUP throughout the project. In each of the two examples, the objectives in introducing the RUP were made clear, with quantifiable benefits, and based on those objectives, it was decided which parts of the RUP should be used. Plan The second step is to plan the rollout of the process and the tool environment. You need to plan when and how to do the configuration and customization of the process, tool environment, and training; you need to plan the delivery of JIT training and mentoring; and you need to plan the physical rollout of tools, including the purchase of tools and potential conversion of existing data to new tools. Performing JIT training is just one example of how you should drive all process improvement activities to maximize business benefits. Why train people today on something they will not use for another three months? Students will be less motivated, they may forget what has been taught, and some people may even leave the team before they can apply the knowledge. Let's again take a look at our two example projects. Project Mercury Project Mercury budgets for acquiring the Rational Unified Process, as well as tools for requirements management and visual modeling. Using the RUP Builder, the Project Mercury team produces a suitable RUP configuration (see Chapter 10 for more details on configuring the RUP). They assign a mentor to write the development case and roll out the tools according to Figure 11.1. Since they are inexperienced with iterative development and their Configuration Management and test automation solution is also rather poor, they decide that they can handle at best four iterations in the project. Their training budget is fairly tight, so they send only one person to each course of RUP Fundamentals, Principles of Managing Iterative Development, and Object-Oriented Analysis and Design. Down the road, they all get access to Web-based training for the RUP. They decide to budget for a part-time mentor to assist them in effectively using the tools and the process for the Requirements, Analysis & Design, and Project Management disciplines. Figure 11.1. Rollout of the Requirements, Analysis & Design, and Project Management Disciplines. The evolution of the development case, associated guidelines, and the rollout of tools to support the Requirements, Analysis & Design, and Project Management disciplines. 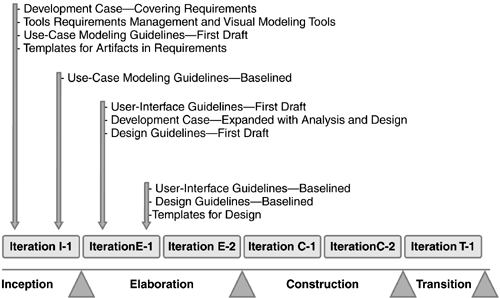 Project Genesis Project Genesis budgets for acquiring the Rational Unified Process and tools. Using the RUP Builder, the Project Genesis team produces a suitable RUP configuration (see Chapter 10 for more details on configuring the RUP). They assign a mentor to write the development case and roll out the tools and the development case according to Figure 11.2. They feel comfortable using a highly iterative approach because several team members have past experience with it and they will have a skilled mentor on the project. Project Genesis has a substantial training budget, and they complete a combination of in-house training and open -enrollment training. Down the road, they all get access to Web-based training for the RUP. They decide to budget for a full-time mentor to assist them in effectively using the tools and the process. Figure 11.2. Rollout of the RUP and Tools. The evolution of the development case, associated guidelines, and the rollout of the RUP and supporting tools. 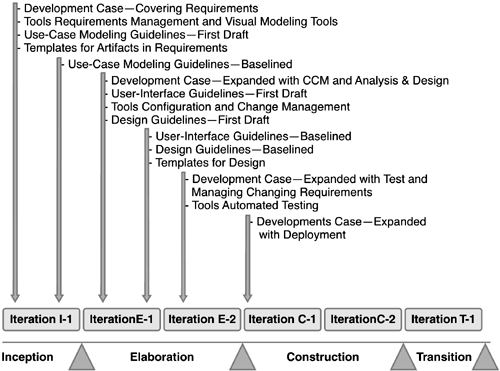 As we can see, the way the rollout is planned varies a lot from project to project. The experience of the team, project funding, and the team's willingness to change are key factors that impact planning. We notice, however, that both projects use a mentor, that is, an expert project member, to accelerate knowledge transfer. Our experience shows that the use of mentors (internal or external) is critical for the success of process improvement initiatives. Configure and Customize Configuration and customization requires tailoring the RUP to include only the parts you need for your project, developing additional guidelines you may need, customizing associated training material, and tailoring and integrating tools, as well as templates. In Chapter 10, we discussed how to configure, instantiate, and customize the Rational Unified Process. In almost all cases where you adopt the RUP for only one project, you should focus on producing a RUP Configuration and Process View using RUP Builder and producing a development case. Both of these things can be done with a small investment in time. If you are using RUP on your second or third project, you should consider building Thin RUP Plug-Ins, but only very large projects (more than 80 people) or organizations should normally consider building Structured RUP Plug-Ins (see Chapter 10). Customizing the RUP also includes customizing templates that ship with the RUP, such as templates for describing use cases, software architecture documents, and so on. You should perform only customizations that are necessary and lead directly to improved project results. It is a common mistake to roll out too "heavyweight" a version of the RUP, with too many artifacts that, in turn, require needless production by the project team. Whenever possible, seek to minimize the number of artifacts to be produced, without compromising on quality. When you are in doubt whether you need an artifact, you should normally not include it (you can always add it later if you realize you were wrong). You should, however, consider the benefit an artifact gives not only when developing the first version of the system, but also when maintaining and improving the system. In many cases, you may be able to reduce the need for large customizations by having mentors assist you. A skilled RUP mentor can dynamically guide you by indicating which parts of the process to apply in what way, allowing for greater flexibility of the process implementation along the way. Once you have validated what works for your team, you can take the time to document it. It is important that your training is adapted to your customized process. In most cases, you do not need to change the training material physically. Rather, the instructor must understand your development case to decide to either skip sections, quickly browse through, or spend extra time on them. Customizing the tool environment may include building integration between tools, customizing templates, or setting up tools. Execute It is now time to deploy the process and tools in your project. Following the plan, you will train people, publish your development case and RUP Configuration, deploy your tools, and initiate the project. One of the benefits of iterative development is that it allows you to improve the process and tools throughout the project as you find out what works and what does not. Iterative development means that early in the project you do some requirements, some design, some implementation, and some testing. Introducing all tools on day one, however, will be overwhelming to the team, so you need to consider "lightweight" implementations of the tools up-front. For example, maybe you need to use only some very limited aspects of your visual modeling tool in Inception or even do the design on a whiteboard. Maybe you automate testing first in the second iteration of Elaboration. Following is a brief outline of what is done during a project: -
Before the project starts. Before the project actually starts, key people need to be trainedusually process engineers , architects , team leads, and project managers. These people need to set up the project, recruit the right people, and set forth the right plans for Inception and beyond. You typically also need to set up a basic tool infrastructure for Inception, such as tooling for requirements management and change and defect tracking. A mentor can help you with producing a development case, training, and planning the project and process implementation. -
Inception phase. During this phase, you typically focus on understanding how to improve the way you manage requirements (Requirements discipline) and how you manage the project (Project Management discipline). You want to set up a Configuration Management (CM) infrastructure for Elaboration, and you want to do JIT training in these areas. A mentor can perform the JIT training, as well as work side-by-side with team members to show them how to work with Requirements and Project Management disciplines. A toolsmith or mentor can help you with setting up a sound CM environment. -
Elaboration phase. By the end of the Elaboration phase, all processes and tools are in place. The most critical part of this phase is often Analysis & Design and Configuration Management because you need to baseline your requirements and architecture, and you need to have a well-functioning Configuration Management infrastructure that enables your development teams to work in parallel. Inception and Elaboration are the two phases in which having a mentor is the most critical. A mentor guides people in what are the most essential tasks and what are the most essential best practices to adopt. The mentor performs JIT training to accelerate learning and avoid information overload. During the Elaboration phase you will test the architecture and key functionality; therefore you need to make sure that the test environment is up and running. You also need to pay special attention to the effective management of iterative development, since typically it is not obvious how to develop the architecture incrementally. -
Construction phase. No new processes or tools are introduced in this phase. The focus here is to produce the product; therefore, the development environment must be stable. In the Construction phase, the motivation is to get new team members on the project up to speed. A mentor helps fine-tune the process, introduce new team members to the process, and keep the project team focused on project results. -
Transition phase: No new processes or tools are introduced. In the Transition phase, the focus shifts from project-specific process improvement to project post-mortems, enabling you to improve the process and tools for future projects. Experiences from the current project are gathered, summarized, and packaged in a form that future projects can use. Evaluate Evaluating the performance of the team and the effectiveness of the implementation of the RUP and supporting tools should be a continuous activity so you can improve the process during your project. However, at the end of the project, you should spend time on assessing the overall effort and validate the business case for adopting the RUP and supporting tools. Did you achieve your established goals? Evaluate the people, the process, and the tools to understand the areas to focus on for any future process implementation effort. Document your findings in a post-mortem report. Adopting the RUP in Small Projects When adopting the RUP product on a small project with perhaps a handful of people, you use the same approach as for larger projects. The difference is not in the thought process or in what you do, but rather in the formality in which you document decisions and the rigor of the approach used when transferring knowledge. Let's walk through the five steps and point out some of the differences: -
Assess. Just as for larger projects, you need to understand what you want to achieve by introducing the RUP, and you need to decide the highest priority items to focus on. You will, however, probably not document this in a business case, but rather come to a verbal agreement within the project team or write up a memo used as a basis for investment decisions. -
Plan. You still need to plan how to introduce the process improvement. Since the effort is smaller, you do not need to document the plan as rigorously as for a larger project. -
Configure and customize. Configure the RUP, but avoid building Structured RUP Plug-Ins since they are most likely not worth the effort. Do minimal customizations to tool environments. Rather than customizing training material, use a mentor to guide you in applying the process and tools for your project and to provide you with an understanding of how your approach should differ from what was taught in any formal training classes. -
Execute. Deploy the process and tools in your project, train and mentor project members, and run your project. The main difference between large and small projects is that in larger projects you can rely more heavily on mentors to transfer knowledge (instead of having to depend exclusively on formal training), but you may still need to send a couple of people to attend training. -
Evaluate. Have a team meeting to evaluate project performance, and compare it to expectations going into the project. Identify opportunities for future improvements. Achieve Effective Return on Investment Through Tool Automation As you encounter problems with your software development, you need to analyze the problem, the impact it has on your business, and how it can best be addressed. Quite often you will find that to achieve bottom-line improvements, you need to improve best practices, tool automation, or both. Iterative development itself creates a profound need for automated tools. Because each iteration is a complete software development cycle executed in a very short amount of time, it thus requires tools that support short cycle times and allow for a high degree of change. Not having the right tool support may mean that you lose out on some of the potential benefits of iterative development. This explains why the Rational Unified Process is tightly integrated with tools for the various parts of the lifecycle. The RUP, however, does not force you to adopt tools, but when you choose to do so, you find guidance within the RUP on how to use tools from IBM Software or other vendors . In Table 11.1, we provide some examples of how you can map problems to business impact and what kind of automation can address the problem and hence improve business results. This does not mean that you have to adopt all the described automation solutions. But when you encounter the problems described earlier or elsewhere, you need to understand their business impact and to what extent they can be addressed by improving best practices, tool automation, or both. Table 11.1. Tool Automation Can Address Core Development Problems. To maximize return on investment ( ROI ) when using the RUP , you should consider adopting tools that fully support iterative development, such as tools for private workspaces, automated build, automated testing, requirements management, and defect tracking. | Problems Encountered | Business Impact | Possible Solutions | | | | | | | | | | | | | | | | | -
Unclear which change requests should be implemented, and which should not. -
Changes that should be implemented are not implemented, and vice versa. | | |  |