Domain 1 Installation, Configuration, and Upgrading
CompTIA A+ Exam Objectives Covered in This Chapter
- 1.1 Identify the names, purpose, and characteristics of system modules. Recognize these modules by sight or definition.
- 1.2 Identify basic procedures for adding and removing field-replaceable modules for desktop systems. Given a replacement scenario, choose the appropriate sequences.
- 1.3 Identify basic procedures for adding and removing field-replaceable modules for portable systems. Given a replacement scenario, choose the appropriate sequences.
- 1.4 Identify typical IRQs, DMAs, and I/O addresses, and procedures for altering these settings when installing and configuring devices. Choose the appropriate installation or configuration steps in a given scenario.
- 1.5 Identify the names, purposes, and performance characteristics of standardized/common peripheral ports, associated cabling, and their connectors. Recognize ports, cabling, and connectors by sight.
- 1.6 Identify proper procedures for installing and configuring common IDE devices. Choose the appropriate installation or configuration sequences in given scenarios. Recognize the associated cables.
- 1.7 Identify proper procedures for installing and configuring common SCSI devices. Choose the appropriate installation or configuration sequences in given scenarios. Recognize the associated cables.
- 1.8 Identify proper procedures for installing and configuring common peripheral devices. Choose the appropriate installation or configuration sequences in given scenarios
- 1.9 Identify procedures to optimize PC operations in specific situations. Predict the effects of specific procedures under given scenarios.
- 1.10 Determine the issues that must be considered when upgrading a PC. In a given scenario, determine when and how to upgrade system components.
This chapter dissects the personal computer, identifies its various components, and attempts to explain those components as succinctly and precisely as possible. As a doctor must be intimately acquainted with human anatomy, so a computer technician must understand the physical and functional structure of a personal computer.
Any PC is a complex machine. It could be described as a bit of a “melting pot” of various technologies and products, manufactured by a host of companies in many different countries. This diversity is also a great advantage because it gives the PC all of its versatility. However, these components don’t always “melt” together into a unified whole without the help of a technician. These different products—whether they are hard disks, modems, sound cards, or memory boards—must share one processor and one motherboard and therefore must be designed to work in harmony. For this reason, configuration of the computer components is especially emphasized on the A+ Core Hardware exam, and nearly one-third of the exam’s question pool pertains to the objectives reviewed in this chapter.
Before sitting for the exam, you will need to have a working knowledge of the components that make up a computer and their function within the system as a whole. The exam will test your knowledge of the types of components and their functions. The objective of this chapter is to review and identify the main components and their functions.
To pass the exam, you must be able to recognize these components and understand their relationship to one another. Figure 1.1 shows a typical PC, its components, and their locations.
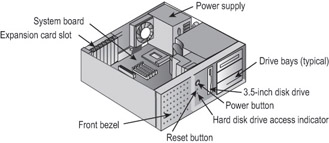
Figure 1.1: Typical PC components
Identifying System Modules
The function of each of these components is critical to the operation of the computer. The knowledge needed to effectively describe each of these components and their operation is not only key to passing the exam, but is necessary to productively troubleshoot issues that arise in daily PC break-fix repair environments.
Critical Information
The system modules described in this section are either essential computer components or available on the market as optional equipment. Each has a distinct and very practical function.
Concepts and Modules
To troubleshoot and repair computers, you must be familiar with the components and their function when operating. Each component provides a specific function to the operation of the computer.
System Board
The spine of the computer is the system board, or motherboard. This component is made of green or brown fiberglass and is placed in the bottom or side of the case. It is the most important component in the computer because it connects all the other components of a PC together. Figure 1.2 shows a typical PC system board, as seen from above. On the system board you will find the CPU, underlying circuitry, expansion slots, video components, RAM slots, and a variety of other chips.
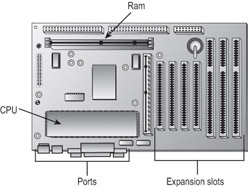
Figure 1.2: A typical system board
Integrated Components
Some motherboards have some of the peripheral devices built in, such as video, sound, and/or networking. These are referred to as integrated system boards. Such boards are cost-effective because they do not require a separate video card, sound card, and so on. The built-in components can be disabled through BIOS Setup if they should ever malfunction or need to be replaced by newer models.
System Board Components
Motherboards include components that provide basic functionality to the computer. The following components are found on a typical motherboard:
- Expansion slots
- Memory (RAM) slots
- CPU slot or socket
- Power connector
- Floppy and IDE drive connectors
- Keyboard and mouse connectors
- Peripheral port connectors (COM, LPT, USB)
- BIOS chip
- Battery
Figure 1.3 illustrates many of the components found on a typical motherboard.
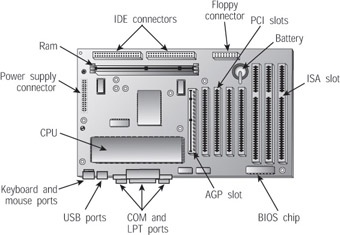
Figure 1.3: Components on a motherboard
Expansion SlotsExpansion slots are used to install various devices in the computer to expand its capabilities. Some expansion devices that might be installed in these slots include video, network, sound, and disk interface cards.
Expansion slots come in three main types: ISA, PCI, and AGP. Each type is different in appearance and function, which you’ll learn more about in future chapters. This chapter shows how to visually identify the different expansion slots on the motherboard.
- ISA Expansion SlotsIf you are repairing a computer made before 1997, chances are the motherboard in your computer has a few Industry Standard Architecture (ISA) slots. These slots are usually brown and are separated into two unequal lengths. Computers made after 1997 generally include a few ISA slots for backward compatibility with old expansion cards.
- PCI Expansion SlotsMost computers made today contain primarily Peripheral Component Interconnect (PCI) slots. They are easily recognizable, because they are short (around 3 inches long) and are usually white. PCI slots can usually be found in any computer that has a Pentium-class processor or higher.
- AGP Expansion SlotsAccelerated Graphics Port (AGP) slots are becoming more popular. In the past, if you wanted to use a high-speed, accelerated 3-D graphics video card, you had to install the card into an existing PCI or ISA slot. AGP slots were designed to be a direct connection between the video circuitry and the PC’s memory. They are also easily recognizable because they are usually brown and located right next to the PCI slots on the motherboard. Figure 1.4 shows an example of an AGP slot, along with a PCI slot for comparison. Notice the difference in length between the two.
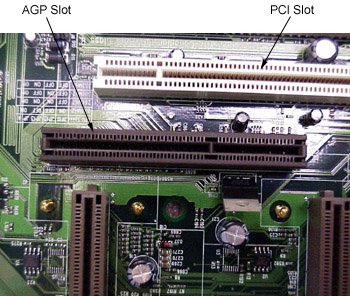
Figure 1.4: An AGP slot compared to a PCI slot
Memory SlotsMemory, or random access memory (RAM), slots contain the actual memory chips. There are many and varied types of memory for PCs today. We’ll further discuss the memory itself later in this chapter. PCs use memory chips arranged on a small circuit board. These circuit boards are called Single Inline Memory Modules (SIMMs) or Dual Inline Memory Modules (DIMMs). DIMMs utilize memory chips on both sides of the circuit board, whereas SIMMs utilize memory chips on a single side. There is also a high-speed type of RAM called Rambus Dynamic RAM (RDRAM), which comes on circuit boards called RIMMs.
Along with chip placement, memory modules also differ in the number of conductors, or pins, that the particular module uses. The number of pins used directly affects the overall size of the memory slot. Slot sizes include 30-pin, 72-pin, 168-pin, and 184-pin. Laptop memory comes in smaller form factors known as Small Outline DIMMs (SODIMMs). Figure 1.5 shows the popular form factors for the most popular memory chips. Notice that they basically look the same, but the memory module sizes are different.
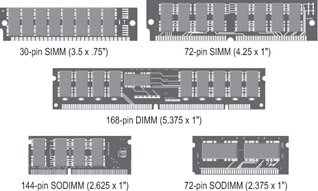
Figure 1.5: Various memory module form factors
Memory slots are easy to identify on a motherboard. They are usually white and placed very close together. The number of memory slots varies from motherboard to motherboard, but the appearance of the different slots is very similar. Metal pins in the bottom make contact with the soldered tabs on each memory module. Small metal or plastic tabs on each side of the slot keep the memory module securely in its slot.
Central Processing Unit (CPU) and Processor SlotsThe CPU slot permits the attachment of the CPU to the motherboard, allowing the CPU to use the other components of the system. There are many different types of processors, which means many types of CPU slots. We’ll expand on the different types of processors in Chapter 4, “Motherboard/Processors/Memory”; for now we will discuss only the CPU’s interface with the motherboard.
The CPU slot can take on several different forms. In the past, the CPU slot was a rectangular box called a Pin Grid Array (PGA) socket, with many small holes to accommodate the pins on the bottom of the chip. With the release of new and more powerful chips, additional holes were added, changing the configuration of the slot and its designator or number. Figure 1.6 shows a typical PGA-type CPU socket.
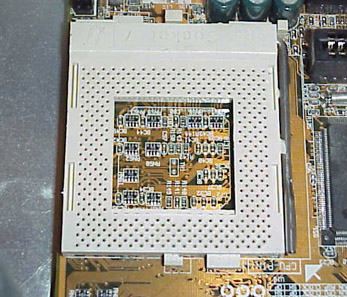
Figure 1.6: A PGA CPU socket
With the release of the Pentium II, the architecture of the slot went from a rectangle to more of an expansion-slot style of interface called a Single Edge Contact Cartridge (SECC). This style of CPU slot includes Slot 1 and Slot 2 for Intel CPUs, and Slot A for Athlon (AMD) CPUs. This type of slot looks much like an expansion slot, but it is located in a different place on the motherboard than the other expansion slots.
To see which socket type is used for which processors, examine Table 1.1.
|
Connector Type |
Processor |
|---|---|
|
Socket 1 |
486 SX/SX2, 486 DX/DX2, 486 DX4 Overdrive |
|
Socket 2 |
486 SX/SX2, 486 DX/DX2, 486 DX4 Overdrive, 486 Pentium Overdrive |
|
Socket 3 |
486 SX/SX2, 486 DX/DX2, 486 DX4 486 Pentium Overdrive |
|
Socket 4 |
Pentium 60/66, Pentium 60/66 Overdrive |
|
Socket 5 |
Pentium 75-133, Pentium 75+ Overdrive |
|
Socket 6 |
DX4, 486 Pentium Overdrive |
|
Socket 7 |
Pentium 75-200, Pentium 75+ Overdrive |
|
Socket 8 |
Pentium Pro |
|
Socket 370 |
Pentium III |
|
Socket 423 |
Pentium 4 |
|
SECC (Type I), Slot 1 |
Pentium II |
|
SECC2 (Type II), Slot 2 |
Pentium III |
|
Slot A |
Athlon |
System Board Form Factors
Form factor refers to the size and shape of a component. Most system boards today use the ATX form factor. Some of its key features are its orientation of the expansion slots parallel to the narrow edge of the board, a one-piece power connector from the power supply, the built-in I/O ports on the side, and the orientation of the CPU in such a position that the power supply fan helps to cool it. Figure 1.7 shows an example.
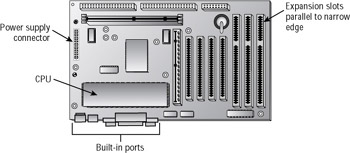
Figure 1.7: An ATX-style motherboard
An older, alternative form factor for a system board is the Baby AT style, shown Figure 1.8. This type uses a two-piece power supply connector, uses ribbon cables to connect ports to the board, and orients the expansion slots parallel to the wide edge of the board.
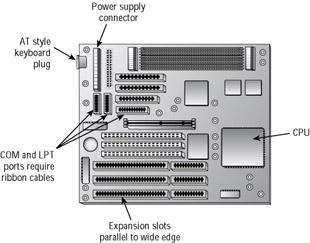
Figure 1.8: An AT-style motherboard
A case is generally designed to hold one or the other of these motherboard form factors, and a power supply is designed to work with one or the other; therefore those three components must be chosen as a group.
Power ConnectorsA power connector allows the motherboard to be connected to the power supply. As you saw in Figures 1.7 and 1.8, the power supply connector is different for AT versus ATX systems. On an ATX, there is a single power connector consisting of a block of 20 holes (in two rows). On an AT, there is a block consisting of 12 pins sticking up; these pins are covered by two connectors with six holes each.
Figure 1.9 shows a very versatile motherboard that happens to have both kinds, so you can compare. The upper connector is for ATX, and the lower one is for AT.

Figure 1.9: Power connectors on a motherboard
On-Board Floppy and IDE ConnectorsWith the exception of diskless workstations, every PC made today uses some type of disk drive to store data and programs until they are needed. Disk drives need a connection to the motherboard in order for the computer to utilize the disk drive. These connections are known as drive interfaces. There are two primary types: floppy drive interfaces and IDE interfaces. Floppy disk interfaces allow floppy disk drives to be connected to the motherboard and, similarly, IDE interfaces do the same for hard disks, CD drives, and other IDE-based drives. When you see them on the motherboard, these interfaces are said to be on board, as opposed to being on an expansion card, known as off board. The interfaces consist of circuitry and a port. A few motherboards also have SCSI interfaces that can be used for connecting drives.
Keyboard and Mouse ConnectorsKeyboard connectors allow for the direct connection of the keyboard to the motherboard. There are two keyboard connector types: AT and PS/2.
AT connectors are round, about 1/2 inch in diameter, and have five sockets in the DIN-5 configuration. They are found on AT motherboards. The second style, PS/2 connectors, are smaller and looks just like a PS/2 mouse connector; these are found on ATX motherboards. Mouse connectors are PS/2 style connectors; on an ATX it is built into the side of the motherboard, and on an AT there is a small ribbon cable that connects a back-mountable port to the motherboard.
Peripheral Ports and ConnectorsPCs were developed to perform calculations on data. In order for the PC to be useful, there must be a way to get the data into and out of the computer. To accomplish this, several ports are available. The four most common types of ports are the serial, parallel, Universal Serial Bus (USB), and game ports. Figure 1.10 shows some typical ports built into an ATX motherboard.
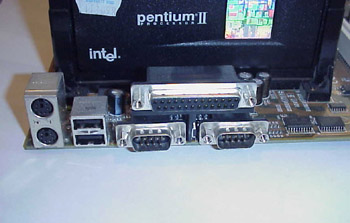
Figure 1.10: Built-in ports on a motherboard
These ports are connected to the motherboard using small ribbon cables on an AT system, or are built directly into the side of the motherboard on an ATX system.
BIOS ChipThis special memory chip contains the BIOS software that tells the processor how to interact with the hardware in the computer. The BIOS chip is easily identified. If you have a branded computer (such as Compaq, IBM, or HP), this chip is marked with the name of the manufacturer and usually the word BIOS. Clones usually have a sticker or printing on them from one of the three major BIOS manufacturers (AMI, Phoenix, and Award).
The BIOS chip is a ROM chip. ROM stands for Read Only Memory, and refers to the fact that the data on the chip is permanent; it cannot be changed by ordinary PC activities. However, if it is an EEPROM (Electrically Erasable Programmable Read Only Memory) chip, it can be flash-updated with a special utility program downloadable from the PC or motherboard maker.
| Note |
If you can’t find the BIOS chip with these guidelines, look for a fairly large chip close to the CPU. It might also have a shiny or hologram sticker on it. |
BatteryYour PC has to keep certain settings when it’s turned off and its power cord is unplugged. These settings include the date, time, hard drive configuration, and memory.
Your PC stores the settings in a special memory chip called the Complementary Metallic Oxide Semiconductor (CMOS) chip. To retain these settings, the CMOS chip requires power constantly. To prevent the CMOS chip from losing its charge, a small battery is located on the motherboard.
Jumpers and DIP Switches
Jumpers and DIP switches are used to configure various hardware options on the motherboard. Processors use different voltages and multipliers to achieve their target voltage and frequency. You must set these parameters on the motherboard by changing the jumper or DIP-switch settings. Figure 1.11 shows a jumper and two types of DIP switches. Individual jumpers are often labeled with the moniker JPx (where x is the number of the jumper).
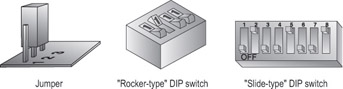
Figure 1.11: A jumper set and DIP switches
Cases
The case is the metal or plastic box in which the motherboard, power supply, disk drives, and other internal components are installed. A case is typically—but not always—purchased with a power supply already installed.
Choosing the right case for the motherboard is important. Recall from the preceding sections that motherboards come in two form factors: ATX and AT. Each requires a different style of case and a different type of power supply.
One case may also be distinguished from another in terms of its orientation. A desktop case lies with its widest side flat on the desk; a tower case stands up on end.
Finally, one case differs from another in terms of the number of drive bays it has. For example, within the broad category of tower cases are mini-towers (typically with two large and two small drive bays), mid-towers, and full towers (typically with four large and three small drive bays). However there is little standardization of the number of drive bays that constitute a particular size; one manufacturer’s full tower might have more or fewer bays than another’s.
Although it is not common, you may occasionally encounter a slim-line case, which is a desktop-orientation case that is shorter and thinner than a normal one—so short that normal expansion boards will not fit perpendicular to the motherboard. In such cases a riser card is installed, which sits perpendicular to the motherboard and contains expansion slots. The expansion cards can then be oriented parallel to the motherboard when installed.
Power Supply
The device in the computer that provides the power is the power supply. A power supply converts 110-volt AC current into the voltages a computer needs to operate. On an AT motherboard, these are +5 volts DC, –5 volts DC, +12 volts DC, and –12 volts DC. Components in modern PCs do not use the negative voltages; they are provided for backward compatibility only. On an ATX motherboard, an additional voltage is provided: +3.3 volts DC.
Power supplies contain transformers and capacitors that carry lethal amounts of current. They are not meant to be serviced. Do not attempt to open them or do any work on them. Figure 1.12 shows a generic power supply.
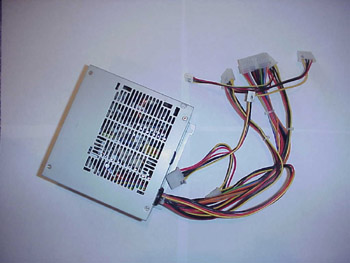
Figure 1.12: A power supply
The CPU
The CPU, or central processing unit, is a processor chip consisting of an array of millions of integrated circuits. Its purpose is to accept, perform calculations on, and eject numeric data. It is considered the “brain” of the computer because it is the part that performs the mathematical operations required for all other activity.
As mentioned earlier, there are two form factors for CPU chips: Pin Grid Array (PGA) and Single Edge Contact Cartridge (SECC). The PGA style is a flat square or rectangular ceramic chip with an array of pins in the bottom. The actual CPU is a tiny silicon wafer embedded inside that ceramic chip. The SECC style is a circuit board with the silicon wafer mounted on it. The circuit board is then surrounded by a plastic cartridge for protection; the circuit board sticks out of the cartridge along one edge. This edge fits into a slot in the motherboard.
All CPUs today require cooling because they generate heat as they operate. The cooling can be either active or passive. A passive heat sink is a block of heat-conductive material that sits close to the CPU and wicks away the heat into the air. An active heat sink contains a fan that pulls the hot air away from the CPU.
| Note |
One way to determine which CPU your computer is using is to open the case and view the numbers stamped on the CPU. However, some passive heat sinks are glued to the CPU, so the numbers may not be visible without removing it. Another way to determine a computer’s CPU is to save your work, exit any open programs, and restart the computer. Watch closely as the computer returns to its normal state. You should see a notation that tells you what chip you are using. The General tab of the System Properties in Windows 95 and higher may also report the CPU speed. |
External Speed (Clock Speed)
The clock speed, or external speed, is the speed at which the motherboard communicates with the CPU. It is determined by the motherboard, and its cadence is set by a quartz crystal (the system crystal) that generates regular electrical pulses.
Internal Speed
The internal speed is the maximum speed at which the CPU can perform its internal operations. This may be the same as the motherboard’s speed (the external speed), but it is more likely to be a multiple of it. For example, a CPU might have an internal speed of 1.3GHz but an external speed of 133MHz. That means for every tick of the system crystal’s clock, the CPU has 10 internal ticks of its own clock.
Cache Memory
A cache is an area of extremely fast memory used to store data that is waiting to enter or exit the CPU. The Level 1 cache, also known as the L1 or front-side cache, holds data that is waiting to enter the CPU. On modern systems, the L1 cache is built into the CPU. The Level 2 cache, also known as the L2 or back-side cache, holds data that is exiting the CPU and is waiting to return to RAM. On modern systems, the L2 cache is in the same packaging as the CPU but on a separate chip. On older systems, the L2 cache was on a separate circuit board installed in the motherboard, and was sometimes called COAST (cache on a stick).
The Bus
The processor’s ability to communicate with the rest of the system’s components relies on the supporting circuitry. The system board’s underlying circuitry is called the bus. The computer’s bus moves information into and out of the processor and other devices. A bus allows all devices to communicate with each other. The motherboard has several buses. The external data bus carries information to and from the CPU and is the fastest bus on the system. The address bus typically runs at the same speed as the external data bus and carries data to and from RAM. The PCI, AGP, and ISA interfaces also have their own buses with their own widths and speeds.
Memory
As the computer’s CPU works, it stores information in the computer’s memory. The rule of thumb is that the more memory a computer has, the faster it will operate. Let’s briefly look at the four major types of computer memory:
Dynamic Random Access Memory (DRAM)This is actually the “RAM” that most people are talking about when they mention RAM. Dynamic refers to the chips’ need for a constant update signal (also called a refresh signal) in order to keep the information that is written there.
Static Random Access Memory (SRAM)SRAM doesn’t require the refresh signal that DRAM does. The chips are more complex and are thus more expensive. However, they are faster. DRAM access times come in at 80 nanoseconds (ns) or more; SRAM has access times of 15 to 20 ns. SRAM is often used for cache memory.
Read-Only Memory (ROM)ROM is called read-only because it can’t be written to. Once the information has been written to the ROM, it can’t be changed. ROM is normally used to store the computer’s BIOS. The system ROM enables the computer to “pull itself up by its bootstraps,” or boot (start the operating system).
Complementary Metallic Oxide Semiconductor (CMOS)CMOS is a special kind of memory that holds the BIOS configuration settings. CMOS memory is powered by a small battery so that the settings are retained when the computer is shut off.
Storage Devices
Storage media hold the data being accessed, as well as the files the system needs to operate and data that needs to be saved. The various types of storage differ in terms of capacity, access time, and the physical type of media being used.
Hard Disk Systems
Hard disks reside inside the computer (usually) and can hold more information than other forms of storage. The hard disk system contains three critical components: the controller, the hard disk, and the host adapter. The controller controls the drive, the hard disk provides a physical medium to store the data, and the host adapter is the translator.
Floppy Drives
A floppy disk drive is a magnetic storage medium that uses a floppy disk made of thin plastic enclosed in a protective casing. The floppy disk itself (or floppy, as it is often called) enables the information to be transported from one computer to another very easily. The downside of a floppy disk drive is its limited storage capacity. Floppy disks are limited to a maximum capacity of 2.88MB, but the most common type of floppy in use today holds only 1.44MB. Table 1.2 lists the various floppy disks and their capacity. All of these except the 1.44MB capacity model are obsolete.
|
Floppy Drive Size |
Common Designation |
Number of Tracks |
Capacity |
|---|---|---|---|
|
51/4” |
Double-sided, Double-density |
40 |
360KB |
|
51/4” |
Double-sided, High-density |
80 |
1.2MB |
|
31/2” |
Double-sided, Double-density |
80 |
720KB |
|
31/2” |
Double-sided, High-density |
80 |
1.44MB |
|
31/2” |
Double-sided, Ultra High Density |
80 |
2.88MB |
CD-ROM Drives
CD-ROM stands for Compact Disc Read-Only Memory. The CD-ROM is used for long-term storage of data. CD-ROMs are read-only, meaning that once information is written to a CD, it can’t be erased or changed. Access time for CD-ROMs is considerably slower than for a hard drive. CDs normally hold 650MB of data and use the ISO 9660 standard, which allows them to be used in multiple platforms.
DVD-ROM Drives
Because DVD-ROMs use slightly different technology than CD-ROMs, they can store up to 1.6GB of data. This makes them a better choice for distributing large software bundles. Many software packages today are so huge that they take multiple CD-ROMs to hold all the installation and reference files. A single DVD-ROM, in a double-sided, double-layered configuration, can hold as much as 17GB (as much as 26 regular CD-ROMs).
Other Storage Media
Many additional types of storage are available for PCs today. However, most of them are not covered on the A+ exam, so we’ll just discuss them briefly here. Among the other types of storage are Zip drives, tape backup devices, and optical drives.
Zip Drives and Jaz Drives
Iomega’s Zip and Jaz drives are detachable, external hard disks that are used to store a large volume (around 100MB for the Zip, 1GB and 2GB for the Jaz) of data on a single, floppy-sized disk. The drives connect to either a parallel port or a special interface card. The major use of Zip and Jaz drives is transporting large amounts of data from place to place. This used to be accomplished with several floppies.
Tape Backup Devices
Another form of storage device is the tape backup. Tape backup devices can be installed internally or externally and use a magnetic tape medium instead of disks for storage. They hold much more data than any other medium but are also much slower. They are primarily used for archival storage.
Optical Drives
Optical drives work by using a laser rather than magnetism to change the characteristics of the storage medium.
Monitors
Display systems convert computer signals into text and pictures and display them on a television-like screen. Several different types of computer displays are used today, including the TV. All of them use either the same cathode ray tube (CRT) technology found in television sets or the liquid crystal display (LCD) technology found on all laptop, notebook, and palmtop computers.
As we have already mentioned, a monitor contains a CRT. But how does it work? Basically, a device called an electron gun shoots electrons toward the back of the monitor screen (see Figure 1.13). The back of the screen is coated with special chemicals (called phosphors) that glow when electrons strike them. This beam of electrons scans the monitor from left to right and top to bottom to create the image.
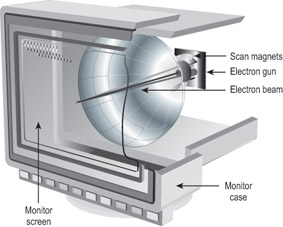
Figure 1.13: How a monitor works
There are two ways of measuring a monitor’s image quality: dot pitch and refresh (scan) rate. A monitor’s dot pitch is the distance between two dots of the same color on the monitor. Usually given in fractions of a millimeter (mm), it tells how sharp the picture is. The lower the number, the closer together the pixels are, and thus the sharper the image. An average dot pitch is 0.28mm.
A monitor’s refresh rate specifies how many times in one second the scanning beam of electrons redraws the screen. The phosphors stay bright only for a fraction of a second, so they must constantly be hit with electrons to stay lit. Given in draws per second, or hertz (Hz), the refresh rate specifies how much energy is being put into keeping the screen lit. Most people notice a flicker in the display at refresh rates of 75Hz or lower because the phosphors begin to decay to black before they are revived; increasing the refresh rate can help reduce eyestrain by reducing the flickering.
Liquid Crystal Displays
Two major types of LCDs are used in laptops today: active matrix screens and passive matrix screens. Their main differences lie in the quality of the image. Both types use some kind of lighting behind the LCD panel to make the screen easier to view.
Passive Matrix
A passive matrix screen uses a row of transistors across the top of the screen and a column of them down the side. It sends pulses to each pixel at the intersections of each row and column combination, telling it what to display.
Passive matrix displays are becoming obsolete because they are less bright and have poorer refresh rates and image quality than active matrix displays. However, they use less power than active matrix displays do.
Active Matrix
An active matrix screen uses a separate transistor for each individual pixel in the display, resulting in higher refresh rates and brighter display quality. These screens use more power, however, because of the increased number of transistors that must be powered. Almost all notebook PCs today use active matrix. A variant called Thin Film Transistor (TFT) uses multiple transistors per pixel, resulting in even better display quality.
Adapter Cards
Adapter cards are also known by many other names, including circuit boards/cards and expansion boards/cards. In all cases, adapter cards are circuit boards that fit into expansion slots in the motherboard. They can include modems, network interface cards, sound cards, and many other types of devices.
Adapter cards are purchased to match an available expansion slot in the motherboard. PCI is the most common type of expansion slot for an adapter card in today’s PCs. ISA slots are nearly obsolete, and AGP slots are used only for video cards.
Exam Essentials
Know what the BIOS does.This is a ROM chip on the motherboard. It contains the BIOS software that tells the processor how to interact with the hardware in the computer. The BIOS chip tells the motherboard how to start up, check itself and its components, and pass off control to the operating system.
Know the different types of memory.DRAM is Dynamic Random Access Memory. SRAM is Static Random Access Memory. ROM stands for Read-Only Memory, and it is normally used to store the computer’s BIOS. CMOS is a special kind of memory that holds the BIOS configuration settings.
Know the CPU package types.Pin Grid Array (PGA) is a square or rectangular ceramic chip with pins in the bottom. Single Edge Contact Cartridge (SECC) is a plastic cartridge that fits into a slot in the motherboard.
Adding and Removing Field Replaceable Modules for DesktopSystems
At some point, every computer will need to be upgraded. Upgrading usually means one of two things: replacing old technology with new technology or adding functionality to an existing system. An example of upgrading old technology would be replacing a slower, older modem with a faster, newer one. An example of adding functionality to an existing system would be adding more RAM to increase performance. In either case, upgrading usually involves adding a new component. This process consists of several basic steps, each of which must be carefully followed. In this section, we will cover the following steps:
- Disassembly
- Inspection
- Part Replacement and Reassembly
Warning As you work inside a PC, be aware of safety hazards both to yourself and to the equipment. These are covered in detail in Objective 3.2, but you may wish to review them earlier than that as well.
Critical Information
When you choose an area in which to work on a computer, pick a workspace that is sturdy enough to support the weight of a computer and any peripherals you are adding to your system. The area must also be well lit, clean, and large enough to hold all the pieces and necessary tools.
Disassembling the Computer
You do not need to disassemble the computer completely to perform most upgrade and repair jobs; part of being a successful technician is to identify what parts must be removed for each job. For example, replacing a motherboard requires almost complete disassembly, but replacing a disk drive does not require any disassembly at all in most cases (except for removing the drive itself).
Preparing Your Work Area
For any work you do on a computer, you must have an adequate workspace. First, the work area must be flat. Second, the area must be sturdy. Make sure the work surface you are using can support the weight of the components. Third, the area must be well lit, clean, and large enough to hold all pieces (assembled and disassembled) and all necessary tools.
Before you begin, make sure all necessary tools are available and in working order. Also make sure that the documentation for the system you are working on is available (including owner’s manuals, service manuals, and Internet resources).
The final guideline to preparing your work area is to set aside plenty of time to complete the task. Estimate the time required to complete the entire task (disassembly, installation, reassembly, and testing). Once you’ve prepared your work area and gathered your tools, you’re ready to begin the actual disassembly of the computer. The steps are basically the same for all brands and types of computers.
Disassembly Prerequisites
You need to do several things do before you even move the computer to your work area:
- Shut down any running programs and turn off the computer.
- Remove all cables that are attached to the computer.
- Remove any floppy disks from their drives.
- Check to see that all the prerequisites have been met, and move the computer to the work surface.
Removing Input Devices
External devices such as the monitor, keyboard, and mouse should be unplugged before you open the case. Although this step is not necessary for every upgrade, it does make it easier to remove the case cover because the cords and connectors are not in the way.
Removing the Case Cover
Now you can unfasten the computer’s cover by removing any retaining screws at the back of the computer. Some cases do not have screws; instead they have a sliding bar or latches that release the cover. Many of today’s PCs can be completely disassembled without a single tool.
Then remove the cover by sliding or lifting it. The exact procedure varies greatly depending on the case; Figure 1.14 shows an example for a desktop style case.
Don’t remove all the screws at the back of the computer! Some of these screws hold vital components (such as the power supply) to the case, and removing them will cause those components to drop into the computer.

Figure 1.14: Removing the case cover on a desktop case
Removing the Expansion Cards
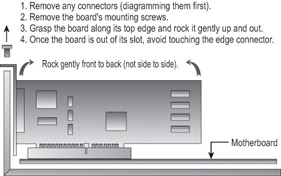
The next step in disassembly is to put on an antistatic wrist strap, plugging one end into the ground plug of an outlet. Then you can start to remove any expansion cards. There are four major steps in removing the expansion cards, as shown in Figure 1.15:
- Remove any internal or external cables or connectors.
- Remove any mounting screws that are holding the boards in place, and put the screws somewhere where they won’t be lost.
- Grasp the board by the top edge with both hands and gently rock it front to back (not side to side).
- Once the board is out, place it in an antistatic bag to help prevent electrostatic discharge (ESD) damage while the board is out of the computer.
Duplicate this procedure for each card.
| Note |
Be sure to note the slot from which you remove each card, because some bus types (including PCI) keep track of the slots in which the expansion boards are installed. Reinstalling an expansion card in a different slot later will probably not cause a problem, because the Plug-and-Play BIOS should redetect it, but better safe than sorry.
|
Removing the Power Supply
Before you remove the power supply from the computer, you must do two things: disconnect the power supply connectors from the internal devices, and remove the mounting hardware for the power supply, as shown in Figure 1.16.
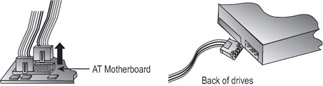
Figure 1.16: Removing power supply connectors
Grasp the connector (not the wires) and gently wiggle it out of its receptacle. Then, proceed to the next connector. The system board and disk drives both use power connectors. Make sure all of them are removed. AT cases have power leads connected to a switch at the front of the case that will also need to be removed.
An AT PC power supply has two connectors to the motherboard. These plug into receptacles that are side by side. If you get confused about how these connectors attach, the general rule is black-to-black. An ATX power supply has a single 20-wire connector to the motherboard.
Once all the power supply connectors are disconnected from their devices, you can remove the mounting hardware. You can usually detach the power supply from the case by removing four screws. Some power supplies don’t need to have screws removed; instead, they are installed on tracks or into slots in the case and need only to be slid out or lifted out.
Removing the Disk Drives
To remove a disk drive, first disconnect it from the power supply (if you have not done so already) and then disconnect the ribbon cable that runs from the drive to the motherboard (or drive controller board). Then, physically remove the drive from its bay. On some cases, drives are secured in the bays with screws in the sides, as in Figure 1.17; on other cases they slide in and out on rails with clips that release and retain them.
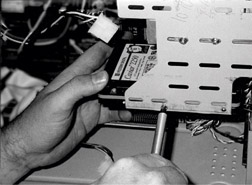
Figure 1.17: Removing the hard drive
Most servers have hot-pluggable drives, which means they can be added or removed while the computer is running. You remove them by depressing a retaining clip or button. Consult the documentation provided with the machine or drives for the exact details.
Removing the Motherboard
The motherboard is held away from the metal case using brass or plastic spacers called stand-offs, and is secured and grounded using mounting screws. To remove the motherboard, you must remove the screws holding the motherboard to the case floor. On an ATX motherboard, you then simply lift the motherboard out of the case. On an AT motherboard, as in Figure 1.18, you must slide the motherboard about 1 inch to one side to release its plastic stand-offs from the mounting holes in the case floor.
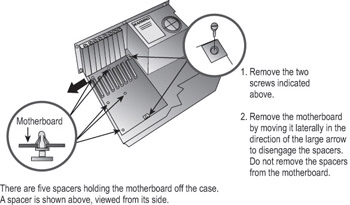
Figure 1.18: Removing the motherboard
Removing the Memory
Memory is held in place by retaining clips at both ends of the module. For a SIMM, the retaining clips are metal. Pull them back, tilt the SIMM back to a 45-degree angle with the motherboard, and then lift it out of the slot. For a DIMM, the retaining clips are plastic. Push them down (away from the DIMM), and the DIMM will pop free from its slot automatically; you can just lift it out. Place the removed memory in an antistatic bag to prevent damage.
Inspecting the Computer
Inspecting the computer is an important step in the disassembly and reassembly of the system. You should check the components for any damage and gather any documentation. Damage is sometimes visible on motherboards. Discolored areas on the board are often caused by power surges.
After a component is removed, it is a good idea to create a parts list on a notepad and make sure that you have all of the supporting documentation and device drivers. If you do not have the supporting documentation and drivers, then it is good practice to download them from the manufacturer’s website or from a multivendor information site.
Part Replacement and Reassembly
The reassembly of the machine is almost an exact reversal of its disassembly. Once you have all of the necessary documentation and device drivers, the process is quite simple. You reassemble the computer by replacing the hard-to-reach items first and then attaching the supporting devices.
Installing the System Board
The motherboard attaches to the case by the spacers (stand-offs) that hold it away from the metal case. There are two kinds. AT systems use plastic stand-offs that fit into holes in the motherboard and then slide into channels in the case floor. Both AT and ATX systems use brass stand-offs that attach to the floor of the case and have screw holes in their tops for attaching the motherboard screws.
Before you reattach the motherboard, it is best to make sure that the memory and the processor are properly secured and seated in the slots. Doing so will help prevent damage to the chips and protect your hand from cuts, because installing them after the board is secured will leave you with limited space. After you have snapped the board onto its spacers, one or two retaining screws normally need to be attached. When attaching these screws, be sure not to over-tighten them and damage the board.
Installing the Power Supply
The power supply should be installed next. Attach it with the screws you removed during its disassembly. After it is secure, reattach the power leads to their respective connectors on the motherboard. If it’s an AT system, make sure the black wires on the motherboard power connectors (usually labeled P8 and P9) are oriented together on the connector.
Installing Drives
The drives are the next components you attach. The first drive you should attach is the floppy drive. The ribbon cable and the power connector connect to the back of the drive as they were removed. Be sure to check the ribbon cable’s attachment, because it is the most commonly reversed item on the PC. The red stripe on the cable indicates 1, which should be oriented closest to the power connector on the drive.
Next, attach the IDE drives, such as hard drives and CD drives. They connect to the motherboard’s IDE interface via ribbon cable, and connect to the power supply via a Molex power connector.
Installing PCI, ISA, and AGP Devices
After the drives are attached, add any PCI, ISA, and AGP devices that the system uses, such as a video card, sound card, or modem. If the motherboard has any of these components built in, their ports might be built into the side of the motherboard (typical of an ATX motherboard), or might require you to attach a port to the back of the case and then run a small ribbon cable to connect that port to the motherboard.
Closing the Case
After you install all the components, slide the cover over the metal frame of the case. This may be a challenging part of the repair. Cases are generally designed to be the most inexpensive part of the PC. They are disassembled much more easily than they are reassembled. Tighten the screws on the outside of the case or make sure the case has snapped into the proper position.
Attaching Input Devices
Input devices such as the keyboard and mouse should be attached in the same ports from which they were removed. Be sure the keyboard and mouse are plugged into the correct ports if they both use a PS/2 connector. A good rule of thumb is that the keyboard attaches to the port closest to the outside of the machine.
Exam Essentials
Know when to attach an antistatic wrist strap.One thing from this chapter that will be on the test is attaching an antistatic wrist strap. You should attach one of these to a ground mat every time you open a computer. More components are damaged from static discharge than from anything else.
Know the “black wires together” rule.When you’re attaching an AT power supply to a motherboard, the connector will be in two pieces, P8 and P9. These must be oriented so the black wires on each connector are near the black wires on the other connector. Otherwise, damage to the motherboard could result.
Adding and Removing Field Replaceable Modules for PortableSystems
Fewer technicians work on portable systems than desktop systems, because most portable systems use proprietary parts that can be difficult to obtain unless you are working for an authorized service center. In addition, each portable computer must be opened a slightly different way for service, and some require special tools for entry.
Nevertheless, a professional technician will likely be called upon occasionally to perform basic repairs or maintenance on a notebook computer. The most common tasks are upgrading the RAM and replacing the hard disk, and both of those activities can be performed using widely available parts.
Critical Information
This objective was separated from Objective 1.2 in the latest revision of the A+ objectives, so much of the information contained under Objective 1.2 applies here as well. The following sections provide information specific to portable computers.
Removing and Replacing the Battery
Depending on the notebook model, the battery may be anywhere, but it is usually underneath the keyboard. On some models, you can slide the battery out the side by removing a panel or cover; on other models you must lift the keyboard.
Pull out the battery and insert a fresh battery in the same slot, pressing it firmly into place. Then, replace the cover over the battery’s bay.
Batteries are hot-pluggable, so you do not have to shut down in order to remove one. However, unless you have a second battery or are connected to AC power, you will lose power and the PC will shut off when you remove the battery.
Adding and Removing PC Card Devices
PC Card devices are designed to be easily removable and installable. They are approximately the size and shape of a thick credit card, and fit into PC Card (PCMCIA) slots in the side of the notebook PC. PC Card devices can include modems, network interface cards, SCSI adapters, USB adapters, FireWire adapters, and wireless Ethernet cards.
To eject a PC Card device, press the Eject button next to its slot. To insert a PC Card device, press the device into the slot. You can do this while the computer is running. (That’s called hot-plugging or hot-swapping.) However, in Windows it is a good idea to stop the PC Card device first, before ejecting it, to ensure that all operations involving it complete normally. To do so, double-click the Safely Remove Hardware icon in the system tray, click the device, and then click Stop.
Disassembling a Notebook PC
There are many designs of notebook PC cases, and each one disassembles a little differently. The best way to determine the proper disassembly method is to consult documentation from the manufacturer.
Some models of notebook PCs require a special T-8 Torx screwdriver. Most PC toolkits come with a T-8 bit for a screwdriver with interchangeable bits, but you might find that the T-8 screws are countersunk in deep holes so that you cannot fit the screwdriver into them. In such a case you would need to buy a separate T-8 screwdriver, available at most hardware stores or auto-parts stores.
Prepare a clean, well-lit, flat work surface, assemble your tools and manuals, and ensure that you have the correct parts. Shut down the PC, unplug it, and detach any external devices such as an external keyboard, mouse, or monitor.
Removing and Replacing Disk Drives
Accessing the hard disk drive usually involves lifting up the keyboard or removing it entirely. The hard disk typically has a ribbon cable made of thin plastic; be very careful when detaching it so you don’t bend or break it. The hard disk also usually has a power supply connector that is smaller than that of a typical hard disk in a desktop PC. After disconnecting the hard disk, remove the screws holding it in place and lift it out.
The procedure for removing the floppy disk and/or CD drive varies widely depending on the model. Some notebook PCs are fully modular, such that the floppy disk and CD drives pop out easily without any tools. On other models, you may find that you need to completely disassemble the PC to access them. Consult the documentation from the manufacturer.
After removing the old drive, insert the new one in the same spot and secure it with screws. Then attach the power supply cable and ribbon cable and reassemble the PC.
Adding Memory
Most notebook PCs have a certain amount of memory hard-wired into them that you cannot remove. They also typically have a memory expansion slot into which you can insert a single circuit board containing additional RAM.
If such an additional memory module has been installed, you can remove it if desired (perhaps to replace it with one that has larger capacity). Most notebook PCs have a panel on the bottom held in place by screws. Remove this panel to expose the memory expansion slot. Then gently pull out the existing RAM module if needed, and insert the new RAM module.
Docking and Undocking
Some notebook PCs have optional accessories called docking stations or port replicators. These allow quick connect/disconnect with external peripherals and may also provide extra ports the notebook PC does not normally have.
Each docking station works a little differently, but there is usually a button you can press to undock the notebook from the unit. There may also be a manual release lever in case you need to undock when the button is unresponsive.
Because different hardware is available in docked versus undocked configurations, you might want to set up hardware profiles in Windows to account for the differences.
Exam Essentials
Know what devices are hot-pluggable.PC Card devices are hot-pluggable, meaning you can remove and insert them while the computer is running. So are USB and FireWire devices. However, if you need to remove a drive, add or remove RAM, or connect or disconnect a monitor or a parallel or serial device, you must shut down.
Know where to look for the battery and for RAM expansion slots.Batteries are usually accessed either from the sides or from under the keyboard. RAM is usually accessed on the bottom of the PC. There will also be some RAM built into the motherboard that is not removable.
Identify Typical System Resource Assignments and Procedures for Changing Them
Interrupt request lines, direct memory access channels, and input/output addresses are configurable aspects of the communication between the devices inside a PC. Interrupt request lines (IRQs) are used to signal that an event has taken place that requires the attention of the CPU. Input/output (I/O) addresses refer to the hardware communication lines that carry data between the CPU and the bus slots of the PC. Direct memory access (DMA) channels allow a storage device or adapter card to send information directly into memory without passing through the CPU, which results in a faster data transfer rate.
Whenever a new component is installed into a PC, its IRQs, I/O addresses, and DMA channels must be correctly configured or the device will not function correctly. This is the most common problem when installing new circuit boards. For this reason, the A+ Core Hardware exam includes several questions pertaining to the determination and configuration of these resources.
Critical Information
At some point, every computer will require the installation of a new component, whether it’s a new sound card, a memory upgrade, or the replacement of a failed device. As a technician, you will be required to perform this task time and time again. You should be well versed in determining the installation configuration and resources.
Understanding Computer Resources
The various tools that you can use to discover the available resources on a PC can make installing new hardware a lot easier. Unfortunately, the tools are of little use unless you understand the information they present. In this section, we discuss the various resources that might be used by PC components and how those resources are used.
In general, there are four main types of PC resources you might need to be aware of when installing a new component: interrupt request (IRQ) lines, memory addresses, direct memory access (DMA) channels, and I/O addresses.
Interrupt Request Lines
IRQs are appropriately named. Interrupts are used by peripherals to interrupt, or stop, the CPU and demand attention. When the CPU receives an interrupt alert, it stops whatever it is doing and handles the request.
Each device is given its own interrupt to use when alerting the CPU. (There are exceptions; some PCI devices can share with one another, for example, and USB devices all use a single interrupt.) AT-based PCs have 16 interrupts available. Given the limited number of available interrupts, it is critical that you assign them wisely! Table 1.3 lists the standard use and other uses associated with each interrupt.
|
Interrupt |
Most Common Use |
Other Common Uses |
|---|---|---|
|
0 |
System timer |
None |
|
1 |
Keyboard |
None |
|
2 |
None; this interrupt is used to cascade to the upper eight interrupts (see note following this table) |
None |
|
3 |
COM2 |
COM4 |
|
4 |
COM1 |
COM3 |
|
5 |
Sound card |
LPT2 |
|
6 |
Floppy disk controller |
Tape controllers |
|
7 |
LPT1 |
Any device |
|
8 |
Real-time clock |
None |
|
9 |
None |
Any device |
|
10 |
None |
Any device |
|
11 |
None |
Any device |
|
12 |
PS/2-style mouse |
Any device |
|
13 |
Floating-point coprocessor |
None |
|
14 |
Primary IDE channel |
SCSI controllers |
|
15 |
Secondary IDE channel |
SCSI controllers and network adapters |
| Note |
Interrupt 2 is a special case. Earlier (XT-based) PCs had only eight interrupts because those computers used an 8-bit bus. With the development of the AT, eight more interrupts were created (to match the 16-bit bus), but no mechanism was available to use them. Rather than redesign the entire interrupt process, AT designers decided to use interrupt 2 as a gateway, or cascade, to interrupts 9–15. In reality, interrupt 2 is the same as interrupt 9. You should never configure your system so that both interrupt 2 and 9 are used. |
Most experienced field technicians have the standards (as listed in Table 1.3) memorized. In studying for the A+ exam, make sure you know all the default assignments, as well as the assignments for COM1–COM4 and LPT1–LPT2.
Memory Addresses
Many components use blocks of memory as part of their normal functioning. Network interface cards often buffer incoming data in a block of memory until it can be processed. Doing so prevents the card from being overloaded if a burst of data is received from the network.
When the device driver loads, it lets the CPU know which block of memory should be set aside for the exclusive use of the component. This prevents other devices from overwriting the information stored there. Certain system components also need a memory address. Memory addresses are usually expressed in a hexadecimal range with eight digits, such as 00F0000–000FFFFF.
Direct Memory Access
Direct memory access (DMA) allows a device to bypass the CPU and place data directly into RAM. To accomplish this, the device must have a DMA channel devoted to its use.
All DMA transfers use a special area of memory set aside to receive data from the expansion card (or CPU, if the transfer is going the other direction) known as a buffer. The basic architecture of the PC DMA buffers is limited in size and memory location.
No DMA channel can be used by more than one device. If you accidentally choose a DMA channel that another card is using, the usual symptom is that no DMA transfers occur and the device is unavailable.
Certain DMA channels are assigned to standard AT devices. DMA is no longer as popular as it once was, because of advances in hardware technology, but it is still used by floppy drives and some keyboards and sound cards. The floppy disk controller typically uses DMA channel 2. A modern system is not likely to run short on DMA channels because so few devices use them anymore.
I/O Addresses
I/O (input/output) addresses, also known as port addresses, are a specific area of memory that a component uses to communicate with the system. Although they sound quite a bit like memory addresses, the major difference is that memory addresses are used to store information that will be used by the device itself. I/O addresses are used to store information that will be used by the system. An I/O address is typically expressed using only the last four digits of the full address, such as 03E8. I/O addresses are usually expressed as a range such as 03E8-03EF. The exam asks about a few I/O addresses; Table 1.4 provides a list of a few that you should know.
|
Port |
I/O Address |
|---|---|
|
COM1 |
03F8–03FF |
|
COM2 |
02F8–02FF |
|
COM3 |
03E8–03EF |
|
COM4 |
02E8–02EF |
|
LPT1 |
0378–037F |
|
LPT2 |
0278–027F |
|
Primary IDE |
01F0–01F7 |
|
Secondary IDE |
0170–0177 |
Determining Available Resources
The best way to determine the PC’s available resources is by using hardware-configuration-discovery utilities. These software programs talk to the PC’s BIOS as well as the various pieces of hardware in the computer and display which IRQ, DMA, and memory addresses are being used. Most operating systems include some way of determining this information. MS-DOS, Windows 3.x, and Windows 95 included a tool named MSD.EXE. Windows 95 and higher have a graphical utility called Device Manager. Windows NT includes a program known as NT Diagnostics.
Let’s look at Device Manager in Windows. To display it in Windows 9x, right-click My Computer and choose Properties, and then click the Device Manager tab. To display it in Windows 2000 and XP, right-click My Computer and choose Properties, then click the Hardware tab, and then click Device Manager.
To display a device’s resources, open the category by clicking the plus sign next to it and double-clicking the device name. Then, look in the Resources tab for that device. (See Figure 1.19.)
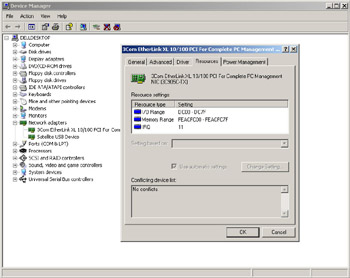
Figure 1.19: Device Manager under Windows XP
You can also get this same information through the System Information utility, available in Windows 98 and higher. To run it, choose Start (All) Programs Accessories System Tools System Information. Then, click one of the categories in the left pane to see the information in the right pane. (See Figure 1.20.)
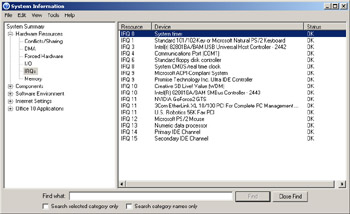
Figure 1.20: System Information under Windows XP
Manually Specifying a Resource Assignment
In Windows’ Device Manager, you can manually specify the resources for a device to solve a problem with a resource conflict—that is, a situation in which two or more devices lay claim to the same resource. A resource conflict usually appears as a yellow exclamation point next to a device’s name in Device Manager. Double-clicking the device opens its Properties box, and on the Resources tab you will find an explanation of the problem in the Conflicting Device List.
To change a device’s resource assignments, clear the Use Automatic Settings check box and select a different configuration from the Settings Based On list. (See Figure 1.21.) If none of the alternate configurations resolves the conflict, you can double-click a specific resource on the Resource Type list and enter a manual setting for it.
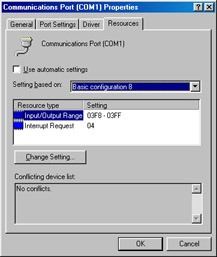
Figure 1.21: Manually changing a resource assignment.
Most modern computers use a power management and configuration method called ACPI (Advanced Configuration and Power Management), which helps prevent resource conflicts but which also limits the amount of tinkering you can do with manual resource assignments. If you get a message that a particular resource cannot be changed, or if the Use Automatic Settings check box is unavailable, it is probably because of ACPI.
If the device is not Plug-and-Play compatible, it may have jumpers for hard-setting the resources assigned to it. If that’s the case, Windows will not be able to change these assignments; it will use the assignments the device requires.
Exam Essentials
Know the default IRQs for COM ports and common devices.Know the default IRQs for COM ports and common devices such as modems, sound cards, disk drives, and so on.
Be familiar with Device Manager.Device Manager can display information about the computer’s memory, I/O ports, IRQs being used, and many other PC resources.
Know what MSD is.MSD.EXE was the MS-DOS equivalent of Device Manager. It was included in both MS-DOS and in Windows 95.
Understand how manual resource assignments are set.Manual resource assignments for Plug-and-Play devices are set on the Resources tab of the device’s Properties box. For a non-PnP device, resource assignments are controlled by jumpers on the device itself.
Identifying Peripheral Ports, Cables, and Connectors
A computer’s peripheral ports are the physical connectors found outside the computer. Cables of various types are designed to plug into these ports and create a connection between the PC and the external devices that may be attached to it. A successful IT technician should have an in-depth knowledge of ports and cables.
Critical Information
Because the peripheral components need to be upgraded frequently, either to keep pace with technological change or simply to replace broken devices, the test requires a well-rounded familiarity with the ports and their associated cabling.
Unless a peripheral device connects directly to the motherboard, it must use a port. Ports can be distinguished from one another by three factors:
Bits of Data Simultaneously ConveyedA serial cable carries only one bit at a time. A parallel cable carries multiple bits at a time (usually eight).
Data Transmission SpeedThis is expressed in kilobits or megabits per second, and refers to the overall data throughput.
Type of ConnectorA wide variety of connectors are used in PCs today, including the DB-style (as with legacy parallel and serial ports and VGA monitors), Centronics style (as with printers and some SCSI devices), and USB.
Parallel vs. Serial
A cable (and its port) can be either parallel or serial, and it is not always immediately obvious from looking which is which. For example, both parallel and serial cables can both use the DB-25 style of connector.
Both parallel and serial cables have multiple wires inside them, but they use them for different purposes. A parallel cable uses eight wires to carry bits of data in each direction, plus extra wires for signaling and traffic control. A serial cable uses only one wire to carry data in each direction; all the rest of its wires are for signaling and traffic control.
Transmission Speed
Neither parallel nor serial is intrinsically faster than the other. There are both fast and slow parallel and serial connections. For example, a legacy serial port such as for an external modem carries data fairly slowly (about 115Kbps), but a USB cable (also serial) carries data very quickly (up to 12Mbps for USB 1.1, and even faster for USB 2.0).
Connector Types
The following are common connector types:
DBA D-shaped connector with a metal ring around a set of pins. Named for the number of pins/holes used: DB-25, DB-9, DB-15, and so on. Can be either parallel or serial. Common uses: VGA video, legacy serial devices such as external modems, and parallel printer cables (the connector on the PC only; the printer end uses Centronics).
RJA plastic plug with small metal tabs, like a telephone cord plug. Named for the number of metal tabs in the connector: RJ-11 has two, and RJ-14 has four. Both are used for telephone systems. RJ-45 has eight, and is used for Ethernet 10/100BaseT networking. Always serial.
BNCStands for Bayonett-Neill Connector or British Naval Connector. A metal wire surrounded by shielding, like a cable television connector. Used for 10Base2 Ethernet networking. Always serial.
CentronicsA plastic block with metal tabs flat against it, surrounded by a D-shaped metal ring. Used to connect a parallel printer cable to the printer, and also for some SCSI devices. Always parallel.
Ribbon ConnectorA rectangular block consisting of a set of square holes that connect to pins on a circuit board. Used to connect floppy drives, IDE drives, and some SCSI devices to their controllers. Always parallel.
PS/2 (Mini-DIN)A round connector with six small pins inside, commonly used to connect keyboards on ATX motherboards or PS/2 style mice.
DINA larger round connector with five rather large pins inside, used for connecting the keyboard on an AT motherboard.
USBA flat rectangular connector, used with USB interfaces.
Cabling
Cables are used to connect two or more entities together. They are usually constructed of several wires encased in a rubberized outer coating. The wires are soldered to modular connectors at both ends. These connectors allow the cables to be quickly attached to the devices they connect.
Cables may be either shielded or unshielded. This refers to shielding against electromagnetic interference (EMI); it has nothing to do with whether the cable is shielded against dirt or water.
A list of common cable types used in PCs, their descriptions, their maximum effective lengths, and their most common uses is given in Table 1.5. The F or M in a connector’s designation is for Female (holes) or Male (pins).
|
Application |
1st Connector |
2nd Connector |
Max. Length |
|---|---|---|---|
|
Null modem |
DB-9F |
DB-9F |
25 feet |
|
Null modem |
DB-25F |
DB-25F |
25 feet |
|
RS-232 (modem cable) |
DB-9F |
DB-25M |
25 feet |
|
RS-232 (modem cable) |
DB-25F |
DB-25M |
25 feet |
|
Parallel printer |
DB-25M |
Centronics 36M |
10 feet |
|
External SCSI cable |
Centronics 50M |
Centronics 50M |
10 feet (total SCSI bus length) |
|
VGA extension cable |
DB-15M |
DB-15M |
3 feet |
|
UTP Ethernet cable |
RJ-45M |
RJ-45M |
100 meters |
|
Thinnet Ethernet cable |
BNC-M |
BNC-M |
100 meters |
|
Telephone wall cable |
RJ-11M or RJ-14M |
RJ-11M or RJ-14M |
N/A |
One cable that deserves special mention is the null modem cable. It allows two computers to communicate with each other without using a modem. This cable has its transmit and receive wires crossed at both ends, so when one entity transmits on its TD line, the other entity receives it on its RD line.
UTP (unshielded twisted pair) is the most common type of cable used for network cabling. There are various categories of network cabling; the category required for 10/100BaseT networking is Category 5, often shortened to Cat5. There is also a Cat5e cable type, which is used for higher-speed Ethernet such as gigabit Ethernet.
Exam Essentials
Know what RJ-45 connectors are used for.You are likely to be asked what type of connector would be used to attach a network connector to a wall jack.
Know what PS2/Mini-DIN connectors are used for.You are likely to be asked what type of connector would be used to connect a keyboard or mouse to the back of a PC.
Know what RJ-11 connectors are used for.You are likely to be asked what type of connector would be used to connect a modem to a telephone jack.
Understand parallel versus serial.Parallel cables carry data eight bits at a time; serial cables carry it one bit at a time.
Installing and Configuring Common IDE Devices
IDE drives are the most common type of hard drive found in computers. But IDE is much more than a hard drive interface; it is also a popular interface for many other drive types, including CD-ROM, DVD, and Zip. This objective tests your knowledge of the IDE interface and its relationship to drives.
Critical Information
IDE drives are the most prevalent in the industry today. IDE drives are easy to install and configure, and they provide acceptable performance for most applications. Their ease of use relates to their most identifiable feature—the controller is located on the drive itself.
IDE Technologies
The design of the IDE is simple: Put the controller right on the drive and use a relatively short ribbon cable to connect the drive/controller to the IDE interface. This offers the benefits of decreasing signal loss (thus increasing reliability) and making the drive easier to install. The IDE interface can be an expansion board, or it can be built into the motherboard, as is the case on almost all systems today.
IDE generically refers to any drive that has a built-in controller. The IDE we know today is more properly called AT IDE; two previous types of IDE (MCA IDE and XT IDE) are obsolete and incompatible with it.
There have been many revisions of the IDE standard over the years, and each one is designated with a certain ATA number—ATA-1 through ATA-6. Drives that support ATA-2 and higher are generically referred to as Enhanced IDE (EIDE).
With ATA-3, a technology called ATAPI (ATA Packet Interface) was introduced to help deal with IDE devices other than hard disks. ATAPI enables the BIOS to recognize an IDE CD-ROM drive, for example, or a tape backup or Zip drive.
Starting with ATA-4, a new technology was introduced called UltraDMA, supporting transfer modes of up to 33MBps.
ATA-5 supported UltraDMA/66, with transfer modes of up to 66MBps. To achieve this high rate, the drive must have a special 80-wire ribbon cable, and the motherboard or IDE controller card must support ATA-5.
ATA-6 supported UltraDMA/100, with transfer modes of up to 100MBps.
If an ATA-5 or ATA-6 drive is used with a normal 40-wire cable or is used on a system that does not support the higher modes, it reverts to the ATA-4 performance level.
IDE Pros and Cons
The primary benefit of IDE is that it is nearly universally supported. Almost every motherboard has IDE connectors. In addition, IDE devices are typically the cheapest and most readily available type.
A typical motherboard has two IDE connectors, and each connector can support up to two drives on the same cable. That means you are limited to four IDE devices per system unless you add an expansion board containing another IDE interface. In contrast, with SCSI you can have up to seven drives per interface (or even more on some types of SCSI).
Performance also may suffer when IDE devices share an interface. When you’re burning CDs, for example, if the reading and writing CD drives are both on the same cable, errors may occur. SCSI drives share an interface much more gracefully.
RAID
RAID stands for Redundant Array of Inexpensive Drives. It is a way of combining the storage power of more than one hard disk for a special purpose such as increased performance or fault-tolerance. RAID is more commonly done with SCSI drives, but it can be done with IDE drives.
There are several types of RAID:
RAID 0Also known as disk striping. This is technically not RAID, because it does not provide fault tolerance. Data is written across multiple drives, so one drive can be reading or writing while the next drive’s read-write head is moving. This makes for faster data access. However, if any one of the drives fails, all content is lost.
RAID 1Also known as disk mirroring. This is a method of producing fault tolerance by writing all data simultaneously to two separate drives. If one drive fails, the other contains all the data and can be switched to. However, disk mirroring does not help access speed, and the cost is double that of a single drive.
RAID 5Combines the benefits of both RAID 0 and RAID 1. It uses a parity block distributed across all the drives in the array, in addition to striping the data across them. That way, if one drive fails, the parity information can be used to recover what was on the failed drive. A minimum of three drives is required.
Installation and Configuration
To install an IDE drive, do the following:
- Set the master/slave jumper on the drive.
- Install the drive in the drive bay.
- Connect the power supply cable.
- Connect the ribbon cable to the drive and to the motherboard or IDE expansion board.
- Configure the drive in BIOS Setup if it is not automatically detected.
- Partition and format the drive using the operating system.
Each IDE interface can have only one master drive on it. If there are two drives on a single cable, one of them must be the slave drive. This setting is accomplished via a jumper on the drive. Some drives have a separate setting for Single (that is, master with no slave) and Master (that is, master with a slave); others use the Master setting generically to refer to either case. Figure 1.22 shows a typical master/slave jumper scenario, but different drives may have different jumper positions to represent each state.
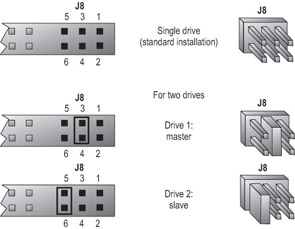
Figure 1.22: Master/slave jumpers
Most BIOS Setup programs today support Plug and Play, so they will detect the new drive automatically at startup. If this does not work, the drive might not be installed correctly, the jumper settings might be wrong, or the BIOS Setup might have the IDE interface set to None rather than Auto. Enter BIOS Setup and find out. Setting the IDE interface to Auto and then allowing the BIOS to detect the drive is usually all that is required.
In BIOS Setup for the drive, you might have the option of selecting a DMA (Direct Memory Access) or PIO (Programmed Input/Output) setting for the drive. For modern drives that support UltraDMA, neither of these settings is necessary or desirable. Both are methods for improving drive performance by allowing the drive to write directly to RAM, bypassing the CPU when possible.
Now that your drive is installed, you can proceed to partition and format it for the operating system you have chosen. Then, finally, you can install your operating system of choice.
For a Windows 9x or MS-DOS system, use the FDISK utility to partition the disk. Then, format the partition(s) using the FORMAT command.
For a Windows 2000 or XP system, allow the Windows Setup program to partition and format the drive, or use the Disk Management utility within Windows to perform that tasks. To access Disk Management, from the Control Panel choose Administrative Tools and then choose Computer Management.
Exam Essentials
Know how many pins an IDE cable has.An IDE cable has 40 pins. You are likely to be asked to choose a cable in a scenario question simply by knowing how many pins the drive requires.
Know how a controller works in a master/slave environment.When you have a master and a slave, only one of the two controllers controls data transfers. You are likely to be asked a scenario question that relates to this environment.
Know what other devices besides hard drives use IDE interfaces.With the popularity of IDE technology, manufacturers have introduced tape drives and CD-ROMs that use IDE interfaces.
Understand RAID levels.Know that RAID 0 is performance enhancement with no fault tolerance, RAID 1 is fault tolerance with no performance enhancement, and RAID 5 is both.
Installing and Configuring Common SCSI Devices
The small computer systems interface (SCSI) is a type of subsystem that is both highly flexible and robust. The range of devices that can use SCSI technology includes hard disk drives, scanners, tape drives, and CD-ROM drives. This is why it’s so flexible, but also why its standards are so complex. In this section, we will review the different types of SCSI, and we’ll discuss configuration and installation issues.
Critical Information
SCSI (pronounced “scuzzy”) is a technology developed and standardized by the American National Standards Institute (ANSI). The standard specifies a universal, parallel, system-level interface for connecting up to eight devices (including the controller) on a single shared cable, called the SCSI bus. One of the many benefits of SCSI is that it is a very fast, flexible interface. You can buy a SCSI disk and install it in a Mac, a PC, or virtually any computer if a SCSI adapter is available.
SCSI is used for more than just drives. There are also SCSI scanners, tape backup units, and even printers.
SCSI Connectors
SCSI devices can be either internal or external to the computer. Eight-bit SCSI-1 and SCSI-2 internal devices use a SCSI A cable, a 50-pin ribbon cable similar to that of an IDE drive. Sixteen-bit SCSI uses a SCSI P cable, with 68 wires and a DB-style connector. There is also an 80-pin internal connector called SCA used for some high-end SCSI devices.
External SCSI connectors depend on the type. SCSI-1 uses a 50-pin Centronics connector, as with a parallel printer. SCSI-2 uses a 25-, 50-, or 68-pin female DB-style connector. SCSI-3 uses a 68- or 80-pin female DB-style connector.
IDs and Termination
To configure SCSI, you must assign a unique device number (often called a SCSI address) to each device on the SCSI bus. These numbers are configured through either jumpers or DIP switches. When the computer needs to send data to the device, it sends a signal on the wire addressed to that number.
A device called a terminator (technically a terminating resistor pack) must be installed at both ends of the bus to keep the signals “on the bus.” The device then responds with a signal that contains the device number that sent the information and the data itself. The terminator can be built into the device and activated/deactivated with a jumper, or it can be a separate block or connector hooked onto the device when termination is required.
Termination can be either active or passive. A passive terminator works with resistors driven by the small amount of electricity that travels through the SCSI bus. Active termination uses voltage regulators inside the terminator. Active termination is much better, and you should use it whenever you have fast, wide, or Ultra SCSI devices on the chain and/or more than two SCSI devices on the chain. It might not be obvious from looking at a terminator whether it is active or passive.
Types of SCSI
The original implementation of SCSI was just called “SCSI” at its inception. However, as new implementations came out, the original was referred to as SCSI-1. This implementation is characterized by its 5Mbps transfer rate, its Centronics 50 or DB-25 female connectors, and its 8-bit bus width. SCSI-1 had some problems, however. Some devices wouldn’t operate correctly when they were on the same SCSI bus as other devices. The main problem was that the ANSI SCSI standard was so new, vendors chose to implement it differently. These differences were the primary source of conflicts.
The first improvement that was designed into SCSI-2 was a wider bus. The new specification specified both 8-bit and 16-bit buses. The larger of the two specifications is known as Wide SCSI-2. It improved data throughput for large data transfers. Another important change was to improve upon the now-limiting 5Mbps transfer rate. The Fast SCSI-2 specification allowed for a 10Mbps transfer rate, thus allowing transfers twice as fast as SCSI-1. So, Wide SCSI-2 transfers data 16 bits at a time, and Fast SCSI transfers data 8 bits at a time but twice as fast (at 10Mbps).
SCSI-3, also known as Ultra SCSI, comes in two widths: 8-bit (narrow) and 16-bit (wide), and three speeds: 20Mbps, 40Mbps, and 80Mbps. See Table 1.6.
|
SCSI 3 Type |
Narrow (8-Bit) |
Wide (16-Bit) |
|---|---|---|
|
Ultra 1 |
20MBps |
40MBps |
|
Ultra 2 |
40MBps |
80MBps |
|
Ultra 3 |
80MBps |
160MBps |
SCSI-3 also provides ways to increase the maximum distance for the chain. Standard SCSI is also known as Single Ended (SE) SCSI, and it can go about 10 feet. Low-Voltage Differential (LVD) SCSI is a variant with higher speeds and longer maximum distances, up to 39 feet. LVD and SE can work together on the same chain, but all will revert to SE limitations in that case.
High-Voltage Differential (HVD) is a special type of SCSI incompatible with the other two types. It has a maximum distance of 82 feet and must have a special HVD terminator.
SCSI Device Installation and Configuration
Installing SCSI devices is more complex than installing an IDE drive. The main issues with installing SCSI devices are cabling, termination, and addressing.
We’ll discuss termination and cabling together because they are very closely tied. There are two types of cabling:
- Internal cabling uses a 50-wire ribbon cable with several keyed connectors on them. These connectors are attached to the devices in the computer (the order is unimportant), with one connector connecting to the adapter.
- External cabling uses thick, shielded cables that run from adapter to device to device in a fashion known as daisy-chaining. Each device has two ports on it (most of the time). When hooking up external SCSI devices, you run a cable from the adapter to the first device. Then you run a cable from the first device to the second device, from the second to the third, and so on.
Because there are two types of cabling devices, you have three ways to connect them. The methods differ by where the devices are located and whether the adapter has the terminator installed. The guide to remember here is that both ends of the bus must be terminated. Let’s look briefly at the three connection methods:
Internal Devices OnlyWhen you have only internal SCSI devices, you connect the cable to the adapter and to every SCSI device in the computer. You then install the terminating resistors on the adapter and terminate the last drive in the chain. All other devices are unterminated. This is demonstrated in Figure 1.23.
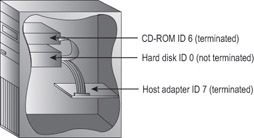
Figure 1.23: Cabling internal SCSI devices only
| Note |
Some devices and adapters don’t use terminating resistor packs; instead you use a jumper or DIP switch to activate or deactivate SCSI termination on such devices. (Where do you find out what type your device uses? In the documentation, of course.) |
External Devices OnlyIn the next situation, you have external devices only, as shown in Figure 1.24. By external devices, we mean that each has its own power supply. You connect the devices in the same manner in which you connected internal devices, but in this method you use several very short (less than 0.5 meters) stub cables to run between the devices in a daisy chain (rather than one long cable with several connectors). The effect is the same. The adapter and the last device in the chain (which has only one stub cable attached to it) must be terminated.
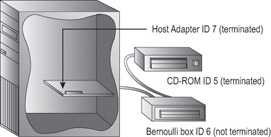
Figure 1.24: Cabling external SCSI devices only
Both Internal and External DevicesFinally, there’s the hybrid situation in which you have both internal and external devices (Figure 1.25). Most adapters have connectors for both internal and external SCSI devices—if yours doesn’t have both, you’ll need to see if anybody makes one that will work with your devices. For adapters that do have both types of connectors, you connect your internal devices to the ribbon cable and attach the cable to the adapter. Then, you daisy-chain your external devices off the external port. Finally, you terminate the last device on each chain, leaving the adapter unterminated.
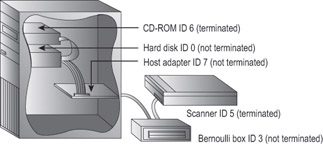
Figure 1.25: Cabling internal and external SCSI devices together
| Note |
Even though the third technique described is the technically correct way to install termination for the hybrid situation (in which you have both internal and external devices), some adapter cards still need to have terminators installed. |
Each device must also have a unique SCSI ID number. This number can be assigned by the jumper (with internal devices) or with a rotary switch (on external devices). You start by assigning your adapter an address. This can be any number from 0 to 7 on an 8-bit bus, 0 to 15 on a 16-bit bus, and 0 to 31 on a 32-bit bus, as long as no other device is using that ID.
Here are some recommendations that are commonly accepted by the PC community. Remember that these are guidelines, not rules:
- Generally speaking, give slower devices higher priority so they can access the bus whenever they need it. Lower numbers are higher priority.
- Set the bootable (or first) hard disk to ID 0.
- Set the CD-ROM to ID 3.
After the devices are cabled and terminated, you have to get the PC to recognize the SCSI adapter and its devices. The SCSI adapter manages all SCSI device resource allocation, so generally all that is required is to make sure the operating system is able to see the SCSI adapter. This involves installing a Windows driver for the adapter in Windows, for example, or a real-mode driver in CONFIG.SYS for MS-DOS.
However, if you want to boot from a SCSI drive, the system must be able to read from that drive in order to load the operating system; you must enable the SCSI adapter’s own BIOS extension so that the PC can read from it at startup without a driver. Check the documentation for the adapter; sometimes the BIOS Setup program for the SCSI adapter is activated via a function key at startup.
Once the drive is installed and talking to the computer, you can high-level-format the media and install the operating system.
| Tip |
If there are problems, double-check the termination and ID numbers. If everything looks correct, try changing the ID numbers one at a time. SCSI addressing is a gray area where many problems arise. |
RAID
RAID works the same with SCSI as it does with IDE drives; see the RAID section under Objective 1.7 for details.
Exam Essentials
Know the transfer rates of the different types of SCSI architectures. The different types of SCSI controllers and their supporting devices support throughput ranging from 5Mbps to 160Mbps. You should be familiar with these types and their throughput.
Understand SCSI IDs. SCSI IDs are a critical concept to understand. This information is not only necessary for the exam, but you must be able configure SCSI ID numbers in order to install a SCSI device.
Understand termination. You must not only understand what termination does, but also know how to implement it for the exam and to install a SCSI device.
Know the difference among SE, LVD, and HVD. Make sure you know which will coexist (SE and LVD) and what benefits LVD and HVD offer over SE.
Installing and Configuring Common Peripheral Devices
Peripheral devices are devices that are not built into the PC. They can include monitors, printers, scanners, network hubs, digital cameras, and external modems and transceivers (such as DSL or cable modems).
Critical Information
A PC technician must know how peripheral devices work, how to install them, and how to configure them. These devices are the focus of several test questions.
Procedures for Installing and Configuring Peripherals
Most peripherals connect easily to a port on the main system unit. Some of them then require setup through the operating system.
Monitors
Before connecting or disconnecting a monitor, ensure that the power to both the PC and the monitor is off. Then connect a VGA (DB-15) cable from the monitor to the PC’s video card, and connect the monitor’s power cord to an AC outlet.
Modems
There are two types of modems: internal and external. Internal modems are installed as expansion cards inside a computer, as described under Objective 1.2. External modems have their own power supplies and connect to an external COM port with an RS-232 cable or to a USB port.
Internal modems are usually smaller and cheaper than their external counterparts. However, they are more difficult to configure, especially if they are not Plug and Play. You need to configure them to use an unused COM port. Non-PnP internal modems have jumpers on them for setting the resources to use. Table 1.7 lists the IRQ and I/O port addresses of the standard COM ports installed. A PnP modem is usually assigned an appropriate COM port and associated resources automatically through the operating system.
|
COM Port |
IRQ Address |
I/O Address |
|---|---|---|
|
COM1 |
4 |
3F8–3FF |
|
COM2 |
3 |
2F8–2FF |
|
COM3 |
4 |
3E8–3EF |
|
COM4 |
3 |
2E8–2EF |
External modems use an existing serial port (legacy serial port or USB), so they don’t have the configuration problem with IRQs and I/O addresses. A legacy serial external modem must be connected with the power off for both the PC and the modem. A USB modem can be connected or disconnected to the computer at any time. External modems have their own power supplies that connect to an AC outlet.
Terminal Adapters
Non–dial-up Internet connections such as cable and DSL typically use external terminal adapters to make the connection. There are two ways this can work. Some terminal adapters connect to the PC via a USB interface, and the PC sees the terminal adapter as a network device. The device shows up in the Network section of Device Manager. To connect such a terminal adapter, simply plug it into the PC’s USB port at any time. The PC can be either on or off. The terminal adapter then connects either to a phone line (for DSL) or a cable line (for cable).
Other terminal adapters interface with the PC via a 10/100BaseT network interface card (NIC). You install the internal NIC in the PC, as described under Objective 1.2, and then connect the terminal adapter to the NIC using Cat5 network cabling (RJ-45 connectors).
Digital Cameras
Most digital cameras connect to a PC via a USB interface. When the camera is connected, the camera appears as a removable drive in My Computer, and you can browse its contents to examine the pictures. You can then copy the pictures to the PC’s hard disk with drag-and-drop through a regular file-management interface.
PDAs
A PDA typically connects to a PC via a docking cradle, which may have either a legacy serial or USB interface. When you’re initially installing a PDA docking cradle, it may be necessary to run some setup software to connect the PDA’s synchronization software to your preferred personal information management program.
Wireless Access Points, Hubs, and Routers
A wireless access point is like a network hub. It works independently of any network node and continues to function even when the PCs are turned off. However, you can configure it by entering its IP address into a web browser interface. Check the documentation to find out the IP address to use and the username and password required for access to it.
Infrared Devices
Infrared ports are most often associated with notebook PCs, although any PC may have one installed as an add-on. An infrared device is automatically recognized through the operating system whenever it comes into range of the PC, and it’s available through the infrared port. For example, when an infrared printer comes into range, the printer is detectable.
Printers
Almost all printers are Plug and Play, such that Windows can automatically detect them and either install a driver automatically or prompt you for a Setup disk. To set up a printer, use the Add Printer Wizard through the Printers applet in the Windows Control Panel.
Some printers have their own special queue software. If possible, run the Setup utility that comes with the printer.
A printer may have either a legacy parallel or USB interface. If it’s legacy parallel, both the printer and the PC must be powered off to make the connection; if it’s USB, the connection can be made at any time.
UPSs and Surge Suppressors
A surge suppressor is just a power strip with electrical protection; it has no direct interactivity with the computer.
An uninterruptible power supply (UPS) is like a surge suppressor, but with battery backup capability. However, some UPS devices include a serial or USB connector for communication with the PC. On such systems, you can connect the PC to the UPS and then use utility software that comes with the UPS to monitor battery life and power quality.
As with other devices, if you’re using a legacy serial interface, the power must be shut off to the PC before attaching or detaching it. A USB interface may be connected at any time.
Exam Essentials
Most of the information in this section seems very basic. Remember to use the principles set forth in Objective 1.2, “Identify basic procedures for adding and removing field-replaceable modules for desktop systems,” earlier in this chapter.
Know which interfaces can be hot-plugged.USB and FireWire devices can be connected while the PC is running; legacy parallel and serial devices and monitors cannot.
Know how to access a network hub, router, or access point.You can communicate with one of these devices through a web browser by entering its IP address as the URL.
Know how to install a broadband Internet terminal adapter.Some are USB; others connect to a network card in the PC.
Optimizing PC Operations
Upgrades are a part of any technician’s job description. Upgrades present their own set of challenges that can range from compatibility to space requirements. This section describes some hardware upgrades that can enhance system performance.
Critical Information
The most common need for an upgrade is to increase system performance. Over time, a computer’s performance will decrease as newer software is added. In most cases, newer versions of software require additional resources that are not available. The PC was originally configured to run at certain performance levels that considered the applications and peripherals available when it was produced. Upgrades will increase the system’s performance to accommodate newer software and peripheral devices.
Toward the end of the life expectancy of the system, it may become necessary to upgrade the system for required programs or for new hardware to function. If the system is too antiquated, it may be more cost efficient to replace the entire computer. However, in many cases, the system’s performance can be enhanced to acceptable levels by adding resources.
Memory
As we mentioned earlier in this chapter, RAM is used to store data temporarily while the PC is operating. The operating system and applications utilize RAM, so if the amount of available RAM is insufficient, the operating system will utilize hard disk space to store some of the data. Because the speed at which the data stored on a hard drive is considerably lower than the speed at which data can be accessed in RAM, the performance of the system will degrade as more and more information is stored on the hard drive.
In such a case, adding RAM can have a significant effect on the system’s performance. To fully understand the effect that the amount of RAM can have on a system, consider the memory requirements of past and present operating systems shown in Table 1.8. Refer to Objectives 1.10 and 4.2 for specifics on installing RAM and for help selecting the appropriate RAM type for a system.
|
Operating System |
RAM Requirement |
|---|---|
|
MS-DOS |
1MB |
|
Windows 3.1 |
4MB (8MB recommended) |
|
Windows NT Workstation 4.0 |
16MB (32MB recommended) |
|
Windows 95 |
4MB (8MB recommended) |
|
Windows 98 |
16MB (24MB recommended) |
|
Windows 2000 Professional |
64MB |
|
Windows Me |
32MB |
|
Windows XP |
64MB (128MB recommended) |
Disk Subsystem
The disk subsystem consists of the hard drives, the controllers, and the cables used to connect them.
Hard Drives
Hard drives are most commonly replaced because the system runs out of space to store data and program files. A small hard drive is replaced with one of larger capacity, or an additional hard disk is added.
Another reason to upgrade a hard drive is to increase the speed at which data can be written to or read from the drive. For example, replacing an old hard disk that conforms to ATA-3 standards with a newer one that conforms to ATA-6 (UltraATA/100) would result in a disk that had a much faster access time and data transfer rate (provided that the IDE controller and the cable were of the correct type to support it).
There are two common ways to replace a disk drive in a computer: adding a drive or completely replacing the disk. Each approach has benefits and drawbacks.
Complete Replacement
If you need additional hard disk capacity and do not have the physical room for a second drive inside the computer’s case, or you do not want to manage two drives, complete replacement is necessary. Complete replacement requires reinstalling or restoring the operating system, program files, and data on the new drive. Because this is a considerable undertaking, drive-image tools have been developed to aid in this process. A drive-image tool takes a snapshot of the drive and allows you to create an image that can be expanded on the larger drive, avoiding reinstallation.
These images are normally compressed and require less space than the actual contents of the drive, allowing the images to be placed on a CD-ROM or other storage media. Some examples of this type of data transfer programs are Norton Ghost and Seagate Power Quest Drive Image. Larger corporations use these tools to create a basic image of the operating system and commonly used programs to decrease downtime and lower upgrade and repair costs.
Adding Drives
The simplest way to increase hard drive capacity is to add another drive. Most desktop PCs have IDE controllers built into the motherboard. These controllers allow for two devices to be connected to both the primary and secondary controller. With this type of architecture, four IDE devices can be installed in a PC if space permits.
After adding the drive, you can place data and programs on it. This type of installation does not require the reinstallation or restoration of the operating system and program files on the new drive.
Controller Card
If the motherboard is more than a few years old, its IDE interface may not support the latest, fastest UltraATA standards. To get the highest performance out of a new hard drive, you may want to install an IDE controller card that supports the same standard as the new drive (for example, UltraATA/100 or ATA-6).
Cable
UltraATA/66 and UltraATA/100 work only with a special 80-wire ribbon cable; when installing such drives on an existing IDE interface you will probably also want to replace the 40-wire cable with an 80-wire one. Most new hard disks come with the 80-wire cable.
CPU Upgrade
The frequency at which the processor operates, or MHz, determines the speed at which data passes through the processor. Upgrading the processor to a higher frequency will provide a dramatic improvement in the system’s overall performance.
It is important to remember that replacing a processor requires some research. Most motherboards support a certain class of processor; they do not have the capacity to upgrade to a different class of chip. For example, it is not possible to upgrade a Pentium-class chip to a Pentium II–class chip. This relates not only to the processor slots, but also to the power requirements of the chip. You must consider the additional cooling requirements of the new chip as well. In most cases, processor upgrades are accomplished by replacing the motherboard and processor using a special overdrive chip. Overdrive chips will be discussed further in Chapter 4.
Some motherboards support the use of multiple CPUs, and in such motherboards additional CPUs can improve overall system performance. Although the system does not run at a faster speed (in terms of MHz), an additional CPU makes the system able to process more operations per second.
Upgrading the BIOS
When the BIOS no longer supports all of the devices that need to be connected to the PC, an upgrade is needed. There are two ways to upgrade the BIOS chip: by manually replacing the chip or by using special flash software.
Manual Chip Replacement
Manual chip replacement requires a technician to remove the old chip and replace it with a new chip provided by the motherboard manufacturer. Manual replacement is not an option in today’s PCs.
Flash BIOS Replacement
Flash BIOS is the modern way of upgrading a computer’s BIOS. By placing the BIOS update disk in the floppy drive and booting the machine, a technician can reprogram the system’s BIOS to handle new hardware devices that the manufacturer has included.
This works because the BIOS in modern systems is written in an Electrically Erasable Programmable ROM (EEPROM) chip. This chip is normally read-only, but when it receives a stronger-than-normal voltage of electricity, it can temporarily become rewriteable. The utility for updating the BIOS includes instructions to the motherboard to deliver this extra-strong electricity prior to the new BIOS update being sent to the chip.
Manufacturers periodically post the flash upgrades on their websites for technicians to download. Be aware that you must take care in this process because the BIOS could be disabled and require the motherboard to be shipped back to the manufacturer. In most cases, the flash program will give the technician the opportunity to save the current software and settings to a restore disk that can reverse the changes if necessary.
Upgrading the Cooling System
The cooling system consists of the fan in the power supply, the fan or heat sink on the CPU, and any additional heat sinks or fans in the case. If a system is inadequately cooled, lockups and spontaneous reboots may occur.
Liquid-cooled cases are now available that use circulating water rather than fans to keep components cool. These cases are typically more expensive than standard ones and may be more difficult to work on for an untrained technician, but they result in an almost completely silent system.
Air cooling is the most common cooling method used in PCs. CPUs typically have active heat sinks, which are heat sinks that include an electric fan that constantly channels heat away. A CPU that is running too hot might benefit from a better cooling fan. The heat sink portion is a block of spikes that channel heat away from the CPU.
Most passive heat sinks (that is, heat sinks that do not include a fan) are attached to the CPU using a glue-like thermal compound. This makes the connection between the heat sink and the CPU more seamless and direct. Thermal compound can be used on active heat sinks too, but generally it is not because of the possibility that the fan might stop working and need to be replaced.
In addition to the main fan in the power supply, you can also install additional cooling fans in a case that help circulate air through the case.
Upgrading to a Faster NIC
The typical speed for an Ethernet network today is 100BaseT, or 100MBps. This speed requires a 100BaseT network card. 10BaseT network cards can coexist on a 100BaseT network but will send and receive data at only 10MBps. Upgrading to a higher-speed network card can improve network performance in such a case.
In addition, new Ethernet technologies such as gigabit Ethernet are becoming popular; they push the speed beyond 100MBps. Upgrading to a NIC that supports these even faster speeds may be advantageous if the PC is on a network that supports them.
Specialized Video Cards
A standard 2-D video card is adequate for business use, but for the serious graphic artist or gamer, a 3-D video card with acceleration features can provide much better performance. These video cards include extra RAM buffers for holding video data, better on-board processing assistance for motion video, and support for the APIs (application programming interfaces) that the popular applications and games are written for, such as DirectX.
Exam Essentials
Know what performance enhancements are achieved by upgrading memory.Upgrading the amount of RAM a computer has will increase the speed of the machine by preventing the use of the hard drive to store data that is being accessed.
Know what performance enhancements are achieved by upgrading the hard drive, the IDE controller, and the IDE ribbon cable.Replacing the hard drive can allow you to add to the overall storage capacity of the machine. In some cases, read/write performance can be improved by upgrading. Understand the UltraATA/66 and UltraATA/100 requirements.
Know what performance enhancements are achieved by updating the BIOS.Replacing the BIOS can increase the number of supported devices.
Understand the benefits of improving system cooling.Make sure you know what symptoms are produced by inadequate cooling and what options are available for upgrading the cooling system.
Upgrading a PC
When you’re planning and executing system upgrades, it is important to know not only how to physically perform the upgrade, but also what effect the upgrade will have and what potential problems may be anticipated. This is a newly added A+ exam objective in the 2003 revision, and it emphasizes critical thinking as it pertains to upgrades.
Critical Information
Although almost any technical information about components may be useful in planning an upgrade, the A+ exam objectives provide a list of example issues for this objective; the most critical of these are summarized in the following sections.
Drivers for Legacy Devices
A legacy device is one that is based on old technology. Examples might include an ISA expansion card or a device that connects to a COM or LPT port rather than using the newer USB port. The term legacy can also refer to a piece of used hardware that is based on older technology internally.
Windows supports a wide variety of legacy devices with its own native drivers, but it may sometimes be necessary to seek out a driver for a legacy device to run under a particular operating system version. The best source is the website of the device manufacturer. Other sources are also available, such as driver repositories on the Web.
Bus Types and Characteristics
When you’re selecting upgrade devices, you may have a choice of bus types to which to connect the new device. It is important to understand the benefits of the various buses so you can choose wisely.
For example, you might have a choice of an ISA or PCI internal modem, or a COM port or USB external modem. Or you might need to choose between an AGP and a PCI video card.
For external ports, USB is better and faster than both COM (legacy serial) and LPT (legacy parallel), and is further advantageous because of its seamless Plug-and-Play integration and its hot-plugging ability.
For internal buses, AGP is the fastest and best, but it is only for video cards. PCI is the next most desirable. ISA is old technology and nearly obsolete, and you should avoid it whenever possible. One exception might be an internal modem. Because an internal modem operates at a maximum of only 56Kbps, it would be least affected by being relegated to the ISA bus. In contrast, a video card would suffer greatly on ISA.
Table 1.9 describes the speeds and characteristics of internal expansion buses.
|
Bus |
Width |
Speed |
Uses |
|---|---|---|---|
|
ISA |
8-bit or 16-bit |
8MHz |
Avoid if possible, or use for slow devices like modems |
|
PCI |
32-bit |
33MHz |
All nonvideo internal expansion boards |
|
AGP |
64-bit |
66MHz to 133MHz |
The primary video card in the system |
Memory Capacity and Characteristics
When you’re selecting RAM for a memory upgrade, it is important to buy the right kind. On a modern system, you must match the RAM to the motherboard’s needs in the following areas:
Physical Size168-pin or 184-DIMMs or 184-pin RIMMs.
TypeSDRAM, Double Data Rate (DDR) SDRAM, or Rambus RAM.
SpeedPC100, PC133, and up. Faster RAM will work than is required, but not slower.
Capacity64MB, 128MB, and up. Older systems may use SIMMs (Single Inline Memory Modules), which have somewhat more complex shopping issues:
- Physical Size30-pin (8-bit) or 72-pin (32-bit)
- SpeedMeasured in nanoseconds of delay; for example, 60ns. Lower is better. Faster RAM will work than is required, but not slower. All RAM in the system should be the same speed.
- ParitySome SIMMs have an extra chip for parity checking. Some motherboards require parity RAM; others make it optional or forbid it.
- Refresh TechnologySome SIMMs are Extended Data Out (EDO), allowing for better performance through less frequent refreshing. Some motherboards require it; others make it optional or forbid it.
CapacityVaries greatly, from 256KB up to 64MB or more.
When you’re shopping for RAM for a system that uses SIMMs, it’s important to consult the motherboard manual to find out any special rules for installation. Some motherboards have complex charts showing the combinations and positions of the SIMMs that it will allow.
Motherboards may combine one or more RAM slots into a single logical bank, and all the RAM installed in that set of slots must be completely identical in every way. Check the motherboard documentation. On systems that use 30-pin SIMMs, four slots typically combine to create a single bank. On 486 systems that use 72-pin SIMMs, each SIMM slot is a separate bank. On Pentium systems that use 72-pin SIMMs, two SIMM slots together form a bank.
System/Firmware Limitations
One of the most common problems in upgrading to a larger hard disk is the BIOS’s inability to support the larger disk size. In the original IDE specification, the size limit was 540MB. This limitation was upped to 8GB with the introduction of Logical Block Addressing (LBA) in 1996, which the BIOS must support. A BIOS update may be available for the motherboard to enable LBA if needed.
The 8GB limitation can be broken if the BIOS supports Enhanced BIOS Services for Disk Drives, a 1998 update. Again, a BIOS update for the motherboard may enable this support if it is lacking.
If no BIOS update is available, the choices are to replace the motherboard, to use the drive at the BIOS’s maximum size it can recognize, or to install a utility program (usually provided with the hard disk) that extends the BIOS to recognize the new drive. Such utilities are very useful but can introduce some quirks in the system that cannot be easily undone, so their usage is not recommended except where no other alternative exists.
Power Supply Output Capacity
A power supply has a rated output capacity in watts, and when you fill a system with power-hungry devices, you must make sure that that maximum capacity is not exceeded. Otherwise problems with power can occur, creating lockups or spontaneous reboots.
To determine the wattage a device draws, multiply voltage by current. For example, if a device uses 5 amps of +3.3v and 0.7 amps of +12v, a total of 25 watts is consumed. Do this calculation for every device installed. Most devices have labels on them that state their power requirements.
Some devices do not have power labels; for such devices, use the numbers in Table 1.10 for estimations.
|
Component |
Watts Consumed, for Estimating Purposes |
|---|---|
|
Motherboard |
20–30 watts |
|
CPU |
30–70 watts (faster CPU, more watts) |
|
AGP video card |
20–50 watts |
|
PCI circuit boards |
5 watts each |
|
ISA circuit boards |
10 watts each |
|
Floppy drive |
5 watts |
|
CD drive |
10–25 watts |
|
RAM |
8 watts per 128MB |
|
IDE hard drive |
5–15 watts |
|
SCSI hard drive |
10–40 watts |
Selecting a CPU for a Motherboard
The CPU must be compatible with the motherboard in the following ways:
Physical ConnectivityThe CPU must be in the right kind of package to fit into the motherboard.
SpeedThe motherboard’s chipset dictates its external data-bus speed; the CPU must be capable of operating at that external speed.
Instruction SetThe motherboard’s chipset contains an instruction set for communicating with the CPU; the CPU must understand the commands in that set. For example, a motherboard designed for an AMD Athlon CPU cannot accept an Intel Pentium CPU, because the instruction set is different.
VoltageThe CPU requires a certain voltage of power to be supplied to it via the motherboard’s interface. This can be anywhere from +5v for a very old CPU down to around +2.1v for a modern one. The wrong voltage can ruin the CPU.
Selecting a Notebook Battery
When you’re shopping for notebook batteries, be aware not only of the physical size and shape (which vary depending on the notebook manufacturer’s specifications), but also of the battery technology:
Nickel Cadmium (NiCad)The least preferable. Must be recharged every 3 to 4 hours. A full recharge can take as long as 12 hours. Tend to lose their ability to hold a charge unless they are fully discharged each time before being recharged. Thus, leaving the notebook PC plugged in all the time and using the battery only occasionally for short periods of time can actually ruin the battery over time.
Nickel-Metal Hydride (NiMH)Better than NiCad because they do not use heavy metals with great toxicity. They can also store up to 50 percent more power and do not suffer loss of functionality from partial draining and recharging.
Lithium Ion (LIon)Lightweight and have a long life, plus they are not subject to problems with partial draining and recharging. They tend to be more expensive than NiCad or NiMH, however.
Fuel CellCasio recently announced plans to produce a hydrogen fuel cell battery for notebook computers that promises to last 20 hours or more on a single charge. By the time you read this, it may be available, offering greatly increased performance at a much higher price than normal notebook batteries.
Selecting a PCMCIA Card
PCMCIA cards are the expansion cards for notebook PCs. Most notebook PCs have a PCMCIA bay that can accept one Type III device or two Type I or Type II devices:
Type IUp to 3.3mm thick. Used mostly for memory.
Type IIThe most common type. Up to 5.5mm thick. Used for devices that would typically be expansion boards in a desktop PC, such as network interface cards.
Type IIIUp to 10.5mm thick. Used for drives. Not common.
In addition to these types based on thickness, there are also types based on technology. The PCMCIA (PC Card) standard has recently been updated to a new standard called CardBus; look for CardBus in the specification whenever you’re buying PC Card devices. CardBus devices are backward compatible with older PCMCIA slots.
Exam Essentials
Understand the differences among PCI, ISA, and AGP.Know the bus widths and speeds and be able to select the best bus type for a given device.
Know what factors go into making memory compatible with a PC.These factors can include physical size, capacity, technology, speed, and compatibility with existing RAM in the system.
Understand why updating the BIOS makes it possible to support larger hard disks.Know the 8GB limit of LBA-supported systems, and how it can be overcome with Enhanced BIOS Services for Disk Drives with a BIOS update.
Be able to calculate the wattage requirements of power supplies.Given the voltage and amperage draws for a group of devices, determine the wattage of a power supply required to support them.
Review Questions
|
1. |
What two types of expansion slots are found on all modern motherboards? What is a third, older type that might or might not also be present? |
|
|
2. |
Name three features that distinguish an ATX motherboard from an AT motherboard. |
|
|
3. |
What are PGA and SECC? Which of those types is the Socket 423 used with the Pentium 4? |
|
|
4. |
What voltages does a typical power supply provide to the motherboard? |
|
|
5. |
What is the purpose of an antistatic wrist strap, and when should it be worn? |
|
|
6. |
Name two ports/interfaces on a notebook PC that are hot-pluggable, and two more that are not. |
|
|
7. |
Name the default IRQs for COM1 and COM2. |
|
|
8. |
In what Windows utility would you manually change a hardware resource assignment? |
|
|
9. |
What is RAID 5, and what advantages does it provide? |
|
|
10. |
Which type of SCSI is incompatible with all other types? |
|

Answers
|
1. |
PCI and AGP. The third type is ISA. |
|
2. |
Possible answers include: (1) position of CPU, (2) expansion slot orientation, (3) built-in ports on the side, (4) one-piece power supply connector, (5) physical size and shape of the motherboard, and (6) type of keyboard connector |
|
3. |
They are the two types of slots/sockets for CPUs in motherboards. PGA is the type with a grid of holes into which pins fit on a flat chip. SECC is the type that accepts a circuit board surrounded by a cartridge. Whenever you see socket in the name, it’s always a PGA type. SECC types have slot in the name. |
|
4. |
+5v, -5v, +12v, and -12v for all power supplies, plus +3.3v for an ATX power supply. |
|
5. |
Its purpose is to prevent electrostatic discharge (ESD, or static electricity) from damaging components. It should be worn whenever you’re working inside a PC case. |
|
6. |
Hot-pluggable ports/interfaces include PC Card (PCMICIA) and USB. Non hot-pluggable ports include legacy parallel, legacy serial, and VGA. |
|
7. |
COM1 is usually IRQ4, and COM2 is usually IRQ3. |
|
8. |
Device Manager. |
|
9. |
RAID 5 uses a parity block when striping data across three or more drives, improving performance and providing fault tolerance. |
|
10. |
High Voltage Differential (HVD) is incompatible with standard Single End (SE) and Low Voltage Differential (LVD). |
Part I - A+: Core Hardware Service Technician Exam
- Domain 1 Installation, Configuration, and Upgrading
- Domain 2 Diagnosing and Troubleshooting
- Domain 3 Preventive Maintenance
- Domain 4 Motherboard/Processors/Memory
- Domain 5 Printers
- Domain 6 Basic Networking
Part II - A+ Operating System Technologies Exam
- Chapter III Two Models of Online Patronage: Why Do Consumers Shop on the Internet?
- Chapter V Consumer Complaint Behavior in the Online Environment
- Chapter X Converting Browsers to Buyers: Key Considerations in Designing Business-to-Consumer Web Sites
- Chapter XVII Internet Markets and E-Loyalty
- Chapter XVIII Web Systems Design, Litigation, and Online Consumer Behavior
