| On large GroupWise systems, you will likely have to spend some time with the link configuration tool, shown in Figure 9.7, by optimizing or otherwise tweaking the connections between different domains, and between domains and post offices. Figure 9.7. The link configuration tool is accessed via Tools, GroupWise Utilities 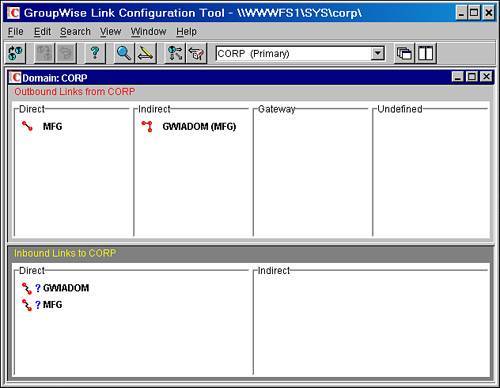
In the example in Figure 9.7, there are two domains. The MFG domain's link is listed under direct links, and the GWIADOM domain is an indirect link. The domain to which ConsoleOne is currently connected and from which it reads the link configuration information is CORP (Primary). How do these domains communicate with one another? Are messages routed directly among all of them? As Figure 9.7 shows, the CORP domain has a direct connection to the MFG domain. However, the CORP domain does not have a direct connection to the GWIADOM domain. Therefore, any messages that are destined from the CORP domain to the GWIADOM domain are routed to the MFG domain first. In some customer environments, setting up indirect links between domains has some very practical purposes. For example, imagine a global firm with domains in many regions of the world. The Americas region has four domains: New York, Chicago, Los Angeles, and San Francisco. The Asian region has four domains: Japan, Taiwan, Hong Kong, and Singapore. The link speed between the Asian domains is somewhat fast. Only Japan has a somewhat fast network link to the New York office. So it is logical to have Taiwan, Hong Kong, and Singapore all connect to New York, Chicago, Los Angeles, and San Francisco through the Japan domain. The Chicago, Los Angeles, and San Francisco domains should all connect to the Asian region domains through the New York domain. This link architecture has the following benefits: The fastest network links are being used, so messages will move more quickly. Slow network links are not being used, freeing up those links for traffic that's not as easily configurable, such as eDirectory synchronization traffic.
As this example illustrates, it is best to configure your link configuration records to follow your WAN network infrastructure. Creating an Indirect Connection Imagine you want to route messages from CORP to GWIADOM through MFG. Consider the following scenario: CORP connects directly to GWIADOM. The CORP MTA gets 8912 or 8913 errors (TCP timeouts), sometimes during business hours. These errors occur only when CORP is connected directly to GWIADOM. MFG has no problem communicating with GWIADOM because it is in close network proximity to GWIADOM, and CORP has no problem communicating with MFG. Therefore, CORP should connect to GWIADOM through MFG.
The following steps create an indirect connection between CORP and GWIADOM: 1. | Connect to the domain whose MTA you want to affect.
In this scenario, it's the CORP domain, which is done from GroupWise system operations, under Select Domain.
| 2. | Select the appropriate domain object (GWIADOM, in this case). From the Tools menu, choose GroupWise Utilities, Link Configuration.
| 3. | Double-click the link you want to edit. In this scenario, it is the GWIADOM domain link (see Figure 9.8).
Figure 9.8. A direct link from CORP to GWIADOM 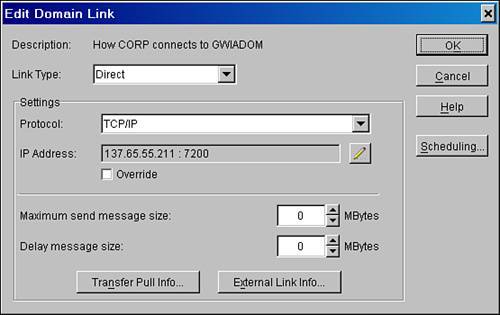
Here the link type is direct. Because this is what needs to be changed, grab that drop-down menu.
| 4. | If you select the indirect link type, as in Figure 9.9, everything changes.
Figure 9.9. An indirect link from CORP to GWIADOM 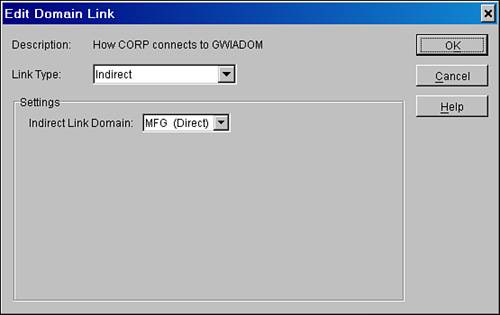
No longer are there IP addresses and ports. With an indirect or gateway connection, the only aspect to specify is the domain or gateway, respectively, through which to connect. In this scenario, the MFG domain has been used.
| 5. | Click OK and exit the link configuration tool.
| 6. | When prompted to save changes to links, answer Yes.
|
Indirect connections are generally most useful in larger GroupWise systems. Overriding Links with the Link Configuration Tool In some circumstances, it might be necessary to use the link configuration tool to override the IP address that has been specified for an MTA or POA object. Consider the following scenario: The MFG domain's MTA object is on a different IP address than the one listed in ConsoleOne. For some reason, the IP address on the MTA won't change correctly. The change does not propagate, and the link is now down between the domains CORP and MFG.
With the following steps, you can override the address: 1. | Connect to the domain whose MTA needs to be affected, which in this scenario is CORP.
| 2. | Select that domain object. From the Tools menu, choose GroupWise Utilities, Link Configuration.
| 3. | Double-click the problem link that needs to be edited; in this scenario it's the MFG domain link.
| 4. | Check the box labeled Override.
| 5. | Notice that there are now new fields for the IP address and port for this link. Enter the correct IP address and port here. Figure 9.10 shows a configured override link.
Figure 9.10. Override link configuration 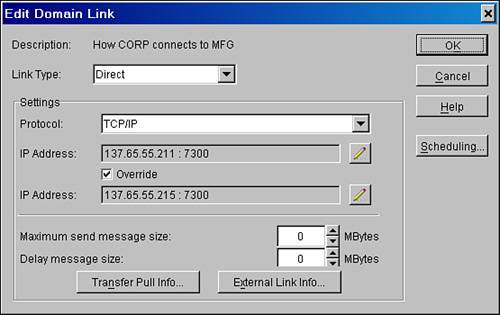
| 6. | Click OK.
| 7. | Exit the link configuration tool, responding Yes to the prompt to save changes.
|
You will rarely need to use the override feature. We have used it in situations in which network address translation (NAT) is being used, and must be overridden for the sake of some domain's MTAs that cannot use the NATted address. Configuring a Transfer Pull Link Transfer pull assumes that two domains connect via UNC paths, but that one MTA is not going to be given any file-system rights to the other MTA's domain directory. In this situation, the MTA that does have rights has to "pull" messages from the nontrusted MTA's domain directory. To configure this, both MTAs must have their links changed. You must give the nontrusted MTA an override link to a new UNC path. This path will be on the nontrusted MTA's server. You will give the trusted MTA a transfer pull path to this new UNC path. Consider the following scenario: MFG is the nontrusted MTA. The path it will use is \\WIDGET_MFG1\DATA\XFERPULL (on the MFG MTA's server). CORP is the trusted MTA. It will use the transfer pull path of \\WIDGET_MFG1\DATA\XFERPULL. The CORP MTA has already been assigned a login ID and password for the MFG server. This was done by adding the /USER and /PASSWORD switches to the startup file of the MTA.
The following steps configure the links: 1. | Make a directory under the WIDGET_CORP1 server on the DATA volume called XFERPULL.
| 2. | Under the XFERPULL directory, make a directory called WPCSIN.
| 3. | Under the WPCSIN directory, make individual directories 0 through 7.
| 4. | Connect to the MFG domain and highlight that domain object.
| 5. | From the Tools menu, choose GroupWise Utilities, Link Configuration.
| 6. | Double-click the link to the CORP domain.
Make sure the link type is direct and the link protocol is UNC.
| 7. | Check the Override box.
| 8. | Enter the new UNC path (\\WIDGET_MFG1\DATA\XFERPULL) in the UNC Override field.
| 9. | Exit the link configuration tool and save all changes.
| 10. | Connect to the CORP domain and highlight that domain object.
| 11. | From the Tools menu, choose GroupWise Utilities, Link Configuration.
| 12. | Double-click the link to the MFG domain.
Make sure the link type is direct and the link protocol is UNC.
| 13. | Click the Transfer Pull Info button.
| 14. | Enter the new UNC path (\\WIDGET_MFG1\DATA\XFERPULL) in the Transfer Pull Directory field.
| 15. | Enter a polling interval, in seconds.
Remember that polling across a slow or nontrusted link can be a performance hit for the MTA. Sixty seconds is usually fast enough to satisfy users whose mail traverses the link.
| 16. | Click OK to dismiss the Transfer Pull Info dialog box, and click OK again to finish editing the link.
| 17. | Exit the link configuration tool and save your changes.
|
The MFG MTA really has no idea what is going on. The MTA is simply redirecting any messages for CORP into a directory on its own file server. The CORP MTA, however, is doing double duty. When the CORP MTA sends to the MFG domain, the MTA sends as it normally does, by dropping files in the directory specified as the MFG UNC path. But every 60 seconds, the CORP MTA polls the new UNC path (\\WIDGET_ MFG1\DATA\XFERPULL), the transfer pull directory, to see whether MFG has anything to send. In this example when the MFG domain needs to send mail to the CORP domain, the domain simply places the files in the XFERPULL directory on the local server. Then every 60 seconds, the CORP domain will come along and scan this directory for mail that is destined for the CORP domain. This allows the MFG domain to send mail to CORP without needing rights to the server where CORP resides. Note The transfer pull method is rarely used today because of the availability of TCP/IP links. With TCP/IP links, no file system rights are granted. Transfer pull is used when there is no IP communication between two domains. The Linux MTA does not support UNC connections to another domain or a post office. As such, the Linux MTA does not support transfer/pull links.
Scheduling Links with the Link Configuration Tool Suppose you have a TCP/IP WAN link to a particular domain, and during the day there is heavy traffic on that link. You have decided that GroupWise traffic should not be sent over this connection during the day, unless there are high-priority messages, or lots of files have queued up. Here's a walk-through on this scenario: The MFG domain lies across a WAN link that is exceptionally busy from 8 a.m. to 5 p.m., Monday through Friday, because of a mainframe inventory program. The CORP MTA, which connects to MFG, is not to connect during the day, unless there are high-priority messages, a large volume of messages, or messages that have been waiting a long time.
The following steps help you work through this scenario: 1. | Connect to the domain to which the link schedule will apply. In this scenario, it's the CORP domain.
| 2. | Select that domain object. From the Tools menu, choose GroupWise Utilities, Link Configuration.
| 3. | Double-click the link you want to edit.
In this case, it's the MFG domain link.
| 4. | Click the Scheduling button to get to the Link Schedule window (see Figure 9.11).
Figure 9.11. The Link Schedule window allows you to create a link schedule for your domain 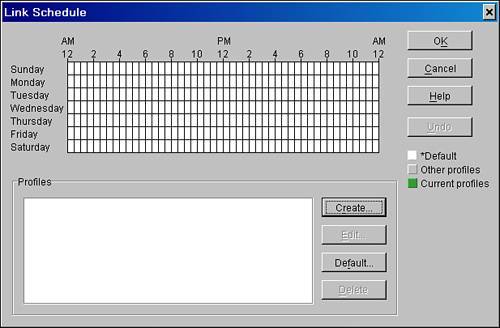
You need to create two profiles. One is the default profile, which will be in force after hours. The other is the daytime profile, which will be in force during business hours.
| 5. | Click the Default button and click OK to dismiss the Default profile.
| 6. | Click the Create button to get to the window shown in Figure 9.12.
Figure 9.12. The Create Profile window, with changes made for link scheduling 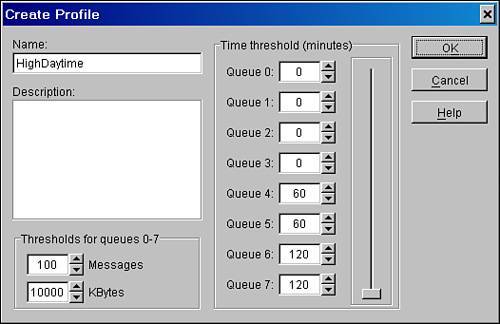
| 7. | Name this profile.
Now you are creating the profile for link scheduling during the day.
In this example, the profile is set so that high-priority queues (03) are processed immediately. Normal-priority queues (45) are processed only after the oldest item in them has waited 60 minutes. Low-priority queues (67) are processed only after the oldest item has waited two hours.
This example has also been set up so that if a total of 100 messages exist across all queues, regardless of their age, the MTA will open the link. Also, if there are 10,000KB (10MB) of files across all queues, the MTA will open the link.
| 8. | Click OK.
| 9. | With this new profile selected, drag the mouse across the schedule pane to create a rectangle.
The one in the example runs across the 8 to 5:30 block, Monday through Friday (see Figure 9.13). This is the schedule for which the selected profile will be active. During all other hours (the white space), the default profile will be active.
Figure 9.13. The Link Schedule window with the profiles created and scheduled 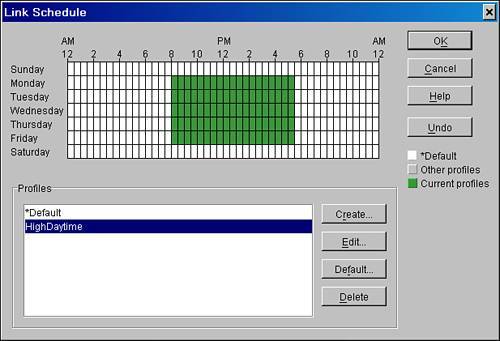
| 10. | Click OK to dismiss the Link Schedule window, and click OK again to close the Edit Link window.
| 11. | Exit the link configuration tool and save your changes.
|
This is a great feature, but it's relevant only to specialized environments. |