| This section assumes you have the following prerequisites: There are other prerequisites to fulfill in order to create signed keys (certificates), but the next subsection explains how to fulfill those prerequisites. Administrator's Workstation Prerequisites The following are prerequisites for one administrator's workstation. Not everyone who uses ConsoleOne, or who is a network administrator, must have these prerequisites fulfilled. The following subsections are presented as though the administrator is using Windows. Workstation NICI Install the Novell International Cryptographic Infrastructure for Windows. At the time that this book was written, these are the instructions for doing this: Go to http://download.novell.com and look for "NICI," which is short for Novell International Cryptographic Infrastructure. At the time that this book was written, the name of the file to download was wcniciu0.exe. This software will be installed directly on the machine from which you are going to use ConsoleOne. This software is necessary for the Novell Certificate Server snap-in, which you will install later, to work. Run the *.EXE that you pulled down, and follow the installation wizard.
NICI is now installed, and the workstation does not even need to be rebooted for NICI to take effect. Novell Certificate Console (PKI) Snap-ins for ConsoleOne Although you have a CA and a PKI infrastructure already in place, it's possible that you do not have the Novell Certificate Console (PKI) snap-ins for ConsoleOne installed. The easiest way to determine what is installed is to load ConsoleOne, and select Help, About Snapins. You need to make sure you have the Novell Certificate Server Snapin Version 2.21 or better. If you do not have these snap-ins, obtain them from Novell's website and install them. Here are instructions for doing that, at the time this book was written: Go to http://download.novell.com. Obtain the latest Certificate Server PKI snap-ins for ConsoleOne by selecting it from the list. At the time this book was written, the software was called "2.21 Snap-in on Windows 95/98/NT/2000." The snap-ins were available as a download under the category "ConsoleOne." This software does not have a README or an install routine. To install this software, run your UNZIP utility to expand the zipped file. When prompted for a path to expand the software, indicate the path to ConsoleOne, such as C:\NOVELL\CONSOLEONE\1.2. Be sure to indicate the full path to the 1.2 directory. Figure 27.2 shows PKUNZIP with the correct extract path. Figure 27.2. Installing the PKI snap-ins for ConsoleOne 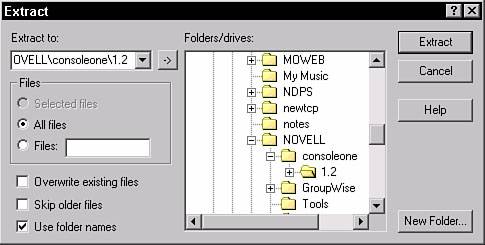
The PKI snap-ins for ConsoleOne will now load when ConsoleOne loads. These snap-ins will aid in the creation of certificates. Generating a Private Key and a Certificate Signing Request for the Private Key GroupWise comes with a utility (GWCSRGEN.EXE) that can create a private key in the form of a file, and a CSR (certificate signing request) for that private key. Then the private key can be signed by an external certificate authority such as Verisign, or the certificate can be signed by the certificate authority in your eDirectory tree. This chapter assumes you will have the key signed by the certificate authority in your eDirectory tree. You can find GWCSRGEN.EXE in the GroupWise 7 SDD\ADMIN\UTILITY\GWCSRGEN directory. Following are the steps for using the GroupWise CSR Generate utility: 1. | Run the GroupWise CSR Generate utility.
| 2. | Fill in the fields of the CSR Generate utility, as shown in Table 27.1.
Table 27.1. GroupWise CSR Generate Utility Configuration InstructionsFIELD NAME | INSTRUCTIONS |
|---|
Key filename | Name the file with an 8.3 name. The name doesn't matter to the software; we like to use a name with a *.KEY filename; for example, WWWIDGET.KEY. | Key password | This is a password that will be embedded inside the private key. This should be a password you will not forget. If you do, though, you will have to go through this entire procedure again. | CSR filename | The name and length of this file does not matter; it will be used only temporarily. We like to put a *.CSR extension on the file; for example, WWWIDGET.CSR. | Country | The two-letter country code for the country you are in. For example, for the United States the country code is US. For The Netherlands, it's NL. | State/Province | The state or province where your company is located. | City | Your city; you do not need to use abbreviations. | Organization | The full name of your organization; for example, WorldWide Widgets Corporation. | Division | The division of your organization that needs this certificate; for example, ITS. | Hostname of Server | Technically, you define the DNS name for the server that will be using this certificate. However, in this example we will use the same certificate on all the agents, and in fact the DNS name need not be valid for GroupWise to use the certificates for encryption. You can just use the Internet domain name for your organization; for example, WWWIDGETS.COM. |
|
Figure 27.3 shows the GroupWise CSR Generate utility with the aforementioned settings. Figure 27.3. The GroupWise CSR Generate utility is used to create a private key and generate a certificate signing request 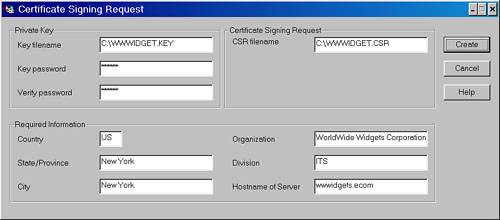
Generating a Public Key from the Certificate Signing Request Following are the steps for generating a certificate from the CSR you made in the preceding section: 1. | Load ConsoleOne. This must be the same instance of ConsoleOne with the Novell Certificate Server snap-ins.
| 2. | Highlight any Organizational Unit, or Organization in your eDirectory tree browser view, and select Tools, Issue Certificate.
| 3. | You should get the Issue Certificate dialog box shown in Figure 27.4. Click the Browse button to the right of the Filename field. Browse to the *.CSR file that you made in the instructions earlier in this chapter, and click Next.
Figure 27.4. Specifying a CSR filename 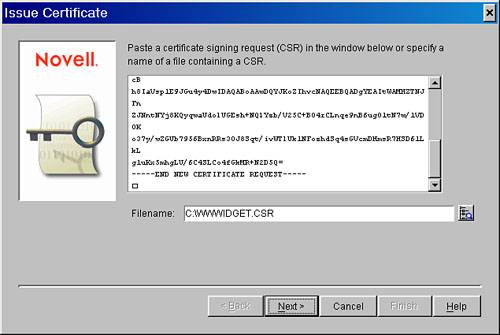
| 4. | At the next page, you don't have any selection to make. Just click Next.
| 5. | On the next screen, shown in Figure 27.5, you specify the key type. Select the following options and click Next:
Figure 27.5. Specifying key type and usage 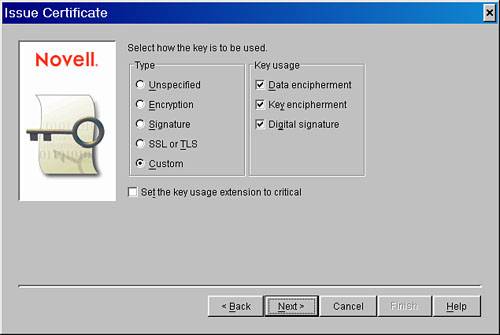
Custom Data encipherment Key encipherment Digital signature
| 6. | At the next screen, you can choose the number of years that the certificate is valid for. Only you will be using these certificates; therefore, you might want to specify a period longer than the default, for example, five years. Then click the Next button.
| 7. | On the review screen you get to see the configuration options you chose. Click the Finish button.
| 8. | Lastly, you'll see the Save Certificate dialog box, as shown in Figure 27.6. Make sure to choose Base64 format for the file type.
Figure 27.6. Saving the certificate in Base64 format 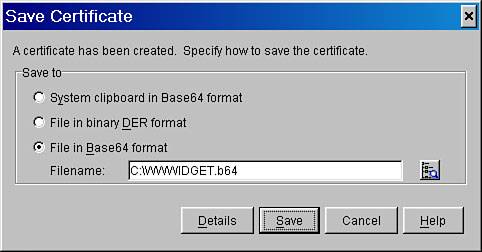
|
Now you have generated and created a public key contained within a certificate which is the *.B64 file, a private *.KEY file. The private key is secured through the password that you assigned to the key when you used the GroupWise CSR Generate utility. Securing GroupWise Agents That Use Certificates and Key Files The instructions in the remainder of this chapter ensure that the following data is secured via SSL: GroupWise client to GroupWise POA communication GroupWise WebAccess agent to GroupWise POA communication GroupWise POA to IMAP client communication GroupWise POA to SOAP client communication GroupWise POA to MTA communication via MTP GroupWise MTA to MTA communication via MTP HTTP monitoring of the GroupWise MTA HTTP monitoring of the GroupWise POA HTTP monitoring of the GroupWise WebAccess agent GroupWise Messenger Client to the Novell Messaging Agent GroupWise Messenger Client to the Novell Archive Agent HTTP monitoring of the Novell Messaging Agent HTTP monitoring of the Novell Archive Agent The GWIA's communications with other Internet hosts (that support SSL) The GWIA's communications with POP3 clients The GWIA's communications with IMAP clients
The public key, the private key, and the password for the private key can be used to fill in the fields. In ConsoleOne, you'll see the options to fill in the fields shown in Table 27.2. Table 27.2. Certificate Creation Configuration InstructionsFIELD | INPUT |
|---|
Certificate | The *.B64 file; the filename should not exceed the size of an 8.3 character filename. | SSL Key File | The *.KEY file; the filename should not exceed the size of an 8.3 character filename. | Set Password | This is the password you input earlier when using the GroupWise CSR Generate utility to generate the private key. |
The path to the *.B64 and the *.KEY files should be a path on the server where the GroupWise agent is running. You have lots of flexibility as to where you place the certificates; it just needs to be somewhere on the server that is running the GroupWise agent. We like to use a model where we create a CERT directory off of the root data directory for that agent. Table 27.3 depicts our method for placing these files. Table 27.3. Recommended Certificate and Private Key LocationsAGENT | CERTIFICATE AND KEY LOCATION |
|---|
GroupWise MTA | Create the CERT directory off of the domain directory. The domain directory is the one that contains the file WPDOMAIN.DB. | GroupWise POA | Create the CERT directory off of the post office directory. The post office directory is the one that contains the file WPHOST.DB. | GroupWise WebAccess Agent | Create the CERT directory off of the Domain\WPGATE\WEBACCESS GATEWAY DIRECTORY. | GroupWise Internet Agent | Create the CERT directory off of the Domain\WPGATE\GWIA GATEWAY DIRECTORY. | Novell Messenger/GroupWise MessengerMessaging Agent | Create the CERT directory off of the SYS:NOVELL\NM\MA directory. | Novell Messenger/GroupWise MessengerArchive Agent | Create the CERT directory off of the SYS:NOVELL\NM\AA directory. |
This method of placing the key and certificate under the root data directory for the agent is friendly to scenarios in which Novell Cluster Services is in place. Also, when you have the key and certificate files in close proximity to the root data directories of your agents, other folks with administrative rights to your servers are less likely to mess with these files because of their proximity to your GroupWise system's data directories. Figure 27.7 shows a GroupWise POA that has been configured to use a public and private key, and the password for the private key on the SSL Settings property page of the POA object. The password you use is the same one used when generating the private key in the GWCSRGEN.EXE utility. Figure 27.7. A configured SSL Settings property page for a GroupWise POA 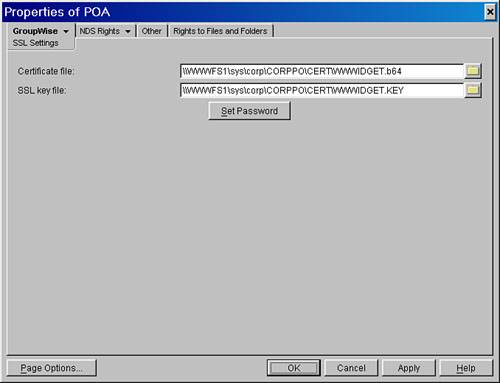
Filling out the SSL Settings property page of a GroupWise agent is not all you must do to enable SSL. You must also enable SSL encryption for the services that the agent provides. For example, on the GroupWise POA, you might enable SSL encryption for client/server connections, MTP communication, and HTTP monitoring. Figure 27.8 shows a POA configured for these settings. Figure 27.8. Specifying SSL for services the POA provides 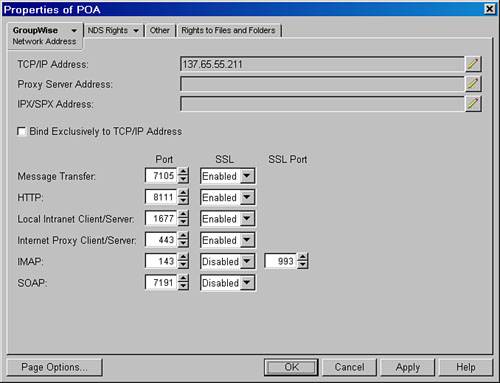
It's important to note that for some of the SSL fields on the POA you can set SSL to Disabled, Enabled, and Required. The Required option has the following impact. Suppose the POA is set for SSL Required for Local Intranet Client/Server. If a GroupWise WebAccess agent or client does not support SSL, that agent or client cannot log in to the GroupWise POA. Note that the only GroupWise clients that support SSL are the GroupWise 6.5 and GroupWise 7 clients. The GroupWise 5.x and 6.0x clients do not support SSL. When a GroupWise client/server session is SSL-ized, a little padlock icon shows up in the lower-right corner of the GroupWise client. If a user hovers over the padlock with the mouse pointer, a simple dialog box displays that reads SSL Secured, as shown in Figure 27.9. Figure 27.9. A GroupWise client/server session secured by SSL 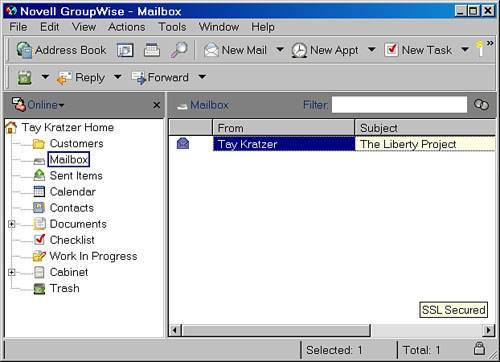
The location for configuring SSL certificates and keys is similar for all GroupWise agents. The GroupWise Messenger/Novell Messenger agents are slightly different. Table 27.4 lists the agent type, explains where to configure the SSL certificates and keys, and indicates where to configure the services that are SSL-ized by that agent. Table 27.4. How to Configure GroupWise Agents to use SSLAGENT TYPE | WHERE TO CONFIGURE SSL | WHERE TO CONFIGURE SERVICES |
|---|
Agent | SSL certificate and key configuration | SSL enabling services for this agent | POA | SSL Settings property page under the GroupWise tab | Network Address property page under the GroupWise tab | MTA | SSL Settings property page under the GroupWise tab | Network Address property page under the GroupWise tab | WebAccess Agent | SSL Settings property page under the GroupWise tab | Network Address property page under the GroupWise tab | GroupWise Internet Agent (GWIA) | SSL Settings property page under the GroupWise tab | Network Address property page under the GroupWise tab | Novell Messenger/GroupWise MessengerMessaging Agent (MA) | Security property page under the Agent tab | Security property page under the Agent tab | Novell Messenger/GroupWise MessengerArchive Agent (AA) | Security property page under the Agent tab | Security property page under the Agent tab |
Table 27.5 offers some important notes with regard to SSL-izing the agents. Table 27.5. Troubleshooting Notes When Enabling SSL on GroupWise AgentsAGENT | NOTES |
|---|
POA | If you "require" SSL connections, you might end up denying connections to certain clients and WebAccess Agents. After enabling SSL, the POA generally picks up the changes and does not need to be restarted. | MTA | After enabling SSL, the MTA generally picks up the changes and does not need to be restarted. | WebAccess Agent | After enabling SSL, the WebAccess Agent (GWINTER) must be restarted. | GWIA | After enabling SSL, the GWIA must be restarted. The GWIA will only SSL-ize communication with other Internet SMTP hosts that also support the extended SMTP StartTLS protocol. In Chapter 30, the section "Overview of How to Secure Messages" talks more about StartTLS. | Novell Messenger/GroupWise MessengerMessaging Agent (MA) | Be sure to enable the option. Enable SSL for Client/Server. After SSL is enabled, the MA must be restarted. | Novell Messenger/GroupWise MessengerArchive Agent (AA) | Be sure to enable the option. Enable SSL for Client/Server. Be sure to enable the option. Enable SSL for Message Transfer Protocol if the MA and the AA are configured to run on separate servers. After SSL is enabled, the AA must be restarted. |
Note If you need to change the password on the key file, you normally need to restart the agent. Review the Agent log file to see whether it reports that it must be restarted because of a change to the key password.
Enabling SSL for POA to LDAP Server Communication Chapter 26, "Configuring GroupWise Authentication via LDAP," talks about how to enable the POA to perform LDAP authentication. Be sure to read that chapter first before trying to understand the steps in this section. Also, be sure to read all the material preceding this section so that you'll more fully understand the steps you will be taking in this section. In a Novell eDirectory environment, the LDAP server by default uses the SSL CertificateDNSserver name object in the same context as the server running LDAP services. This object is actually called a key material object. For the GroupWise POA to communicate with the LDAP server via SSL, the POA must use that same encryption key. The Novell LDAP server reads the key right out of eDirectory, but the GroupWise POA does not. The key, therefore, must be exported to a file so that the POA can use it to send encrypted data to the Novell LDAP server. When you configure your GroupWise POA to speak to a specific LDAP server, you must have exported the key file that the LDAP server also uses. Read through this sample scenario to understand how to configure the LDAP server and the POA to talk to one another via SSL. Note The server running the GroupWise POA for CORPPO Post Office (WWWFS1) is a NetWare 6.5 server running a GroupWise 7 POA.
Server Hosting Novell LDAP Services (WWWFS2) There are three basic steps behind enabling SSL communications, as detailed here: 1. | Make sure that your LDAP server is configured to speak correctly when using an SSL connection.
| 2. | Export the encryption key file for the same key material object in eDirectory that the LDAP server is currently configured to use. This way, the POA can use the same encryption key from the key material object that the LDAP server is currently using.
| 3. | Configure your POA to use the encryption key you obtained from the LDAP server.
|
The following sections walk through these actions. Configuring the LDAP Server to Support SSL The default settings for an eDirectory LDAP server do not allow for clear-text passwords. If you enabled the LDAP server to allow clear-text passwords, in order to set up and test your LDAP authentication without SSL, this is where you can now disable the option for clear-text passwords. This ensures the security of your eDirectory usernames and passwords because now any service using NLDAP must use encryption to talk to the LDAP server. You should confirm the following configuration settings for the LDAP server: Confirm the port for LDAP SSL communication (which is 636 by default). Confirm that SSL is enabled for the LDAP server. Confirm that the LDAP server does not allow clear-text passwords. Determine which key material object the LDAP server is using.
Here are the steps for checking out these settings. You might not have the correct LDAP server snap-ins, so rather than taking you through the process of obtaining the LDAP server snap-ins, this section instructs you about how to check these settings without the LDAP snap-ins. If you have the LDAP snap-ins for ConsoleOne, the settings we mention should be easy to find: 1. | Highlight the eDirectory OU that contains the server that is running the LDAP services.
| 2. | Edit the object called LDAP Serverserver name of the server running LDAP services. In our example scenario this object is called LDAP ServerWWWFS2.
Note You want to confirm that SSL is enabled for LDAP and that the SSL port is configured to 636. You also need to determine the key material object that the LDAP server is using. | 3. | From the Other tab (this is if you do not have the LDAP snap-ins), confirm the following:
LDAP Enable SSLExpand this attribute and make sure that it says true. LDAP SSL PortExpand this attribute and determine the port. It should generally read 636. LDAP:keyMaterialNameExpand this attribute, and determine the key that the LDAP server is configured to use. Generally the key is SSL CertificateDNS. If it's not, just make note of which key is being used.
| 4. | Exit the LDAP server object you have been looking at, and find the object called LDAP Groupserver name of the server running LDAP services. In this sample scenario, this object is called LDAP GroupWWWFS2.
| 5. | Edit the LDAP Group object. Go to the Other tab and confirm the setting called LDAP Allow Clear Text Password. Expand this attribute and make sure that it reads false.
|
Your LDAP server is now prepared to support SSL. Obtaining a Key File for the SSL CertificateDNS Object In this section, you need to export a key file for the SSL certificate already in eDirectorywhich the LDAP server is also using. By default, most LDAP servers are configured to use the SSL CertificateDNSserver name key material object. If your LDAP server is using a different key material object, just follow the instructions in this section with the appropriate key material object. This object is in the same context as the server, the LDAP server, and LDAP group objects mentioned in the preceding section. In this scenario, the name of the object is SSL CertificateDNSWWWFS2. Follow these steps: 1. | Load ConsoleOne. You must be using the ConsoleOne with the Certificate Server snap-ins.
| 2. | Highlight the SSL CertificateDNSserver name object. In this sample scenario, the name of the object is SSL CertificateDNSWWWFS2. Edit this object.
| 3. | Select the Certificates tab, and then choose the Trusted Root Certificate property page.
| 4. | Click the Export button.
| 5. | In the Export Certificate dialog box, do not export the private key with the certificate. Click the Next button.
| 6. | In the next export screen, keep the file in *.DER format, and give the file a descriptive 8.3 character format. In the example shown in Figure 27.10, the file is saved as fileservername.DER. Click the Next button.
Figure 27.10. Exporting the public key into *.DER format 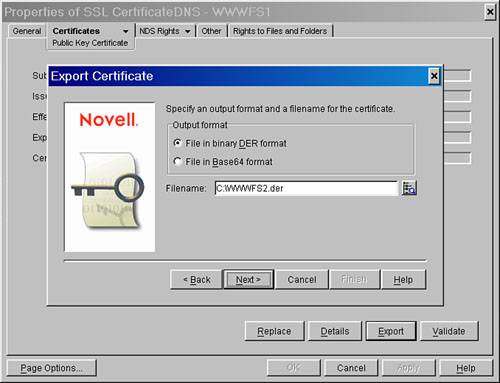
| 7. | On the summary screen, click the Finish button to export the key.
| 8. | Copy the *.DER file that you just created to the program directory for the GroupWise POA. On the NetWare Server this is as follows:
SYS:SYSTEM
On a Linux server you put the *.der file in the following directory:
/opt/novell/groupwise/agents/lib/nldap
|
Configuring the POA to Use the Encryption Key You are ready to configure the GroupWise LDAP server definition so that it will support SSL. Follow these steps to do so: 1. | In ConsoleOne, find your already-configured LDAP server definition you just exported (the *.DER file). These LDAP server definitions are available under Tools, GroupWise System Operations, LDAP Servers.
| 2. | Edit the LDAP server, and select the Use SSL check box.
| 3. | Do not use the Browse button, which indicates a UNC path to the *.DER file. Instead, just indicate the name of the *.DER file only. Because the *.DER file is in the program directory of the POA, the POA will discover it there. Using this method of referencing only the name of the *.DER file then allows the LDAP server definition to be generic in fashion, and usable by other GroupWise POAs. So in the SSL key file field indicate the *.DER file that correlates to the LDAP server whose TCP/IP address is referenced in the LDAP server address field. In this scenario, it's the TCP/IP address for the file server WWWFS2. The *.DER file is WWWFS2.DER, as shown in Figure 27.11.
Figure 27.11. Enabling SSL for LDAP servers in GroupWise system operations 
Note Remember that with Linux, filenames are case sensitive. If an LDAP server is being used by Linux and NetWare POAs, it is probably best to indicate the name of the *.der file in lowercase. | 4. | Change the LDAP port from 389 to port 636. Figure 27.11 shows a configured LDAP server definition.
| 5. | The POA might need to be restarted for it to acknowledge the SSL settings for LDAP authentication that you just enabled.
| 6. | Test to see whether LDAP over SSL is working using these benchmarks:
Make sure that the GroupWise POA is set to use verbose logging. Log in to GroupWise as a user on the post office where you have LDAP over SSL configured. Observe the log of the POA; you should see something similar to the following sample log: 13:13:11 1AB C/S Login win Net Id=irina ::GW Id=irina :: 137.65.55.212 13:13:11 1AB Initializing Secured LDAP session with 137.65.55.211 at port 636 using SSL Key file SYS:SYSTEM\wwwfs2.der
|
Now with SSL enabled for LDAP requests, users' passwords will no longer go across the wire in an unencrypted manner. Enabling SSL for GroupWise Messenger to LDAP Server Communication The steps to configure the GroupWise Messenger Agent's (MA) communication with the LDAP server over SSL are very similar to those for configuring the GroupWise POA. This section assumes that you already have the MA configured for LDAP authentication. In this section, you are merely enabling SSL. In a Novell eDirectory environment, the LDAP server uses (by default) the SSL CertificateDNSserver name object in the same context as the server running LDAP services. This object is actually called a key material object. For the GroupWise POA to communicate with the LDAP server via SSL, the POA must use that same encryption key. The Novell LDAP server reads the key right out of eDirectory, but the MA does not. The key, therefore, must be exported to a file so that the MA can use the key to send encrypted data to the Novell LDAP server. When you configure your MA to speak to a specific LDAP server, you must have exported the key file that the LDAP server also uses. Read through this sample scenario to understand how to configure both the LDAP server and the MA to talk to one another via SSL. The server running the Novell Messenger/GroupWise Messenger MA (WWWFS1) is a NetWare 6.5 server running the Messaging Agent. Server Hosting Novell LDAP Services (WWWFS2) There are three basic steps behind enabling SSL communications: 1. | Make sure that your LDAP server is configured to speak correctly when using an SSL connection.
| 2. | Export the encryption key file for the same key material object in eDirectory that the LDAP server is currently configured to use. This way, the MA can use the same encryption key from the key material object that the LDAP server is currently using.
| 3. | Configure your MA to use the encryption key you obtained from the LDAP server.
|
The following sections walk through these actions. Configuring the LDAP Server to Support SSL The default settings for an eDirectory LDAP server do not allow for clear-text passwords. If you enabled the LDAP server to allow clear-text passwords in order to set up and test your LDAP authentication without SSL, this is where you can now disable the option for clear-text passwords. This ensures the security of your eDirectory usernames and passwords, because any service using NLDAP must use encryption to talk to the LDAP server. You should confirm the following configuration settings for the LDAP server: Confirm the port for LDAP SSL communication (which is 636 by default). Confirm that SSL is enabled for the LDAP server. Confirm that the LDAP server does not allow clear text passwords. Determine which key material object the LDAP server is using.
You might not have the correct LDAP server snap-ins, so rather than taking you through the process of obtaining the LDAP server snap-ins, this section instructs you about how to check these settings without the LDAP snap-ins. If you have the LDAP snap-ins for ConsoleOne, these settings are easy to find. We do not recommend modifying these attributes without the LDAP snap-ins. If you must modify them, you must find a copy of ConsoleOne that has the LDAP snap-ins enabled. Use these steps to view the settings: 1. | Highlight the eDirectory OU that contains the server that is running the LDAP services.
| 2. | Edit the object called LDAP Serverserver name of the server running LDAP services. In this sample scenario, this object is called LDAP ServerWWWFS2.
Note You want to confirm that SSL is enabled for LDAP and that the SSL port is configured to be 636. You also need to determine the key material object that the LDAP server is using. | 3. | From the Other tab (this is if you do not have the LDAP snap-ins), confirm the following:
LDAP Enable SSLExpand this attribute and make sure that it reads TRue. LDAP SSL PortExpand this attribute and determine the port. It should generally read 636. LDAP:keyMaterialNameExpand this attribute, and determine the key that the LDAP server is configured to use. Generally the key is SSL CertificateDNS. If it's not, just make note of which key is being used.
| 4. | Exit the LDAP Server object you have been looking at, and find the object called LDAP GroupServer name of the server running LDAP services. In this sample scenario, this object is called LDAP GroupWWWFS2.
| 5. | Edit the LDAP Group object. Go to the Other tab and confirm the setting called LDAP Allow Clear Text Password. Expand it and make sure that it reads false.
|
Your LDAP server is now prepared to support SSL. Obtaining a ROOTCERT.DER Key File from a Server Running LDAP In this section, you need to obtain the ROOTCERT.DER key file from the SYS:PUBLIC directory in which the LDAP services are running. The steps to perform this are the following: 1. | Go to the SYS:PUBLIC directory of the server that is running your LDAP services. Obtain the ROOTCERT.DER file.
| 2. | Make sure that there is a directory under the MA root directory called CERT. Copy the ROOTCERT.DER file mentioned in step 1 to the CERT directory under the MA root directory.
| 3. | Rename the ROOTCERT.DER file to something like the fileserver name of the file server running LDAP services.DER. The filename should be in the 8.3 format; for example, WWWFS2.DER.
|
Now you have put the LDAP server's key file in physical proximity to the GroupWise Messaging Agent so it can use the key file. Configuring the GroupWise LDAP Server Definition to Support SSL Following are the steps for enabling LDAP authentication for the GroupWise Messaging Agent: 1. | In ConsoleOne, find your already-configured LDAP profile or profiles if you are using LDAP server pooling. The LDAP profiles are in the LDAPContainer object located under the MessengerService object.
| 2. | Edit the LDAP profile object that you have already configured.
| 3. | Under the LDAP Profile tab, go to the Connections Property page.
| 4. | Edit the connection that represents the LDAP server you have obtained the public key for. Change the port to 636. Enable the SSL Enabled check box.
| 5. | Use the Browse button next to the Root Certificate File field and select the *.DER file that correlates to the LDAP server whose TCP/IP address is referenced in the LDAP server address field. In this scenario, it's the TCP/IP address for the file server WWWFS2. The *.DER file is WWWFS2.DER, as shown in Figure 27.12. If the path is on a Linux server, indicate the Linux path to the *.DER file and keep in mind case sensitivity on the file.
Figure 27.12. The LDAP Connection window is where you define the LDAP server, as well as the key file associated with it 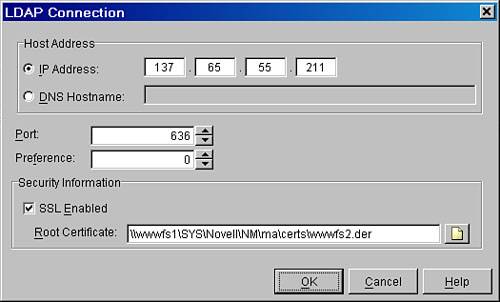
| 6. | The Messaging Agent (MA) must be restarted for it to acknowledge the SSL settings for LDAP authentication that you just enabled.
|
Now with SSL enabled for LDAP requests and users' passwords, requests to LDAP will no longer go across the wire in an unencrypted manner. |