Accessing Picture Details
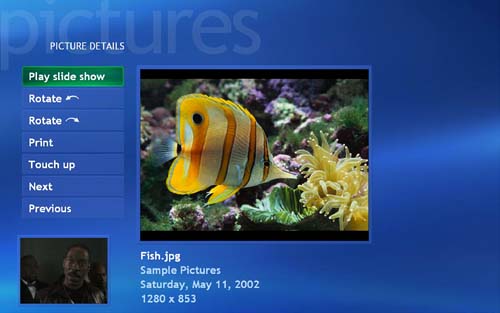
| The fastest and easiest way to start fixing and finessing your photos is to highlight the image you want to work with in the thumbnail view within My Pictures, and then press the More Info button on the remote control (Details, if you have an HP system). This works equally well if you are displaying the photo in full-screen mode or in a slide show, or simply have it highlighted in the thumbnail view. You'll instantly be presented with the Picture Details screen (see Figure 19.1), which includes the following choices:
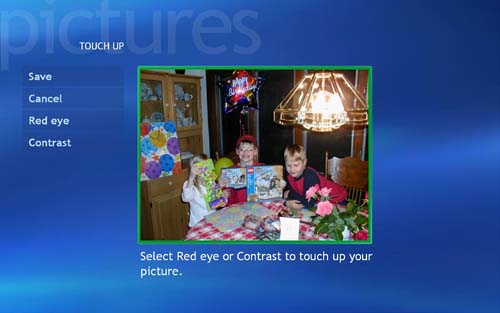
Figure 19.1. The Picture Details screen is the control center for moving and manipulating images from within the My Pictures interface. Using the tabs on the left side of the Picture Details screen, you can launch a slide show, rotate the image, print it, fix it, or click to view a different image. Let's take a look at some of these controls individually, beginning with the most interesting and powerful. The Touch Up ControlWhen you select the Touch Up option from the Picture Details screen, Media Center may present you with a range of options for correcting common problems associated with digital photos (see Figure 19.2). Figure 19.2. This screen gives you an opportunity to tweak your digital images. The business end of the Touch Up menu gives you a choice of the following common procedures for doctoring up your digital images:
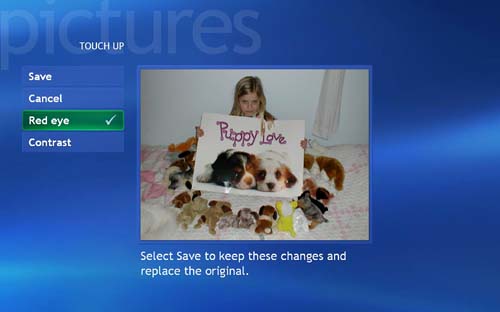
In addition, you'll also have options to save or cancel these operations. Red EyeThis is another prime example of how the ease of using Media Center's simple push-button features can lull you into thinking that nothing very special is going on. With remote-control ease, you can instruct Media Center to scrutinize your image and automatically apply the fix your photo needs. To remove red-eye distortion, simply highlight the Red Eye tab and press OK on the remote (see Figure 19.3). Figure 19.3. The check mark next to Red Eye indicates that Media Center's Touch Up feature has corrected the red-eye in your image. What is red-eye, anyway? In this case, it's not an optical disease, but a visual distortion that occurs when the light from your flash hits the subject's eyes at just the right angle, causing a bright red reflection from the blood vessels in a person's retinas. If you seem to have a bigger problem with red-eye when you take pictures of kids , it's no accident . Children's pupils are larger and have less coloring than adults, compounding the problem. People with blue or gray eyes also tend to reflect more light to the lens. Luckily, the Touch Up feature does a pretty good job of repairing red-eye distortion, but if you want to try to avoid having red-eye occur in the first place, here are a few things to try:
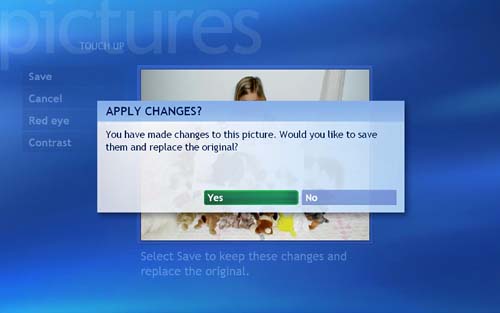
ContrastThe Contrast tab allows you to automatically optimize the light and dark areas of your image. If you want to compare the image before and after the contrast fix, select the tab to remove the check mark. If you prefer the way the picture looks with the contrast optimized, select Contrast again. The check mark will be replaced and you can then select Save (if you try to exit without saving, you'll be confronted with the warning screen shown in Figure 19.4). Figure 19.4. If you make changes using the Red Eye or Contrast controls, Media Center asks whether you want to save them before allowing you to exit. caution
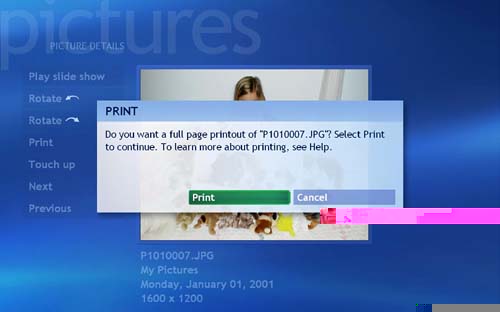
After selecting the Contrast option and saving the image, you'll automatically be returned to the Picture Details page. Save or CancelAs discussed previously, you need to save the changes made during the Touch Up process to make them permanent. If you decide to cancel, you can always change your mind and fix your photos later. The Play Slide Show ControlThe Play Slide Show option on the Picture Details screen launches the slide show display, starting with the selected photo and progressing through every photo in your directory. (It will also include subdirectories if you have chosen the Show Pictures in Subfolders feature in the Settings menu, as described in Chapter 18, "Creating Slide Shows.") The Picture Rotation ControlsWith this readily accessible feature, Media Center has addressed one of the major annoyances of digital photography: the inability to easily rotate a photo from a vertical to a horizontal orientation, and back again. Anyone who has rotated his camera to take a vertical photo, and then tried to view it on his PC and been frustrated by the picture being cocked sideways , will appreciate the ease with which Media Center My Pictures has integrated the ability to rotate your photo into the "right side up" position. The Picture Navigation ControlsThe Picture Details screen makes it easy to view, rotate, and repair multiple images in assembly-line fashion by using the Next and Previous tabs to quickly navigate from one picture to another. The Print ControlIf you want a quick route to printing a full-screen hard copy of your image, simply select the Print tab from the Picture Details screen (see Figure 19.5). You'll be given only two choices: print a full-page photo using your default printer, or cancel the process. More full-featured printing options are available elsewhere on your Media Center machine (see "Print This Picture," later in this chapter). Figure 19.5. This pop-up message is displayed when you select the Print tab from Picture Details. |
EAN: 2147483647
Pages: 159