Laser Printers
|
| < Day Day Up > |
|
The previous A+ Core Hardware Service Technician exams used to bombard the examinee with questions relating to minute details of the stages of the laser printing electrophotographic process. The current exam may also address some of these details. It is very important that you understand this process and its intricacies, as well as the laser printer paper-feeding process. Equally important, however, is to focus your study on printer troubleshooting and maintenance in general. The current A+ Core test laser printer questions seem to be headed in the direction of the overall use of the technology. For example, you may know that a uniform charge of -600V is applied to the laser printer's photosensitive drum by the primary corona wire during the conditioning phase of the EP process, but that knowledge will not help you on the test if you can't answer a question asking you how to dispose of a toner cartridge properly.
A laser printer is a popular type of nonimpact printer that is capable of producing resolutions of 1400 dpi or greater, with a usual minimum requirement of 600 dpi. Laser printers use technology similar to that of photocopiers.
A laser printer also puts many dots on paper that eventually form an image. Unlike the previously mentioned printing technologies, however, the laser printing process uses plastic toner particles that bond to an electrophotosensitive drum to create an image. These toner particles are actually a combination of organic material, plastic, and iron. A toner cartridge houses the powder toner and is inserted into the laser printer itself. A used toner cartridge should be sent back to the toner cartridge manufacturer for proper disposal or possible refilling. Note for the exam that the toner, paper, and disposable ribbons are considered printer-consumable items. If laser-printed output begins to appear wavy or inconsistent, the problem may be an empty or malfunctioning toner cartridge.
The laser printing process begins after you send a document or image from your computer to the laser printer. After the image is accepted by the laser printer, a laser beam and a mirror are used to write an electrostatic representation of the image to a photosensitive drum. The electronically charged drum then rolls through the toner, which adheres to the drum to form an image. At this stage of the process, a sheet of paper is fed into the printer, where it receives an electrostatic charge. The paper is then rolled over to the drum, and the toner image is transferred to the paper. In the next process, the toner is heated and fused to the paper. The final output is directed out of the printer, and the printer awaits the next document or image. This process is repeated every time a page of information is sent to the printer.
Printer Quality Types
Printer quality type standards refer to the quality of the printed dots produced, mainly by dot matrix printers. Printer quality types can also apply to other printing technologies, such as laser printing. You should be familiar with the following printer type qualities for the A+ Core Hardware Service Technician test.
-
Letter Quality (LQ). LQ is the standard for printing today; it is the best quality type available and requires a device that can support a minimum of 300 dpi. LQ produces characters that are crisp and clear. There are no noticeable spaces between the dots printed on the paper. LQ is used mostly in higher end dot matrix and laser printers.
-
Near Letter Quality (NLQ). Dot matrix and ink-jet printers that produce output at 150 dpi utilize NLQ. The dots that make up a character, number, or symbol are printed over twice, which gives them a better look than draft quality. Unfortunately, the tiny printed dots are still somewhat noticeable.
-
Draft quality. Draft output is a very low-grade print quality. All the dots that make up a printed image are noticeable.
Raster Image Processing
A raster is a rectangular area or grid of the monitor's display area used for images or for the mathematically created vector drawing processes. The size of the raster area depends on the resolution of the display area. Monitors use auto sizing to calculate the raster grid size of a display area. A Raster Image Processor (RIP) is used to translate complicated raster images and vector drawings sent to a laser printer. The RIP requires memory to store large images before they are processed. If there is not enough memory in the printer to support the image to be stored, it is more than likely that you will get a 'Memory Overflow' error message. Resolution Enhancement Technology (RET) allows a printer to print raster images at a higher resolution than the printer is technically capable of. RET uses a combination of technologies to fill in the spaces between dots on an image for better visual quality. Decreasing the printer's resolution and decreasing the RET can also help to reduce the frequency of 'Memory Overflow' error messages.
Laser Technologies
Laser printer manufacturers utilize different laser printing technologies and processes to attain the same result of producing a high-quality image on final output. For the A+ Core test, we are focusing on the Electrophotographic (EP) process. There are three important laser-printing processes that you should be familiar with.
-
LCD process. The LCD process technology replaces the laser used in the EP process with an LCD panel or grid to write an image to the photosensitive drum.
-
Light-Emitting Diode (LED) process. LEDs are used in this technology in place of a laser beam to provide a light source to the photosensitive drum.
-
Electrophotographic process. The EP process is by far the most common printing process in use today. A laser beam, mirror, toner, and EP drum are used to produce a final image.
The EP Laser Printing Process
The stages of the EP laser printing process that you need to be familiar with for the A+ Core exam are listed below. Figure 6.5 shows a diagram of the EP laser printing process.
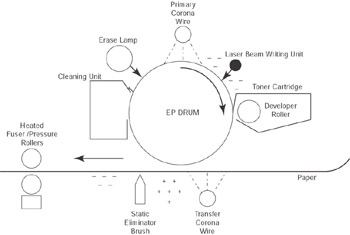
Figure 6.5: The electrophotographic (EP) laser printing process.
-
Cleaning. The EP drum must be cleaned, erased, and desensitized of any electronic charge it may have as a result of a previous process. A rubber blade is used to remove any toner or particles from the drum. The used toner is disposed of into a cleaning unit or bucket. A fluorescent lamp is used to remove any electronic charge retained by the EP drum from a previous process. This preparation stage is vital; the drum must be properly prepared in order to produce a sharp image. Think about it: if your camera lens is dirty, you are probably not going to get a clear picture.
-
Conditioning. At this point, the EP drum cannot hold an image; it needs to be conditioned to do so. This is accomplished with a charge of -600V applied to the EP drum by the primary corona wire. The charge is evenly distributed across the entire drum, creating an electronic field. This process enables the drum to become photoconductive and prepares it for the writing phase.
-
Writing. At this stage of the process, the printer's laser beam writing unit and a series of mirrors are used to draw tiny dots on the EP drum, which represent the final image to be produced. The area of the drum that the laser beam comes in contact with loses some of its negative charge (by approximately -100V) and becomes relatively more positive (the charge is still considered negative, just not as negative as the areas not hit by the laser beam). When the laser beam has finished creating the image on the relatively positive EP drum, the printer's controller starts the paper sheet-feed process by pulling a sheet of paper into the printer. The paper stands ready at the printer's registration rollers until the controller directs it farther into the printer.
Note Paper-feed rollers have sensors to control the proper flow of paper out of the paper tray. It is a common occurrence to receive a 'paper jam' error on the printer LED display-but on investigation, you find that there is no paper in the tray. Chances are that there is a particle of foreign matter in the way, or the sensor is dirty. While troubleshooting, always check the paper-feed sensors first in this situation.
-
Developing. At this point in the process, the EP drum is ready to accept toner on the areas or dots that have a more positive charge. The toner cartridge houses a toner-developing roller that is magnetized and constantly turning. The magnetized roller attracts the toner particles located near it and dispenses the toner to the positively charged areas (dots) on the rotating EP drum. The EP drum now has a ‘picture,' or mirror duplicate of the image, to be placed on the paper.
-
Transferring. It's time to get the image, drawn in toner, from the EP drum to the paper. Keep in mind that the toner is being held on the EP drum with a relative negative charge. At this point, the paper has been pulled into the printer. The paper passes by the transfer corona wire, or in some printers a transfer roller, where it receives a highly positive charge on its back side. The paper then passes under the negatively charged EP drum, and the toner is transferred onto the highly charged paper. A static charge eliminator, otherwise known as an eliminator comb, is used to keep the paper from wrapping itself around the EP drum.
-
Fusing. The toner must now be fused, or bonded onto the paper. A fuser assembly, which is a quartz heating lamp inside a roller tube, is situated above a rubber roller pressure assembly. The paper and its toner are fed between the two devices. The toner is heated (melted) by the fuser assembly and pressed onto the paper permanently by the pressure rollers. It is important to note that there is a built-in temperature sensor on the heated rollers. If the temperature during this process rises above 180°F, the sensor will shut down the printer.
Note Silicon oil is used to lubricate the fusing rollers during the fusing process to keep the paper from sticking to the rollers.
-
End of cycle. A cleaning pad is used to remove excess toner and residue from the heated rollers. The paper containing the final image is rolled out of the printer.
The following alphasupply.com Web site has an excellent laser printing troubleshooting page that lists detailed laser printing problems and solutions in step-by-step detail. This page is definitely worth a look: http://alphasupply.com/
printer_problems.htm
Ink Dispersion
Dispersion can be defined as the act of dispersing, which means to separate, distribute, or scatter in different directions. Most printer inks are made up of a combination of ingredients, including pigments, resins, solvents, and varnishes. For a printed document or photo to be clear and precise, it is important that printer ink pigments are dispersed free of lumps and other particles, in a smooth and even manner. Scientifically speaking, ink dispersion has to do with the ink manufacturing and production processes involved with how pigments are separated or broken down from other material. For the A+ exam it is important to note that if ink is improperly dispersed, or if there is a problem with an ink dispersion nozzle (used with most ink-jet printers), printing may become faded or unclear.
Dye Sublimation
Dye sublimation technology and dye sublimation printers have brought clear, crisp, photo-quality printing home. With a dye sublimation printer, a heat-sensitive print head moves over a ribbon of transparent film that contains heat-activated inks or sections that represent the four primary printing colors of cyan, magenta, yellow, and black. (CMYK). These solid inks are vaporized and sublimate (adsorb) onto special polymer-coated gloss paper.
Here some important highlights regarding dye sublimation:
-
Produces smooth, clear prints, making digital pictures look very realistic
-
Final print is less susceptible to fading over time
-
Offers very fast printing
-
Dye sublimation printers are more expensive than ink-jet printers
-
Special ‘gloss' paper is used
In conclusion, the process of dye sublimation produces a smooth, photographic-quality image.
| Note | Dye sublimation technology and dye sublimation printers have become very popular with the heavy use of digital cameras in today's society. CompTIA recognizes this and will most likely ask you about this technology on the exam. |
Print, Copy, Fax, and Scan
In the past, the average home or small office required separate devices for such tasks as printing, copying, faxing and scanning. This required enormous amounts of desk/office space, as well as a high cost of ownership and maintenance. Enter the MFD (Multifunction Device)! An MFD is a device that combines the functionality of a printer, a copier, a scanner, and a fax machine into one unit. An MFD has only one warranty, so you don't need a separate warranty for each of your devices. An MFD is usually connected to a computer system with one cable (usually parallel or USB) and possibly an RJ11 patch for a phone line. An MFD typically requires only one power cord. A networked MFD is typically connected to a switch or router and can be accessed by many users if set up to do so. Most MFDs come with easily installed software packages that allow you set up all of the MFD's software drivers and functions with minutes. The popularity of MFDs has pretty much flattened the market for single, stand-alone devices. The most popular versions of MFDs offer ink-jet or laser jet technology.
| Note | MFDs have been identified by CompTIA as part of the 2003 A+ objectives. Make sure you are familiar with these combination devices that are used to print, copy, fax, and scan. |
Finishers (Stapling, Etc.)
Most high-end printers allow the use of optional units called multifunction finishers. A multifunction finisher is simply a printer-attachable unit that allows some or all of the following options and features:
-
Ability to stack multiple sheets of letter- or ledger-size paper
-
Ability to offset multiple print jobs
-
Ability to stack sheets into booklets
-
Ability to staple sheets of letter- or ledger-size paper
-
Ability to fold single pages
-
Ability to saddle stitch and fold booklets
Most finishers have interfaces that are proprietary to the printer manufacturer, meaning they are not interchangeable between printers. The jamming of staples or paper causes the majority of problems that occur with most finishers. Every manufacturer has its own set of procedures for dealing with these jams. It is advised that you follow the finisher's manufacturer instructions for finisher-related jams.
Important Printer Information and Test Tips
The following printer-related information and test tips are included to ensure that you are well prepared for the many printer-focused questions that may come your way on the real exam:
-
A dot matrix's printer pins strike or ‘hit' paper to create a final image.
-
Concerning the laser printing process: If the printer drum has an image on it, but the printer is just sending blank pages out, there is most likely a transfer corona failure or problem.
-
If you experience printed lines of miscellaneous characters, text, or code followed by blank sheets of paper after installing a new printer, it is likely that you have installed the wrong printer driver, or it is possible that you have a loose printer cable.
-
With an ink-jet printer, ink is sprayed onto the paper with a nozzle.
-
Such things as ribbons and paper are considered to be printer consumables.
-
By no means should a laser printer ever be plugged into a UPS.
-
Centronix, DB-25, and USB represent possible printer connections.
-
Humidity, worn rollers, or bad feeder separator pads and bad media are all very common causes for more than one sheet of paper being fed into a printer at a time.
-
Laser printers have ozone filters that are used to protect the environment. It is very important that a laser printer's ozone filter be vacuumed or replaced during routine printer maintenance.
-
If you send a print job to a printer and nothing is printed at all, you should verify that your toner cartridge is not empty and in good condition. You should also verify that you have removed the manufacturer's tape from the toner cartridge if it is new.
|
| < Day Day Up > |
|
EAN: 2147483647
Pages: 237
- Using SQL Data Definition Language (DDL) to Create Data Tables and Other Database Objects
- Using SQL Data Manipulation Language (DML) to Insert and Manipulate Data Within SQL Tables
- Working with Comparison Predicates and Grouped Queries
- Retrieving and Manipulating Data Through Cursors
- Working with Ms-sql Server Information Schema View