Interface Customizations
|
|
First, I would like to describe some useful user interface (UI) customizations. Most of these can't be set using the GUI tools or administrative utilities.
Registry Values for Configuring Start the Menu in Windows XP and Windows Server 2003
Most users, especially beginners, will prefer to customize the taskbar and Start menu using the standard Graphical User Interface (GUI). However, there are lots of capabilities that allow advanced users to customize the Windows XP or Windows Server 2003 interface by using Group Policy Object Editor or by editing the registry directly. Let's cover these settings in more detail.
The most convenient way to edit the taskbar and Start menu features is provided by Group Policy Object Editor. To start editing these policies in a workgroup environment or on a standalone Windows XP or Windows Server 2003 computer, proceed as follows:
-
Click Start, click Run, type mmc, and then click OK.
-
From the File menu, select the Add/Remove Snap-in command. Go to the Standalone tab, and click Add.
-
From the Available Standalone Snap-ins list, select the Group Policy option and click the Add button. When the Select Group Policy Object window opens, select the Local Computer option to edit the local Group Policy Object (GPO) or click Browse to find the Group Policy Object that you want.
-
Click Finish, then Close, then OK. The Group Policy snap-in opens the Group Policy Object for editing. Expand the console tree in the left pane of this window as follows: User Configuration | Administrative Templates | Start Menu and Taskbar (Fig. 13.1).
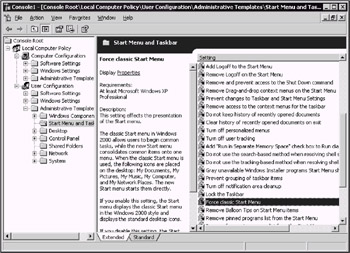
Figure 13.1: Editing the Start menu and taskbar policies using Group Policy Editor
| Note | In a domain environment, to accomplish the same goal you must open the Group Policy tool MMC snap-in, focused on a specific GPO. To do so, start the Active Directory Users and Computers MMC snap-in, right-click the name of the domain or organizational unit of interest, and select the Properties command from the context menu. Then, go to the Group Policy tab and highlight the GPO of interest. (Note that if you haven't created any other GPOs, only the Default Domain Policy will be available.) Click the Edit button. |
Let's choose the Force classic Start Menu Properties policy to demonstrate how policies are used to edit features.
-
Go to the right pane of the Group Policy window and double-click the Force classic Start Menu item in the list of available policies. The Force classic Start Menu Properties window will open (Fig. 13.2). To view the explanation of the policy settings, click the Explain tab.
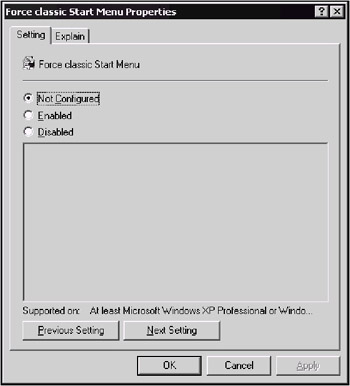
Figure 13.2: The Setting tab of the Force classic Start Menu Properties window -
To set the selected policy, chose the Enabled radio button and click Apply.
-
Now, to view the effect of the application of this policy, open the Taskbar and Start Menu Properties window and go to the Start Menu tab. Notice that the Start menu radio button, which is present by default, has become unavailable. The user is now forced to use the classic Windows NT/2000–style Start menu (Fig. 13.3).
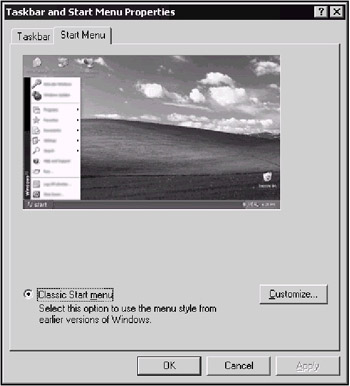
Figure 13.3: The effect of applying the Force classic Start Menu policy
You can achieve the same result by editing the registry directly. For example, by enabling the Force classic Start Menu policy, you create the NoSimpleStartMenu registry value (REG_DWORD data type) under the HKEY_CURRENT_USER\Software\Microsoft\Windows\CurrentVersion\Policies\Explorer registry key (Fig. 13.4).
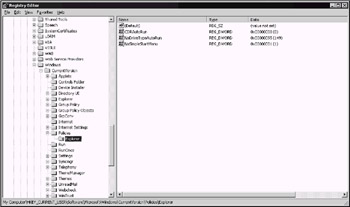
Figure 13.4: The HKEY_CURRENT_USER\Software\Microsoft\Windows\CurrentVersion\Policies\Explorer registry key reflects the effect of applying the Force classic Start Menu policy
Other registry values that you can create to customize the taskbar and Start menu are listed below. Except where noted, these values are all of the REG_DWORD data type. They reside under the following registry key:
HKEY_CURRENT_USER\Software\Microsoft\Windows\CurrentVersion\Policies\Explorer
If the value is set to 1, the restriction is enabled; when the value is at 0, the setting is disabled.
-
NoStartMenuPinnedList — This setting removes the pinned programs list from the Start menu, along with the Internet and E-mail checkboxes.
-
NoStartMenuMFUprogramsList — This setting removes the frequently used programs list from the Start menu.
-
NoStartMenuMorePrograms — This setting removes the More Programs option from the Start menu.
-
NoCommonGroups — This setting removes common program groups (items in the All Users profile in the More Programs list) from the Start menu.
-
GreyMSIAds — This setting displays partially installed programs in gray on the Start menu.
-
NoWindowsUpdate — This setting disables and removes links to Windows Update and locks access to the Windowsupdate.Microsoft.com site.
-
DisableMyPicturesDirChange — This setting prevents the user from changing the path to the My Pictures folder.
-
DisableMyMusicDirChange — This setting prevents the user from changing the path to the My Music folder.
-
DisableFavoritesDirChange — This setting prohibits the user from changing the path to the Favorites folder.
-
NoStartMenuMyMusic, NoSMMyPictures, NoFavoritesMenu, and NoRecentDocsMenu — These settings remove all user shell folders (except My Documents) from the Start menu, along with the appropriate checkboxes from the Start menu customization dialog.
-
NoSMMyDocs — This setting removes the My Documents folder from the Start menu, along with the appropriate checkbox from the Start menu customization dialog.
-
DisablePersonalDirChange — This setting prevents the user from changing the path to the My Documents folder.
-
MaxRecentDocs — This setting specifies the maximum number of shortcuts to recently used documents displayed in the Recent Documents submenu.
-
ClearRecentDocsOnExit — This setting clears the history list when the user logs off.
-
NoRecentDocsMenu — This setting removes the Recent Documents folder from the Start menu.
-
NoFavoritesMenu — This setting removes the Favorites menu from the Start menu, and removes an appropriate checkbox from the Start menu customization dialog.
-
NoNetworkConnections — This setting removes the Network Connections item from the Start menu. This value also removes the corresponding checkbox that is normally available in the Start menu customization dialog.
-
NoStartMenuNetworkPlaces — This setting removes the Network Places item from the Start menu and the appropriate checkbox from the Start menu customization dialog.
-
NoRecentDocsNetHood — This setting prohibits the addition of remote shared folders to the Network Places item whenever the user opens a document in the shared folder.
-
NoSMHelp — This setting removes the Help item from the Start menu. (This will not prevent Help files from running.)
-
NoFind — This setting removes the Search command from the Start menu and disables the appropriate option in the Start menu customization dialog.
-
NoRun — This setting removes the Run command from the Start menu, disables the appropriate checkbox in the Start menu customization dialog, and disables the ability to run programs from Task Manager or by pressing <WinKey>+<R>.
-
MemCheckBoxInRunDlg — This setting adds the Run in Separate memory Space checkbox to the Run dialog, which allows 16–bit programs to run in a separate VDM (Virtual DOS Machine).
-
NoSetTaskbar — This setting prevents any changes from being made to the Taskbar and Start menu settings. This value also removes the Taskbar and Start Menu item from Control Panel and from the Start menu.
-
NoInstrumentation — This setting prevents the system from remembering the programs, paths, and documents used.
-
NoUserNameInStartMenu — This setting removes the user name from the Start menu.
-
NoResolveSearch — This setting prevents the system from searching the target drive to resolve a shortcut.
-
NoResolveTrack — This setting prevents the system from using NTFS tracking features when resolving shell shortcuts.
-
ForceStartMenuLogoff — This setting prevents the user from removing the Logoff option from the Start menu.
-
StartmenuLogoff — This setting disables the Logoff option in the Start menu and prevents users from adding it.
-
NoClose — This setting removes the Turn Off Computer option from the Start menu and prevents the user from shutting down the system using the standard shutdown user interface (UI).
-
NoChangeStartMenu — This setting disables drag-and-drop modifications of the Start menu. (Other customization methods remain available unless they are explicitly disabled.)
-
HKCU\Software\Microsoft\Windows\CurrentVersion\Policies\NonEnum\{20D04FEO–3AEA–1069–A2D8–08002B30309D} — This setting removes the My Computer item from the Start menu and disables the corresponding checkbox in the Start menu customization dialog.
| Note | If the values listed above are created under HKEY_CURRENT_USER, they will be applicable only to the currently logged on user. If you want them to apply to all new users, create them under the HKEY_USERS\.DEFAULT\Software\Microsoft\Windows\CurrentVersion\Policies\Explorer registry key. |
Changing the Behavior of Taskbar Grouping
By default, when you enable the Group similar taskbar buttons option at the Taskbar tab of the Taskbar and Start Menu Properties window (Fig. 13.5), items are grouped only when the taskbar buttons begin to get too small. The item that you opened first is grouped first. Note that the Windows XP and Windows Server 2003 user interfaces allow you to enable or disable the taskbar grouping feature, but they don't provide the ability to change its behavior.
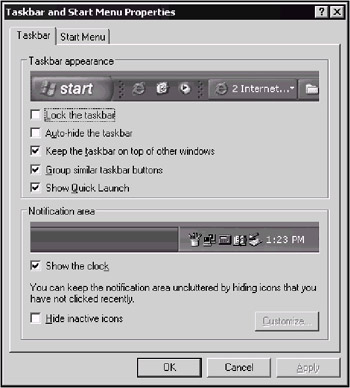
Figure 13.5: The Taskbar tab of the Taskbar and Start Menu Properties dialog
Therefore, registry editing is the most appropriate way to change the default behavior of the taskbar buttons grouping feature. To customize it, create the TaskbarGroupSize value (REG_DWORD data type) under the following registry key:
HKEY_CURRENT_USER\Software\Microsoft\Windows\CurrentVersion\Explorer\Advanced
The taskbar grouping behavior depends on the values you assign to the TaskbarGroupSize registry value entry. These values are:
-
0 — (default) groups by age (oldest group first)
-
1 — groups by size (largest group first)
-
2 — groups any group of size 2 or more
-
3 — groups any group of size 3 or more
Log off and then back on for this change to take effect.
Disabling Notification Area Balloon Tips
Notification Area balloon tips (Fig. 13.6) are a nice feature, especially for beginners. However, experienced users may become tired of them. For example, if one of your disks is running out of free space, you wouldn't want to be persistently reminded of this fact. Sometimes these tips simply distract you from your work. And, although this feature might be useful on Windows XP workstations, it is redundant for servers.
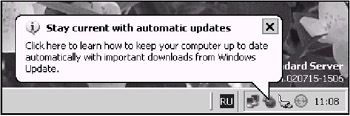
Figure 13.6: An example of Notification Area balloon tips
To disable the feature:
-
Start Regedit.exe and expand the following key:
HKEY_CURRENT_USER\Software\Microsoft\Windows\CurrentVersion\Explorer\Advanced
-
Create a new REG_DWORD value and name it EnableBalloonTips. Set this value to 0.
-
Quit Registry Editor, log off, then log back on.
| Note | These steps disable all Notification Area balloon tips for the current user. There is no way to disable balloon tips for a specific program. |
Preventing a Program from Being Displayed in the Most Frequently Used Programs List
If you like the simple Start menu feature, first introduced with Windows XP and also present in Windows Server 2003, you have undoubtedly noticed that it maintains a list of the most frequently used programs. Now, suppose you want to continue using this feature, but you don't want some specific programs to appear in that list. What can you do about it? Of course, you can right-click the required shortcut and select the Remove from This List command from the context menu. However, this will not prevent the program from appearing in that list if you use it later. You can also configure the Start menu to specify the number of shortcuts in the list of most frequently used programs. You can clear this list by clicking the Clear List button (Fig. 13.7). If you don't want the list of most frequently used programs to be displayed, set the value in the Number of programs on Start menu field to 0.
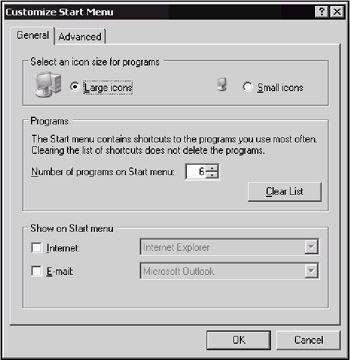
Figure 13.7: The General tab of the Customize Start Menu window
This, however, won't prevent a specific application (Regedit.exe, for example) from appearing in the list.
The exclusion of specific programs can't be accomplished using the GUI tools. However, if you edit the registry, you can easily achieve the desired result. To do so:
-
Start Registry Editor (Regedit.exe).
-
Add an empty string value named NoStartPage to the following registry key (Program name.exe is the name of the executable file that is used to start the program):
HKEY_CLASSES_ROOT\Applications\Program name.exe
-
Quit Registry Editor, and restart the computer.
The application will be removed from the list of frequently used programs and will never appear in that list again.
Disabling System Beeps on Windows 2000, Windows XP, and Windows Server 2003
If you or your colleagues in the office care for silence, you might want to disable system beeps. This can be achieved by disabling the Beep driver or by direct registry editing.
To disable the Beep driver using built-in-administrative tools:
-
Start Device Manager, select the Show hidden devices command from the View menu, and expand the Non-Plug and Play Drivers branch.
-
Right-click Beep, select the Properties command from the right-click menu, and go to the Driver tab of the Beep Properties window (Fig. 13.8).
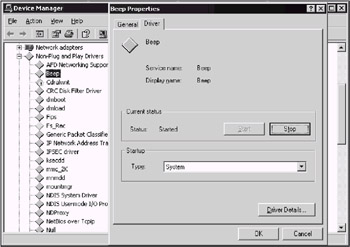
Figure 13.8: Stopping the system Beep driver -
Click the Stop button to stop the driver. To disable system beeps permanently, you can either change the Startup Type to Disabled or, if you have several hardware profiles, disable the Beep driver in one of the existing profiles.
| Note | The change you have introduced will be applicable to all users who log on to the local system, since it will be saved under the HKLM registry key. |
To disable Windows 2000, Windows XP, or Windows Server 2003 system beep for a specific user only:
-
Log on to the system as the user for whom you want to disable system beep.
-
Start Registry Editor and locate the following key: HKEY_CURRENT_USER\Control Panel\Sound (Fig. 13.9).
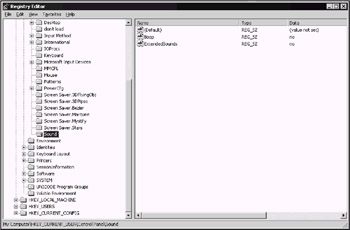
Figure 13.9: Disabling system beep by means of editing the registry -
Under this key, locate the Beep value entry (REG_SZ data type) and set it to no.
| Note | This time, the change will apply to a specific user, since it is saved under the HKCU registry key. For the change to take effect, you will have to log off and log back on. |
|
|