Group Policy Objects
|
|
Starting with Windows NT 4.0, Microsoft introduced System Policy, a mechanism for using the registry to "lock down" specific portions of user desktops to prevent users from tweaking the configuration. System Policy was a significant step forward in centralized administration. However, it didn't completely address most enterprise issues related to reducing the Total Cost of Ownership (TCO), such as:
-
Software distribution
-
Configuration management
-
Security management
Because of this, Microsoft continued its research and developed Group Policy Objects (GPOs), which, starting with Windows 2000, have replaced System Policy.
| Note | Group Policy is implemented only on Windows 2000 and later. Windows NT 4.0 doesn't support the storage or processing GPOs. However, Windows 2000 and its successors can process the old-style Windows NT 4.0 System Policies (such as Ntconfig.pol) when a user logs on to a Windows NT 4.0 domain from a computer running Windows 2000, Windows XP, or Windows Server 2003. |
A local GPO exists on every workstation or server running Windows 2000, Windows XP, or Windows Server 2003. By default, a local GPO is stored in the folder %SystemRoot%\System32\GroupPolicy. The local GPO is a standalone object; you must manage it on each computer running Windows 2000 or later using the MMC Group Policy snap-in. Except for its prominence on individual computers, Group Policy shows its power in the AD infrastructure. For example, some of the GPO capabilities available in an AD-based domain environment (centralized software deployment, folder redirection, etc.) are not available on local GPOs. For GPOs to fulfill their real promise, it is necessary to deploy Active Directory and start migrating all workstations and servers to Windows 2000 or later.
One of the key features in Microsoft's Change and Configuration Management (CCM) strategy is the ability to use AD as a kind of application repository. For example, in AD infrastructure you can "advertise" applications such as Word, Excel, or Visio as AD objects. These can be distributed to and installed by end users, depending upon where the objects related to the users or their computers reside in the directory. The name of the feature you use for this advertisement function is Software Installation.
Specifically, Software Installation is defined within a Group Policy Object (GPO). GPOs are AD objects that can be applied to a local machine, site, domain, or organizational unit (OU). Similarly to Group Policy in Windows 2000, Group Policies in Windows Server 2003 can be applied to "containers": entire sites, domains, or OUs. A GPO is linked to a container and applied only to the computers or users whose accounts exist within it. It is rarely efficient or practical to implement site policies, so most policies will be implemented at the domain or OU level. In addition to domain policies, a local Group Policy is configured and can be adjusted on individual workstations or servers.
| Note | The acronym LSDOU (Local, Site, Domain, OU) is used to describe the cumulative order in which GPOs are applied to users and machines. Each policy is applied during boot or logon. The local policy is applied first, then the domain policy, then the OU policy. Even within these containers, GPO application is cumulative. For example, if we have three OUs — OU1, OU2, and OU3 — the policies linked to OU1 are applied to the users and computers listed in OU2. Policies in OU1 and OU2 are applied to OU3. If a setting is not configured in a previous GPO, the new GPO's setting will be applied. If the new GPO and the old GPO have a conflicting setting, the conflict is resolved by applying the new GPO's setting. But if this setting is not configured, the previous one will remain. |
It is important to understand the affect GPOs have on the system registry and how they interrelate and interact with it. GPOs are multifunction AD objects, which comprise multiple "nodes" (Fig. 11.4). Each node within a GPO provides a different kind of control over computers (Computer Configuration node) or users (User Configuration node).
Figure 11.4: GPOs are multifunction AD objects composed of multiple "nodes", each providing a different control over computers or users.
Table 11.1 summarizes the most common per-computer and per-user nodes available in GPOs.
| Computer or user: Node name | Description |
|---|---|
| | |
| Computer: Software Settings: Software Installation | Computer-based deployment of applications |
| Computer: Windows Settings: Security Settings | Computer-based configuration of security (includes items such as account policy, audit policy, and event log configurations) |
| Computer: Windows Settings: Scripts-Starup & Shutdown | Specification of computer startup and shut down scripts |
| Computer: Administrative Templates | Windows NT 1.0-style System Policy: which enforces changes to the KHLM registry key |
| User: Software Setting: Software Installation | User-based deployment of applications |
| User: Internet Explorer Maintenance | Used to set Internet Explorer preferences and "branding" settings per user |
| User: Windows Settings: Security Settings | Configuratin of user-specific IP Security and public-key usage policies |
| User: Windows Settings: Scripts-Logon and Logoff | Specification of user-specific logon and logoff scripts |
| User: Remote Installation Services | Configuration options for people using Remote Install Service to install Windows 2000/XP or Windows Server 2003 |
| User: Administrative Templates | Windows NT 4.0-style System Policy, which enforces changes to the HKCU registry key |
| | |
Concerning our discussion of AD and Group Policy interrelationship with the registry, the most interesting nodes to us are Software Installation and Administrative Templates.
| Note | GPOs are applied to user objects and computer objects only. They are not applied to security groups. However, the effect of a GPO can be filtered by security groups. That is, you can have a GPO assigned to a particular OU (all of its users and computers) but restrict how that GPO is applied based on the particular security group to which those users or computers belong. |
One more thing to note about GPOs is their physical makeup. As outlined in Chapter 10, GPOs are composed of two physical "pieces": the Group Policy Template (GPT) and the Group Policy Container (GPC). The first piece, the GPT, is composed of a set of files and folders that are replicated to all domain controllers in an AD domain. By default, GPOs are replicated as part of the SYSVOL share, which is created automatically on all Windows 2000 and Windows Server 2003 domain controllers. Files contained in the SYSVOL share are automatically replicated on the same schedule as the Active Directory replication. The NT File Replication Service (NTFRS) is responsible for replicating SYSVOL. The SYSVOL share resides in %SystemRoot%\sysvol\sysvol for a given domain controller. The source files for SYSVOL, however, are kept in the %SystemRoot%\sysvol\domain folder. If you expand this folder, you see a Policies subfolder. In this Policies subfolder, you see several folders with names that look like GUIDs (Globally Unique Identifiers) which they are — for the corresponding GPOs in the directory. To view a GPO's GUID using the Group Policy MMC snap-in, right-click the required GPO name and select the Properties command from the context menu. The GUID is listed as the "Unique name" for that GPO on the General tab or the GPO properties window (Fig. 11.5).
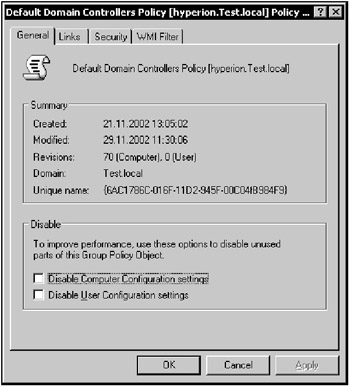
Figure 11.5: The GUID is listed as the "Unique name" for a specific GPO on the General tab or the GPO properties window.
There are a couple of ways to bring up the Group Policy tool, but perhaps the easiest is to load the Active Directory Users and Computers MMC snap-in. Right-click on a Domain or OU name and select Properties from the context menu. You'll see a Group Policy tab (Fig. 11.6), which lists all available GPOs at that level and lets you edit them. You can also load the Group Policy tool by typing gpedit.msc from a command line. However, when you launch the tool this way, it is automatically focused on the local GPO for that computer, rather than a domain, OU, or site-based GPO.
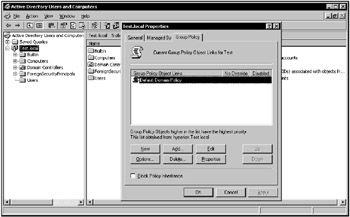
Figure 11.6: The Group Policy tab of the GPO properties window
The example illustrating a directory structure for one of the GPOs in the SYSVOL folder (Fig. 11.7) shows that a typical GPO contains a lot of nested directories. Files in each of these nested directories are replicated to each domain controller within a given domain. For the purposes of this chapter, we'll explore only those pieces of GPO that directly relate to registry, namely, the following subdirectories and their contents:
-
\Adm
-
\Machine\Applications\*.*
-
\User\Applications\*.*
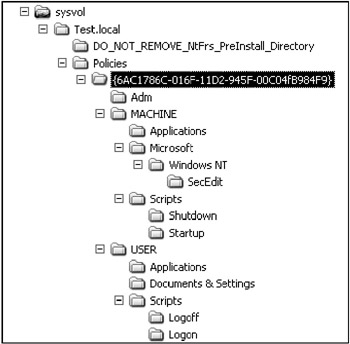
Figure 11.7: The example directory structure for one of the GPOs stored in the SYSVOL folder
In addition to the Group Policy Template, a GPO is composed of a Group Policy Container (GPC). The GPC, in contrast to the Group Policy Template, represents the part of the GPO that resides in Active Directory itself. Thus, the GPC is a set of Active Directory Objects that are generated when you first create a GPO. To view the GPC structure within Active Directory, proceed as follows:
-
Start the Active Directory Users and Computers MMC snap-in, and select the Advanced Features command from the View menu.
-
Expand the console tree, drill down to your Active Directory domain, and it locate the folder named System within. The System folder contains a subfolder named Policies, within which you will find GUID-based folders corresponding to Group Policy Objects existing within your domain (Fig. 11.8).
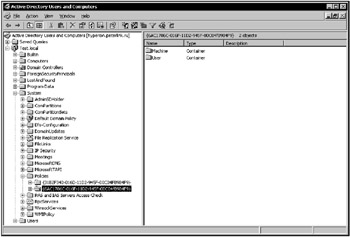
Figure 11.8: Viewing Group Policy Containers using the Active Directory Users and Computers MMC snap-in
Windows Server 2003 Improvements to Group Policies
As might be expected, computer-specific nodes and their settings are applied to computer objects only when the computer processes the GPO — usually at system startup and periodically thereafter. (These can be configured via Group Policy.) However, user objects process user-specific settings only at time of user logon. These settings also can be updated manually in intervals configured via Group Policy. Hence, a user could log on to a particular computer processing different GPOs — if the computer account is in one OU and the user is in another.
| Note | You also can trigger computer and user policy manually. In Windows 2000, this could be done by using the secedit.exe command with the /refreshpolicy option. However, note that secedit.exe does not trigger any software installation policy you may have defined. In Windows XP and Windows Server 2003, use the gpupdate command to refresh Group Policy. This command replaces the Windows 2000 secedit /refreshpolicy command. If you choose not to use the gpupdate command, Group Policy will still refresh; it will just take longer. |
In the first implementation of Group Policies in Windows 2000, calculating effective policy for a given user or computer was challenging. This was especially true when there were many different GPOs at various levels within a given domain. At that time, Microsoft did not provide helper tools that would allow administrators to model the results of policies applied to a given computer or user. Thus, before undertaking a massive deployment of Group Policies within a corporate environment, it was imperative to carefully test all new policies.
| Note | Many administrators used a command-line tool called GPResult.exe, which was supplied as part of the Windows 2000 Server Resource Kit. This tool generates a list of current GPO settings for a given user logged onto a given Windows 2000 computer. |
With Windows Server 2003, Microsoft introduced several Group Policy management improvements, including:
-
Software Restriction Policies. The rapid growth of the Internet increases security threats to a network, both from worms or viruses and from attacks. A network also could face internal threats, such as human errors. With software restriction policies, organizations can protect their networks from malicious software or even suspicious code by identifying and specifying the applications that are allowed to run. Unfortunately, Windows 2000 and earlier versions of Windows NT are unable to process software restriction policies. To use such policies, all domains must be migrated to Windows Server 2003 domains in native mode and all clients must be upgraded to Windows XP. (For more information on software restriction policies, refer to Chapter 9.)
-
Enhanced User Interface in the Group Policy Object Editor. Policy settings are more easily understood, managed, and verified with Web-view integration in the Group Policy Object Editor. Clicking on a policy instantly shows the text explaining its function and supported environments such as Windows XP or Windows 2000.
-
Group Policy Management Console. Expected to be freely available as an add-in component, the Group Policy Management Console (GPMC) provides a new framework for managing Group Policy. With GPMC, an administrator can backup and restore Group Policy Objects (GPOs), import/export and copy/paste GPOs, report GPO settings, and more.
-
New Policy Settings. With Windows Server 2003, Microsoft introduced more than 200 new policy settings that let administrators easily lock down or manage configurations. These settings also enable or prohibit most new features, such as Remote Assistance, AutoUpdating, and Error Reporting.
-
User Data and Settings Management Enhancements. Administrators can automatically configure client computers to meet specific requirements of a user's business roles, group memberships, and location. Improvements include simplified folder redirection and more robust roaming capabilities. These were addressed briefly in Chapter 10.
-
Cross-Forest Support. Although GPOs can only be linked to sites, domains, or organizational units (OUs) within a given forest, the cross-forest feature in Windows Server 2003 enables several new scenarios that Group Policy supports.
-
Resultant Set of Policy (RSoP). The Microsoft RSoP tool is probably the most important improvement, since it allows administrators to plan, monitor, and troubleshoot Group Policy. These capabilities in Windows 2000 were limited; only a GPResult.exe command-line Resource Kit utility was available. With RSoP, administrators can plan, preview, and verify policies and their effects on a specific computer or user. Unfortunately, RSoP is unavailable for Windows 2000 and earlier.
Using Resultant Set of Policy
Resultant Set of Policy (RSoP) is a long-awaited tool that allows system administrators to determine which Group Policy settings are being applied to a particular user or computer account. This tool can be used both for planning Group Policies before deploying them in a production environment and for troubleshooting problems with specific Group Policy settings. It implements one of the newest mechanisms for managing and troubleshooting Group Policies, and, therefore, deserves special attention. Unfortunately, like many improvements recently introduced by Microsoft, it is not available for Windows 2000 and earlier versions of Windows NT, nor for other legacy operating systems.
On Windows Server 2003, RSoP can operate in two modes:
-
Logging mode, which displays Group Policy settings for a specific user or computer. This mode is applicable for standalone computers running Windows Server 2003. At the time of this writing, it also could be used on Windows XP computers joined to Windows 2000 or Windows Server 2003 domains.
-
Planning mode, which allows administrators to evaluate the affect of applying different Group Policy Objects
Where does RSoP get information on the resulting Group Policies? To gather this data, it queries the Common Infrastructure Management Object Manager (CIMOM) database through Windows Management Instrumentation. The CIMOM database contains information on computers' hardware, software installation settings, scripts, folder redirection settings, security settings, and Internet Explorer maintenance settings. The CIMOM database is refreshed with the current information each time a computer logs on to the network.
| Note | The Common Infrastructure Management (CIM) model, now known as the Web-Based Enterprise Management (WBEM) initiative, was adopted by the Distributed Management Task Force (DMTF). This emerging standard, intended for all computer systems, offers a common way of describing and managing systems. Windows Management Instrumentation, which is built into Windows 2000, Windows XP, and Windows Server 2003, is the Windows-specific implementation. It can be used to discover information about Windows systems as well as manage them. |
To obtain results using RSoP:
-
Start MMC console, then select the Add/Remove Snap-in command from the File menu. Click the Add button on the Standalone tab, and select the Resultant Set of Policy from the list of available standalone snap-ins. Click Close, then click OK.
Note To request RSoP, you must either be logged on to the machine as the user whose policy you want to see, have local Administrator privileges on the machine you are querying (membership in the local Administrators, Domain Admins, or Enterprise Admins group is required), or have been delegated control over RSoP.
-
After adding the Resultant Set of Policy snap-in, select Generate RSoP Data from the Action menu. RSoP Wizard will start. Click Next.
-
RSoP Wizard will display the Mode Selection window (Fig. 11.9). To see Group Policy settings applied to a specific user or computer, select the Logging mode option and click Next. Note that logging mode might be the only mode available.
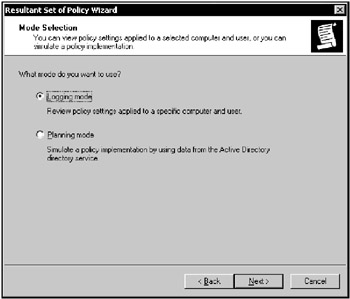
Figure 11.9: RSoP Wizard prompts you to select a mode -
Next, the wizard will display a window prompting you to select a computer. You can either display Group Policy settings for the local computer or click the Browse button and select a remote system. Make your selection and click Next. You will be prompted to select a specific user for whom you need to display policy settings (Fig. 11.10). Select a user and click Next.
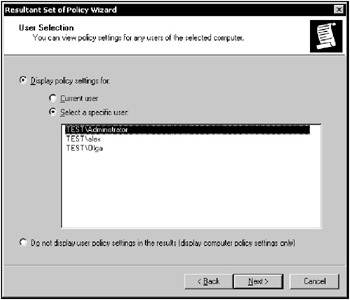
Figure 11.10: The User Selection window displayed by RSoP Wizard -
The wizard will display the next window summarizing your selections. To change your selections, click Back. To confirm the selected options and proceed with the query, click Next, and RSoP will start the query. When the query completes, the wizard will display the final window, where you need to click Finish.
-
RSoP will appear for the selected user on the selected computer (Fig. 11.11). Click the RSoP folder to view data. Note that you can also set the order in which policies are applied. Simply right-click on the policy element, select Properties, then click the Precedence tab (Fig. 11.12).
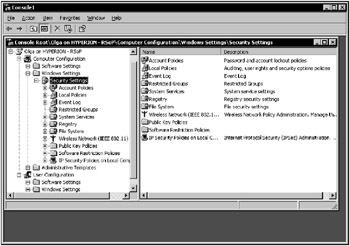
Figure 11.11: RSoP query results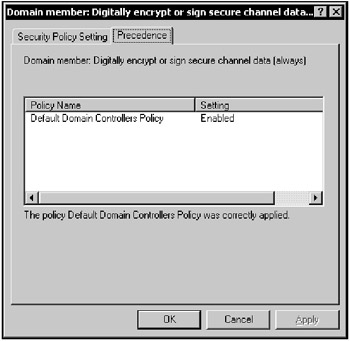
Figure 11.12: The Precedence tab displays the order of policy application
| Note | To immediately view RSoP for the current user on the local Windows Server 2003 computer, click the Start button, select the Run command, enter the rsop.msc command into the Open field, and click OK. |
You will immediately notice that there is a Group Policy problem if a red × on the user or computer configuration level appears. (This indicates an error.) To view information on the error, right-click the marked object, select Properties and go to the Error Information tab.
How Group Policy Administrative Templates Affect the Registry
Now that I have introduced some theoretical foundation required for understanding Group Policy Objects (GPOs), it is time to present some of the GPO features that influence the system registry.
As previously emphasized in this chapter and in Chapter 10, both Windows NT 4.0 and Windows 9x supported so-called System Policies, which were simply special types of registry files delivered to users at logon time. These registry files (their default names were Ntconfig.pol and Config.pol) were used to centrally modify HKEY_CURRENT_USER and HKEY_LOCAL_MACHINE registry root keys. For example, within a given policy file, it was possible to specify different registry modifications for different users, computers, or global groups. The template ADM files controlled which registry keys and values could be modified and what the possible values could be. These template files represented text files using special macro language to specify which key or value was to be modified and how. Most savvy administrators customized ADM files to enforce the desirable policy. In particular, the following two keys became the primary targets for enforcing system policies:
-
HKEY_LOCAL_MACHINE\Software\Microsoft\Windows\CurrentVersio\Policies
-
HKEY_CURRENT_USER\Software\Microsoft\Windows\CurrentVersion\Policies
However, System Policies were limited and difficult to use. Starting with Windows 2000, the situation has improved.
If you refer back to Table 11.1, you'll notice that old-style System Policies used in legacy versions of Windows have become part of Group Policy Object (GPO). In Windows 2000 and its successors, the Administrative Templates portion of GPO performs functions identical to those of old system policies. Furthermore, GPO-based administrative templates still use the ADM file format.
The default templates, such as System.adm and Inetres.adm, are stored under the \ADM folder within the Group Policy Template (GPT). If you carefully study the format of these files, you will notice that the structure of ADM files in Windows Server 2003 is similar to that of Windows 2000 and even of Windows NT 4.0. The main difference is that each new version supports additional macro keywords to provide new functionality. For example, the EXPLAIN keyword, introduced with Windows 2000 and supported on all later versions, lets the developer of a specific ADM file create Help text associated with a given policy item. The SUPPORTED keyword, introduced with Windows XP and Windows Server 2003, allows the developer to specify supported OS versions. This is an important point, since, as multiple examples have shown in this chapter, not all new features introduced with the release of Windows Server 2003 are supported on Windows XP, to say nothing of earlier Windows versions.
Each GPO can have a different set of ADM files, and each machine or user can process multiple GPOs. Flexibility in the area of desktop and application control and lockdown is as granular as you want to make it.
Having looked at the mechanics of how administrative templates are used, let's move on to what administrators see when they edit a GPO using these templates. Start up the Group Policy tool MMC snap-in, focused on a GPO. Every Windows 2000 or Windows Server 2003 domain contains a Default Domain Policy when first installed, so if you haven't created any other GPOs, you can start by editing that one. To do so:
-
Start the Active Directory Users and Computers MMC snap-in, right-click the name of the domain of interest, and select the Properties command from the context menu.
-
Go to the Group Policy tab. Highlight the GPO of interest. (Note that if you haven't created any GPOs, only the Default Domain Policy will be available.) Click the Edit button.
-
The Group Policy Object Editor will launch, and it will be focused on the selected GPO. Under the GPO name, you see two nodes: Computer Configuration and User Configuration. To demonstrate administrative templates, let's focus on the User Settings. Expand the User Configuration node, then expand the Administrative Templates node. You'll see a tree of folders representing the available areas for administrative template controls (Fig. 11.13).
Figure 11.13: The Group Policy Object Editor focused on the Default Domain Policy -
What you see is a graphical representation of the ADM files that are loaded by this particular GPO. The ADM files dictate which folders, registry keys, and values are presented here. Each folder, such as Control Panel, Network, and System, represents ADM categories. Within each category are sets of policies that you can specify. For example, if you expand the System folder, you will see a subfolder named Power Management. After you expand a specific subfolder, the right pane of the Group Policy Object Editor window will expose the list of all available registry limitations that can be set in relation to the selected feature. For example, the Power Management folder contains the Prompt for password on resume from hibernate / suspend policy. (When you configure this policy, the appropriate setting will be created or modified in registry.)
-
To configure a specific policy, simply double-click it to open the respective Properties window (Fig. 11.14). Previously in this section, when discussing the ADM file structure, I pointed out the new keywords appearing with each new Windows version. Now, notice the effect they have on the GPO Editor user interface. For example, the EXPLAIN keyword appears in the Properties window's Explain tab, which you can click to read Help text associated with the selected policy item. Also notice the Supported on: At least Windows XP Professional… string at the bottom of this dialog. It appeared because the SUPPORTED statement was included in the ADM file. Despite these changes to the GPO Editor user interface, the template offers familiar choices. For example, like in Windows NT 4.0 policies, policy items in Windows 2000, Windows XP, or Windows Server 2003 can have three different states (Fig. 11.14), as follows:
-
Not Configured — The particular registry value behind this policy item is not changed, regardless of its state.
-
Disabled — This particular policy item is disabled. That is, if the policy is Prompt for password on resume from hibernate / suspend — when it is disabled, each user can decide whether to automatically lock his or her computer after performing a resume operation.
-
Enabled — This policy item is enforced at all times.
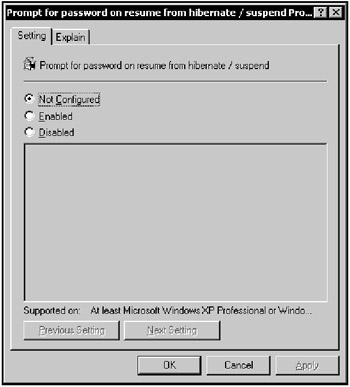
Figure 11.14: Policy items in Windows 2000, Windows XP or Windows Server 2003 can have one of three states: Not Configured, Enabled, or Disabled -
-
If multiple GPOs are applied to a user or machine, two identical policy items from different GPOs could contradict each other (i.e., one enables an item and the other disables it). In this case, it's the "last-writer-wins" approach that resolves the conflict. The last writer may not always be obvious because GPOs can reside at the site, domain, or OU levels, and each of level can have multiple GPOs. I already mentioned the order of precedence in the Directory (Local, Site, Domain, OU). In addition, a set of up/down buttons next to the list of available GPOs allows the order of precedence to be set within a container. The higher a GPO is in the list, the later it is processed. Later settings override previous ones.
Once you set all of the policy items within a GPO, where is this information kept? As previously mentioned, it is replicated in the SYSVOL directory in the Group Policy Template for that GPO. Both machine- and user-based administrative template settings are stored in a file called Registry.pol. However, each is stored in its own folder. For example, user-specific Registry.pol is located in %SystemRoot%\sysvol\ domain\policies\<GPO_GUID>\User. Registry.pol replaces the Ntconfig.pol and Config.pol files, which were used in Windows versions earlier than Windows 2000. However, unlike Ntconfig.pol, Registry.pol is not a valid registry hive file. You can't load it into a temporary hive, nor can you view it. It is a text file, but it contains non-printable characters and cannot be edited using a text editor, such as Notepad.
However, one drawback of Windows NT 4.0 policies was the effect of tattooing. When you remove a policy from the domain, the entries are left in the registry for the affected user or machine. This is not the case in Windows 2000 and later. In these newer versions, if you disable or remove a GPO that has made registry changes, the corresponding changes are also removed from the registry.
In Windows NT 4.0, the default path for policy restrictions was in HKCU or HKLM, under the Software\MS\Windows\CurrentVersion\Policies keys. (See the full path previously given in this section.) Starting with Windows 2000, the default path for policy settings has been changed to HKCU and HKLM under the Software\Policies key. As long as your ADM templates make changes to either of these policy keys, any tattooing is cleaned up when you remove a GPO. Of course, you are not limited to these keys. You could easily create an ADM file that enforces registry policy on HKLM\Software\Myapp. However, if a custom ADM file has been created that strays from the well-known keys, those custom keys won't be cleaned up when the GPO is removed.
How Software Installation Works
Another important GPO feature that directly affects the system registry is Software Installation. Any application carrying the label "Designed for Windows" must use registry. Any time a setup program runs, it reads the registry information to determine if all the components necessary to complete the installation procedure successfully are present in the system. It then adds new configuration data to the registry. For this reason, Setup programs — including Windows Setup and setup utilities that install third-party software and/or device drivers — always hold the first position in the list of components using the system registry.
At this point, we come to an important issue. Software installation and distribution technology has undergone significant advances in recent years. Before proceeding with a discussion of these technological improvements, ask yourself a simple question: How are you installing software today? If you're still running from machine to machine with the CD-ROM media and forcing users to take a coffee break for 30 to 60 minutes while you install and test the required application, your method may be inefficient. For a home office or small network (about 10 machines), this may be acceptable. When the number of computers, users, and applications increases, this method quickly becomes a "poor administrative experience". Massive deployments today involve thousands of computers, most of which are administrated remotely. Therefore, it was necessary to develop management software that can remotely deliver most standard software packages to a client.
Understanding this, Microsoft introduced the Software Installation feature, a tool that enables software distribution and desktop configuration management via Active Directory. Using this feature, you can present the required applications for installation to users or machines within specific domain, site, or OU by adding that application to a GPO in Active Directory. The effect of this action is that users subject to that GPO have the required applications installed for them. Of course, the installation does not happen all at once; this would render the machine useless under the weight of simultaneous application installations. Rather, the applications are installed in a "just-in-time" fashion, depending on the configuration within the GPO.
The Windows Server 2003 family includes several improved technologies and features that significantly ease the task of OS and add-on software deployment:
-
Remote Installation Services (RIS). Administrators can use RIS servers to deploy all editions of Windows 2000, Windows XP Professional, and Windows Server 2003 (except Windows 2000 Datacenter Server and Windows Server 2003, Datacenter Edition.) Automated deployment is enhanced with tighter security, improved performance to major components in RIS — such as Trivial File Transfer Protocol (TFTP) — and Hardware Abstraction Layer (HAL) filtering to ensure that images are recognized only by machines with a compatible HAL.
-
User State Migration. Migrating files and settings for multiple users in a corporate environment is easier with the User State Migration Tool (USMT). USMT gives administrators command-line capabilities when they customize specific settings or make unique modifications to Registry. In addition, Windows Server 2003 includes a Files and Settings Transfer Wizard designed for individuals or small-office users. The wizard is also useful in a corporate network environment for employees who receive a new computer and need to migrate their own files and settings without the support of an IT department or help desk.
-
Windows Installer. Managing software applications in a corporate environment has traditionally burdened organizations with high costs. With Windows Installer, administrators can greatly simplify the process of customizing installations, updating and upgrading applications, and resolving configuration problems. Windows Installer can also manage shared resources, enforce consistent file version rules, and diagnose and repair applications at run time.
To deliver an application to users or machines, you normally use the Group Policy Object Editor MMC snap-in focused on the desired GPO. When you are ready to deliver a specific application to users:
-
Place the installation package on the network share. Make sure that it is accessible to the clients.
-
Start the Active Directory Users and Computers MMC snap-in, right-click the name of the domain or OU of interest, and select the Properties command from the context menu. Then go to the Group Policy tab, highlight the required GPO, and click the Edit button.
-
The Group Policy Object Editor will launch, and it will be focused on the selected GPO. Expand the console tree and locate the Software installation nodes both under Computer Configuration | Software Settings and User Configuration | Software Settings (Fig. 11.15). The Software Installation feature allows you to deliver applications to computers and users. For example, you can make applications A and B available to computers within a given domain and make applications C and D available to users within that domain. The effect of this setup will be as follows: Applications A and B will be installed for all users who work on computers subject to that GPO. Additionally, applications C and D will be installed for all users subject to that GPO who logon at the same machine. The example presented in Fig. 11.15 shows several applications published for domain users.
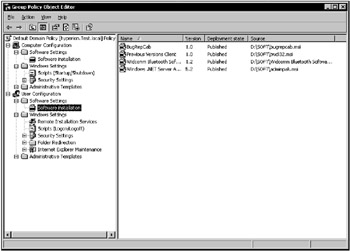
Figure 11.15: Publishing several applications using the Group Policy Editor MMC snap-in -
Right-click the Software installation node under Computer Configuration | Software Settings or User Configuration | Software Settings, depending on whether you want to make the application available to computers or users within a given domain or OU. From the right-click menu, select New | Package commands. You will be prompted to specify the network path to the application's distribution package.
Note The Software Installation feature supports a new package setup format called the Windows Installer. (Windows Installer technology will be covered in more detail later in this chapter.) Application setups packaged using the Windows Installer have an MSI filename extension. The Software Installation feature also supports a down-level format, known as Zero Administration Packaging (ZAP). ZAP files are simple text INI files that let you publish (not assign) your existing application setups without having to convert them to the MSI format.
-
After you specify the network path to the distribution sharepoint, the Deploy Software window will appear (Fig. 11.16). You will be prompted to select the deployment method. You can either publish or assign the application that you are going to deploy. The difference between these two methods lies in how an application presents itself to the user's desktop and how it uses the registry to enable just-in-time installation. When you publish an application, you make it available for your users if they need it. This means it will be an "optional" application available to the user via the Control Panel's Add/Remove Programs applet (Fig. 11.17). Conversely, when you assign an application, you take the first step toward installing that application for a user or machine. An application will be "advertised" in the user's environment and Windows Explorer shell. An icon for that application will be placed to the user's Start menu or Desktop, and filename extension association for that application will be created in the registry under HKEY_CLASSES_ROOT.
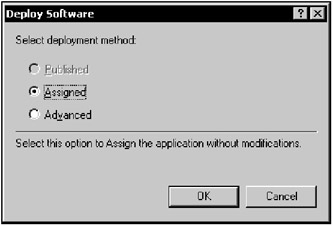
Figure 11.16: The Deploy Software dialog prompts you to choose whether you are going to publish or assign the selected application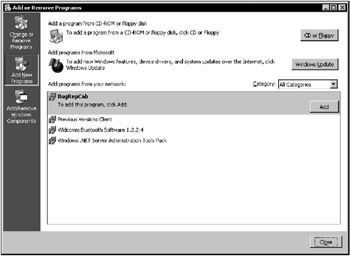
Figure 11.17: Published applications are available to the user via the Add/Remove Programs applet in Control Panel
| Note | The option of publishing an application is only available within the User Settings portion of GPO. It is impossible to publish an application to a computer. (Notice that the Published option is grayed in Fig. 11.16.) Thus, when deploying applications on a per-computer basis, you can only assign applications. |
Let's briefly review what happens to the system registry when you publish or assign an application.
As previously mentioned, when you publish an application, it will show up as an option in the Add/Remove Programs Control Panel applet after the user (or machine) logs on to the network. Note that to display the list of published applications, the client needs to query Active Directory. After that, if the user chooses to install the published application and clicks the Add button (Fig. 11.17), the setup routine for that application will start to install it on the local computer.
On the other hand, when you assign an application, an icon for that application will be placed to the user's Start menu or Desktop, and filename extension association for that application will be created in the registry under HKEY_CLASSES_ROOT. Then, even if the application has yet to be installed, the user can invoke the installation process by simply accessing a file that has such an extension type. Suppose Microsoft Word has been assigned to the user but has not been installed. After the user double-clicks a file that has the DOC filename extension, the installation procedure will start.
| Note | When you assign an application to a machine, that application is actually installed at system startup. This lets you deliver application installations in an unattended way to a workstation or server. |
In summary, when you assign an application, three things happen to the user's environment:
-
A shortcut is placed on the desktop (if specified in the application package).
-
An association(s) is made in HKCR for that application's supported file extensions.
-
OLE/COM registrations are made in HKCR for that application's supported components.
| Note | What really happens in HKCR during application assignment is a function of the particular user's security rights. If the user has administrative access over a machine, registrations are made in HKLM\Software\Classes. If the user is a "normal" user — without sufficient rights to write to HKLM — then assigned application registrations are written to HKCU\Software\Classes. However, you can override this default behavior within the MSI package, where you can specify that the application is installed only on a per-user or per-machine basis. |
Active Directory Class Store and the System Registry
As mentioned throughout this book, the system registry keeps all information about applications and COM (Component Object Model) components installed on a local system. All information related to how, and from what location, machines and users run installed applications resides under the HKEY_CLASSES_ROOT key. As a result, this key is often viewed as the registry of applications. However, as previously outlined in this chapter, HKEY_CLASSES_ROOT, as well as other parts of the system registry, have one common limitation: they represent the local configuration database. The number of local registries equals the number of Windows-based computers within a network, and there is no easy way of ensuring that application information in all local registries is up-to-date. In previous Windows versions, there also was no easy method of pushing a change to all local registries on client workstations.
When Active Directory was introduced with Windows 2000, the situation improved. Active Directory serves as a global repository of various objects, such as computers, users, and groups. It includes Class Store, which is associated with Group Policy Objects (GPOs). When an application is published or assigned within specific GPO, a Class Store is created that reflects the COM classes that the application has registered (Fig. 11.18). To view Class Store information, start the Active Directory Users and Computer MMC snap-in, then select the Advanced Features command from the View menu. You'll find Class Store information nested within System | Policies container, which stores all GPOs (identified by their GUIDs) defined for a specific domain. Under a specific GUID, there are two more subcontainers: Machine and User. Class Store can be either machine- or user-specific, depending upon how application deployment has been defined. After an application is published or assigned, the Microsoft Installer (MSI) package is queried to determine all COM classes defined within that package. These classes are stored by GUID in Class Store.
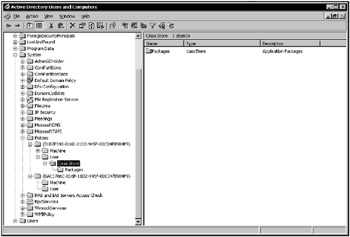
Figure 11.18: When you publish or assign an application within specific GPO, a Class Store is created
Thus, Active Directory Class Store serves as a sort of centralized HKCR, or a repository for shared components accessible by all users.
| Note | Since MMC snap-ins are actually COM servers, usually comprising one or more DLL files with their related HKCR registry entries, MMC is a good example of how this new feature can be used to benefit system administrators. Now, with MMC, you can create MSC files with a set of predefined snap-ins and publish or assign them in a Group Policy. This will give all system administrators a set of powerful tools to perform specific tasks without exposing other administrative areas. |
Windows Installer and the System Registry
Previously in this chapter, when discussing GPOs and the Software Installation feature, I mentioned Windows Installer technology, which implements the mechanisms used to deliver and install published or assigned applications. Now, consider in more detail how the Windows Installer technology interacts with the operating system and, more importantly, with the system registry. Windows Installer technology plays a key role in the process of software distribution; it customizes installations, updates and upgrades applications, and resolves configuration problems. In addition to saving time and effort, this new technology provides the following benefits:
-
The application is installed via OS service. There are two sides to software installation: the application-install package itself and the Windows Installer service, which is installed by default on every computer running Windows 2000, Windows XP, or Windows Server 2003. On Windows 2000 and later, this allows for the installation of applications in an administrative context.
-
Microsoft Installer (MSI) provides a standard package format. The MSI format represents the new standard for communicating with the Windows Installer technology. The install package is an integral part of software installation. Installation files that are not packaged using the MSI format (with the exception of down-level ZAP files) cannot be published or assigned via Active Directory.
| Note | MSI is a standard API that defines how software is configured and installed. Software vendors such as Microsoft, InstallShield, and Wise provide packaging tools that are capable of building MSI files according to the MSI standard. These application packages then can be published or assigned within a GPO. |
-
Transactional install and rollback. This feature helps guarantee that the MSI package is fully installed in the way its vendor intended. If the installation process fails, the transaction rollback function can be used to undo all the changes made up to that point in the installation. Thus, the system — including Registry entries created by the install process — will return to the state that existed before installation began.
-
Self-repair of corrupt or deleted critical files. MSI format provides the capability of marking certain files for detection of failure. If such a file (usually, a DLL or EXE file) in the distribution is corrupt or deleted, the user will be prompted to repair the installation by presenting the original MSI distribution. If the installation media is available (for example, on a network share), the repair happens automatically.
-
Install on demand and Just-In-Time (JIT) installation. Previously in this chapter, when discussing procedures of publishing or assigning applications via GPOs, I mentioned that applications deployed using Windows Installer technology can be offered to clients at any time. Once the application is offered (for example, via the Add/Remove Programs applet in Control Panel), users can install the application by simply clicking the Add button. The installation of applications assigned to users or machines can be triggered when a user clicks a corresponding registered extension. Applications installed in a JIT fashion are ready to use in a few moments.
-
Packages can use transform files. An application's package can be developed such that a base or administrative install is prepared for general distribution. A transform file can overlay the base, letting you customize specific installations. Furthermore, MSI packages can use patch files. For example, after a package is on the machine, you might need to fix the source files if a bug is found and apply a patch file to the package.
| Note | Like most software products, Windows Installer has versions associated with it. There are major revisions (such as 1.0) and minor revisions (such as 1.1). Windows Installer is unique in that it is versioned for each platform. That is, Windows NT, Windows 9x, Windows 2000, Windows XP, and Windows Server 2003 have their own Windows Installer version numbers. To find out which version of Windows Installer is on your machine, navigate the %SystemRoot%\System32 directory, right-click the msi.dll file, select the Properties command from the context menu, and go to the Version tab (Fig. 11.19). Note the pattern of version numbers; versions that end with ".0" are built in the OS (Windows Server 2003, in this example), while those that end otherwise are downloads. |
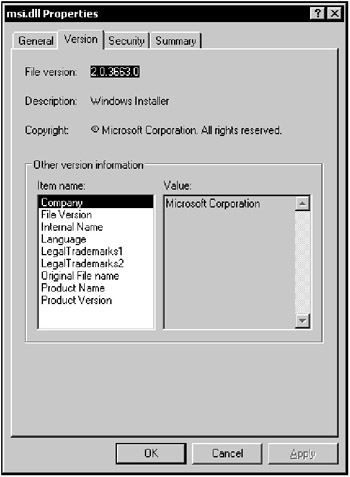
Figure 11.19: Discovering your Windows Installer version number
An MSI file is itself a kind of database. An MSI file is referred to as Object Linking and Embedding (OLE) Structured Storage. OLE Structured Storage (OSS) is a way of putting intelligence into a file that is otherwise a series of bits read sequentially. OSS files are composed of streams and storage objects. Streams correspond to files; storage objects correspond to directories. In a way, an OSS file is a file system within a file system. That is, the MSI file is a single file on the NTFS partition, but applications using that file can access different objects (e.g., streams and storage) within the file in an organized way. The advantage of OSS files is they can be used to keep rich information in a file. In the context of MSI, OSS provides a database of information within the file that describes an application. The database itself is composed of tables and columns, just like an Access or SQL Server database might be.
Examples of database "tables" within an MSI OSS file include
|
|
|
The second side to software installation, the Windows Installer service, is just that — an NT service installed on every Windows 2000 device by default. The executable that comprises the Installer service is msiexec.exe. The Installer service is the piece of code that does all the actual installation work when an application is published or assigned. The Installer service runs in LocalSystem security context by default. As such, it has the ability to perform any system changes that a normal user account would not have sufficient rights to perform. But the Installer service has another unique ability: When a user clicks on a shortcut representing an application that has been deployed using a GPO, the Installer service can not only perform the install on LocalSystem's behalf, it also can perform parts of the install on the user's behalf.
This is especially useful in large environments. In Windows NT 4.0, an application that made changes to the registry in both HKLM and HKCU had to be packaged in two pieces. One piece made the changes to HKLM and those parts of the system to which the normal, non-power, non-administrative user lacks access. That piece was usually delivered to the machine via a system service, such as the AT scheduler, or a third-party tool, such as those included in the Microsoft Systems Management Server. Then, at some later time, perhaps at logon or application startup, the HKCU changes for that application were delivered to the user under their security context using logon scripts, system policies, or application startup "wrappers".
This two-part process was disconnected and difficult to manage in a large environment. With the advent of the Windows Installer service and Microsoft Installer (MSI), you can deliver an application to users as a single event that they initiate when they need the application.
And, as the next section makes clear, you can also define an MSI package so that only certain features within an application — both required features, such as Word functionality, and optional pieces, such as spell checker — need to be installed when the user clicks the icon or activates the extension. I'll talk more about how the Installer service interacts with Registry to install applications later in the chapter.
In addition to installing MSI packages, the Installer service is responsible for determining when an application is broken — and for fixing it. It does this through the use of key files, as I'll explain further on in this chapter. The Installer service also can roll back an application installation if it fails before completion. While an application is installing, temporary files are created in the temporary folder %SystemDrive%\config.msi. During a rollback, these files are used to undo steps taken before the failure.
Products, Features, and Components
Microsoft Installer (MSI) and the Windows Installer provide the capability to package an application, so users install only those portions of the application that they need and use. Optional portions, however, are included when users first invoke them. An example of this from the pre-Win2K days is the custom option within most setup routines. The custom option generally let you install only those components that you really wanted. For example, in Microsoft Word, you could have chosen not to install clip art or WordPerfect Help because you didn't plan to use them. If you later decided you wanted those options, you had to find the media and rerun setup to add them.
The MSI way of doing things is more modular and therefore more adaptive to adding and removing components. An MSI package specifies a three-tiered hierarchy to define applications. The three tiers are
|
|
|
|
A product is the coarsest distinction for an application. (Microsoft Word and Excel are products.) When you install a product, you are installing an application. Products are made up of features, such as Word's spell check and Excel's SQL database access. Features, which are specific to a product, contain components, the lowest and most granular portion of the MSI hierarchy. Components can be shared across multiple products and their associated features.
A component is a set of files and registry entries that define a feature's function. Using our example of the spell-check feature, a component may contain the spellcheck DLL and associated registry entries that enable it. The intention is that a component contains only one EXE, DLL, ActiveX Control, or Help file. In that way, you can properly compartmentalize component functions and easily share components across features and products. Likewise, if you have a file that is a DLL, that same version of the file should not occur in more than one component. (If it does, it can be difficult to maintain portability of components across other features and products.)
| Note | MSI components can include COM components, but they are not the same things. Transforms (introduced with the Windows Installer technology) are modifications to a base MSI package that let you customize an application installation at install time. For example, you may have purchased a third-party application that already has its own MSI file. To customize the default settings to meet your environment, you can use transforms. If you have ever modified ACME setup STF files that came with older versions of Office, then you can appreciate the functionality that transforms provide. You define a transform when you publish or assign an application within the Group Policy tool. The Modifications tab within the application's properties lets you add transforms. Transform files end in MST extensions. Transforms also let you define which product features are installed initially and which are installed on first use. |
The Mechanics of Products, Features, and Components
Now that we have taken a high-level look at how MSI packages are broken down, let's turn to some of the interactions between MSI packages and Registry. The first thing to understand is how products, features, and components are identified. Both products and components are named using a unique 128-bit GUID. Features, however, are given simple names that help identify the function they provide. There are two main keys in Registry, identified below, via which products, features, and components are tracked.
-
HKEY_LOCAL_MACHINE\Software\Microsoft\Windows\CurrentVersion\Installer — This area contains details about all currently installed products, features, and components, including component names and which components are associated with which features.
-
HKEY_CLASSES_ROOT\Installer — This area also contains information about installed products, features, and components, including the name of the network or media share from which the MSI product and feature was installed. In addition, this key contains information about COM components that have been advertised by MSI packages but not installed. This information can be used to fault in these components when a calling application needs them.
The Installer service uses these registry keys to determine whether and when an application is incomplete, and if needed, where to find the install media in the event of a reinstall.
The Explorer Shell and the Installer Service
Now that we have looked at the process of packaging and installing applications using the Windows Installer, let's look at how the Explorer shell interacts with the Installer service to know when to fault in your assigned applications. As previously mentioned, when you assign an application, three things (as defined within the MSI file) can happen: A shortcut can be placed on the user's desktop, a file association can be made, and any COM classes included in the application can be registered. When you click on an assigned shortcut or open a document with an assigned file association, how does the Explorer shell know to go to Active Directory and find out where the MSI package for that application is located? It uses "installer tokens," special tags that the shell interprets to discover whether it is dealing with an assigned or published application. Changes in Windows 2000 to the Explorer shell and COM let these applications identify installer tokens. Shortcuts delivered by assignment also contain installer tokens, but if you try to view them by examining a LNK file's properties, you don't see any meaningful information.
The registry value called "command" contains the installer token telling the shell that an application has been assigned. The same method is used on COM objects that have been assigned as part of an application. In this case, the value InprocServer32 under the InprocServer32 key contains the token instead of the path to the actual dynamic-link library (DLL) or OCX.
Once the Explorer shell detects an installer token, it passes the token to the Installer service, which is its cue to communicate with Registry to determine where the MSI package for the application physically resides. Once that information is secured, the Installer service begins the install.
|
|