When You Should Edit the Registry
|
|
The best answer to this question is: "Only in an emergency". You definitely should not get in the habit of editing the registry any time a problem arises. In any case, minor problems should not be solved by editing the registry. Microsoft has made significant efforts to develop powerful and flexible graphical administrative tools to help users carry out everyday tasks related to system configuration and troubleshooting. All users are recommended to try solving problems using these tools and to proceed with editing the registry only when all other methods have failed.
However, there is always a chance that all of the methods of configuring the system using Control Panel applets or resetting device settings using Device Manager will fail. If this is the case, you will need to know how to work with the registry and how to edit it using the registry editor.
Some actions related to customizing applications can be performed only by editing the registry directly. For example, if you need to open Windows Explorer when the user double-clicks on My Computer, or to enable built-in leak detection, you'll need to edit the registry because these tasks can't be achieved using other methods. If you need to edit the registry, do it very carefully and in accordance with the instructions.
The Internet contains many tips related to registry editing. Usually, these tips are related to setting some registry entries. If you decide to modify the registry, don't forget to create a backup copy of the registry before proceeding with these changes.
Alternative Methods of Editing the Registry
Remember that, even in cases where registry editing is absolutely necessary, an unskilled user can create even greater problems when performing this task. For example, errors that occur while editing the registry may lead to problems with loading device drivers or with logging on to the system. Don't edit the registry if you are not absolutely sure that the changes that you are going to make are correct, or if you simply can't afford to lose a significant amount of time for troubleshooting. A single error can mean the need to reinstall your entire operating system.
| Caution | Administrative tools always provide a method of configuring the system preferable to direct registry editing. Using administrative utilities is much safer, because these utilities don't allow you to save incorrect values in the system registry. If you make an error while using one of the registry editors, you won't get a warning, because registry editors don't recognize these errors and don't take any corrective actions. |
After you get acquainted with the registry, you may feel tempted to edit it in order to install or configure hardware devices. The registry editor, discussed in Chapter 3, is a special tool used for viewing and modifying the registry. However, before proceeding with direct registry editing, try to perform the same task using the administrative utilities. Most hardware-related registry entries are very hard to understand unless you have a working knowledge of the hex format. These settings only affect the hardware devices that use them.
For example, you shouldn't manually edit the registry when installing new hardware, because of the methods the system uses to configure Plug and Play devices. As you'll see in Chapter 5, Plug and Play devices now have no default settings. If a device requests a resource that's already in use by another Plug and Play device, the system may change the Plug and Play device settings in such a way as to eliminate hardware conflicts with the new device. If you change the registry settings for Plug and Play devices manually, you'll get constant settings. These settings can't be changed by the operating system if another device requests the same resource.
Installing New Devices
Even if Windows XP or Windows Server 2003 encounters a new device not currently included in the registry and the system has no information on this device, it attempts, first, to detect it. If the new device has been successfully detected and recognized, you will see a small pop-up window in the lower right corner of the desktop informing you that the system has found new hardware (Fig. 1.11). Note that in this case, the system will automatically install the device driver, configure the device settings and, after a few seconds, display another pop-up window, reporting that the newly installed device is ready to use (Fig. 1.12).

Figure 1.11: Windows XP and Windows Server 2003 automatically detect new hardware

Figure 1.12: The newly detected device is successfully installed and configured
In contrast to Plug and Play devices, legacy devices developed before the release of Windows 95 have fixed settings. The task of installing and configuring legacy devices is more complicated than installing Plug and Play devices. Always remember one thing though: Before modifying the registry directly, try to achieve the same result using Hardware Wizard. In Windows XP and Windows Server 2003, this program was significantly improved by extending its functionality and introducing a more intuitive user interface, even in comparison to Windows 2000. To install a legacy device in Windows XP or Windows Server 2003, follow the instructions provided below:
-
Open the Control Panel window, then double-click on the Add Hardware icon, or, alternatively, start the System applet to open the System Properties window, go to the Hardware tab, and click on the Add Hardware Wizard button. Any of these methods will open the Add Hardware Wizard window. Click on the Next button.
-
The wizard will try to detect the new device. If it fails, it will display another window prompting the user to specify if the new device is already connected. The wizard will display a series of screens containing the options available and step-by-step instructions. To install and configure the new device, just follow these instructions, select the required options, and click on Next to continue. Beside new device installation, Hardware Wizard allows you to view the list of installed devices and troubleshoot the devices that are not working properly (Fig. 1.13). To install a new device that is not listed here, select the Add a new hardware device option and click Next.
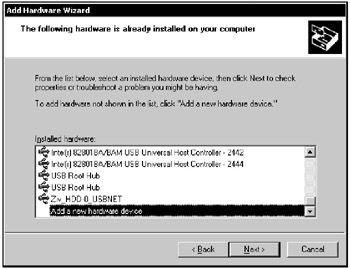
Figure 1.13: Hardware Wizard enables you to view the list of installed devices and troubleshoot the devices that are not working properly -
Next, the Hardware Wizard prompts you to chose whether you are going to search for the hardware automatically or select an appropriate device from the list. Since Windows XP and products of the Windows Server 2003 family provide enhanced hardware support, even in comparison to Windows 2000, let alone previous Windows NT versions, it is recommended that you select automatic search. As a general rule, the system successfully detects all the hardware correctly connected to your system, both Plug and Play and legacy. Therefore, you'll need to select manually the device from the list only in a worst-case scenario (Fig. 1.14). If you don't find your device in this list, set the Show all devices options and click on Next. In this case, the next window will open (Fig. 1.15), containing a long Windows NT/2000-style list of all supported hardware.
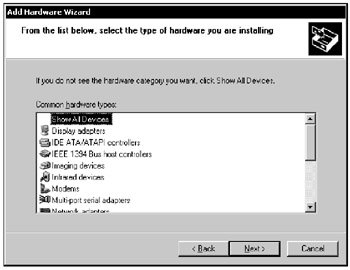
Figure 1.14: Hardware Wizard provides a list of device classes. Select Show All Devices if you don't see the hardware category that you require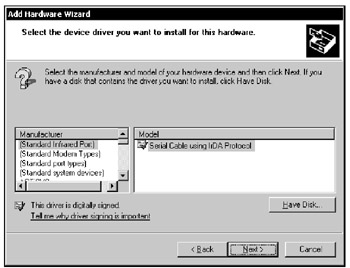
Figure 1.15: The Windows NT/2000-style list of supported devices
As was stated above, Hardware Wizard will detect all compatible hardware devices that have been listed in the HCL (Hardware Compatibility List) and are correctly connected to the system. This also applies to legacy devices. If you encounter problems, first make sure that the device you are going to install is included in the Windows XP or Windows Server 2003 HCL, then check that it is usable and connected properly to your system.
This method of installing and configuring new devices is much safer than direct registry editing, because it eliminates the risk of compatibility problems. However, from time to time, you may need to change the settings of the legacy devices by means of direct registry editing. Many advanced users are interested in changing the resource settings for the hardware devices. You already know that the device manager controls these settings automatically when installing a new device or booting Windows. Sometimes, though, you may need to set these parameters manually. For example, this situation can arise in the case where there is a hardware conflict that can't be solved by the configuration manager. Suppose, for example, that there is a conflict between the IRQ and DMA settings for two legacy devices. In such a case, you can also use the Device Manager to solve the problem.
Hardware-related registry keys are discussed in detail in Chapters 5 and 6, where you will also find instructions on editing registry parameters and selecting appropriate values.
Other Tools for Changing the Registry
Besides Control Panel applets and other GUI tools provided by Windows XP and Windows Server 2003, there are other tools for changing the registry. These tools are listed below:
-
You may use the Options dialogs present in Windows-compatible applications. As was already mentioned, any Windows-compliant application has to store its settings in the registry and provide the user with graphic tools enabling him or her to change these registry settings.
-
The registry settings can also be changed using shareware or freeware applications (both Microsoft and third-party). More detailed information on the most popular registry utilities will be provided later in this book.
-
REG and INF files.
-
Installation programs.
|
|