Troubleshooting Aids
|
|
If you are interested, you'll find plenty of registry-editing tips and tricks, mainly intended to customize the Windows XP User Interface. Unfortunately, it's impossible to describe them all, and even the books specially dedicated to this topic usually show only the top of the iceberg. However, there are some registry-editing techniques that can be used as troubleshooting aids. In this section, I'll describe some which have proved to be the most helpful.
Customizing System Restore
Let us return once again to the System Restore feature, which we briefly discussed in Chapter 2. It is one of the most useful features of Windows XP, but, unfortunately, some users tend to disable it, since in their opinion, it consumes too much free disk space (no less than 200 MB).
If you are an administrator, and don't want the users to disable System Restore, you can prevent them from doing so. To achieve this, simply disable the GUI tools for configuring System Restore.
| Note | To perform these tasks, log on as Administrator or user with administrative privileges. |
There are two alternative methods allowing you to perform this task. Let us consider them both.
Using Use Group Policy Editor
To prevent users from disabling or configuring System Restore, proceed as follows:
-
Start Group Policy Editor and expand the console tree as follows: Computer Configuration / Administrative Templates / System / System Restore (Fig. 12.13).
-
Double-click Turn off System Restore, and then on the Setting tab, select Disable. After you apply this policy, System Restore will be turned on and enforced.
-
Double-click Turn off Configuration, and then on the Setting tab, select Enable. For more information about what these settings do, click the Explain tab on the Properties dialog box.
-
Click Apply, and then click OK.
| Note | These settings are only read at boot time, therefore it is necessary to reboot the system. |
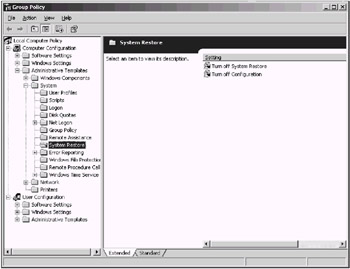
Fig. 12.13: Configuring System Restore using Group Policy Editor
If users try to access System Restore Configuration, the System Properties dialog box is present, but the System Restore tab is not.
Using Registry Editor to Disable System Restore
The same task can be performed by direct registry editing. To use Registry Editor for disabling System Restore Configuration UI, proceed as follows:
-
Start Regedit.exe and expand the following key:
HKEY_LOCAL_MACHINE\SOFTWARE\Policies\Microsoft\Windows NT
-
Under HKEY_LOCAL_MACHINE\SOFTWARE\Policies\Microsoft\Windows NT, create a new nested key, named SystemRestore.
-
Within this key, create a new REG_DWORD value named DisableConfig, and set this value to 1.
-
Close Regedit.exe and reboot the system.
More about System Restore Configuration
As an administrator, you can modify many values related to System Restore by editing the registry directly. This is especially important, if you disable the System Restore Configuration UI, as was described in the previous two sections. Keep in mind, however, that you must do it with care and caution, since you may be unable to reverse the changes that you have introduced by editing the registry directly.
Windows XP registry has three keys that relate to the System Restore feature. These keys are listed below:
-
HKEY_LOCAL_MACHINE\System\CurrentControlSet\Services\Sr
-
HKEY_LOCAL_MACHINE\System\CurrentControlSet\Services\Srservice
-
HKEY_LOCAL_MACHINE\Software\Microsoft\WindowsNT\CurrentVersion\SystemRestore
| Note | The first two keys are related to the System Restore filter and System Restore service. It is not recommended that one modify these keys, since this may cause the Windows XP operating system to become unstable. |
The contents of the third System Restore registry key are shown in Fig. 12.14. Here you can edit some REG_DWORD values. Note, however, that this key also contains several values that you should not edit.
The list of values that you can use to configure System Restore is provided below. These values can be edited without risk of damage to the operating system.
-
CompressionBurst—as was outlined in Chapter 2, on NTFS drives System restore compresses the archived data when the computer is idle. This value (in seconds) sets the idle time compression interval. The System Restore service can compress data for the amount of time that is specified in this value, and then stop. Then, at the next idle time, the computer can repeat the process.
-
DiskPercent—this value relates to the percentage of disk space that System Restore uses for its data store. The default value is 12 percent. The data store size is always calculated as "max (12 percent, DSMax)" regardless of the size of the hard disk. The maximum (max) size is what is specified in DSMax. For hard disk sizes that are less than 4 gigabytes (GB) in size, 12 percent is less than 400 megabytes (MB), so max (12 percent, DSMax) equals 400 MB. For hard disk sizes that are greater than 4 GB, 12 percent is greater than 400 MB, so max (12 percent, DSMax) equals 12 percent. This data store size is not a reserved disk space, and the data store size is used only on demand.
-
DSMax—this value specifies the maximum size for the System Restore data store. The default size of the data store is 400 MB. The data store size is always calculated as max (12 percent, DSMax) regardless of the size of the hard disk. The maximum (max) size is what is specified in DSMax. For hard disk sizes that are less than 4 GB, 12 percent is less than 400 MB, so max (12 percent, DSMax) equals 400 MB. For hard disk sizes that are greater than 4 GB, 12 percent is greater than 400 MB, so max (12 percent, DSMax) equals 12 percent. This data store size is not a reserved disk space, and the data store size is used only on demand.
-
DSMin—this value relates to the minimum amount of free disk space that System Restore needs so that it can function during the installation process. Also, this value relates to the minimum amount of free disk space that is needed for System Restore to reactivate and to resume the creation of restore points after System Restore has been disabled because of low disk space.
-
RestoreStatus—this value specifies if the last restore operation failed (0), succeeded (1), or had been interrupted (2).
-
RPGlobalInterval—this value specifies, in seconds, the amount of time that System Restore waits before it creates the automatic computer check points for elapsed time. The default value is 24 hours.
-
RPLifeInterval—this value specifies, in seconds, the restore points Time to Live (TTL). When a restore point reaches this time and it is still on the system, it gets deleted. The default value is (7776000), which will be 90 days.
-
RPSessionInterval—this value specifies, in seconds, the amount of time that System Restore waits before it creates the automatic computer check points for session time (the amount of time that the computer has been on). The default value is zero (0), which means that this feature is turned off.
-
ThawInterval—this value specifies, in seconds, the amount of time that System Restore waits before it activates itself from a disabled state (after the conditions for this process to occur have been met). If you start the System Restore user interface, System Restore is activated immediately.
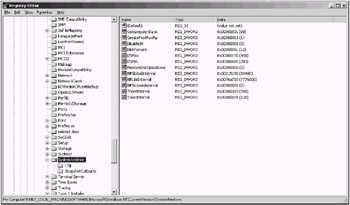
Fig. 12.14: The contents of the HKEY_LOCAL_MACHINE\Software\Microsoft\WindowsNT\CurrentVersion\SystemRestore registry key
| Note | All the other values that you find under this key should not be modified under any circumstances, since this may lead to the system malfunction. Pay special attention to this caution, since Microsoft provides quite a reasonable explanation about why you should not modify these values directly. For example, the DisableSR value, as its name implies, turns System Restore on or off. However, you should never turn the System Restore off in the registry, because if you do, the existing restore points will not be removed. If you modify the CreateFirstRunRp value, you can place your system into an unrecoverable situation. |
Enabling Windows Installer Logging
To help diagnose several Windows Installer issues, Windows XP provides several logging services that can be activated via the registry. After the entries have been added and enabled, you can retry the problem installation and Windows Installer will track the progress. Log files have the standard LOG filename extension. They are stored in your Temp folder under random names starting with Msi letters.
To enable Windows Installer logging, start Registry Editor, and create a new REG_SZ value entry named Logging under the HKEY_LOCAL_MACHINE\Software\Policies\Microsoft\Windows\Installer registry key. Set it to value that could contain the characters form the list below ("voicewarmup", for example).
The letters in the value field can be in any order. Each letter turns on a different logging mode. Each letter's actual function is as follows for MSI version 1.1:
-
i—Status messages
-
w—Non-fatal warnings
-
e—All error messages
-
a—Start up of actions
-
r—Action-specific records
-
u—User requests
-
c—Initial UI parameters
-
m—Out-of-memory of fatal exit information
-
o—Out-of-disk-space messages
-
p—Terminal properties
-
v—Verbose output
-
+—Append to existing file
-
!—Flush each line to the log
-
*—Wildcard, log all information except for the v option. To include the v option, specify "/1*v"
| Note | This should be used only for troubleshooting purposes and should not be left on because it will have adverse effects on system performance and disk space. Each time you use the Add/Remove Programs tool in Control Panel, a new Msi*.log file is created. |
Resetting TCP/IP Settings in Windows XP
If you carefully view the list of networking components for a network interface in Windows XP, you'll notice a strange fact—the Uninstall button is disabled when Internet Protocol (TCP/IP) is selected (Fig. 12.15). According to the explanation provided by Microsoft, this is because the TCP/IP stack is considered a core component of the operating system; therefore, it is not possible to uninstall it in Windows XP (Windows .NET is expected to behave the same way).
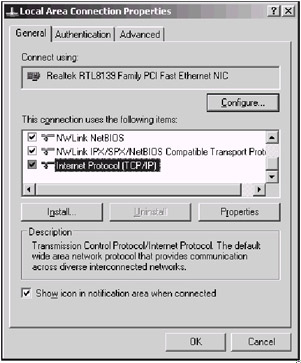
Fig. 12.15: In Windows XP, the Uninstall button is disabled when you select TC/IP protocol in the Local Area Connection Properties window
However, what should you do, if you want to reset the TCP/IP stack by returning it to its original state (as it was when the operating system was installed)? Obviously, you can't remove it and reinstall it again (as was the case in the previous versions of Windows NT/2000). However, there is a convenient workaround provided by the netsh (NetShell) utility, which provides a command-line interface for configuring and monitoring Windows XP networking.
In Windows XP, netsh utility provides a reset command, which rewrites registry keys related to TCP/IP. Consequently, you will get the same result will be as you would have had you removed the TCP/IP stack and then reinstalled it again.
To reset TCP/IP settings in the registry, go to the command line (Start | Run, type cmd and press <Enter>, then issue the following command:
netsh int ip reset [log_file_name]
where log_file_name is the name of the LOG file where the action taken will be recorded. If you don't specify the full pathname to the LOG file, it will be created in the current directory.
The command will reset TCP/IP settings stored under the following registry keys:
HKLM\SYSTEM\CurrentControlSet\Services\Tcpip\Parameters\ HKLM\SYSTEM\CurrentControlSet\Services\DHCP\Parameters\
| Note | If the log file already exists, the new log will be appended to the end of existing file. Also notice that the contents of the actual log file will depend on the system configuration. There may be situations when no actions will be logged. Usually, this happens if the TCP/IP registry settings have not been changed since original Windows XP installation. |
Enabling Remote Assistance in Windows XP
When discussing troubleshooting problems, one musn't forget that Windows XP now includes a nice feature—Remote Assistance. It provides a convenient way for an administrator to connect to the user's computer and to show him or her how to eliminate the problem. After establishing the connections, the administrator can view the user's screen and even (with the user's permission) use his mouse and keyboard.
This feature is installed and enabled by default. However, if someone has disabled it, you can re-enable Remote Assistance using one of the following two methods.
Enabling Remote Assistance in Control Panel
-
Start the System applet in Control Panel and go to the Remote tab (Fig. 12.16).
-
Verify that the Allow Remote Assistance invitations to be sent from this computer checkbox is selected.
-
Click Advanced to set the amount of time that you want to enable access to your computer. The Remote Assistance Settings window will open (Fig. 12.17).
-
If you want the user who connects to take control of your computer, click to select the Allow this computer to be controlled remotely check box.
-
Click OK.
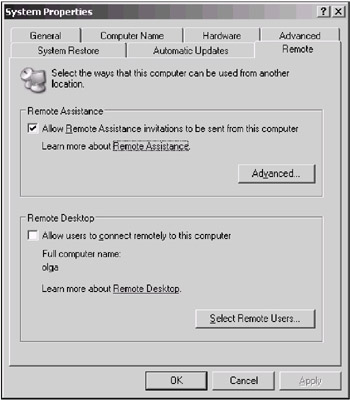
Fig. 12.16: The Remote tab of the System Properties window
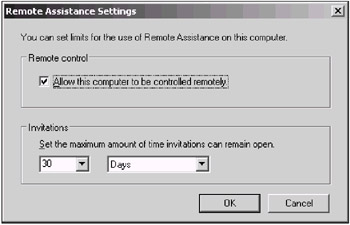
Fig. 12.17: The Remote Assistance Settings window
| Note | To use Remote Assistance, both you and your assistant must use compatible operating systems (Windows XP or later) and Windows Messenger or a MAPI-compliant e-mail account (Microsoft Outlook or Outlook Express). Furthermore, both of you need to be connected to the Internet. |
Enabling Remote Assistance in the Registry
To enable Remote Assistance in the registry, proceed as follows:
-
Start Regedit.exe and locate the following key:
HKEY_LOCAL_MACHINE\SYSTEM\CurrentControlSet\Control\Terminal Server
-
Under this key, locate the fAllowToGetHelp value (Fig. 12.18). If this value does not exist, create a new REG_DWORD value and name it fAllowToGetHelp.
-
Set this value to 1 to enable connections. The value of 0 disables the feature.
-
Click OK and quit Registry Editor. Remote Assistance is enabled immediately; there is no need to restart the computer.
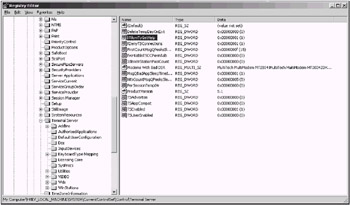
Fig. 12.18: Enabling the Remote Assistance feature in the registry
Configuring a Windows XP Computer to Receive Remote Assistance Offers
After enabling the Remote Assistance feature, it is necessary to configure the Windows XP-based computer to receive Remote Assistance offers. Before you start configuring the computer of the novice user to accept Remote Assistance offers, make sure that the following requirements are met:
-
The Group Policy on the computer of the novice user must be configured to enable Remote Assistance offers.
-
The computers of the novice and expert users must be members of the same domain, or members of trusted domains.
-
Both computers must have Windows XP installed (or a newer operating system).
To configure the Offer Remote Assistance policy setting, proceed as follows:
-
Start the Microsoft Management Console (MMC) Group Policy snap-in and locate the Offer Remote Assistance policy in the Local Computer Policy | Computer Configuration | Administrative Templates | System | Remote Assistance folder (Fig. 12.19).
-
Double-click the Offer Remote Assistance policy.
-
On the Offer Remote Assistance Properties dialog box (Fig. 12.20), click Enable.
-
Next, select one of the options that specify, whether or not the expert users can:
-
View the computer of the novice user
-
View and control the computer of the novice user
Note The setting that you select applies to the entire group that is listed. The Offer Remote Assistance policy setting does not provide a mechanism to enable one group of users to have the ability to view the computer of the novice user and a second group of users to have the ability to view and control the computer of the novice user. There can be only one group.
-
-
Click Show. The Show Contents dialog box is displayed.
-
Click Add to add the Domain Users and Domain User Groups.
-
Click OK, and then click OK to close the Show Contents dialog box and the Offer Remote Assistance Properties dialog box.
-
Quit the MMC Group Policy snap-in.

Fig. 12.19: Configuring the system policy to enable Windows XP computer to receive Remote Assistance offers

Fig. 12.20: The Offer Remote Assistance Properties dialog
These policies will be effective immediately. You do not have to restart the computer.
| Note | Populate the properties of the Offer Remote Assistance Group Policy with care and caution, since you are unable to verify if domain accounts that have been entered are really valid and recommended as experts. Carefully test the policy before you start applying it in your organization. Also notice that the Offer Remote Assistance policy is not available in Microsoft Windows XP Home Edition. |
Troubleshooting Service Startup Problems
Sometimes, you may encounter a situation in which a service can't start because of a logon failure. If this happens, the system might display error messages, and when you restart the system next time, the following error messages may be logged in the system event log:
Source: Service Control Manager Event ID: 7000 Description: The %service% service failed to start due to the following error: The service did not start due to a logon failure.
No information in the Data field will be available.
Source: Service Control Manager Event ID: 7013 Description: Logon attempt with current password failed with the following error: Logon failure: unknown user name or bad password.
No information in the Data field will be available (Fig. 12.21).
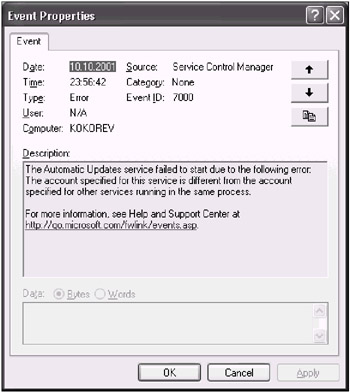
Fig. 12.21: The Event Properties window displaying the error message on the service startup failure due to logon failure
When you attempt to manually start the service, the following error message might be displayed:
Microsoft Management Console Could not start the %service% service on Local Computer Error 1069: The service did not start due to a logon Failure.
This behavior can occur for any of the following reasons:
-
The password on the account the service is configured to use to log on to has been changed
-
The password data in the registry is damaged
-
The right to log on as a service is revoked for the specified user account
To resolve these issues, you can configure the service to use the built-in system account, change the password for the specified user account to match the current password for that user, or restore the user's right to log on as a service.
If the right to log on as a service is revoked for the specified user account, restore the right. The procedure is somewhat different for domain controllers and member servers/client workstation.
If the problem takes place at the controller of an Active Directory domain, proceed as follows:
-
Start the Active Directory Users and Computers Microsoft Management Console (MMC) snap-in
-
Right-click the Organizational Unit (OU) in which the user right to log on as a service was granted. By default, this is in the Domain Controllers OU.
-
Right-click the container, and then click Properties.
-
On the Group Policy tab, click Default Domain Controllers Policy, and then click Edit. This starts Group Policy Manager.
-
Expand the Computer Configuration object by clicking the plus sign (+) next to the policy object. Under the Computer Configuration object, expand Windows Settings, and the expand Security Settings.
-
Expand Local Policies, and then click User Rights Assignment.
-
In the right pane, right-click Log on as a service, and then click Security.
-
Add the user to the policy, and then click OK.
-
Quit Group Policy Manager, close Group Policy properties, and then close the Active Directory Users and Computers MMC snap-in.
If the problem arises at the member server or a standalone computer, perform the following steps:
-
Start the Local Security Settings MMC snap-in.
-
Expand Local Policies, and then click User Rights Assignment (Fig. 12.22)
-
In the right pane, right-click Log on as a service, and then click Properties. The Log on as service Properties window will open (Fig. 12.23)
-
Add the user to the policy, and then click OK.
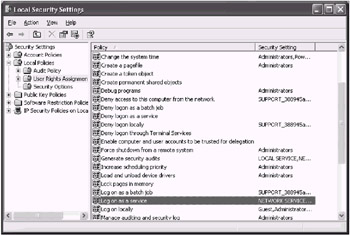
Fig. 12.22: Restoring the right for the user account to log on as service
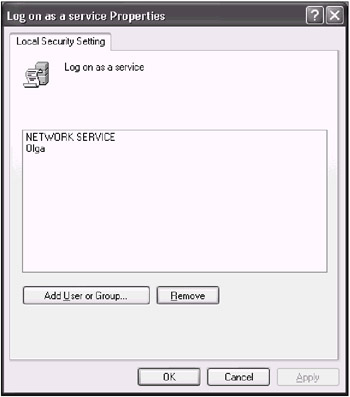
Fig. 12.23: The Log on as service Properties dialog
Configuring Service Logon Information
To configure the password for the specified user account to match the current password for that user, employ the following steps:
-
Start the Administrative Tools applet in Control Panel, then double-click the Services icon.
-
Right-click the appropriate service, and then click Properties.
-
The service properties window will open. Go to the Log On tab (Fig. 12.24), change the password, and then click Apply.
-
Go to the General tab (Fig. 12.25), and click the Start button to restart the service.
If the service starts, you have successfully eliminated the problem. However, there may be situations when the service wouldn't start with the user account you have specified. In such a case, you may reconfigure the service to start up with the built-in system account.
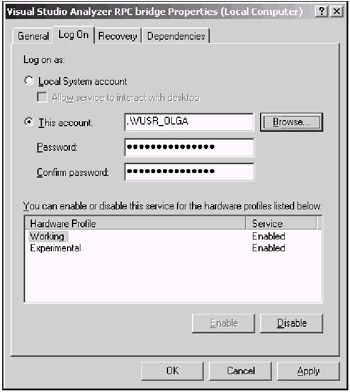
Fig. 12.24: The Log On tab of the service properties window
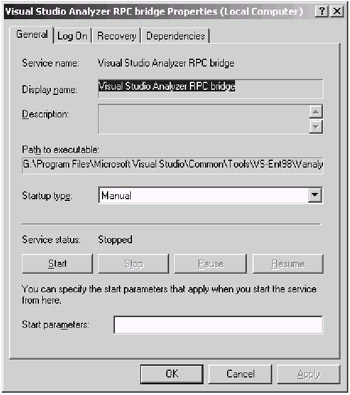
Fig. 12.25: The General tab of the service properties window
Configuring the Service to Start Up with the Built-in System Account
To configure the service to start up with the built-in system account, perform the following steps:
-
Start the Administrative Tools applet in Control Panel, then double-click the Services icon.
-
Right-click the appropriate service, and then select the Properties command from the right-click menu.
-
Go to the Log On tab, set the Local System Account radio button, and then click Apply. If the service needs to interact with the desktop, set the Allow service to interact with desktop checkbox. Task Scheduler is an example of the built-in system service that requires interaction with the desktop. Some thirdparty services (for example, F-Secure Authentication agent) also need to interact with the desktop. However, most services don't need this feature, and typically you may leave this checkbox unselected.
-
Go to the General tab and click the Start button to restart the service.
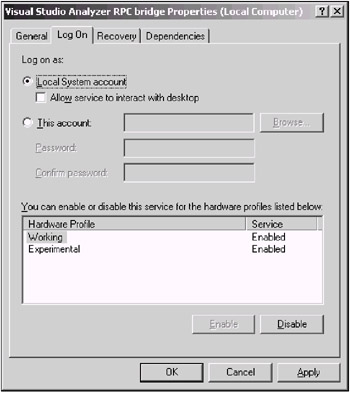
Fig. 12.26: Configuring the service to start up with the Local System account
Using Registry Editor to Troubleshoot Service Startup Problems
If you are able to start the Services tool, you can use the procedures described above to troubleshoot service startup problems. Sometimes, however, there may be situations when you are unable to use the Services administrative tool. For example, the computer may hang when you start this tool, and the following message is displayed:
The RPC Server is unavailable
It is logical to suppose then, that the problem has been caused by the Remote Procedure Call (RPC) service startup failure due to a logon failure with that service or a dependency service. Some services have dependency services that do not start until their dependency services start first. For example, the Alerter service depends on the Workstation service (Fig. 12.27). To view the dependencies for a specific service, right-click the required service, select the Properties command from the context menu, and go to the Dependencies tab. As you can see, the dependencies list for the RPC service is quite long (Fig. 12.28).
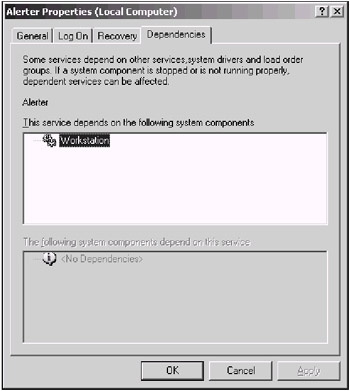
Fig. 12.27: The Alerter service depends on the Workstation service
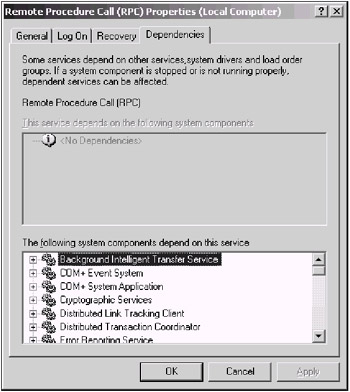
Fig. 12.28: The dependencies list for RPC service is quite long
This, of course, prevents you from staring the Services tool and using the safe method of configuring services. If this situation occurs, proceed as follows to work around the problem:
-
Start Registry Editor and locate the ObjectName value under the HKEY_LOCAL_MACHINE\SYSTEM\CurrentControlSet\Services\ServiceName registry key.
-
Modify that value entry by setting its value to localsystem (Fig. 12.29), then click OK and quit Registry Editor.
-
Attempt to restart the service. You may need to restart the computer for some services to restart properly.
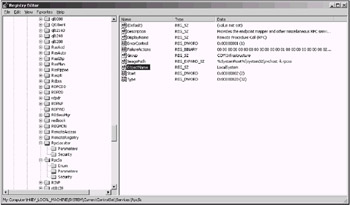
Fig. 12.29: The ObjectName value under HKEY_LOCAL_MACHINE\SYSTEM\CurrentControlSet\Services\ServiceName
If you cannot start the Registry Editor, you can modify the service account information by performing a parallel installation of the operating system.
Disabling a Service or Driver that Prevents Windows NT/2000/XP from Booting
If you have managed to detect the service or device driver that prevents your Windows NT/2000/XP from booting, and you have installed a parallel copy of the operating system, which is bootable, you can try to eliminate the problem using the following procedures:
-
Boot into a parallel copy of the system, and start Regedit.exe (Windows XP) or Regedt32.exe (Windows NT/2000).
-
Go to the HKEY_LOCAL_MACHINE root key
-
Use the Load Hive command to open the following registry file in the original Windows NT/2000/XP installation:
-
%System Root%\System32\Config\System
-
when prompted to assign a name for the hive to be loaded, assign it a name other than System (for example, System1).
-
-
Go to the HKEY_LOCAL_MACHINE\SYSTEM1\Select registry key and note the value for Current:REG_DWORD (this selects which ControlSet00x to load when booting and is the one that needs modification):
-
Perform the following steps to disable a service:
-
Go to the following registry key:
HKEY_LOCAL_MACHINE\TEST\ControlSet00x\Services \<Name of suspected service>, where x is the value of Current:REG_DWORD
-
Change the value of Start:REG_DWORD: to 0×4.
-
| Note | As was outlined in Chapter 6 where we discussed service startup options, other valid startup options for the service include 0×2 (Automatic), 0×3 (Manual), and 0×4 (Disabled). Thus, by setting the Start value to 0×4 you disable the suspected service. |
To disable a device driver, proceed as follows:
-
Go to the HKEY_LOCAL_MACHINE\SYSTEM1\ControlSet00x\Services\<Name of suspect Driver> where x is the value of Current:REG_DWORD
-
Change the value of Start:REG_DWORD: to 0×4.
| Note | As was shown in Chapter 6, other valid startup options for device drivers include 0×0 (Boot), 0×1 (System), 0×2 (Automatic), 0×3 (Manual), and 0×4 (Disabled). |
-
After you have introduced all required modifications, unload the SYSTEM1 hive, quit Registry Editor and try to reboot the original versions of Windows NT/2000/XP.
|
|
EAN: 2147483647
Pages: 144