Troubleshooting Startup Problems
|
|
Windows XP is certainly the most reliable Windows, possessing a level of robustness that is simply lacking in its predecessors, including even Windows 2000. Does this all mean that startup problems cannot possibly occur in Windows XP? No, it doesn't. Any operating system can be rendered unbootable, and Windows XP is no exception. So, you must be prepared in order not to feel helpless, if something goes terribly wrong. A significant part of this chapter is dedicated to troubleshooting Windows XP startup problems, which, one should admit, are the most frustrating ones (especially if your system won't boot when you have a lot of work that needs to be done). So, what should you do in case of emergency? First of all, don't panic. Next, try to detect what is preventing Windows XP from booting.
Since Windows XP boot sequence closely resembles that of Windows 2000, most (but not all) techniques described here are also applicable for Windows 2000. A detailed description of Windows 2000/XP boot sequence was provided in Chapter 6. Therefore, I will only provide a brief description of the boot sequence, and then we will proceed with problem detection and troubleshooting.
Table 11.1 lists Windows XP startup phases with brief descriptions of the processes that take place at each stage of the normal boot process.
| Startup Stage | Description (x86-Based Systems) |
|---|---|
| | |
| POST routine | CPU initiates system board POST routines. POST routines of the individual adapters start after the motherboard POST is accomplished successfully |
| Initial startup process | The system searches for a boot device according to the boot order setting stored in CMOS. If the boot device is a hard disk, Ntldr starts |
| Operating system load | Ntldr switches the CPU to protected mode, starts the file system, and then reads the contents of the Boot.ini file. This information determines the startup options and initial boot menu selections |
| Hardware detection and configuration selection | Ntdetect.com gathers basic hardware configuration data and passes this information to Ntldr. If more than one hardware profile exists, Whistler attempts to use the one that is correct for the current configuration. Notice that if your computer is ACPI-compliant, Windows XP ACPI functionality will be used for device enumeration and initialization (more detailed information on this topic was provided in Chapter 5) |
| Kernel loading | Ntldr passes the information collected by Ntdetect.com to Ntoskml.exe. Ntoskml then loads the kernel, HAL, and registry information. A status bar at the bottom portion of the screen indicates progress |
| Operating system logon process | Networking-related components (such as TCP/IP) load asynchronously with other services and the Begin Logon prompt appears on screen. After a user logs on successfully, Windows XP updates the Last Known Good Configuration information to reflect the current state |
| New devices are detected by Plug and Play | If Windows XP detects new devices, they are assigned system resources. Windows XP extracts the required driver files from the Driver.cab file. If this file is not found, Windows XP prompts the user to provide them. Device detection occurs asynchronously with the operating system logon process |
Diagnosing Startup Problems
Fortunately, Windows XP boot failures are quite rare, especially if you perform regular maintenance and take preventive measures against disaster. However, the problems still have a chance to arise, and, as with any other operating system, they might be caused both by hardware malfunctions and by software errors. If the problem is severe enough, the system stops booting and displays an error message. Quite a brief listing of error messages and their meanings is presented in Table 11.2.
| Startup Problem Symptom | Possible Cause |
|---|---|
| | |
| The POST routine emits a series of beeps and displays error messages, for example: | The system self-test routines halted due to improperly installed devices. |
| Hard disk error. Hard disk absent/failed. | To recover from hardware problems, carefully review the documentation supplied with your system, and then perform the basic hardware checks. Verify that all cables are correctly attached, and all internal adapters are installed correctly. Make sure that all peripheral devices (such as keyboards) required to complete the POST without error messages are installed and functioning. If applicable, verify that you have correctly configured all jumpers or dual in-line package (DIP) switches. Jumpers and DIP switches are especially important for hard disks. Run diagnostic software to detect hardware malfunction, and replace the faulty device. |
| Unfortunately, the topic of troubleshooting hardware problems goes beyond the range of problems discussed in this book. As a matter of fact, it deserves a separate comprehensive volume. However, I would like to recommend some helpful resources on the topic that would certainly help you make sense of the BIOS error codes:
| |
| Master boot record (MBR)–related error messages similar to the following: | The MBR is corrupt. |
| Missing operating system. | The easiest method of recovering the damaged MBR is provided by Recovery Console (the methods of starting Recovery Console were discussed in detail in Chapter 2). Once you are in Recovery Console, use the FIXMBR command to repair the MBR. |
| Insert a system diskette and restart the system. | The FIXMBER command uses the following syntax: Fixmbr [device_name] where device_name parameter specifies the drive on which you need to repair the damaged MBR. For example: fixmbr \Device\HardDisk0 If the device_name parameter is omitted, the new MBR will be written to the boot device, from which your primary system is loaded. Notice, that you'll be prompted to confirm your intention to continue, if an invalid partition table is detected |
| Partition table related error message similar to the following: | The partition table is invalid. |
| Invalid partition table. A disk-read error occurred. | You can recover from this problem using the DiskProbe Resource Kit utility or any third-party low-level disk editor. Please take note of the fact that to prevent this problem, you must create a backup copy of the MBR beforehand (for example, use the DiskProbe tool for this purpose). More detailed information on this topic can be found in the Windows XP Resource Kit documentation. |
| If the MBR on the disk used to start Windows XP is corrupt, then you'll most likely be unable to start Windows XP (and, consequently, DiskProbe). Therefore, before proceeding any further, you'll have to start Windows XP Recovery Console to replace the damaged MBR | |
| Windows XP cannot start after you have installed another operating system | Windows XP boot sector overwritten by the other operating system's setup program. |
| Windows XP Recovery Console provides the FIXBOOT command that enables you to restore the overwritten boot sector | |
| Missing Boot.ini, Ntoskrnl.exe, or Ntdetect.com files (x86-based systems) | Required startup files are missing, damaged, or entries in the Boot.ini are pointing to the wrong partition |
| Bootstrap loader error messages similar to the following: | Ntldr is missing or corrupt. |
| Couldn't find loader Please insert another disk. | If Ntldr or any other file required to boot the system is missing or corrupt, start Recovery Console and copy the required file |
| CMOS or NVRAM settings are not retained | The CMOS memory is faulty, data is corrupt, or the battery needs replacing |
| Stop messages appear | Many possible causes due to software or hardware issues |
As I mentioned in Chapter 6, both Windows NT/2000 and Windows XP generate system messages known as "blue screens" or "Blue Screens of Death" (BSOD) if they encounter serious errors which they can't correct. The Blue Screen of Death may also appear when Windows NT/2000 stops loading in order to prevent further data corruption. If the STOP message appears during system startup, it's quite likely that the cause of the problem is among the following:
-
The user has installed third-party software that's destroyed part of the system registry (that is, the HKEY_LOCAL_MACHINE root key). This may happen if the application attempts installation of new service or driver. As a result, the blue screen will appear, informing the user that the registry or one of its hives couldn't be loaded.
-
The user has incorrectly modified the hardware configuration and, as a result, one of the critically important system files was overwritten or became corrupt.
-
The user has installed a new service or system driver, which is incompatible with the hardware (as a result, the blue screen appears after rebooting). Strictly speaking, it's the attempt to load an incompatible file that leads to the corruption of a correct system file.
| Note | One of the common drawbacks of Windows NT 4.0 and earlier versions of the Windows NT operating system was caused by shared system files, which could be overwritten during installation of third-party software that was incompatible with the operating system. In Windows 2000/XP, this drawback was eliminated by providing appropriate protection for the critical system files. This new Windows 2000 functionality was discussed in Chapter 6. If you wish to avoid startup problems, I recommend that you use these tools on a regular basis. |
Parallel Installation of the Operating System
What else can be done to provide universal troubleshooting tools for the startup problems? There's another traditional method of increasing the probability of quick and easy recovery. This method is known as the "parallel installation of the operating system". The parallel installation is just another copy of the Windows NT/2000/XP operating system installed on the same computer. If the main operating system (the one you use most frequently) fails to boot, an additional copy of the operating system will allow quick access to NTFS volumes, system files, and registry hives. Another method of providing access to NTFS volumes after system failures is using the NTFSDOS utility, which will be discussed in the next chapter.
| Note | Notice that the parallel installations generally weaken the system security (like NTFSDOS, parallel installations provide a backdoor entrance to your main operating system). Thus, from a reliability and recoverability point of view, both parallel installations and NTFSDOS are beneficial. From a security point of view, they're not as good as they may seem to be. |
How should you install the parallel system? First of all, do it in advance, since the installation procedure is time-consuming; and, as a general rule, when problems occur, most people are short of time. The next thing you should take into account is that you can only install the minimum set of options in the parallel operating system.
Additional Hardware Profiles
Besides a parallel installation of the operating system, there's another method of performing quick recovery. If you experiment with various hardware devices, and aren't sure if the device you're going to install is listed in the HCL (Hardware Compatibility List), you may use additional hardware profiles for the system recovery. Proceed as follows:
-
Before installing a new device which may cause a problem (including the startup problems), create a new ERD (Windows 2000) or prepare for ASR (Windows XP) and back up the registry using the method described in Chapter 2. Both the ERD (ASR backup) and registry backup copies will be useful in this case.
-
Create a new hardware profile. Launch the System applet in Control Panel, go to the Hardware tab and click the Hardware Profiles button. The Hardware Profiles window will open (Fig. 11.1). Click the Copy button and create a new hardware profile by copying one of the existing profiles. The best way to name hardware profiles is to use "speaking names", which explain their usage (for example, Working—the current hardware profile, free of errors; and Experimental—the new hardware profile, where you'll do experiments). In the Hardware profiles selection group of options, set the Wait until I select a hardware profile radio button.
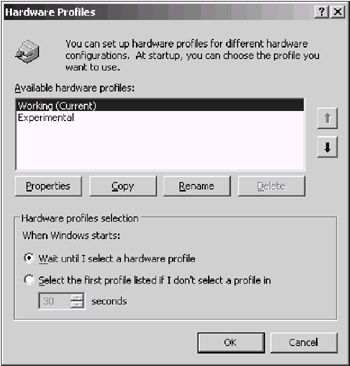
Fig. 11.1: Before installing a new device that isn't listed in the HCL, create additional hardware profile -
Check if the hardware profiles are usable. Try to start the operating system using each of them.
-
Start the computer using the Working profile, and proceed with installing the new device and its drivers using the Hardware Wizard. If the system prompts you to reboot the computer, don't reboot the system immediately. Start the Device Manager, find the newly installed device in the list and select the Properties command from the context menu. You'll see the General tab of the properties window for this device. If the newly installed device is incompatible, you'll immediately see that "something is wrong" (despite the phrase "This device is working properly" displayed in the Device status field, as shown in Fig. 11.2). For example, this device may be marked as an Unknown device, which means that the device is really unknown to the system. In short, this device really may cause problems (in our case, you'll probably get the blue screen after the reboot). To avoid possible problems, disable this device in the current hardware profile by selecting the Do not use this device in the current hardware profile (disable) option from the Device usage list. Thus, the problem device will be disabled in the current hardware profile, and will remain enabled in the experimental hardware profile.
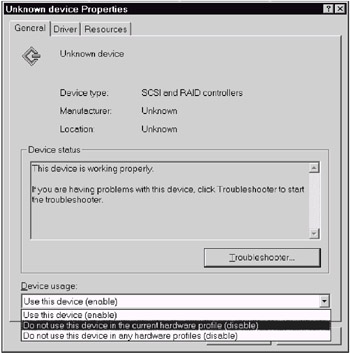
Fig. 11.2: Despite the fact that the Device Manager states that This device is working properly, a newly installed device will cause problems. Disable it in the current hardware profile. -
Now reboot the system, and select the experimental hardware profile (where the problem device is enabled). Did you see the BSOD? Nothing horrible happened, because you have a working hardware profile where the problem device is disabled. In most cases, you'll be able to boot the system using the working hardware profile.
| Note | I recommend that you always have a working hardware profile (which contains no errors and enables no problem devices). This type of profile often provides an easier method of recovering a system with configuration problems than the Advanced startup menu, displayed during Windows 2000 startup after pressing the <F8> key. |
Problems with Zip Iomega Parallel Port Device
This is a problem encountered by many users; and because of this, it's present in many Windows 2000 FAQs (Frequently Asked Questions). Zip Iomega parallel port devices often cause boot problems (blue screen), despite the fact that they're listed in the Windows 2000 HCL. If you've also encountered this problem, then you've probably installed the device incorrectly. Notice that Zip Iomega drivers written for Windows NT 4.0 and Windows 95/98 (these drivers are supplied on the companion CD) are incompatible with Windows 2000. If you need to install the Zip Iomega parallel port device and use it under Windows 2000, then you'll need Microsoft-supplied drivers for this device.
To install Zip Iomega parallel port device under Windows 2000, proceed as follows:
-
Switch your device to the parallel port.
-
Start Windows 2000, launch the System applet in Control Panel, navigate to the Hardware tab and click the Device Manager button.
-
Expand the Ports node in the hardware tree, select the port to which the new device is connected, and select the Properties command from the context menu. The properties window for the port will open. Navigate the Port Settings tab (Fig. 11.3).
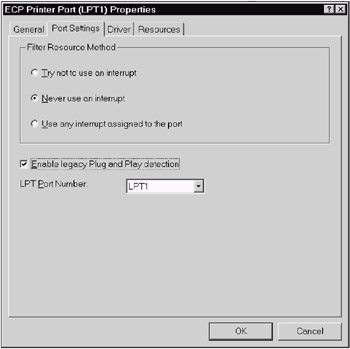
Fig. 11.3: To install the Zip Iomega parallel port device, set the Enable legacy Plug and Play detection on the Port Settings tab of the properties window for the port to which the device is connected -
Set the Enable legacy Plug and Play detection checkbox.
-
Reboot the system. After the reboot, the Zip Iomega device will be detected and installed automatically.
| Note | If you install the Zip Iomega parallel port device using the method described above, the device will work correctly. Don't attempt to install the Iomega Zip Tools software, however, because these utilities aren't Windows 2000-compatible. An attempt to install these tools will cause problems. |
How Can I See the Horrible Blue Screen of Death?
Have you ever seen the Blue Screen of Death? If you haven't, most people will consider you a lucky person. What… you're curious to see what it is? Well, here you are!
Windows 2000 and Windows XP has one undocumented function that allows you to generate an artificial STOP error ("Blue Screen of Death") and manually create a crash dump (Memory.dmp). The STOP screen that appears after using this feature will contain the following message:
*** STOP: 0x000000E2 (0x00000000, 0x00000000, 0x00000000, 0x00000000) The end-user manually generated the crashdump.
By default, this feature is disabled. To enable it, you'll need to edit the registry and reboot the computer. Open the HKEY_LOCAL_MACHINE\SYSTEM\CurrentControlSet\Services\i8042prt\Parameters registry key, add the REG_DWORD CrashOnCtrlScroll value and set it to 1.
After rebooting the system, you'll be able to manually "crash" the system. To view the Blue Screen of Death, press and hold on the right <Ctrl< key, and press the <Scroll Lock> key twice.
Starting System Restore from a Command Prompt
System Restore is certainly one of the most useful tools introduced with Windows XP (experienced users must remember that a similar feature exists in Windows ME). However, what can you do, if you are unable to start your Windows XP-based computer normally or in the Safe Mode? Is the tool quite useless for such cases? Well, not quite.
If you computer is unable to start normally or in the Safe mode, try the following tip to start System Restore from the command prompt.
To start the System Restore tool when you are unable to start your Windows XP-based computer normally or in Safe mode, temporarily change the Windows shell from Explorer.exe to Progman.exe:
-
Start your computer to Safe Mode with the Command Prompt.
Note You must log on as the administrator or a user that has administrator rights.
-
At the command prompt, type regedit, and then press <Enter>.
-
View the following registry key:
HKEY_LOCAL_MACHINE\SOFTWARE\Microsoft\WindowsNT\CurrentVersion\Winlogon
-
In the right pane, modify the Shell value entry by changing its value from Explorer.exe to Progman.exe, then click OK and close Regedit.exe.
-
At the command prompt, type shutdown -r, and then press <Enter> to restart your computer.
-
Log on as the administrator or a user with administrator rights.
-
When Program Manager starts, click Run on the File menu, type %SystemRoot%\system32\restore\rstrui.exe, and then press <Enter>.
-
Follow the instructions on the screen to begin restoring your computer to a previous, functional state.
| Note | Most users wonder whether or not System Restore restores passwords. Because System Restore only rolls back the local machine state, it will restore the passwords that are cached in the local system registry. For example, program passwords such as Hotmail Messenger or Yahoo Messenger will be restored. Notice, however, that actual passwords for such programs reside on the respective Web server, and System Restore will only restore the password remembered by the program. Domain passwords are also restored (notice, however, that part of the information related to joining domains is stored in Active Directory, and this information is not rolled back by System Restore). On the other hand, System Restore will not roll back Windows XP passwords and hints. This is by design. It is intended to prevent confusion as well as those situations when you lock out your computer because the restore point included old passwords that you do not remember. By the same reason, System Restore will not restore the passwords and hints for Internet Explorer and Content Advisor. |
How to Re-Create Missing ASR Floppy Disk
Well, you have tried all troubleshooting steps but nothing happens, and, finally, you have decided to run the Automated System Recovery (ASR) process. And, most unfortunately, when you decided to do so, you discover that your ASR diskette is missing. Does it mean that everything is lost? No, it doesn't, since if your media storing ASR backup is usable, you can re-create the missing ASR floppy disk.
Perhaps you have wondered what the ASR disk contains (and it isn't difficult just to look and find out that the Asr.sif and Asrpnp.sif files contained on the ASR diskette are ASCII files that can be viewed or edited with any text editor, such as Notepad.exe). What's even better is that these files can be extracted from the ASR backup set and then copied to a floppy disk that can be used for an ASR procedure.
Therefore, to recreate a missing ASR diskette, do the following:
-
Format a 1.44 megabyte (MB) floppy disk and insert the disk into the floppy disk drive of the computer.
-
In System Tools, start the Backup program. When the Backup or Restore Wizard screen is displayed, click Next.
-
Click Restore Files and Settings, and then click Next.
-
In the What to Restore dialog box, select the media that contain the ASR backup. Ensure that the media are inserted.
-
Expand the Automated System Recovery Backup Set that corresponds to the ASR floppy disk that you want to create.
-
Expand the second instance of the drive letter that contains the system files. Expand the Windows_folder/Repair folder.
-
Click the following files from this repair folder: Asr.sif, Asrpnp.sif, and Setup.log (Fig. 11.4), and then click Next.
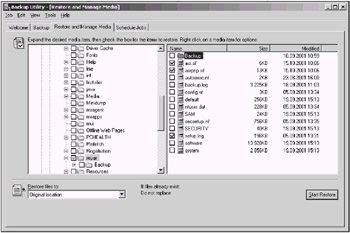
Fig. 11.4: Re-creating the missing ASR floppy disk -
At the Completing Backup or Restore Wizard screen, click Advanced.
-
At the Where to Restore screen, set the Restore Files to: dialog box to Single Folder, and then set the Folder Name dialog box to the root of your floppy drive, for example, "A:\".
-
Click Next. The other options in this wizard are not mandatory and do not affect the transfer of files to the floppy disk. When the wizard is finished, the files are copied to the location that you had previously specified. The ASR floppy disk is ready for use in the event of an ASR restore operation.
| Note | The Asr.sif and Asrpnp.sif files must reside on the root of the floppy disk drive to be used during ASR restore operation. |
|
|
EAN: 2147483647
Pages: 144