Hack30.Build a MAME Cabinet
Hack 30. Build a MAME Cabinet Craft your own stand-up MAME cabinet for realistic arcade play . More and more accurate as every new iteration of MAME is, the popular arcade machine emulator will always have one insurmountable design flaw: no matter how perfectly it emulates arcade machines, it does so on something that isn't an arcade machine. No matter how authentic a video game may look and play on your computer, it will never feel like the real thing. If you truly want to feed your thirst for nostalgia and experience these games the way they were originally intended, you're going to have to build yourself a MAME cabinet: an arcade cabinet with a dedicated MAME computer running inside. A well-built MAME cabinet can be indistinguishable from a "real" arcade game when done rightplus it has the advantage of being able to play thousands of different arcade games instead of being dedicated to playing only one! 3.11.1. Planning Your Personal CabinetBuilding a MAME cabinet isn't particularly hard, but it can become both expensive and disastrous in a hurry if you don't do some simple planning before you start building. One of the most important decisions you can make is determining what general era and type of games you plan on playing the most. This will help you make several specific decisions about your cabinet later, such as the control panel layout, minimum computer specs , and even monitor orientation (horizontal versus vertical). I have seen MAME cabinets dedicated to playing a small handful of classics, and I've seen cabinets configured to play literally thousands of different games. That's the beauty of building your own cabinet; it's all about designing and creating the machine you want to own! The first thing you'll need is the cabinet structure itself. There are two solutions to this problem, the easier of which is to find an older, dead arcade game and convert it into your MAME machine. Dead or dying arcade games can often be found for $50 or less and can be easily modified to meet most people's needs. If you're unable to find a donor machine and are handy with power tools, you may opt to simply build your own cabinet using plans and measurements freely available on the Internet (or by simply winging it). Building your own cabinet offers a lot more leeway and freedom when it comes to the shape and design of your cabinet, but of course it will require more advanced woodworking skills to pull off.
3.11.2. Filling Your CabinetOnce you have your cabinet, it's time to find a computer to mount inside of it. As a general rule, the newer the games are you want to play, the faster your computer will need to be. A 400 MHz PC with two gigabytes of hard drive space powered my first MAME cabinet. It was perfect for playing the classics like Pac-Man and Donkey Kong, but for more recent games you'll need a bit more power. Playing newer games requires a faster processor, more RAM, and more hard drive space. You may also want to add a network card and/or a CD/DVD drive to simplify adding new games and software to your cabinet. Another consideration is the operating system you're going to run. Although anything from DOS to Linux to Windows XP can be used, slimmer operating systems like DOS and Linux typically run better on lower-end computers. Although I've never built one personally , there are plenty of MAME cabinets out there powered by Macintosh computers as well. While you're installing and configuring your MAME PC, be sure to check out some of the frontends available for MAME [Hack #20] . Frontends are graphical user interfaces (GUIs) that simplify choosing and running the game of your choice. Remember, in your MAME cabinet you're not going to have quick access to your mouse or keyboard, so using a frontend is an essential part of navigating through MAME. The simplest frontends allow users to pick a game from a menu and play it. More advanced frontends will display screen shots and marquees, play MP3s during the menu, and even let you sort your games into different groups. Almost all the frontends available for MAME are free, so try several out and find which one works best for your cabinet. In an ideal situation, a MAME cabinet will boot directly into its frontend and be able to shut the machine down when MAME is closed. When it comes to monitors for MAME cabinets there are three choices, each of which has its own benefits and shortcomings. One option is to simply use a computer monitor. It's the easiest of the three options since you can connect it directly to your PC and no major computer configuration is need. Unfortunately, computer monitors provide the least arcade-like experience due to their clarity (computer monitors have a much higher resolution than arcade monitors). Another fact to consider is most arcade cabinets had 19" or 25" monitors in them, so a 15" computer monitor sitting in your cabinet is going to look rather anticlimactic. A second option, if you're lucky enough to have one lying around, is to use a real arcade monitor. While this is clearly the most authentic-looking solution, you're going to need a special video card to connect it to, and possibly more parts to get it to work (not to mention that all monitors contain lethal doses of electricity in themthis may not be the project on which you wish to discover that). If you still want to try this, software capable of video- trickery , such as VGA2TV drivers or ArcadeOS (http://www.mameworld.net/pc2jamma/frontend.html) can be used for routing PC video output to a standard low-resolution arcade monitor. The third option (and a great middle ground) involves using a television set. This provides a picture quality similar to actual arcade monitors, and hooking up a newer television to a computer is a breeze especially when using a newer video card with s-video or composite video outputs! Bear in mind that the video output generated by the TV Out on most modern video cards won't be as pretty as an arcade monitor's display, due to the interlacing that video cards use when generating NTSC signals. Another detail to begin considering is whether you want to mount your monitor horizontally or vertically. Most classic games from 1983 and before (like the aforementioned Pac-Man and Donkey Kong) used vertically-mounted monitors. The majority of games after that date moved to horizontally mounted monitors. If you mount your monitor horizontally (e.g., by simply setting a television set on a shelf), you can still play vertical games; however, a lot of empty black space will appear on either side of the game. Likewise, horizontal games can be played on a vertically mounted screen, with black bars appearing at the top and bottom of the picture (kind of like the black bars that appear when watching a letterboxed DVD on a standard 4:3 ratio television). Again, it's all about forethought, deciding what type of games you're going to be playing the most, and building the cabinet that fits your needs. If in doubt, go horizontal; it's easier. 3.11.3. Controlling Your CabinetOne of the most fun parts of building your own MAME cabinet is designing your control panel. What and where you decide to install is completely up to you, but this is one part of your cabinet that should receive a lot of attention and planning, as a poorly designed control panel can ruin your entire project. Even the simplest MAME control panels will need a joystick, a "player one" start button, and one or more player buttons. Most control panels contain (at least) two joysticks and three or four buttons per player (in addition to the player one and player two start buttons ). Trackballs, spinners and even steering wheels can be added if you so desire . I have seen control panels that support four players with six buttons per player, four start buttons, a pause button, a spinner, a trackball , and a fourway joystick (for playing the classics) all on one control panel. Not only was it even less aesthetically pleasing than it sounds, but also it was three-feet wide! One alternative to having such a busy control panel is creating interchangeable control panels (one for regular games, one for driving games, etc.) that can easily snap in and out. Again, it's all up to your own personal needs and tastes.
Eventually you're going to need to wire all those controls up to your computer. Most modern arcade controls connect to small leaf switches with metal connectors for connecting wires. Each leaf switch will use two wires (a hot and a ground). Wiring up the ground wires is easy; they can all be wired together in one big loop, with the last switch being wired to a ground point. Each hot wire from your control panel is eventually going to be connected to something. That "something" can either be a keyboard or an encoder [Hack #27] . Hacking keyboards is for people who are on a tight budget, like to experiment and tinker with projects, and have more time than money to spend . Keyboard hacking involves connecting the wires from your controls to a keyboard's contacts by using solder. The keyboard control panel is then connected to the PC inside your MAME cabinet. When a button is pressed on your control panel, the signal is sent along the wire to your hacked keyboard, which then sends the key press to your computer, and eventually to MAME. Hacking a keyboard is a time-consuming , intricate , and often frustrating experience, but it is cheap. The alternative (and usually preferred) method is to purchase an encoder. These handy devices are small circuit boards with pre-made connectors on them for your wire inputs. The backsides of these encoders have either a PS/2 or USB connection that is used to connect the encoder to your MAME computer. Ultimarc's I-PAC encoder (http://www.ultimarc.com/ipac1.html) runs $39, but the advantage is that by using an encoder you can hook your control panel up in minutes versus hours or days of soldering on a hacked keyboard. Encoders are well worth the investment. Once you have your frame, computer, monitor, and control panel, it's time to assemble your MAME cabinet! If you purchased a previously used arcade cabinet, now's the time to gut all the old parts out and clean it up. If the cabinet needs any repair work (Bondo does wonders) or painting, now's the time to do it, before any electronics have been installed. Once the woodwork is done, it's time to mount your monitor. If using a computer monitor or television, you can either remove the chassis from the plastic housing and mount it directly to your cabinet, or you can simply build a shelf inside your cabinet for your monitor to sit on top of. If you do end up using a shelf, make sure your monitor is secured into place with a few 2 x 4s and metal brackets. You really don't want that large television falling out of the back of your cabinet the first time you try to move it. Regardless of how you mount your monitor, you'll also need a bezel to block out the edges around the front of the tube. Poster board works really well for this. It's cheap, easy to work with, and looks great when mounted behind Plexiglas. Next you'll want to attach your control panel, secure any loose wires, and mount your PC into place. For cooling reasons, I've always preferred mounting my computer components directly to the wood inside (without using the case); others often simply place the computer (tower and all) inside their cabinet. It's just a matter of personal preference. Once the big stuff is done, it's time for the details. PC speakers can be connected to your MAME computer and hidden behind the cabinet's original speaker grills. Custom marquees and sideart for your cabinet can either be downloaded or custom made, printed out and mounted to your cabinet to make your MAME machine really stand out. Likewise, your control panel and bezel can also be customized with printouts and custom artwork as well. Again, the only limit here is your own imagination . You can make your MAME cabinet as subdued or as wild as you like! Figure 3-21 shows my finished arcade cabinet. Figure 3-21. Rob's finished arcade cabinet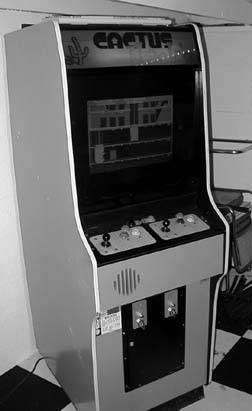 When you're all finished, you should end up with something that resembles an original arcade cabinet, configured and ready to play all of your favorite classic videogames at a moment's notice! It's amazing how different the experience of playing games is when you're standing in front of an actual arcade cabinet. And the best news of all is that if you wire up the coin slots on the front of your cabinet, you can start making the money you invested into your cabinet back from your friends , one quarter at a time! Rob O'Hara |

EAN: 2147483647
Pages: 150