Chapter 9. Advanced JSP and XML Techniques
| CONTENTS |
IN THIS CHAPTER
- Accessing Web Services from a Browser
- Handling Large XML Documents
- Handling Special Characters and Encoding
- Using XML Tag Libraries
- Summary
Now that the previous chapters have gotten you started with Web services and XML, it is time to discuss some more advanced topics. This chapter begins by examining how to access a Web service from within an HTML page. This concept will open up new techniques of coding HTML pages and has profound implications for Web application design. Next, the chapter discusses encoding issues and ways of processing large XML documents. Following that, some useful aspects of the two XML-related tab libraries that can be found in the new Jakarta tag library will be highlighted.
Accessing Web Services from a Browser
One aspect of Web services that shows tremendous promise is the ability to access a Web service directly from an HTML page. A few lines of description cannot begin to convey the impact that this will have on Web applications. This ability will increase the flexibility of what is possible within a traditional HTML page. Instead of requesting an entirely new page from the server to perform an update, it's now possible to dynamically change elements on the HTML page with only a single Web service call. For example, a person could select one item in a drop-down box, and then have a Web service database call refresh the other elements on the page. It means validation of entries can be made directly against a database server rather than having to refresh the entire page. To newer programmers, this might not seem huge; however, this simple capability borders on revolutionary for Web application design.
NOTE
The technique shown in this chapter for accessing a Web service using a browser will involve an applet. To make the applet work, it currently requires a JAR file of about 800Kb in size to hold the required classes. As such, this technique is geared towards an intranet solution rather than an Internet solution. Over time this situation will improve, especially as some of the class files required migrate towards the standard Java distribution. In addition, applet caching can be used to reduce the long-term impact of downloading the midsize JAR file for Internet-based business systems. However, for a typical Internet page, this isn't a good solution yet. Microsoft has a similar solution, which will function in the same way as this example. The Microsoft solution uses a 60Kb file. However, the Microsoft version of this technique will only work in Internet Explorer. This technique is still young, but it will improve with time.
Let's begin by building a generic example to show how an HTML page can talk back to a Web service. The question becomes how to go about accessing a Web service. JavaScript seems to be the right tool as a scripting language to access a Web service, especially because JavaScript is the standard language used to modify and access the HTML page from within a browser. However, JavaScript cannot access a Web server directly. This means that a bridge between JavaScript and the Web service needs to be built.
It turns out that two methods exist to perform the magic we need. The first is to use an applet and the second is to use a Web service DHTML behavior. Currently, the DHTML behavior solution is a Microsoft-only solution within Internet Explorer 5 or better browsers. An applet solution will work in any browser that supports a Java JVM of version 1.3.1_01a or later. This makes the applet solution the more generic approach, so this chapter will focus on the applet solution.
Using an Applet
Applets are a well-known commodity within Java. However, applets have one quality that makes them very important to this example: They are able to communicate back to the server that hosted their page. We will use this quality to access a Web service.
The most important first step is to make sure that the browser used to run this example is using a current JVM. Make sure that your browser is using Java 1.3.1_01a. Many browsers will still be using an older version of the JVM, which will cause this example not to work. If this example doesn't work for you, this could be the problem.
If you are having problems getting your browser to work with the latest Java JVM plug-in, check out the Sun site for help. The current link to get the latest Java plug-in is http://java.sun.com/getjava/installer.html.
Don't get confused by the Java 1.3.1 plug-in, which comes with the Netscape 6.2 browser. At the time of writing, it's very important that, at a minimum, the Java 1.3.1_01a plug-in be installed for this example to work! In addition, Opera doesn't use a plug-in rather, it works against your machine's local JVM. Therefore, you will need to make sure that Opera is using the correct JVM if you have multiple JVMs installed on your machine. Finally, two flavors of the plug-in exist: Consumer and IT Professional. At the time of this writing, the Consumer version is more up-to-date and is the one we want to use. Unfortunately, this means that searching for the 1.3.1_01a JRE might be a bit confusing. Hopefully, by the time you read this, a newer version will have been released and this point will be inconsequential.
Because we are using an applet, the code to access the Web service is still Java. This means that the code within the applet to access a Web service would be the same as it is within the JSP examples in the previous chapters. To illustrate this point and make the code easy to write, the example here reuses the banner Web service code that was written in Chapter 8, "Integrating JSP and Web Services."
Now it's time to get to the example, which means building an applet. This book doesn't cover the details of building an applet. For programmers who need a refresher course on the basics of applets, check out the Sun Java trail for applets, found at http://java.sun.com/docs/books/tutorial/applet/.
This applet class shown in Listing 9.1 should be saved as webapps/xmlbook/chapter9/BannerApplet.java.
Listing 9.1 An Applet to Communicate with a Web Service
import java.applet.Applet; import java.awt.*; import java.awt.event.ActionListener; import java.awt.event.ActionEvent; import xmlbook.chapter8.BannerService; public class BannerApplet extends Applet implements ActionListener { private List bannerlist = new List(5,true); private TextField currentbanner = new TextField(50); private Button clear = new Button("Clear"); private Button newbanner = new Button("New"); private BannerService banner = new BannerService(); public void init() { GridBagLayout gridbag = new GridBagLayout(); setLayout(gridbag); GridBagConstraints gbc = new GridBagConstraints(); gbc.gridy = 0; gbc.gridx = 0; gridbag.setConstraints(newbanner, gbc); add(newbanner); gbc.gridx = 1; gridbag.setConstraints(clear, gbc); add(clear); gbc.gridx = 2; gbc.gridwidth = GridBagConstraints.REMAINDER; gridbag.setConstraints(currentbanner, gbc); currentbanner.setEditable(false); add(currentbanner); gbc.gridy = 1; gbc.gridx = 0; gbc.fill = GridBagConstraints.BOTH; gridbag.setConstraints(bannerlist, gbc); add(bannerlist); clear.addActionListener(this); newbanner.addActionListener(this); } public void actionPerformed(ActionEvent e) { String action = e.getActionCommand(); if(action == "New") { updateCurrentBanner();} if(action == "Clear") { ClearAll(); } } public String getBanner() { try { return banner.getRandomBanner(); } catch (Exception e) { return ("Error Retrieving Banner");} } public void updateCurrentBanner() { String servicebanner = getBanner(); currentbanner.setText(servicebanner); bannerlist.add(servicebanner); } public void inputNewBanner(String data) { currentbanner.setText(data); bannerlist.add(data); } public void ClearAll() { bannerlist.removeAll(); currentbanner.setText(""); } } Now, let's review the highlights of this applet class. The first point is the lack of a package. This particular class isn't going to be reused, so the goal is just to keep the code simple. The applet will be stored next to the calling Web page.
There isn't much to comment on within the code. The applet has several methods to modify the applet display. One method to consider is ClearAll, which clears the applet. Another method is inputNewBanner, which accepts a String to create a new banner to display within the applet. These methods were created to show that it's possible to invoke applet methods from the HTML page. The other method of interest is getBanner. This method will be used to call the Web service and return a new banner from the server. The example will show how to access this method from the HTML page and transfer the results to the HTML page.
In looking at the applet, we see that all the interesting Web service functionality has been encapsulated within the BannerService object. The point is to break the logic into reusable objects. Just as it's a bad design to call a service directly from a JSP, the same is true for an applet class.
Now, it's time to place BannerApplet within a page. This page, shown in Listing 9.2, should be saved as webapps/xmlbook/chapter9/AppletTestBench.jsp.
Listing 9.2 AppletTestBench.jsp Test Page Calling a Web Service
<%@page contentType="text/html"%> <html> <head><title>Applet Test Bench Page</title></head> <body> <strong>The Applet Which Accesses the Web Service</strong><br/><br/> <applet code="BannerApplet.class" id ="BannerApplet" codebase = "." archive="jaxp.jar,crimson.jar,soap.jar,mail.jar, activation.jar,xmlbook.jar" width =500 height =120> </applet> <br/><br/><strong>Html Form to Call The Applet</strong><br/><br/> <form name="applet_test" id="applet_test"> <input name="data" id="data" type="text" maxlenth="20" value="Data to send to applet" /> <input name="update" id="update" type="button" onclick="f_tweakapplet(data.value);" value="Update Applet"/> <input name="clear" id="clear" type="button" onclick="f_clearapplet();" value="Clear Applet"/> <input name="getdata" id="getdata" type="button" onclick="f_getdata();" value="Get Applet Data"/> </form> <br/><p><strong> Result Area to Show What Happens </strong></p><br/> <div id="banner">Original Text. This will be where we display a Banner.</div> <script language=Javascript> function f_tweakapplet(data) { document.applets[0].inputNewBanner(data); } function f_clearapplet() { /* For this method to work the id attribute of the applet element must be declared! */ var applet = document.getElementById("BannerApplet"); applet.ClearAll(); // Note you can also use dot notation as follows // document.BannerApplet.ClearAll(); } function f_getdata() { /* For this method to work the id attribute of the applet element must be declared! */ var applet = document.getElementById("BannerApplet"); var banner = applet.getBanner(); var display = document.getElementById("banner"); display.innerHTML = "<p> Web Service Banner:</p> " + banner; } </script> </body> </html> Although the page created is a JSP, it could be any HTML page. This particular page doesn't perform any server-side actions.
The most important point to notice is that the BannerApplet class reuses the BannerService object created back in Chapter 8. Accessing a Web service from an applet isn't different from the Chapter 8 examples. However, the location of the code is quite different. The examples from Chapter 8 all run from within the Tomcat container, whereas this applet will run from the browser. This means that the JVM browser needs access to all required classes to make the applet work as a SOAP client. The JVM browser won't have the Apache SOAP class files. The applet tag needs to tell the JVM where to find every required class file, which is achieved with the archive attribute:
archive="jaxp.jar,crimson.jar,soap.jar,mail.jar, activation.jar,xmlbook.jar"
This attribute tells the applet tag where to download the jar files listed. Although it's possible to use the codebase attribute to change the download location of the applet and jar files, this example uses a codebase attribute of .. This means that the jar files and applet classes are to be found in the same directory as the Web page itself.
So, to make this example work, place the following files within the webapps/xmlbook/chapter9/ directory: jaxp.jar, crimson.jar, soap.jar, mail.jar, activation.jar, and xmlbook.jar. The xmlbook.jar is a new jar file, which you need to create now. Because this example uses BannerService, the new jar file is needed to hold the contents of the xmlbook.chapter8 package created in Chapter 8. Within the xmlbook.jar file, also place the BannerApplet.class file created in Listing 9.1.
The other applet tag attribute of interest is the id attribute. Because we will need to access the applet through JavaScript, it's required to assign a unique id to the applet to make access simpler:
id ="BannerApplet"
For this example, the JavaScript will be able to access the applet using the BannerApplet id value:
function f_clearapplet() { /* For this method to work the id attribute of the applet element must be declared! */ var applet = document.getElementById("BannerApplet"); applet.ClearAll(); // Note you can also use dot notation as follows // document.BannerApplet.ClearAll(); } Looking at the JavaScript f_clearapplet function, you can see that the id applet is being accessed by the code. Because the browser is using a DOM Document to represent the HTML page, notice that it's possible to use the familiar DOM methods to work with the page. In this case, we can make the call document.getElementById to get the applet object. When we have the handle to the applet object, it's possible to invoke any public method. In this JavaScript function, the code invokes the ClearAll method.
Of more interest is the actual invoking of a Web service call and then gathering the results. The code is similar to the previous JavaScript function:
function f_getdata() { /* For this method to work the id attribute of the applet element must be declared! */ var applet = document.getElementById("BannerApplet"); var banner = applet.getBanner(); var display = document.getElementById("banner"); display.innerHTML = "<p> Web Service Banner:</p> " + banner; } The only difference is to create a JavaScript variable to store the result of the Web service call. This is very simple. After we have the data, it's only a matter of using standard JavaScript techniques to modify the HTML page. In this example, the code gets a handle of the banner div element. When this element is retrieved, the JavaScript uses the innerHTML method to replace the current contents of the banner div element with the newly retrieved banner link from the Web service call. When the innerHTML method is executed, the browser automatically repaints the HTML screen to reflect the new value. This method of applet and innerHTML modification opens up the possibility of dynamic client-side HTML pages.
Calling Listing 9.2 produces the results shown in Figure 9.1.
Figure 9.1. Viewing the Applet Test Bench Page.
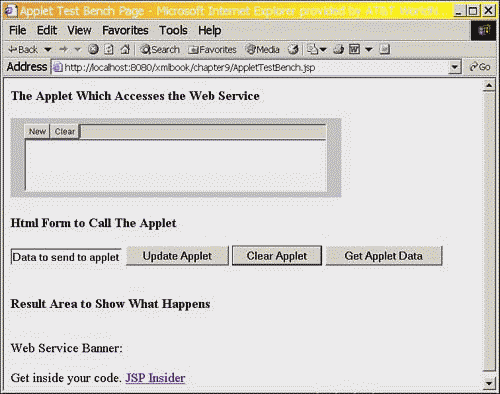
On the page shown in Figure 9.1, I took the liberty of clicking the Get Applet Data button. To get a true appreciation of the page, you should play around with it and closely examine the code.
The basic techniques shown here will go quite a long way to opening up Web applications to new capabilities. However, if additional resources are required, investigate the LiveConnect JavaScript packages. The URL to reference is http://developer.netscape.com/docs/manuals/js/client/jsguide/lc.htm. This is the best place to start. Note that the use of LiveConnect started with Netscape. Internet Explorer also has some support for these packages.
Handling Large XML Documents
There isn't a single technique for handling large XML files. Rather, dealing with large XML files is as much a discipline of planning, as it's a collection of programming techniques. The other aspect to consider is that large is a relative term. A large XML file for one project might be considered small for another project. The term large, therefore, should usually be thought of in terms of acceptable processing time rather than file size. This means that a large file is any XML file that causes delays to your process because of its size in processing.
The other way to think about what constitutes large for an XML file is to consider the size of the final internal representation used to manipulate the XML data for DOM. This size can be quite different from the original document. The size of the actual representation will be proportional to the size and complexity of the original document. For example, a rule of thumb for DOM is that the DOM representation of an XML document will be roughly three times larger than the original file. For planning purposes, I conservatively use a 5 to 1 ratio to ensure that there is enough RAM to deal with XML files.
To summarize, a large XML file is one that has a negative impact on either performance or memory use within your application. Having defined large, the question now becomes how do we deal with XML datasets that impact our site because of data overload?
The trick is one of perception. A large XML file is fine as is; we just need to look at it differently. To this end, it means approaching large files as a collection of data instead of as a single piece of data. We need to be choosy and carefully select the data we need to use.
Now we have two options. The first option is not to generate the large file in the first place. When we are fortunate enough to control the file generation process, it's often best to limit the size of the file to be reasonable for our process. However, we won't examine this option. Oftentimes we don't control the final file size. In addition, that isn't an XML discussion but rather a file generation issue.
What is the best way to handle monster XML files when we have no choice in the matter? The first option to consider is the venerable SAX parser. To this end, SAX is the dominant way to process a large file. In this, a file can be handled sequentially. It's also possible to use SAX to run through a file and build a smaller document. After an XML document is parsed using SAX, our internal data representation would only contain the bare minimum required to use the dataset. It's also possible to use SAX to only partially read a file and exit when the process has enough data yet another way to save time when every second counts. Chapter 10, "Using XSL/JSP in Web Site Design," is built around a SAX example, which illustrates both of these techniques.
This is fine for SAX, but how do we handle large XML files in the other parsers? After we break away from SAX, dealing with larger XML files gets more difficult.
JDOM
At the time of writing, JDOM doesn't have any special large file handling capacities. This means that the best way to handle a large file is to build a customized SAX handler to import only the data needed within your JDOM representation. However, the JDOM authors have been busy at work incorporating features for handling large XML files. This means that you should inspect the JDOM documentation for the latest methods to handle large XML files. Knowing the crew at JDOM, I have the greatest confidence they will implement some great solutions.
dom4j
Similar to JDOM, one solution to handling large files is to build our own customized SAX handler to import only the data needed within the JDOM representation. However, dom4j also supports creating an inline handler to perform this task.
The one advantage of using the inline handler is the ability to use path statements to indicate which elements should be processed by the handler.
Let's build an example. This example will use the JSPBuzz XML file from Listing 7.11, located in webapps/xmlbook/chapter7/buzz_10_09_2001.xml.
Although this example uses a smaller XML file, the principles would be the same if a larger XML file were to be accessed by the code.
The example itself will be a simple search engine to display only JSPBuzz links a user requests to see. This example will show how to construct a dom4j representation that is smaller than the original XML file. Of course, the dom4j representation will be smaller because it won't have all the data. However, we will have the data required to get the job done.
The first piece is a helper class to search through elements within the document. The file, shown in Listing 9.3, should be saved as webapps/xmlbook/WEB-INF/classes/xmlbook/chapter9/QueryElement.java.
Listing 9.3 A Recursive Method to Search Through Elements
package xmlbook.chapter9; import java.util.Iterator; import org.dom4j.Element; public class QueryElement { public QueryElement() {} public boolean findString(String as_search, Element element) { as_search = as_search.toLowerCase(); if (element.getText().toLowerCase().indexOf(as_search)> -1) return true; Iterator elementlist = element.elementIterator(); while (elementlist.hasNext() ) { Element child = (Element) elementlist.next(); boolean lb_test = findString( as_search, child); if (lb_test) return lb_test; } return false; } } The actual code just recursively loops through an Element object and any sub-elements to search for a string. The findString method returns true if the search string was found; otherwise, it returns false.
The next piece required is the handler defining which document elements to keep within the Document representation. The file, shown in Listing 9.4, should be saved as webapps/xmlbook/WEB-INF/classes/xmlbook/chapter9/SearchHandler.java.
Listing 9.4 A Handler to Sort Out and Keep Only Desired Elements
package xmlbook.chapter9; import java.util.Iterator; import org.dom4j.Element; import org.dom4j.ElementHandler; import org.dom4j.ElementPath; public class SearchHandler implements ElementHandler { private String search = ""; public void setSearch(String as_data){ search = as_data; } private QueryElement testelement = new QueryElement(); public SearchHandler() {} public SearchHandler(String as_search) {setSearch(as_search);} public void onStart(ElementPath path) {} public void onEnd(ElementPath path) { Element row = path.getCurrent(); /* Remove BuzzStories that don't match the search */ if (testelement.findString(search,row) == false) row.detach(); } } Listing 9.4 shows the customized ElementHandler, which is used to filter out unneeded elements. The search string is passed in to the handler upon creation. Two events exist. The first is onStart, which dom4j calls at the start of the processing of an Element. The second event, onEnd, is called after dom4j has finished processing the Element. The code will be in onEnd because this way we have all the data stored in dom4j objects. This means that it's slightly easier to perform our logic, such as using the findString method constructed in the Listing 9.3 QueryElement class. When an Element is determined not to be needed, the detach method is used to remove it from the Document object. In this manner, we can control the size of the final document and yet be able to process through an extremely large XML file.
The next step is the actual reading in of the XML file. The class to do this is shown in Listing 9.5 and should be saved as webapps/xmlbook/WEB-INF/classes/xmlbook/chapter9/SearchBuzz.java.
Listing 9.5 The SearchBuzz.java Class Used to Read in an XML File
package xmlbook.chapter9; import java.io.File; import java.io.IOException; import javax.servlet.jsp.JspWriter; import org.dom4j.Document; import org.dom4j.io.SAXReader; import xmlbook.chapter7.*; public class SearchBuzz { public SearchBuzz() {} public void findEntries( String as_search, String as_xml, String as_xsl, JspWriter out) throws IOException { try { SAXReader reader = new SAXReader(); SearchHandler filter = new SearchHandler(as_search); reader.addHandler("/jspbuzz/buzzlink",filter); Document document = reader.read(new File(as_xml)); ProcessDom4J transform = new ProcessDom4J(); transform.applyXSL (out, document, as_xsl); } catch(Exception e) { out.print(e.toString()); } } } Not very much is new in SearchBuzz.java; in fact, we reuse code from Chapter 7, "Successfully Using JSP and XML in an Application," in the form of the ProcessDom4J class to help speed up the coding. The only new line of code is the call to the addHandler method:
SearchHandler filter = new SearchHandler(as_search); reader.addHandler("/jspbuzz/buzzlink",filter); The addHandler method is how the code attaches the SearchHandler class from Listing 9.4 to work with the SAX reader.
To aid in the display of the data, the example creates a simple XSL file to create a simple presentation of the final XML file. The XSL page, shown in Listing 9.6, should be saved as webapps/xmlbook/chapter9/BuzzLink.xsl.
Listing 9.6 The BuzzLink.xsl Stylesheet to Format the XML Document
<?xml version="1.0" encoding="UTF-8"?> <!DOCTYPE xsl:stylesheet [<!ENTITY nbsp " ">]> <xsl:stylesheet version="1.0" xmlns:xsl="http://www.w3.org/1999/XSL/Transform" xmlns:fo="http://www.w3.org/1999/XSL/Format"> <xsl:output method="html"/> <xsl:template match="/"> <table border="0" width="90%"> <xsl:apply-templates select="jspbuzz/buzzlink"> <xsl:sort data-type="number" select="@type"/> </xsl:apply-templates> </table> </xsl:template> <xsl:template match="jspbuzz/buzzlink"> <tr><td width="100%"> <a href="{link} " name="{@type} {@position} " target="_window" style="font-weight:bold;"> <xsl:value-of select="title"/> </a> </td></tr> <xsl:if test="string-length(author)>0 or string-length(date)>0"> <tr><td > <table><tr> <td nowrap="nowrap" width="400px"> <xsl:value-of select="author"/> </td> <td> <xsl:value-of select="date"/>  </td> </tr></table> </td></tr> </xsl:if> <xsl:apply-templates select="body" /> </xsl:template> <xsl:template match="body" > <tr><td valign="top" ><xsl:value-of select="."/></td></tr> </xsl:template> </xsl:stylesheet> The actual stylesheet is unremarkable. It's a vastly simplified version of the original stylesheet used to generate the production version of the JSPBuzz newsletter. The only interesting note is the ease of building this stylesheet. The stylesheet was coded in just a few moments because I worked from a master template. A nice feature of stylesheets is the ability to reuse and modify an existing stylesheet for different uses. It's always a good idea to keep an original master template stylesheet to work from to help create new stylesheets. This is especially true when you're expecting many variations of presentation output for an XML document.
The final piece of the example is the JSP to display the selected JSPBuzz links. The JSP, shown in Listing 9.7, should be saved as webapps/xmlbook/chapter9/SearchResults.jsp.
Listing 9.7 The SearchResults.jsp Class Used to Read in an XML File
<%@page contentType="text/html" import="xmlbook.chapter9.SearchBuzz"%> <html> <head><title>Parsing Large XML files</title></head> <body> <% String ls_search = (String)request.getParameter("find"); %> <form action="SearchResults.jsp" method="post" name="frm_search"> <table> <tr><td>Enter the exact search phrase:</td> <td><input type="text" name="find" value="<%=ls_search%>" size="15"/></td> <td><input type="submit" name="submit" id="submit" /></td> </tr> </table> </form> <div> <% if (ls_search != null && ls_search.trim().length() > 0) { String xmlpath = application.getRealPath("chapter7/buzz_10_09_2001.xml"); String xslpath = application.getRealPath("chapter9/BuzzLink.xsl"); SearchBuzz sb = new SearchBuzz(); sb.findEntries(ls_search,xmlpath,xslpath,out); } else {out.print("Type in a search phrase to list buzz links of interest.");} %> </div> </body> </html> When Listing 9.7 is executed and a search on Jakarta is performed, we should see the results shown in Figure 9.2.
Figure 9.2. Viewing SearchResults.
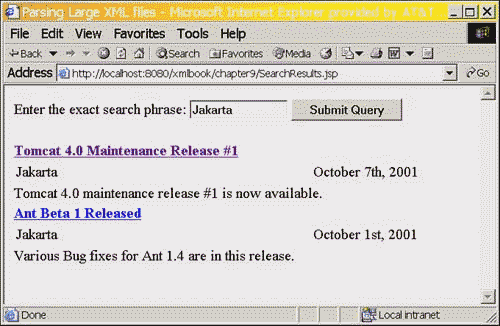
Keep in mind that this example shows how to work with and create a Document to represent only the data we need. The example could be modified to also use the data not included in the final representation to modify the final Document object during the creation process.
Handling Special Characters and Encoding
A simple topic, but one that causes problems to many new programmers, is character encoding and parsing. The basic problem is embedded characters into the XML file not supported by the specified encoding standard. This situation will cause XML parsers to fail. This happens more than it should because programmers will default to using the UTF-8 character encoding scheme. Although using UTF-8 is a good choice, it won't always be the correct default encoding for an XML document.
One problem with UTF-8 is Latin1 incompatibility. What this means in practice is that ASCII symbols in the range 160-255 can cause problems. Let's create an example. The file, shown in Listing 9.8, should be saved as webapps/xmlbook/chapter9/SpecialChars.xml.
Listing 9.8 Using the Wrong Encoding for and
<?xml version="1.0" encoding="UTF-8"?> <jspbuzz volumn="example" issue="100"> <buzzlink type="link" numericdate="20010925" position="1"> <reference>Special Characters</reference> <title>Playing With Special Characters</title> <body>A discussion on copyright and Trademark </body> </buzzlink> </jspbuzz The trademark symbol's value is 153 and won't be a problem. However, the copyright symbol's value is 169, and it will cause some problems. Running this XML file through a SAX parser will give us an error. The exact error would depend on the SAX implementation used in the code. In dom4j the following error results:
org.dom4j.DocumentException: Error on line 6 of document file:/C:/java/tomcat4/webapps/xmlbook/chapter9/SpecialChars2.xml An invalid XML character (Unicode: 0xa9) was found in the element content of the document.
To add to the confusion factor, not every parser will explode. For example, the preceding XML file will work fine when an XSL stylesheet is applied against it in Internet Explorer. Why? A different parser is at work. SAX parsers tend to be the most strict and unforgiving in this department.
Now, the best way to handle this error is to fix the encoding at the top of the file. In this example, everything will work fine if the following change is made:
<?xml version="1.0" encoding="ISO-8859-1"?> ISO-8859-1 works for this example because it is built specifically for the Latin1 characters. Technically, we should use UTF-16 as the character encoding because it's the more complete encoding. However, UTF-16 isn't always accepted. For example, using the following XML header
<?xml version="1.0" encoding="UTF-16"?> within dom4j will result in this error:
org.dom4j.DocumentException: Error on line 0 of document : The encoding "UTF-16" is not supported. Nested exception: The encoding "UTF-16" is not supported.
The other way to fix this problem is not to embed the character, but to represent the character with its raw decimal value. So if we were to revise the last example to read
<body>A discussion on copyright © and
that would fix the problem and SAX would handle the translation correctly. That's a pain, but one we have to deal with in character encoding. Sadly, this can introduce another problem. Some tools have problems displaying these UTF-8 characters, and the result might look like . Most newer browsers will correctly display the data.
Another fun fact is that changing the encoding from UTF-8 introduces new problems to our programming because many methods will use UTF-8 by default. For example, in the JAXB API, using the following method to write out XML could cause problems:
XMLWriter(java.io.OutputStream out)
By default, it will write out using the UTF-8 encoding. This means that if the actual output needed is UTF-16, it could cause problems in a manner that might not be caught for a while. (As an example, a test file was compatible with UTF-8, but the production version has the special characters specified in UTF-16.) To get around this problem, specify the output encoding in the following manner:
XMLWriter(java.io.OutputStream out, String encoding)
This means that, when creating new documents, you should programmatically check your settings to make sure that the encoding property is set correctly rather than have the code default to one for your document.
NOTE
To make matters more confusing, the default encoding might depend on the platform on which the code is being executed. Typically, this is UTF-8, but it is set by the JVM and can vary from platform to platform.
The problems with encoding come from the basic fact that 95% of the files being written are encoded using UTF-8. The reality is we need to be careful to use the actual encoding that is required in our XML files.
Why is it best to fix this manually rather than make the change programmatically? It depends on the API being used. The basic problem is that changing the encoding isn't always possible. For example, in DOM specification 1 or 2, it's impossible to change the XML declaration line. This was done because the XML declaration was thought to be an inherent property that should not be modified. The DOM level 3 specification will fix this. But, until DOM level 3 is more widely accepted, the initial encoding stated is the encoding that the file will use. In SAX, you can't modify the encoding because SAX is read-only. SAX relies on the encoding to be specified correctly within the XML file. It's very important to use the correct encoding in your XML files. Over time, expect to encounter many wrongly encoded XML files around the Internet. Don't get trapped by using the wrong encoding.
Using XML Tag Libraries
At the time of writing, the early-access release of the Java Standard Tag Library (JSTL) has just become available. This set of tag libraries for working with JSP encapsulates much of the functionality that is common to JSP Web applications. While this Standard release has not been finalized yet, I expect the API of the two tag libraries demonstrated here to remain constant. As such, it's possible that these examples won't function correctly. If that occurs, use the documentation link found later to access current examples of the usage of these tag libraries.
The two tag libraries that are of specific use are the XSL and XTags libraries. Through the use of the XSL library, an XML document can be processed with an XSL stylesheet, and the results can be inserted in place. The XTags library is useful for working with XSLT and XPath. XTags allows you to navigate, process, and style XML documents directly in JSP.
XSL Tag Library
The XSL tag library consists of the following three custom tags:
-
apply Transforms the specified XML data source with the specified XSL stylesheet and outputs the results.
-
import Imports the contents of the specified page and assigns it as a String to the specified scripting variable.
-
include Captures the contents of the specified page as body content of the surrounding tag. This is similar to <jsp:include> except that it doesn't cause the resource to be output directly.
The following example demonstrates one use of the XSL tag library. This example will take the XML file BannerAds.xml from Listing 4.1 and apply the stylesheet of the same name from Listing 4.2.
To download and install the JSTL, go to http://jakarta.apache.org/taglibs/doc/standard-doc/intro.html. This page will also provide links to documentation and example pages. Note that this tag library requires the Xerces XML parser and the Xalan XSL parser. Installation instructions for those can be found in Chapter 4, "A Quick Start to JSP and XML Together."
The example JSP page, shown in Listing 9.9, should be saved as /webapps/xmlbook/chapter9/XSLTagExample.jsp.
Listing 9.9 XSLTagExample.jsp
<%@taglib uri="http://jakarta.apache.org/taglibs/xsl-1.0" prefix="xsltag" %> <html> <head> <title>XSL Tag Library Example</title> </head> <body bgColor="lightblue" > <table border="1" bgColor="white"> <tr><td>This output was created reading both an external stylesheet and an external XML document using the 'xsl' and 'xml' attributes. </td></tr> <tr><td> <xsltag:apply xml="/chapter4/BannerAds.xml" xsl="/chapter4/BannerAds.xsl"/> </td></tr> </table><br /> <table border="1" bgColor="white"> <tr><td>This output was created by loading nested content with the <xsltag:include> action, and using an external stylesheet like above. This technique could be used to acquire XML data resulting from another JSP. </td></tr> <tr><td> <xsltag:apply xsl="/chapter4/BannerAds.xsl"> <xsltag:include page="/chapter4/BannerAds.xml"/> </xsltag:apply> </td></tr> </table><br /> <table border="1" bgColor="white"> <tr><td>This output was created by importing data into a page-scope attribute and then applying an external stylesheet to it. </td></tr> <tr><td> <xsltag:import id="data" page="/chapter4/BannerAds.xml"/> <xsltag:apply nameXml="data" xsl="/chapter4/BannerAds.xsl"/> </td></tr> </table> </body>
The majority of this file is HTML markup and text that, when output, will explain each usage of the apply custom tag. The first part of the example is transformation with the following line of code:
<xsltag:apply xml="/chapter4/BannerAds.xml" xsl="/chapter4/BannerAds.xsl"/>
The xsl and xml attributes of the apply tag specify the source documents of the XML document and the stylesheets. The results of the transformation are then output.
The next part of the example uses the apply tag in a similar way. The difference is that this time the body of the tag contains the XML document to transform. That document is obtained through the include tag as shown here:
<xsltag:apply xsl="/chapter4/BannerAds.xsl"> <xsltag:include page="/chapter4/BannerAds.xml"/> </xsltag:apply>
The last part of the example imports the XML document through the following import tag. As a String, the XML document is then assigned to the scripting variable data.
<xsltag:import id="data" page="/chapter4/BannerAds.xml"/> <xsltag:apply nameXml="data" xsl="/chapter4/BannerAds.xsl"/>
Finally when the page is loaded in our browser, the output is as shown in Figure 9.3. (If you get an error, make sure that you have installed the tag library properly.)
Figure 9.3. Results of XSLTagExample.jsp.
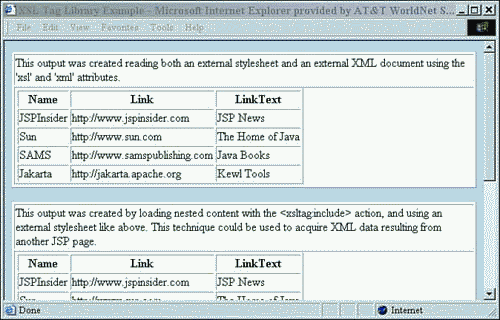
The XSL Standard tag library provides a simple way to perform XML transformations. The XML data source can be the result of another JSP, it can be an external file, or it can be found in the body of this library's apply tag. This tool can be a timesaver in those Web applications that don't require a specific parser.
XTags Library for XML
The XTags library consists of some custom tags that behave similarly to those found in the XSL stylesheet language. In addition to those, there are others that add new functionality to XML transformations. As a result, these custom tags can be used inline in JSPs to output transformed XML. This makes it possible to style XML without the need for an external stylesheet.
The XTags library uses dom4j. As a result, if this .jar file has not been added to Tomcat yet, it is time to do so. Download dom4j from http://www.dom4j.org/. Place the dom4j.jar file in the lib directory found under the Tomcat installation. Stop and restart the server so that Tomcat registers the new classes.
The first example will begin by parsing an external XML source, namely the BannerAds.xml file from Listing 4.1. When this file has been parsed, inline custom tags will be used to output the transformed XML. Save the example shown in Listing 9.10 as /webapps/xmlbook/chapter9/XTagsJSPStyle.jsp.
Listing 9.10 XTagsJSPStyle.jsp
<html> <%@ taglib uri="http://jakarta.apache.org/taglibs/xtags-1.0" prefix="xtags" %> <head> <title>XTags Standard Library Example</title> </head> <body> <xtags:parse uri="/chapter4/BannerAds.xml" /> <table border="1"> <xtags:forEach select="//BANNERAD"> <tr> <td><b><xtags:valueOf select="NAME"/></b></td> <td><a href=" <xtags:valueOf select="LINK" /> " /> <xtags:valueOf select="LINKTEXT"/> </td> </tr> </xtags:forEach> </table> </body> </html>
This example should look very similar to the stylesheet from Listing 4.2. The JSP begins by parsing an XML document through the use of the following parse custom tag:
<xtags:parse uri="/chapter4/BannerAds.xml" />
Once parsed, this XML document is processed through the use of other XTag custom tags. The result is as shown in Figure 9.4.
Figure 9.4. Results of XTagsJSPStyle.jsp.
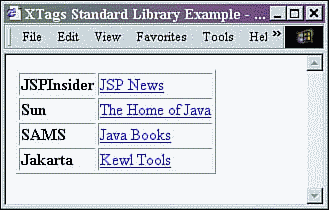
This tag library is not limited to the transformation and output of XML. It also includes several custom tags for the manipulation of the parsed XML document.
In Listing 9.11, we will add an Element to our parsed XML document through a custom action named add. This new element will be added to the current node, and that node must be an Element. Once completed, the resulting XML document will be transformed using other XTags.
After outputting some HTML and parsing the XML document, we find the following tag. This context tag selects the currently selected node. In this case, we are selecting the root element BANNERS.
<xtags:context select="/BANNERS" >
Within the body of the preceding context custom tag, we find the add tag. This results in the addition of the XML fragment found in its body to the current node previously selected.
<xtags:add>
The example shown in Listing 9.11 should be saved as /webapps/xmlbook/chapter9/XTagsAdd.jsp.
Listing 9.11 XTagsAdd.jsp
<html> <%@ taglib uri="http://jakarta.apache.org/taglibs/xtags-1.0" prefix="xtags" %> <head> <title>XTags Standard Library Example</title> </head> <body> <xtags:parse uri="/chapter4/BannerAds.xml" /> <xtags:context select="/BANNERS" > <xtags:add> <BANNERAD> <NAME>XML Spec</NAME> <LINK>http://www.w3.org</LINK> <LINKTEXT>W3C</LINKTEXT> </BANNERAD> </xtags:add> </xtags:context> <table border="1"> <xtags:forEach select="//BANNERAD"> <tr> <td><b><xtags:valueOf select="NAME"/></b></td> <td><a href=" <xtags:valueOf select="LINK" /> " /> <xtags:valueOf select="LINKTEXT"/> </td> </tr> </xtags:forEach> </table> </body> </html>
The output is as shown in Figure 9.5. Notice that there is a new table row displaying the text data added through the body of the add custom tag.
Figure 9.5. Results of XTagsAdd.jsp.
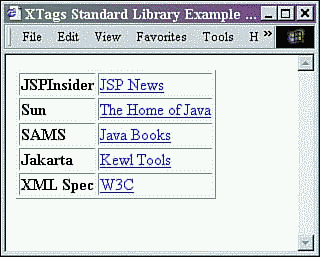
In the same way that an element was added with the use of the add custom tag, elements can be removed or replaced using the remove and replace custom tags. The remove tag will delete all nodes that are matched through the XPath statement found in this tag's select attribute, whereas the replace tag will replace the current node, which must be an Element, with the XML fragment contents of its body.
Similar to the XSL tags of the previous section, the XTags library also provides a method for transforming an XML document with an external stylesheet. This can be useful when the page contents are made up of multiple XML documents, each of which must be transformed.
In Listing 9.12, we will transform an external XML document with an external stylesheet in only one line of code. Save the code in Listing 9.12 as webapps/xmlbook/chapter9/XTagsStyle.jsp.
Listing 9.12 XTagsStyle.jsp
<html> <%@ taglib uri="http://jakarta.apache.org/taglibs/xtags-1.0" prefix="xtags" %> <head> <title>XTags Standard Library Example</title> </head> <body> <xtags:style xml="/chapter4/BannerAds.xml" xsl="/chapter4/BannerAds.xsl"/> </body> </html>
The output can be seen in Figure 9.6.
Figure 9.6. Results of XTagsStyle.jsp.
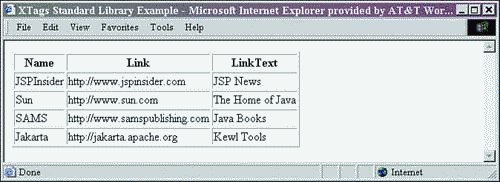
Besides the custom tags that replicate the functionality of XSL tags, there are also tags that perform new operations. One such custom tag is break. This tag allows a forEach custom tag, similar to the for-each of XSLT, to be exited before all nodes selected are processed. (This lack of a simple looping break mechanism has been one minor limiting factor of the XSL language. )
Similar to the previous examples, the BANNERAD elements will be selected and processed one by one. The difference this time is that when the NAME element whose value is equal to Sun is encountered, the forEach loop is exited. The break tag placed within the if tag enables this. Save the code in Listing 9.13 as webapps/xmlbook/chapter9/XTagsBreak.jsp.
Listing 9.13 XTagsBreak.jsp
<html> <%@ taglib uri="http://jakarta.apache.org/taglibs/xtags-1.0" prefix="xtags" %> <head> <title>XTags Standard Library Example</title> </head> <body> <xtags:parse uri="/chapter4/BannerAds.xml" /> <table border="1"> <xtags:forEach select="//BANNERAD"> <tr> <td><b><xtags:valueOf select="NAME"/></b></td> <td><a href=" <xtags:valueOf select="LINK" /> " /> <xtags:valueOf select="LINKTEXT"/> </td> </tr> <xtags:if test="NAME = 'Sun'"> <xtags:break/> </xtags:if> </xtags:forEach> </table> </body> </html>
The results of XTagsBreak.jsp are shown in Figure 9.7. Notice that the first two BANNERAD elements were processed within the forEach tag, and then the processing ended when the test condition was met.
Figure 9.7. Results of XTagsBreak.jsp.
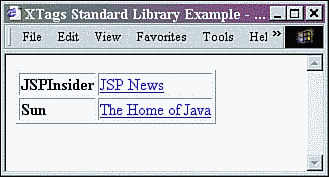
Another custom tag that performs new transformation functionality is the context tag. This tag is similar to the forEach custom tag in how it iterates over the list of nodes selected by the XPath statement found in the select attribute. However, unlike the forEach custom tag, the body of the context tag will always be processed at least once.
In Listing 9.14, we will add a context tag that selects a non-existing element. The output will demonstrate that the body of this loop was indeed processed. Save this file as webapps/xmlbook/chapter9/XTagsContext.jsp.
Listing 9.14 XTagsContext.jsp
<html> <%@ taglib uri="http://jakarta.apache.org/taglibs/xtags-1.0" prefix="xtags" %> <head> <title>XTags Standard Library Example</title> </head> <body> <xtags:parse uri="/chapter4/BannerAds.xml" /> <table border="1"> <xtags:forEach select="//BANNERAD"> <tr> <td><b><xtags:valueOf select="NAME"/></b></td> <td><a href=" <xtags:valueOf select="LINK" /> " /> <xtags:valueOf select="LINKTEXT"/> </td></tr> </xtags:forEach> </table> <br /> <xtags:context select="//TEST"> Context body executes without any selected elements </xtags:context> </body> </html>
The results of the JSP are shown in Figure 9.8. Note that even though no TEST elements are in the XML document, the body of the context custom tag executed once. There will be a time in the creation of stylesheets that this functionality will be very useful.
Figure 9.8. Results of XTagsContext.jsp.
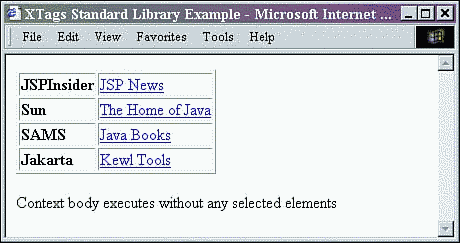
Summary
This chapter introduced a few topics and tools that the advanced XML developer needs to be familiar with. Besides these topics, many more advanced topics are covered in Part III, "Building JSP Sites to Use XML." Chapter 10 introduces the concept of servlet mapping in order to automatically handle requests for XML resources. In Chapters 11, "Using XML in Reporting Systems," and 12, "Advanced XML in Reporting Systems," stylesheet and JSP techniques for the creation of useful reporting systems are demonstrated. Techniques for client-side processing and sorting of a few of those same reports are explained in Chapter 13, "Browser Considerations with XML." Chapter 14, "Building a Web Service," demonstrates how to set up a Web service server to provide data to others, and Chapter 15, "Advanced Application Design," discusses the ins and outs of the JSP 1.2 XML syntax, which will enable the self-modification of code.
| CONTENTS |
EAN: N/A
Pages: 26
- An Emerging Strategy for E-Business IT Governance
- Assessing Business-IT Alignment Maturity
- Measuring and Managing E-Business Initiatives Through the Balanced Scorecard
- A View on Knowledge Management: Utilizing a Balanced Scorecard Methodology for Analyzing Knowledge Metrics
- Measuring ROI in E-Commerce Applications: Analysis to Action