Chapter 16: Creating the Recruitment System Application
|
In Chapter 15, "Project Case Study—Creating the Recruitment System Application," you learned about the high-level design of the Recruitment System application. The high-level design specifies the type of application that needs to be created, such as a Windows or Web application, along with the database design. The high-level design also includes the various user interfaces required for the application.
This chapter looks at the development phase of the Recruitment System application. First you'll learn how to design Web pages for the application. Some of the pages will be static, which means that their components will not change. These pages can be designed using authoring tools like Dreamweaver MX. Some pages will be dynamic, which means that their content is generated based on some logic or conditions. Dynamic pages are created using CFML and HTML tags. In addition to designing Web pages for the application, you'll also write code to implement the application's functions.
Designing Web Pages for the Recruitment System Application
As discussed in Chapter 15, the high-level design for the Recruitment System application involves designing six Web pages. Before you start designing these Web pages, it's important that you have a proper directory structure in place for structured application development. As a first step, create a directory named ProjectThree. You'll store all the Web pages and code files in this directory. To design static components, such as controls on Web pages, you'll use Dreamweaver MX. For more details on designing Web pages with Dreamweaver MX, refer to Appendix D, "Using Dreamweaver MX."
Designing the Login Page
Using Dreamweaver, create a basic HTML page and save it as Login.cfm in the ProjectThree directory. This page contains a combination of HTML and CFML tags and a client variable. Client variables are used to store values that can be used across multiple Web pages. HTML tags provide the basic structure of the Login page.
Modify the HTML code of the page to set the title as "Recruitment System Application." Set the background color of the page by using the bgcolor property of the <BODY> tag. To align the controls (which you'll create next) in the center of the page, use a DIV tag and set the align property to "center".
| Note | In HTML, the <FORM> tag is used to create a form. ColdFusion provides the <CFFORM> tag, which is more powerful than the <FORM> tag. When you use the <CFFORM> tag, <CFINPUT> and <CFSFLECT> tags can be used for creating Text Field, Checkbox, and List controls. These tags have attributes like REQUIRED and VALIDATE, which are very useful for validating form entries before processing the forms. For more details on inserting and using these tags in Dreamweaver MX, refer to Appendix D. |
Next, create various controls on the Login page, as shown in Figure 16.1. This page will prompt users for their user ID and password. Clicking the Login button will activate the login validation script, and users will be navigated to the Main Working Console page after a successful login.

Figure 16.1: The design of the Login page.
The Login page contains the following controls:
-
A Form control to act as the container for the other controls on the page
-
An HTML Table control to hold Text Field controls
-
Two Text Field controls to accept a user ID and a password
-
A Button control to validate the login information provided by a user
The Form control is the main container control on the page. Place the HTML Table control within the Form control. Next, set the properties of the Form control as described in Table 16.1.
| Property | Value |
|---|---|
| (ID) | Login |
| Name | Login |
| Action | processlogin.cfm |
| Method | POST |
Table 16.2 lists the properties assigned to the Text Field controls used on the Login page.
| Control | Property | Value |
|---|---|---|
| Text Field1 | Name | user_id |
| Text Field1 | Size | 20 |
| Text Field1 | Type | Single Line |
| Text Field2 | Name | password |
| Text Field2 | Size | 20 |
| Text Field2 | Type | Single Line |
Table 16.3 lists the properties assigned to the Button control used on the Login page.
| Control | Property | Value |
|---|---|---|
| Button1 | Name | Submit |
| Button1 | Label | Login |
| Button1 | Action | Submit form |
Designing the Main Working Console Page
The Main Working Console page is used to display a list of all applicants. Create a new Web page named MainPage.cfm. Figure 16.2 displays the design of the Main Working Console page.
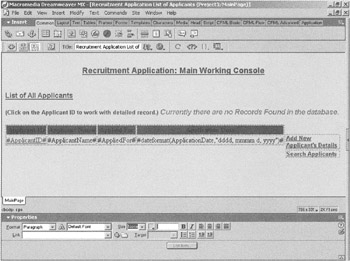
Figure 16.2: The design of the Main Working Console page.
As shown in Figure 16.2, there are two HTML Table controls and two links on this page. Most of the content displayed on this page is generated dynamically. The code for this page is discussed in the "The Workings of the Recruitment System Application" section, later in this chapter.
Designing the Application Details Page
Using Dreamweaver, create a basic HTML page and save it as Applicant-Details.cfm in the ProjectThree directory. As displayed in Figure 16.3, the Application Details page consists of various controls on a form.
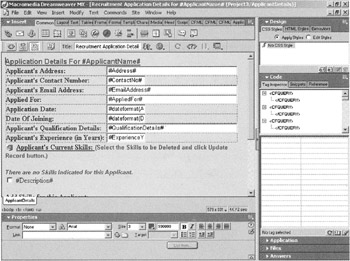
Figure 16.3: The design of the Application Details page.
The Application Details page contains the following controls:
-
An HTML Table control to hold Text Field controls
-
Eight Text Field controls to accept and display applicant details, such as address, telephone number, e-mail address, position applied for, application date, joining date, qualification, and experience
-
A Checkbox control to display an applicant's skills
-
A List control to display standard skills and accept them as applicant's skills to be saved in the back-end database
-
A Button control named Update Record to save the changes made by a user
After creating the controls, you need to set their properties. Table 16.4 describes the properties assigned to the Text Field controls on the page.
| Control | Property | Value |
|---|---|---|
| TextField1 | Type | Text |
| TextField1 | Name | App_Address |
| TextField1 | Size | 50 |
| TextField1 | Value | #Address# |
| TextField1 | MaxLength | 50 |
| TextField1 | Required | Yes |
| TextField1 | Message | "Address Field Cannot be Empty" |
| TextField2 | Type | Text |
| TextField2 | Name | App_ContactNo |
| TextField2 | Size | 15 |
| TextField2 | Value | #ContactNo# |
| TextField2 | MaxLength | 15 |
| TextField2 | Required | Yes |
| TextField2 | Message | "Contact No Field is either Empty or not in correct format(xxx-xxx-xxxx)" |
| TextField2 | Validate | Telephone |
| TextField3 | Type | Text |
| TextField3 | Name | App_EmailAddress |
| TextField3 | Size | 50 |
| TextField3 | Value | #EmailAddress# |
| TextField3 | MaxLength | 100 |
| TextField3 | Required | Yes |
| TextField3 | Message | "Email Field cannot be Empty" |
| TextField4 | Type | Text |
| TextField4 | Name | App_AppliedFor |
| TextField4 | Size | 50 |
| TextField4 | Value | #EmailAddress# |
| TextField4 | MaxLength | 30 |
| TextField4 | Required | Yes |
| TextField4 | Message | "Applied For Field cannot be Empty" |
| TextField5 | Type | Text |
| TextField5 | Name | App_ApplicationDate |
| TextField5 | Size | 15 |
| TextField5 | Value | #dateformat(ApplicationDate,"mm/dd/yyyy")# |
| TextField5 | MaxLength | 10 |
| TextField5 | Required | Yes |
| TextField5 | Message | "Application Date Field is either Empty or not in correct format(mm/dd/yyyy)" |
| TextField5 | Validate | Date |
| TextField6 | Type | Text |
| TextField6 | Name | App_DateOfJoining |
| TextField6 | Size | 15 |
| TextField6 | Value | #dateformat(DateOfJoining,"mm/dd/yyyy")# |
| TextField6 | MaxLength | 10 |
| TextField6 | Required | No |
| TextField6 | Validate | Date |
| TextField7 | Type | Text |
| TextField7 | Name | App_Qual_Details |
| TextField7 | Size | 50 |
| TextField7 | Value | #QualificationDetails# |
| TextField7 | MaxLength | 200 |
| TextField7 | Required | Yes |
| TextField7 | Message | "Qualifications Field cannot be Empty" |
| TextField8 | Type | Text |
| TextField8 | Name | App_ExpYears |
| TextField8 | Size | 15 |
| TextField8 | Value | #ExperienceYears# |
| TextField8 | MaxLength | 2 |
| TextField8 | Required | Yes |
| TextField8 | Message | "Exp. Years Field cannot be Empty" |
The Checkbox control is populated dynamically when the Application Details page is loaded. Skill descriptions for an applicant are displayed, and the skill ID is set as the value of the Checkbox control. At design time, set the properties of the Checkbox control as described in Table 16.5.
| Control | Property | Value |
|---|---|---|
| Checkbox | Type | checkbox |
| Checkbox | Name | CurrentSkills |
| Checkbox | Value | #SkillID# |
The List control is also populated dynamically when the Application Details page is loaded. Skill descriptions from the Skills table are displayed, and the skill ID is set as the value of the List control. When a user selects a skill description from the list, the corresponding skill ID is saved in the back-end database. The List control is created using the <CFSELECT> tag. Refer to Appendix D for more details on how to insert this tag using Dreamweaver MX. At design time, set the properties of the List control as described in Table 16.6.
| Control | Property | Value |
|---|---|---|
| List | Name | App_Skills |
| List | Size | 5 |
| List | Multiple | Yes |
| List | Query | get_skills |
| List | Value | SkillID |
| List | Display | Description |
| List | Required | No |
To save the changes made to the Appplication Details page, use the Button control. Set the properties of the Button control as described in Table 16.7.
| Control | Property | Value |
|---|---|---|
| Button | Type | Submit |
| Button | Name | Submit |
| Button | Value | Update Record |
Designing the Add New Applicant Page
When a user clicks the Add New Applicant Details link on the Main Working Console page, the Add New Applicant page is displayed. Using Dreamweaver, create a basic HTML page and save it as AddNewApplicant.cfm in the Project-Three directory. As shown in Figure 16.4, the Add New Applicant page consists of various controls on a form.
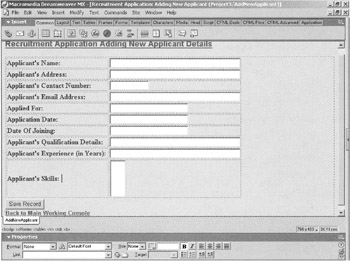
Figure 16.4: The design of the Add New Applicant page.
The Add New Applicant page contains the following controls:
-
An HTML Table control to hold Text Field controls
-
Nine Text Field controls to accept an applicant's details, including name, address, contact number, e-mail address, position applied for, application date, joining date, qualification, and experience
-
A List control to display and accept an applicant's standard skills to be saved in the database
-
A Button control to save a new record
Next, set the properties of the Text Field controls as described in Table 16.8.
| Control | Property | Value |
|---|---|---|
| TextField1 | Type | Text |
| TextField1 | Name | App_Name |
| TextField1 | Size | 50 |
| TextField1 | Value | #Address# |
| TextField1 | MaxLength | 50 |
| TextField1 | Required | Yes |
| TextField1 | Message | "Name Field Cannot be Empty" |
| TextField2 | Type | Text |
| TextField2 | Name | App_Address |
| TextField2 | Size | 50 |
| TextField2 | Value | #Address# |
| TextField2 | MaxLength | 50 |
| TextField2 | Required | Yes |
| TextField2 | Message | "Address Field Cannot be Empty" |
| TextField3 | Type | Text |
| TextField3 | Name | App_ContactNo |
| TextField3 | Size | 15 |
| TextField3 | Value | #ContactNo# |
| TextField3 | MaxLength | 15 |
| TextField3 | Required | Yes |
| TextField3 | Message | "Contact No Field is either Empty or not in correct format(xxx-xxx-xxxx)" |
| TextField3 | Validate | Telephone |
| TextField4 | Type | Text |
| TextField4 | Name | App_EmailAddress |
| TextField4 | Size | 50 |
| TextField4 | Value | #EmailAddress# |
| TextField4 | MaxLength | 100 |
| TextField4 | Required | Yes |
| TextField4 | Message | "Email Field cannot be Empty" |
| TextField5 | Type | Text |
| TextField5 | Name | App_AppliedFor |
| TextField5 | Size | 50 |
| TextField5 | Value | #EmailAddress# |
| TextField5 | MaxLength | 30 |
| TextField5 | Required | Yes |
| TextField5 | Message | "Applied For Field cannot be Empty" |
| TextField6 | Type | Text |
| TextField6 | Name | App_ApplicationDate |
| TextField6 | Size | 15 |
| TextField6 | Value | #dateformat(ApplicationDate, "mm/dd/yyyy")# |
| TextField6 | MaxLength | 10 |
| TextField6 | Required | Yes |
| TextField6 | Message | "Application Date Field is either Empty or not in correct format(mm/dd/yyyy)" |
| TextField6 | Validate | Date |
| TextField7 | Type | Text |
| TextField7 | Name | App_DateOfJoining |
| TextField7 | Size | 15 |
| TextField7 | Value | #dateformat(DateOfJoining, "mm/dd/yyyy")# |
| TextField7 | MaxLength | 10 |
| TextField7 | Required | No |
| TextField7 | Validate | Date |
| TextField8 | Type | Text |
| TextField8 | Name | App_Qual_Details |
| TextField8 | Size | 50 |
| TextField8 | Value | #QualificationDetails# |
| TextField8 | MaxLength | 200 |
| TextField8 | Required | Yes |
| TextField8 | Message | "Qualifications Field cannot be Empty" |
| TextField9 | Type | Text |
| TextField9 | Name | App_ExpYears |
| TextField9 | Size | 15 |
| TextField9 | Value | #ExperienceYears# |
| TextField9 | MaxLength | 2 |
| TextField9 | Required | Yes |
The List control is populated dynamically when the Add New Applicant page is loaded. The List control displays skill descriptions from the Skills table, and the skill ID is set as the value for the List control. The List control is created using the CFSELECT tag. Refer to Appendix D for more details on how to insert this tag using Dreamweaver MX. Set the properties of the List control as described in Table 16.9.
| Control | Property | Value |
|---|---|---|
| List | Name | App_Skills |
| List | Size | 5 |
| List | Multiple | Yes |
| List | Query | get_skills |
| List | Value | SkillID |
| List | Display | Description |
| List | Required | Yes |
To save the new record, create a Button control. At design time, set the properties of the Button control as described in Table 16.10.
| Control | Property | Value |
|---|---|---|
| Button | Type | Submit |
| Button | Name | Submit |
| Button | Value | Save Record |
Designing the Search Console Page
When a user clicks the Search Applicants link on the Main Working Console page, the Search Console page is displayed. Using Dreamweaver, create a basic HTML page and save it as SearchForm.cfm in the ProjectThree directory. As shown in Figure 16.5, the Search Console page consists of various controls in a form.
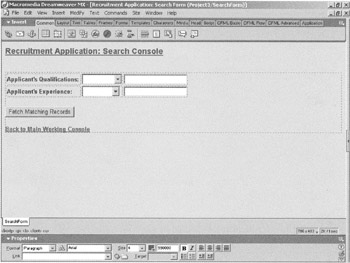
Figure 16.5: The design of the Search Console page.
The Search Console Web page contains the following controls:
-
An HTML Table control to hold Text Field and List controls.
-
Two List controls to display comparison operators for qualifications and experience criteria.
-
Two Text Field controls to accept values for qualifications and experience criteria.
-
A Button control to accept search criteria and find the matching records.
Properties for the Form control are set dynamically by using code. Set the properties of the Text Field controls as described in Table 16.11.
| Control | Property | Value |
|---|---|---|
| TextField1 | Type | Text |
| TextField1 | Name | QualValue |
| TextField2 | Type | Text |
| TextField2 | Name | ExpYearValue |
Table 16.12 lists the properties assigned to the List controls.
| Control | Property | Value |
|---|---|---|
| List1 | Name | QualOperator |
| List2 | Name | ExpYearOperator |
The Button control is used to search records based on specified criteria. The properties of the Button control that need to be set at design time are specified in Table 16.13.
| Control | Property | Value |
|---|---|---|
| Button | Type | Submit |
| Button | Name | Submit |
| Button | Value | Fetch Matching Records |
Designing the Search Results Page
The Search Results page is used to display the results of a search performed by a user. Create a new page named SearchResults.cfm. Figure 16.6 displays the design of the Search Results page.
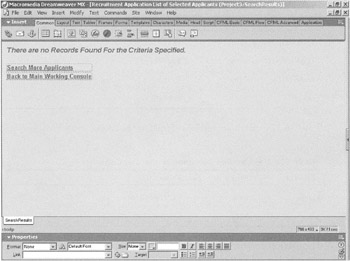
Figure 16.6: The design of the Search Results page.
As shown in Figure 16.6, most of the page's content is generated dynamically and displayed in an HTML table. Links for performing more searches and navigating back to the Main Working Console are placed at the bottom of the page. The code for this page is discussed in the next section.
|
EAN: 2147483647
Pages: 200