Drawing Shapes, Text, and Images
The Graphics class contains methods for drawing shapes, text, and images on a Canvas. It also maintains some state, like the current pen color and line style. MIDP's Graphics class is similar to the Graphics and Graphics2D classes in J2SE but much smaller.
Coordinate Space
All drawing on a Canvas takes place in a coordinate space based on the pixels of the MID. By default, the origin of this coordinate space is located in the upper-left corner of the Canvas. X coordinates increase in the right-hand direction, while Y coordinates increase in the downward direction, as shown in Figure 9-1.
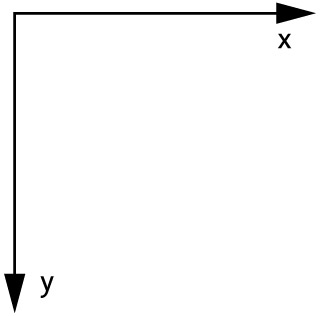
Figure 9-1: Canvas coordinate axes
You can adjust the origin of this coordinate space by calling the translate() method of the Graphics class. This set the origin to the given coordinates in the current coordinate system. To find out the location of the translated origin relative to the default origin, call getTranslateX() and getTranslateY().
Drawing and Filling Shapes
Graphics contains a collection of methods that draw and fill simple shapes. These are detailed in Table 9-1.
| SHAPE OUTLINE | FILLED SHAPE |
|---|---|
| drawLine(int x1, int y1, int x2, int y2) | - |
| drawRect(int x, int y, int width, int height) | fillRect(int x, int y, int width, int height) |
| drawRoundRect(int x, int y, int width, int height, int arcWidth, int arcHeight) | fillRoundRect(int x, int y, int width, int height, int arcWidth, int arcHeight) |
| drawArc(int x, int y, int width, int height, int startAngle, int arcAngle) | fillArc(int x, int y, int width, int height, int startAngle, int arcAngle) |
These methods do basically what you'd expect. The following example demonstrates some simple drawing using Graphics. It consists of two pieces. First, PacerCanvas demonstrates some simple drawing and filling:
import javax.microedition.lcdui.*; public class PacerCanvas extends Canvas { public void paint(Graphics g) { int w = getWidth(); int h = getHeight(); for (int x = 0; x < w; x += 10) g.drawLine(0, w − x, x, 0); int z = 30; g.drawRect(z, z, 20, 20); z += 20; g.fillRoundRect(z, z, 20, 20, 5, 5); z += 20; g.drawArc(z, z, 20, 20, 0, 360); } } The next class is Pacer, a MIDlet that uses PacerCanvas.
import javax.microedition.lcdui.*; import javax.microedition.midlet.*; public class Pacer extends MIDlet{ public void startApp() { Displayable d = new PacerCanvas(); d.addCommand(new Command("Exit", Command.EXIT, 0)); d.setCommandListener(new CommandListener() { public void commandAction(Command c, Displayable s) { notifyDestroyed(); } }); Display.getDisplay(this).setCurrent(d); } public void pauseApp() {} public void destroyApp(boolean unconditional) {} } When you run Pacer in Sun's J2MEWTK emulator, it looks like Figure 9-2.
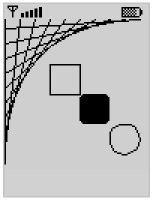
Figure 9-2: Playing around with Graphics
Working with Color
The Graphics class maintains a current drawing color that is used for drawing shape outlines, filling shapes, and drawing text. Colors are represented as combinations of red, green, and blue, with eight bits for each color component. You can set the current drawing color using the following method:
public void setColor(int RGB)
This method expects the red, green, and blue values in a packed integer, as shown in Figure 9-3.

Figure 9-3: Packing a color into an integer
An alternate convenience method accepts red, green, and blue values as integers in the range from 0 to 255 inclusive:
public void setColor(int red, int green, int blue)
You can retrieve the current drawing color (as a packed integer) with getColor(). Alternately, you can retrieve each component separately using getRedComponent(), getGreenComponent(), and getBlueComponent().
Of course, different devices will have different levels of color support, from black and white (affectionately known as "one-bit color") through full 24-bit color. As I mentioned in Chapter 5, the isColor() and numColors() methods in Display return useful information about the capabilities of the device.
For grayscale devices, Graphics provides setGrayScale() as a convenience method. You pass it a number from 0 (black) to 255 (white). You can find out the current grayscale value by calling getGrayScale(). If the current color of this Graphics is not a grayscale color (i.e., if the red, green, and blue values of the current color are not the same), then this method returns its best guess as to the brightness of the current color.
Line Styles
Graphics also maintains a current line style, called a stroke style, which is used for drawing shape outlines and lines. There are two choices for line style, represented by constants in the Graphics class:
-
SOLID is the default.
-
DOTTED lines may also be drawn.
It's up to the implementation to decide exactly how dotted lines are implemented, so dotted lines on one device may look dashed on another. You can set or retrieve the current style using setStrokeStyle() and getStrokeStyle(). For example, the following code draws a square with a solid outline (the default) and another square with a dotted outline:
public void paint(Graphics g) { g.drawRect(20, 10, 35, 35); g.setStrokeStyle(Graphics.DOTTED); g.drawRect(20, 60, 35, 35); }
Drawing Text
The Graphics class makes it easy to draw text anywhere on the screen. Text drawing is based around the idea of an anchor point. The anchor point determines exactly where the text will be drawn. Anchor points are described with a horizontal and vertical component. The Graphics class defines the horizontal and vertical anchor points as constants. Figure 9-4 illustrates the various anchor points for a string of text. Each anchor point is described as a combination of a horizontal and vertical anchor point.
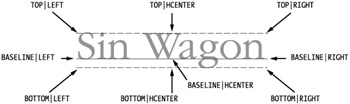
Figure 9-4: Text anchor points
To draw text, you just need to specify the text itself and the location and type of anchor point. You could, for example, place some text in the upper left corner of the screen by using a TOP | LEFT anchor point located at 0, 0.
Graphics provides four different methods for drawing text. You can draw characters or Strings, depending on what you have available:
public void drawChar(char character, int x, int y, int anchor) public void drawChars(char[] data, int offset, int length, int x, int y, int anchor) public void drawString(String str, int x, int y, int anchor) public void drawSubstring(String str, int offset, int len, int x, int y, int anchor)
The following example shows how to place text at various places on a Canvas:
import javax.microedition.lcdui.*; public class TextCanvas extends Canvas { public void paint(Graphics g) { int w = getWidth(); int h = getHeight(); // First label the four corners. g.drawString("corner", 0, 0, Graphics.TOP | Graphics.LEFT); g.drawString("corner", w, 0, Graphics.TOP | Graphics.RIGHT); g.drawString("corner", 0, h, Graphics.BOTTOM | Graphics.LEFT); g.drawString("corner", w, h, Graphics.BOTTOM | Graphics.RIGHT); // Now put something in the middle (more or less). g.drawString("Sin Wagon", w / 2, h / 2, Graphics.BASELINE | Graphics.HCENTER); } } To see this Canvas, you'll have to create a MIDlet that displays it. I suggest using Pacer; just edit the source file so it instantiates a TextCanvas instead of a PacerCanvas. The finished product is shown in Figure 9-5.
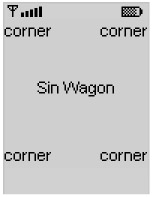
Figure 9-5: TextCanvas in the flesh
Note that Canvas denies us some real estate at the bottom of the screen. This is to allow space for Commands. Canvas, like any other Displayable, can display commands and have a command listener.
Selecting a Font
MIDP fonts are represented by a font face, style, and size. You won't find a big selection of fonts, but there are a few choices. Three faces are available, as shown in Figure 9-6. These are represented by constants in the Font class: FACE_SYSTEM, FACE_MONOSPACE, and FACE_PROPORTIONAL.
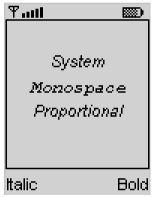
Figure 9-6: The three font faces in italics
Once you've chosen a font face, you can also specify a style and a size. The styles are what you'd expect, and they are represented by constants in the Font class: STYLE_PLAIN, STYLE_BOLD, STYLE_ITALIC, and STYLE_UNDERLINE. You can combine styles, like bold and italic, by ORing the constants together. The size is simply SIZE_SMALL, SIZE_MEDIUM, or SIZE_LARGE.
You could create a small, italic, proportional font with the following call:
Font f = Font.getFont( Font.FACE_PROPORTIONAL, Font.STYLE_ITALIC, Font.SIZE_SMALL);
To tell Graphics to use a new font for subsequent text, call setFont(). You can get a reference to the current font by calling getFont(). You can also find out information about a Font with the getFace(), getStyle(), and getSize() methods. For convenience, Font also includes isPlain(), isBold(), isItalic(), and isUnderlined() methods.
The MIDP implementation has a default font that you can retrieve from Font's static method getDefaultFont().
The Canvas in Listing 9-1 demonstrates the creation and use of fonts. If you'd like to play around with underlining, as well, uncomment the line in the constructor where the underlining command is added to the Canvas. If you do, you'll have more commands than will fit on the screen, so two of them will wind up in an off-screen menu.
Listing 9-1: Having fun with fonts.
import javax.microedition.lcdui.*; public class FontCanvas extends Canvas implements CommandListener { private Font mSystemFont, mMonospaceFont, mProportionalFont; private Command mBoldCommand, mItalicCommand, mUnderlineCommand; public FontCanvas() { this(Font.STYLE_PLAIN); } public FontCanvas(int style) { setStyle(style); mBoldCommand = new Command("Bold", Command.SCREEN, 0); mItalicCommand = new Command("Italic", Command.SCREEN, 0); mUnderlineCommand = new Command("Underline", Command.SCREEN, 0); addCommand(mBoldCommand); addCommand(mItalicCommand); //addCommand(mUnderlineCommand); setCommandListener(this); } public void setStyle(int style) { mSystemFont = Font.getFont(Font.FACE_SYSTEM, style, Font.SIZE_MEDIUM); mMonospaceFont = Font.getFont(Font.FACE_MONOSPACE, style, Font.SIZE_MEDIUM); mProportionalFont = Font.getFont(Font.FACE_PROPORTIONAL, style, Font.SIZE_MEDIUM); } public void paint(Graphics g) { int w = getWidth(); int h = getHeight(); // Clear the Canvas. g.setGrayScale(255); g.fillRect(0, 0, w − 1, h − 1); g.setGrayScale(0); g.drawRect(0, 0, w − 1, h − 1); int x = w / 2; int y = 20; y += showFont(g, "System", x, y, mSystemFont); y += showFont(g, "Monospace", x, y, mMonospaceFont); y += showFont(g, "Proportional", x, y, mProportionalFont); } private int showFont(Graphics g, String s, int x, int y, Font f) { g.setFont(f); g.drawString(s, x, y, Graphics.TOP | Graphics.HCENTER); return f.getHeight(); } public void commandAction(Command c, Displayable s) { boolean isBold = mSystemFont.isBold() ^ (c == mBoldCommand); boolean isItalic = mSystemFont.isItalic() ^ (c == mItalicCommand); boolean isUnderline = mSystemFont.isUnderlined() ^ (c == mUnderlineCommand); int style = (isBold ? Font.STYLE_BOLD : 0) | (isItalic ? Font.STYLE_ITALIC : 0) | (isUnderline ? Font.STYLE_UNDERLINED : 0); setStyle(style); repaint(); } } To see this Canvas in action, you'll need a MIDlet that shows it. You could modify Pacer again, if you wish, or use the following code:
import javax.microedition.lcdui.*; import javax.microedition.midlet.*; public class FontMIDlet extends MIDlet { public void startApp() { Displayable d = new FontCanvas(); d.addCommand(new Command("Exit", Command.EXIT, 0)); d.setCommandListener(new CommandListener() { public void commandAction(Command c, Displayable s) { notifyDestroyed(); } }); Display.getDisplay(this).setCurrent(d); } public void pauseApp() {} public void destroyApp(boolean unconditional) {} }
Measuring Text
The Font class can tell you useful information about the dimensions of text. If you read the previous example carefully, you'll notice we already used one of these methods, getHeight(). This method returns the height of an entire line of text and can be used to position multiple lines of text.
If you really need to know the location of the baseline, call getBaselinePosition(). This returns the distance from the top of a line of text to the baseline. However, given the flexibility offered by the anchor points in Graphics, you probably won't ever need to find the baseline yourself.
The rest of the methods in Font for measuring text measure the width of various pieces of text. The names and parameters of these methods are the same as text drawing methods in Graphics:
public int charWidth(char ch) public int charsWidth(char ch, int offset, int length) public int stringWidth(String str) public int substringWidth(String str, int offset, int len)
You could draw a box around a string, for example:
import javax.microedition.lcdui.*; public class BoxTextCanvas extends Canvas { private Font mFont; public BoxTextCanvas() { mFont = Font.getFont(Font.FACE_PROPORTIONAL, Font.STYLE_PLAIN, Font.SIZE_LARGE); } public void paint(Graphics g) { int w = getWidth(); int h = getHeight(); String s = "dolce"; int stringWidth = mFont.stringWidth(s); int stringHeight = mFont.getHeight(); int x = (w − stringWidth) / 2; int y = h / 2; g.setFont(mFont); g.drawString(s, x, y, Graphics.TOP | Graphics.LEFT); g.drawRect(x, y, stringWidth, stringHeight); } }
Drawing Images
The Graphics class contains a single method for drawing an image:
public void drawImage(Image img, int x, int y, int anchor)
The drawImage() method uses an anchor point, just like the anchor point in the text drawing methods. The available anchor points are slightly different. BASELINE is no longer an option for the vertical anchor point of an image, as the concept of baseline is specific to text. Instead, VCENTER is an additional option for the vertical anchor point. Figure 9-7 shows the available combinations of anchor points.

Figure 9-7: Image anchor points
Clipping
Graphics maintains a rectangular clipping shape. The clipping shape limits drawing, such that any drawing that takes place outside of the clipping shape will not be displayed. It's kind of like painting through a stencil, except you can only use a rectangular stencil. If you were writing a game that had some kind of border on the game board, you might set the clipping rectangle to be the inside of the game board, so that no drawing could overwrite the border.
You can find out the current clipping rectangle by calling getClipX(), getClipY(), getClipWidth(), and getClipHeight().
If you would like to modify the clipping rectangle, there are two methods that you can use. First, you can set the clipping rectangle directly by calling the following method:
public void setClip(int x, int y, int width, int height);
The other possibility is to augment the current clipping rectangle with another rectangle. The following method takes the intersection of the current clipping rectangle and the supplied rectangle and uses it to set the new clipping rectangle:
public void clipRect(int x, int y, int width, int height);
| Team-Fly |
EAN: 2147483647
Pages: 129