Applying Security to Analysis Services
Security within Analysis Services involves designing user permissions to selected cubes, dimensions, cells, mining models, and data sources. Analysis Services relies on Microsoft Windows to authenticate users, and only authenticated users who have rights within Analysis Services can establish a connection to Analysis Services.
Server and Database Roles
After a user connects to Analysis Services, the permissions that user has within Analysis Services are determined by the rights assigned to the Analysis Services roles to which that user belongs, either directly or through membership in a Windows role. The two roles available in Analysis Services are server and database roles.
Server Role
The server role permits unrestricted access to the server and all the objects contained on the server. This role also allows its members to administer security by assigning permissions to other users. By default, all members of the Administrators local group are members of the server role in Analysis Services and have server-wide permissions to perform any task. You configure this access by using Management Studio, Business Intelligence Development Studio, or an XMLA script.
Here's how you add additional Windows users or groups to this Server role.
-
Open Management Studio and connect to an Analysis Services server.
-
Right-click the server node in the Object Explorer and choose Properties.
-
On the Analysis Server Properties dialog, select the Security page. Note again how no users or groups are included automatically. Although not shown in the dialog, only members of the local Windows Administrators group are automatically assigned this server role.
-
Click the Add button and add users and groups with the standard Windows Select Users and Groups dialog.
-
After adding the users and groups, we can remove the local Administrators from the server role by selecting the General page and clicking on the Show Advanced (ALL) Properties checkbox. Then modify the Security\BuiltinAdminsAreServerAdmins property to false.
Database Role
Within Analysis Services, you can set up multiple database roles. Only the members of the server role are permitted to create these database roles within each database, grant administrative or user permissions to these database roles, and add Windows users and groups to these database roles.
These database roles have no administrative capabilities unless they are granted Full Control, otherwise known as Administrator rights, or a more limited set of administrator rights (such as Process the database, Process one or more Dimensions, and Read database metadata).
In summary, reading Analysis Services data is only available to members of the server role and members of a database role that have Full Control. Other users can only get this access if their database role expressly grants permissions to the objects in Analysis Services (dimensions, cubes, and cells).
You set up database roles using either Business Intelligence Developer Studio or Management Studio. In BIDS, you use the Role Designer, while in Management Studio you use the Create Role dialog. When Management Studio is used for setting up these roles, the changes do not require that you deploy the database, as these changes are made in online mode.
Here's how to add a database role to an Analysis Services database.
-
Open Management Studio and connect to an Analysis Services server.
-
Right-click the Roles folder located in one of the databases and select New Role.
-
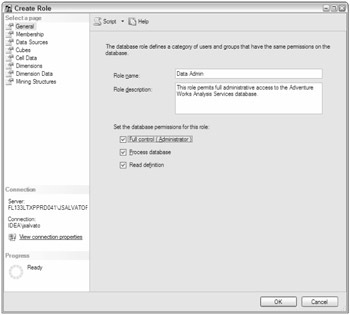
On the Create or Edit Role dialog (see Figure 7-20), enter Data Admin as the role name and check the Full control (Administrator) checkbox.
-
Select the Membership page and add a Windows user account.

Figure 7-20
Database Role Permissions
The easiest way to understand the granularity of permissions within Analysis Services is by reviewing the Create Or Edit Role dialog's pages. Previously, when you added a new role, you assigned the Full control (Administrator) database permissions. If you did not check that Full control checkbox, you would have the ability to assign very granular permissions by using the various pages of the Create Role dialog.
The permissions form a sort of hierarchy in which the topmost permissions need to be assigned before any of the next-level permissions. This hierarchy includes Cubes, Dimensions, Dimension Data, and Cell Data. Analysis Services permits a database to include more than one cube, and that is why you have that as a permission set for our roles. Within the cube, you have dimensions and measures. The measures are constrained by the various dimensions. Let's now look at some examples of assigning these permissions.
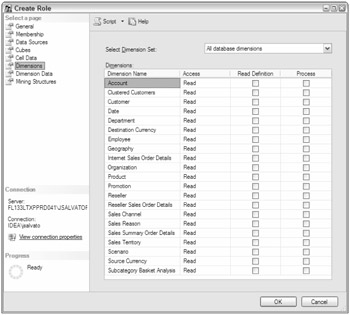
While reviewing the role permissions available, you'll note two in particular that will be regularly used to limit access to information: Dimensions and Dimension Data. These permit you to define what the user can see when browsing the cube. For example, you can configure security such that only staff in the Marketing department can use the Promotions dimension. Access permissions to an entire dimension are configured on the Dimensions page of the Create or Edit Role dialog (see Figure 7-21). You should understand that certain permissions require that other permissions be granted. In this example, you would have to ensure that the role for the Marketing department staff has been granted permissions to access the AdventureWorks cube.

Figure 7-21
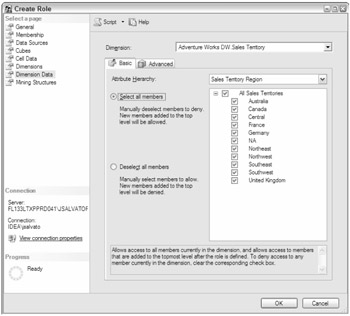
Once access has been modified for the dimensions, you have to define the specific attribute hierarchies and members within the dimension to which role members are allowed access. If you forget to do this, the role will not have permission to view any attribute hierarchies within the dimension, nor any of their members. For example, you can permit a regional sales manager access to the sales territories in which he manages by selecting the Dimension Data page and selecting the AdventureWorks DW.Sales Territory from the Dimension combo box (see Figure 7-22).

Figure 7-22
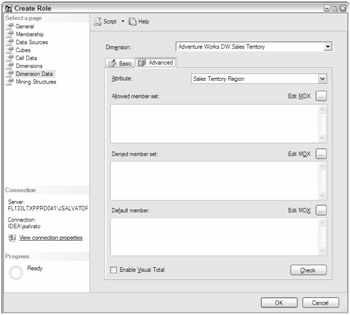
You may also encounter a security configuration that requires even more sophistication, and for that you have the Advanced tab on the Dimension Data page of the Create Role dialog (see Figure 7-23). This tab permits the creation of very complex combinations of allowed and denied listings of dimension members, along with configuration of default members for our role. Here is where administrators may need to work with developers to understand the multidimensional expression language (MDX) syntax that would be required to configure these advanced security options.

Figure 7-23
EAN: 2147483647
Pages: 193