Administration of Integration Services Packages
Now that you've learned about the various aspects of Integration Services service administration, we'll now detail the main elements involved with the administration of SSIS packages. We will start with an overview of SSIS package elements and administration and then look at various ways in which packages can be created. Next, we'll look at the management of the developed SSIS packages. Once you understand how to create and manage packages, we will conclude with the deployment, execution, and scheduling of SSIS packages and solutions.
Overview
A package represents the main organizational and executable component of Integration Services. Packages include a collection of controlflow tasks connected by precedence constraints used to manage the order of task execution, dataflow tasks that manage the complexities of moving data from sources to destinations with many transformation tasks in between and event handlers responsible for communicating various information about the status of the package and its tasks.
In order to better understand the various package administrative functions, we'll start by discussing the flow of package creation or development. You start this process by designing a package using either the import/export wizard or using Business Intelligence Developer Studio. Next, you store these packages in either the filesystem or in a SQL Server database in order to facilitate reuse or later execution. Often, you will need to move packages from one storage location to another with the aid of tools such as the DTUtil command line utility. Next, you will need to run our packages using either the DTExec or DTExecUI utilities. Commonly, you will also need to schedule the execution of packages using the SQL Agent job scheduler. Lastly, you need to monitor the performance and status of packages using Management Studio.
Creating Packages
You can create Integration Services packages using the Import and Export Wizard or by creating a Business Intelligence Developer Studio Integration Services solution. We will focus on the use of the Import and Export Wizard as creation and development of packages within BIDS is more likely to be done by developers. Furthermore, many resources are available to assist in understanding how to create and develop packages within BIDS. As an administrator, you should understand how you can configure package templates for use by your team members.
Using the Import and Export Wizard to Create Packages
In your day-to-day management of data, you often have to move or copy data to and from various data sources. Many times, these data management tasks are not in need of complex transformations or detailed workflow. These types of data management tasks are well suited for the Import and Export Wizard.
The key consideration for using the Import and Export Wizard revolves around the data transformation capabilities you need before loading the destination or target. The Wizard only permits modifications such as setting the names, data types, and data type properties of the columns as they will be defined at the destination. Absolutely no column-level transformations are supported when using the Import and Export Wizard.
Mapping of data types from sources to destinations is managed by mapping files located by default in C:\Program Files\Microsoft SQL Server\90\DTS\MappingFiles. An example of one of these mapping files is the OracleClientToMSSql.xml mapping file, used to map Oracle data types to SQL Server data types. The following is a sample of the XML used to map the Oracle DATE data type to SQL Server's datetime data type:
<!-- DATE --> <dtm:DataTypeMapping > <dtm:SourceDataType> <dtm:DataTypeName>DATE</dtm:DataTypeName> </dtm:SourceDataType> <dtm:DestinationDataType> <dtm:SimpleType> <dtm:DataTypeName>datetime</dtm:DataTypeName> </dtm:SimpleType> </dtm:DestinationDataType> </dtm:DataTypeMapping>
You can add mapping files to this directory to include new combinations of mappings that may not presently exist; you can alter existing mapping files if they don't meet your needs. You should note that after adding new or altering existing mapping files, you must restart the Import and Export Wizard or Business Intelligence Developer Studio in order to recognize these additions or modifications.
You can start using this Import and Export Wizard from the Business Intelligence Development Studio, from SQL Server Management Studio, or from a command prompt using the DTSWizard (C:\Program Files\Microsoft SQL Server\90\DTS\Binn). The only difference in starting this wizard from BIDS is that the wizard cannot run the resulting package as the very last step; instead the resulting package is saved as part of the solution in which the wizard was started.
You can start the Import and Export Wizard in a number of ways:
-
In Management Studio, connect to a database server, and within the database node, right-click a database, select Tasks, and then select either Import Data or Export Data.
-
In BIDS, open an SSIS solution, right-click the SSIS Packages Folder, and select SSIS Import and Export Wizard.
-
Also in BIDS, click the ProjectSSIS Import and Export Wizard.
-
From a command prompt, run DTSWizard.exe (C:\Program Files\Microsoft SQL Server\90\DTS\Binn).
Here's how to run the Import and Export Wizard in order to move data:
-
Launch the Import and Export Wizard from Management Studio, BIDS, or the command prompt.
-
On the Choose a Data Source page, select the location to copy the data from by setting up the data source (such as SQL Native Client, Excel, or Flat File) and the required information for that data source (such as Server Name, Authentication, and Database for a SQL Native Client). Or if we selected to Export Data (within Management Studio), the source information is already preconfigured to include the server and database from which the wizard was launched.
-
On the Choose a Destination page, select the location to copy the data to by setting up the data source and the required information for that data source. If we selected to Import Data (with Management Studio), the destination information is preconfigured to include the server and database from which the wizard was launched.
-
On the Specify Table Copy or Query page, either copy the entire data source by selecting the option to Copy data from one or more tables, or you can specify that only a portion of the data source is copied by selecting the option to Write a query to specify the data to transfer. If you choose to write a query, on the Provide a Query Source page, you can either compose a SQL Statement or browse for a SQL file to load and use to limit the data source records.
-
On the Select Source Tables and Views page, specify all the tables and views to be included unless you previously selected the option to write a query to specify the data, in which case only one table (the query) is available to select.
-
Optionally, also on the Select Source Tables and Views page, you can configure various features that will indicate such things as whether to optimize for many tables or run in a transaction.
-
Optionally, from the Select Source Tables and Views page, when copying tables or views that already exist in the destination, you may select Edit Mappings in order to configure things such as whether or not to delete or append data to an existing table or whether or not to enable identity inserts (see Figure 6-8).
-
Optionally, from the Select Source Tables and Views page, when creating new tables or views that do not exist in the destination, you can select Edit Mappings to configure things such as whether to create destination tables or drop and recreate destination tables. Additionally, you can alter the destination mapping information for each column including the name, data type, nullability, size, precision, and scale (see Figure 6-9).
-
Lastly, if launched from Management Studio, on the Save and Execute Package page, you can choose to execute immediately and may optionally choose to save the SSIS package. When saving the package, you can save to SQL Server or to the filesystem, and you can configure the package-protection level to be applied to the saved package (see Figure 6-10).
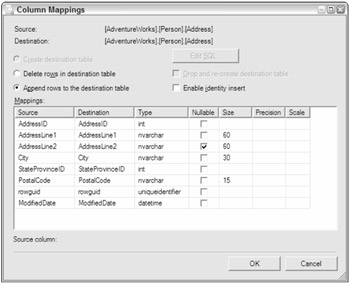
Figure 6-8
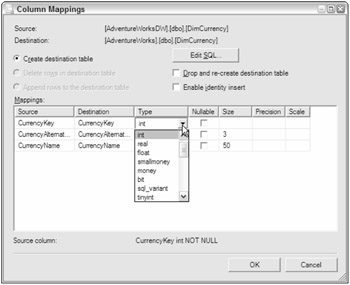
Figure 6-9
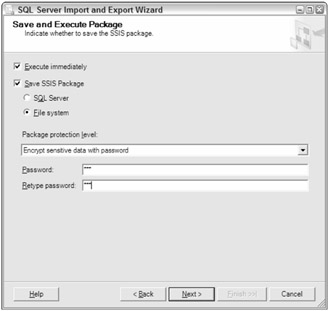
Figure 6-10
Creating and Using Package Templates
When you start a new Integration Services solution, the first thing you'll notice is that a package has already been included in the solution for your use. Although you cannot replace the default template that SSIS uses to generate this initial package (and any subsequent packages created by using the New SSIS Package command), you can design your own customized package or packages to be used as templates.
The primary benefits for creating these package templates include:
-
Encapsulation of common package-design elements added to each package (such as logging or error handling)
-
Productivity gained from inclusion of common package variables or package configurations
-
Enforcement of package-design standards such as annotations
-
Override SSIS package default protection level of EncryptSensitiveWithUserKey, which can be troublesome in multideveloper and deployment scenarios
A common scenario in which you may decide to implement a custom package template is when your team decides that the default package-protection level should be EncryptSensitiveWithPassword in order to enable sharing development tasks among multiple DBAs or developers. By customizing and using a custom package template, rather than the default package that SSIS would create, you can ensure that this desired package-protection level is automatically selected. Another scenario may involve the need for you to enforce common logging and error handling within your packages. The default SISS package does not contain any tasks to handle this functionality; however, you can build this type of functionality into your custom package template, and then, when used, each package would automatically have this functionality built into the design.
Here's how you can designate an SSIS package as a template.
-
Create and save an SSIS package.
-
Copy the package file (.dtsx) you wish to use as a template to the DataTransformationItems folder. This folder is commonly located in C:\Program Files\Microsoft Visual Studio. 8\Common7\IDE\PrivateAssemblies\ProjectItems\DataTransformationProject\DataTransformationItems.
Once you have designated an SSIS package as a template, you can use it in Business Intelligence Developer Studio. Here's how you can use these templates to assist in SSIS package development.
-
Open an Integration Services project with Business Intelligence Developer Studio.
-
In Solution Explorer, right-click the solution or project (topmost node) and select Add.
-
From the options displayed on the Add submenu, select New Item.
-
Within the Add New Item - Project Name dialog, select the package you would like to use as a template and click Add.
-
By default, packages created using templates other than the default template shipped with SSIS have the same name and GUID as the template used for their creation. You should now change both of these package properties using the properties Page for the newly added package.
Management
Once you have started to create packages and solutions containing packages, you'll next need to focus on how these packages are managed. We will start by reviewing how the Integration Services service can assist in managing packages. Next, we will look at ways that you can configure Management Studio to meet our specific needs for managing packages. A brief tour of the DTUtil Package Management Utility will be provided next, along with some details to assist with the importing and exporting of packages. We will end with a review of package features that can be used in the package design and development stages to assist with the lifecycle management of packages and solutions.
Using Management Studio for Package Management
As discussed earlier in the "Integration Services Service" section, packages are managed primarily via Management Studio and its connection to the Integration Services service. Upon connecting to the service, you'll see two main folders: Running Packages and Stored Packages. The packages displayed are either stored in either the msdb database sysdtspackages90 table or the filesystem folders that are specified in the Integration Services service configuration file.
The main uses of Management Studio include monitoring running packages and managing the packages stored within the Integration Services environment. We'll now drill into some details surrounding these particular processes.
First, you can see information regarding currently executing packages within the Running Packages Folder. Information about these packages is displayed on the Summary page, while information about a particular executing package can be obtained by clicking the package under the Running Packages Folder and viewing the Summary page. You can stop the execution of a package listed within this folder by right-clicking the package and selecting Stop.
Secondly, we can make changes to the storage of packages by adding custom folders and by copying packages from one type of storage to another using the Import and Export utilities. You can configure the logical folders displayed within the MSDB folder in Management Studio by altering the sysdts packagefolders90 table within the msdb database. The root folders in this table are those in which the parentfolderid column contains null values. You can add values to this table in order to add logical folders, bearing in mind that the folderid and parentfolderid columns are the keys values used to specify the folder hierarchy. Additionally, you can configure the default folders in the filesystem that Management Studio displays. This is discussed at length in the "XML Configuration File" section of this chapter. Importing and exporting packages will be discussed in another section of this chapter.
The main management tasks you can perform on packages within Management Studio include:
-
Creating new Object Explorer folders to display packages saved in either the file system or SQL Server (msdb database sysdtspackages90 table)
-
Importing packages
-
Exporting packages
-
Running packages
-
Deleting packages
-
Renaming packages
Using DTUtil Package Management Utility
Other than using Management Studio to manage packages, you also have the assistance of a command prompt utility named DTUtil. The primary reason it is important to understand the DTUtil is that this utility permits you to manage packages using schedulers or batch files. As with using Management Studio, the DTUtil enables you to copy, delete, move, sign, and even verify if the server contains specified packages.
Using this utility, you include either the /SQL, /FILE, or /DTS options to specify where the packages that you want to manage are located. You use options (parameters) to specify particular behavior you want to use when running the utility. The options start with either a slash (/) or a minus sign (-) and can be added to the command line in any sequence.
Additionally, you will receive exit codes that let you know when you have things wrong with your syntax or arguments or simply have an invalid combination of options. When everything is correct, DTUtil returns exit code 0 and displays the message "The operation completed successfully." The following other exit codes may be returned:
-
1 - Failed
-
4 - Cannot locate package
-
5 - Cannot load package
-
6 - Cannot resolve the command
The following additional syntactical rules must be followed when you create these commands:
-
Values for options must be strings and must be enclosed in quotation marks or contain no whitespace.
-
Escaping single quotation marks in strings is done by enclosing the double-quoted string inside single quotation marks.
-
Other than passwords, there is no case sensitivity.
One way you can use DTUtil is to regenerate package IDs for packages copied from other packages. Recall that when a copy of an existing package is made, the name and ID of the new package matches that of the copied package. Here's how you can use the DTUtil along with the /I [D Regenerate] switch to regenerate the package IDs. Of course, to update multiple packages with just a single execution of the DTUtil, you can create a batch file that could iterate through a given folder looking for all .dtsx (package) files and have the DTUtil regenerate the package IDs. At the command prompt, use the following syntax:
for %f in (<FilePath>\*.dtsx) do dtutil.exe /i /File %f
If you wish to execute this command from within a script, use the following syntax:
for %%f in (<FilePath>\*.dtsx) do dtutil.exe /i /File %%f By understanding the DTExec utility, you have a very powerful weapon to add to your package management arsenals. We'll now take a look at how you can facilitate the movement of packages using import and export features.
Importing and Exporting Packages
Another common activity you need to understand as an administrator involves the ways in which you can move packages among the various storage locations and formats. The import and export functionality allows you to add or copy packages from one storage location and format to another storage location and format. Thus, not only can you add or copy the packages; you can also change storage formats (for example, from filesystem folders to the SQL Server msdb database).
Here's how you can import a package using the Integration Services Service from within Management Studio.
-
Open Management Studio and connect to an Integration Services server.
-
In Object Explorer, expand the Stored Packages folder and any subfolders to locate the folder into which you want to import a package.
-
Right-click the target folder and select Import Package.
-
On the Import Package dialog, select the package location from SQL Server, File System, or SSIS Package Store.
-
On the Import Package dialog, when the package location is SQL Server, you need to specify the server, authentication type, user name, and password.
-
On the Import Package dialog, when the package location is SSIS Package Store, you need to specify the server.
-
Also on the Import Package dialog, click the Browse button next to Package path and select the package to import.
-
Still on the Import Package dialog, you can change the package name as it will appear in the new location and also specify the protection level of the package (see Figure 6-11).
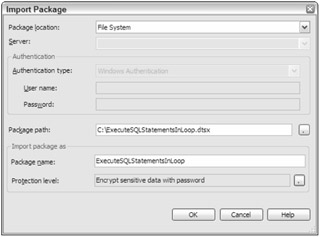
Figure 6-11
You can also export packages using similar steps as detailed for importing packages. The one notable difference is that you right-click the package to be exported and select Export rather than right-clicking the target folder and selecting Import. Additionally, recall that you can also perform these import and export operations using the DTUtil command-line utility.
Deployment
Once Integration Services packages and solutions have been developed either on local computers or on development servers, they need to be deployed to test on production servers. Usually, you start the deployment process once you have ensured that the packages run successfully within Business Intelligence Development Studio.
You deploy your packages or solutions by:
-
Creating a Package Deployment Utility and using the Package Installer Wizard
-
Using import or export package utilities in Management Studio
-
Saving or moving copies of packages in the filesystem
-
Executing the DTUtil Package Management Utility
Often, the modifications made to your Integration Service solution will dictate which deployment method and tools to use. For example, if you modify only a single package out of a 30-package solution, using the import package utility within Management Studio or saving or moving copies of packages in the filesystem might be simpler than deploying the entire solution using the Package Deployment Utility and Package Installer Wizard.
You can really further categorize these four options for deployment into automated and manual. Using the Package Deployment Utility in conjunction with the Package Installer Wizard would be best categorized as an automated deployment method, while the other options represent manual deployment methods. We'll take a look at the details for each of these deployment methods, starting with the automated method.
Creating a Package Deployment Utility
A very common way to deploy packages involves using the Package Deployment Utility. This utility builds your SSIS packages, package configurations, and any supporting files into a special deployment folder located within the bin directory for the Integration Services project. Additionally, this utility creates a special executable file named DTSDeploymentManifest.xml and places it within this deployment folder. After the creation of the Deployment Utility, you then execute the manifest file to install the packages.
This deployment method relies upon two separate steps. First, you create a deployment utility that contains all the files needed for deployment. Second, you use the Package Installer Wizard to perform the deployment of these files to a target deployment server.
The following are the steps necessary to use this Package Deployment Utility in order to deploy our Integration Services solution.
-
Open Business Intelligence Development Studio and open an Integration Services solution.
-
Right-click your solution or project (topmost node) in the Solution Explorer and select Properties.
-
On the [Solution/Project Name] Property Pages dialog, select the Deployment Utility section.
-
Within the Deployment Utility section of the Property Pages dialog, set the value of the CreateDeploymentUtility to true (see Figure 6-12).
-
Optionally, you can configure the deployment to enable configuration changes by setting the AllowConfigurationChanges value to true. This option provides the ability to update the configuration of key elements of your packages that would be machine or environment dependent, such as server names or database initial catalogs that are both properties of database connection managers.
-
Next, build your project as normal. The build process creates the DTSDeploymentManifest.xml file and copies the packages to the bin/Deployment folder or whatever folder was specified for the DeploymentOutputPath on the project property page in the Deployment Utility section.
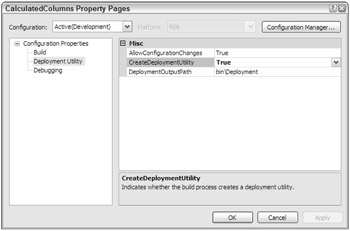
Figure 6-12
Because this utility copies all solution files as part of the process, you can deploy additional files such as a Readme file with the project by simply placing these files in the Miscellaneous folder of the Integration Services project.
Using the Package Installer Wizard
Once you have created a DTSDeploymentManifest.xml file using the Package Deployment Utility, you can install the packages by using the Package Installer Wizard. This wizard runs the DTSInstall.exe program and copies the packages and any configuration to a designated location.
Using the Package Installer Wizard, you get some really useful functionality that you can't find or is hard to achieve using the manual deployment methods. One example is that you may choose either a file-based or SQL-based deployment. You should note that your file-based dependencies will always be installed to the file system. Another important, as well as useful, capability of this deployment process includes the ability to modify configurations for use on the target deployment server. This gives you the ability to update the values of the configuration properties, such as a server name, as part of the wizard.
These are the steps you need to take to ensure a successful deployment of your packages using the Package Installer Wizard.
-
Use Windows Explorer to browse to the file path location in which the DTSDeployment Manifest.xml file was created (usually the solution or project location /bin/Deployment).
-
After creating the files within the Deployment folder, copy the Deployment folder and all its files to a target deployment server.
-
On the target deployment server, open the Deployment folder and double-click the DTSDeploymentManifest.xml file in order to launch the Package Installer Wizard (DTSInstall.exe).
-
On the Deploy SSIS Packages page, select whether you want to deploy your packages to the filesystem or to SQL Server (see Figure 6-13). Optionally, you can also have the packages validated after they have been installed.
-
On the Select Installation Folder page, either provide a folder path for a filesystem deployment or provide a server name and the appropriate server credentials for a SQL Server deployment.
-
For a SQL Server deployment, on the Select Installation Folder page, provide a folder path for the package dependencies that will require storing within the filesystem.
-
Optionally, if the package includes configurations and you set the AllowConfigurationChanges value to true when the deployment manifest was created, the Configure Packages page will be displayed so that you can update the values for the configurations.
-
Optionally, if you requested validation of the packages, the Packages Validation page will be displayed so that you can review the validation results.
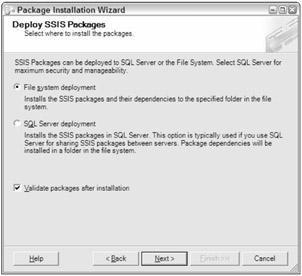
Figure 6-13
Now that you've seen how to deploy your packages using the Package Deployment Utility for preparing the files to copy and deploy on the target server using the Package Installation Wizard, we'll discuss how to perform various types of manual package deployments.
Manual Package Deployment
We referred to using the import or export package utilities, saving or moving copies of packages in the filesystem, and executing the DTUtil Package Management Utility as manual deployment methods. The primary contrast among these deployment methods and using both the Package Deployment Utility and the Package Installer Wizard is that the manual methods require a better understanding of exactly what files need to be moved and where the files need to be located on the deployment target machine, and they offer no automated way to reconfigure some of the dynamic elements within the packages that often require modification when deploying to another machine (such as connection string server and initial catalog values).
Despite the lack of sophistication available when using these deployment methods, there are situations in which they are rather useful, if not better than the automated methods. One example of a situation in which they may prove to be a better fit is when you modify a single package in a solution containing 20 or more packages. Under the automated deployment method, the entire solution would be redeployed, while the manual methods could simply import, export, save, or move the single effected package. This really has benefits with some levels of testing, as you can isolate the impacts of changing the one package and not have to recertify all the untouched packages just because they were redeployed over the older packages.
Import or Export Packages Deployment
Earlier in this chapter, we reviewed the use of the import and export functionality, which allows you to add or copy packages from one storage location and format to another storage location and format. One obvious use of this functionality is to deploy packages after the development and testing have been completed.
One interesting benefit this approach may yield involves the capability of the import or export to change storage formats (for example, from filesystem folders to the SQL server msdb database). This alteration of storage formats may be useful for disaster recovery, as a further safeguard for your Integration Services solutions by saving them in various storage formats and locations.
File Save/Move Package Deployment
Probably the simplest ways to get packages deployed involves copying them out of the Visual Studio project bin directory and placing them on the target server. This method does not have any of the more useful capabilities but can work quite well for smaller-scale Integration Services solutions. One distinct capability missing from this deployment method is the ability to deploy to SQL server.
DTUtil Package Deployment
As with using Management Studio, the DTUtil enables you to copy or move packages. As previously stressed in this chapter, the benefit surrounding the usage of DTUtil is that the commands created can be scheduled or run at a later time. So, using these capabilities, you could schedule the deployment of your packages to another server simply by using DTUtil copy or move commands to move the modified packages to a target server.
The following example demonstrates how a DTUtil copy command can be used for deployment.
dtutil /DTS srcPackage.dtsx /COPY SQL;destPackage
Now that you have packages deployed to an Integration Services server, we will discuss how to execute and schedule packages.
Execution and Scheduling
Thus far, we have looked at ways to create, manage, and deploy Integration Services solutions. Now we will focus our attention on the ways in which you can execute and schedule execution of these solutions. As you have seen with other package and solution administrative tasks, execution of packages can be performed using different tools. Specifically, you can execute packages from:
-
Business Intelligence Development Studio
-
SQL Server Import and Export Wizard (when run from Management Studio)
-
DTExec package execution command line utility
-
DTExecUI package execution utility
-
SQL Server Agent jobs
The choice of which tool to use often depends on factors such as which stage of the package lifecycle we are presently working. As an example, the SSIS Designer within BIDS will be a logical choice for package execution during development due to the features designed to assist in development (such as visually displaying package execution progress by changing the background color of tasks).
Now that we know what options we have for executing or scheduling packages, we'll review how each one may be used.
Running Packages in Business Intelligence Development Studio
Probably the first executions of packages will occur within BIDS, as this is the development environment used to create our Integration Services solutions. Within BIDS, you simply either right-click the package and then select Execute Package or press the F5 function key (or the Start button on the menu bar).
Running Packages with SQL Server Import and Export Wizard
When you use the Import and Export Wizard from Management Studio, you are given an option to execute the package immediately. This provides an opportunity to both relocate and execute packages in one administrative step.
Running Packages with DTExec
The primary use of DTExec is to enable us to be able to run packages from the command line, from a script, or using a scheduling utility. All configuration and execution features are available using this command. Additionally, you can load and run packages from SQL Server, the SSIS Service, and the filesystem.
The following additional syntactical rules must be followed when you create these commands:
-
Command options all start with a slash (/) or a minus sign (-).
-
Arguments are enclosed in quotation marks when they contain any whitespace.
-
Values that contain single quotation marks are escaped by using double quotation marks within quoted strings.
The general syntax for the DTExec commands is:
Dtexec /option value Here's an example, where you are running the CaptureDataLineage.dtsx package:
Dtexec /FILE "C:\Program Files\Microsoft SQL Server\90\Samples\Integration Services\Package Samples\CaptureDataLineage Sample\CaptureDataLineage\CaptureDataLineage.dtsx" /CONNECTION "(local).AdventureWorks";"\" Data Source=(local);Initial Catalog=AdventureWorks;Provider=SQLNCLI.1;Integrated Security=SSPI;Auto Translate=False;\"" /MAXCONCURRENT " -1 " /CHECKPOINTING OFF /REPORTING EWCDI
Whenever you execute a package using DTExec, an exit code may be returned. These values include:
-
0 - Successful execution
-
1 - Failed
-
3 - Canceled by User
-
4 - Unable to Find Package
-
5 - Unable to Load Package
-
6 - Syntax Not Correct
There are numerous options you can use to alter how the package execution gets run. Some examples include /Decrypt, which sets the package password used to secure information within the package, or /Set, which you use to assign SSIS variables values at runtime. The options are processed in the order in which they are specified. When using the /Set and /ConfigFile commands, the values are also processed in the order in which they are specified. Also, note that neither options nor arguments (except passwords) are case sensitive.
Running Packages with DTExecUI
You can configure the various options you need to run packages using the graphical equivalent to the DTExec utility: the DTExecUI utility. With the wizard that this utility uses to gather details regarding the package execution, you can better understand many of the options and see the syntax required to run the package execution.
You launch the DTExecUI utility by double-clicking a file with a .dtsx extension. You then select the types of options that we need to run the package along the left side of the utility pages and then configure the options in the main part of the page (see Figure 6-14). When you are done, you can view the last page, which shows us the command line needed to execute the package with the options we selected.
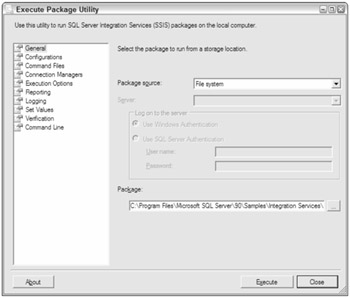
Figure 6-14
Once you have completed the various pages and reviewed the command line that will be submitted, click the Execute button. This will submit the command line to the Integration Services engine by using the DTExecUI utility. You need to be careful when you use this utility in a 64-bit environment, because this utility will run in Windows on Win32, not on Win64. Thus, for 64-bit environments, you should use the 64-bit version of the DTExec utility at the command prompt or use SQL Server Agent.
The main reason for us to become more familiar with both the DTExec and DTExecUI utilities is that they are very useful for testing your packages and ultimately validating the proper command line that we may schedule using the SQL Server Agent. We now will review how the SQL Server Agent can perform scheduled execution of our Integration Services packages.
Scheduling Execution with SQL Server Agent
Without a doubt, you will need the ability to automate the execution of your Integration Services packages. While you may use many popular scheduling tools to accomplish this automation, we will be looking at how SQL Server Agent can assist in automating execution.
You start by creating a job and then including at least one step of the SQL Server Integration Services Packages type. You can also configure other job options. One option we may configure includes job notifications to send e-mail messages when the job completes, succeeds, or fails. Another job option you may configure includes job alerts to send notifications for SQL Server event alerts, performance condition alerts, or WMI event alerts.
Here's how to set up SQL Server Agent to execute a package.
-
Open Management Studio and connect to a SQL Server.
-
In Object Explorer, expand the SQL Server Agent.
-
Within the SQL Server Agent section of Object Explorer, right-click the Jobs folder and select New Job.
-
On the General Page of the New Job dialog, provide a name, owner, category, and description for the job.
-
On the Steps Page of the New Job dialog, click the New button along the bottom.
-
On the New Job Step dialog, provide a step name and select SQL Server Integration Services Packages type. Additionally, configure the SSIS-specific tabbed sections with the information required to run your package. This SSIS section is almost identical to the options we provided when using the DTExecUI utility (see Figure 6-15). You have a package source that you set to SQL Server, filesystem, or SSIS Package Store. Next, you have to provide the package you wish to schedule. When you select the Command Line tab, you can review the detailed command line that will be submitted by the SQL Server Agent to execute the package. You may wish to compare this to the command-line values generated by the DTExecUI utility while you were testing package execution.
-
On the Advanced page of the New Job Step dialog, you can specify actions to perform when the step completes successfully, the number of retry attempts, the retry interval, and actions to perform should the step fail. After accepting the step configuration by pressing OK, the Step page of the New Job dialog will show your new step (see Figure 6-16). After adding multiple steps, you can reorder the steps on this page.
-
After accepting the step configuration, on the New Job dialog, you can optionally configure execution schedules, alerts, notifications, and target servers.
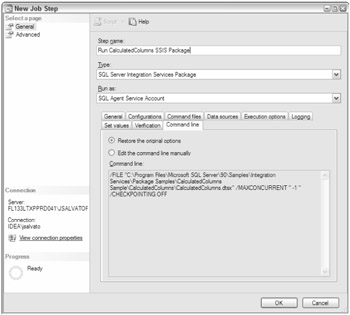
Figure 6-15
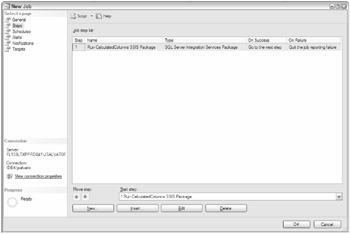
Figure 6-16
EAN: 2147483647
Pages: 193