Using a Contact Sheet to Find Photos After You Back Them Up to CD
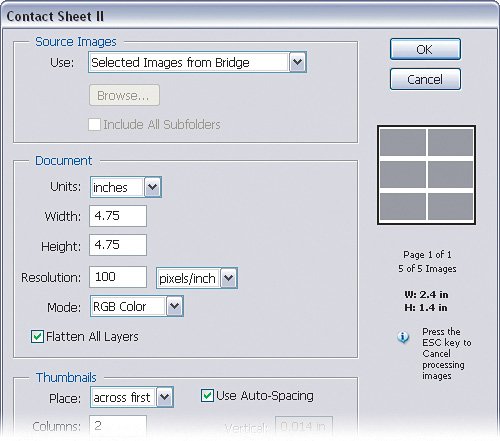
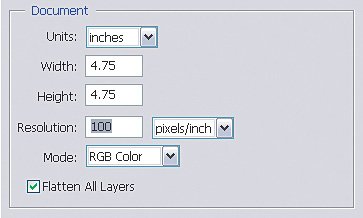
| I often get questions from people asking how they can find their images once they've backed them up to CD or DVD. I don't blame them for asking. Especially with the growing popularity of shooting RAW and the large file sizes, you've got to start backing up photos. If you've got a bunch of disks laying around with all of your photos, how are you supposed to remember what is on them without placing each one into your CD drive and looking? Luckily, there's an easier way called a contact sheet. Step OneIn Bridge, navigate to the CD containing the photos you've backed up or a folder containing any images that you want to create a contact sheet from. Select the images that you want to add to the contact sheet and choose Tools>Photoshop>Contact Sheet II. This will launch Photoshop if it's not open already and open the Contact Sheet II dialog.  ©ISTOCKPHOTO/EVA SERRABASSA Step TwoSince you began this from Bridge, the Use field should already be populated with Selected Images from Bridge. The rest of the options here will determine how your thumbnails will be displayed on the contact sheet. The first thing you'll need to do is decide how large you want this document. If you're creating a document for a CD jewel case, you should use 4.75x4.75". If you just want a regular sheet to preview your images, then you can leave the defaults of 8x10". Also, change the resolution setting to something lower, like 100 or 150 ppi.
Step ThreeThe next section of the dialog, Thumbnails, tells Photoshop how you want your images placed in the contact sheet. There's even a small preview area on the right so you can see what the layout will look like. I know, they're just small gray boxes but hey, at least it's something, right? The first thing you'll want to do is decide how many images you want in each column and row. This is one of those situations where you have to strike a balance between showing a lot of images and making them large enough so you can actually see them. I've found that 6 columns and rows is the max I usually use here (if you can get away with 5 and 5, then go for it).
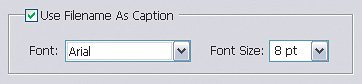
Step FourLastly, if you want to be able to figure out which image you're looking at, then make sure to turn on the Use Filename as Caption checkbox near the bottom of the dialog. Otherwise, you'll still need to look through all of the photos to find the right one. If you know the name, though, you can search for it and find it much quicker. Step FiveYou're ready to let Contact Sheet II do its thing. Click OK and it'll work its magic. In the end, you'll be left with a Photoshop file containing all of your images on one sheet. Just print it out and place it in your jewel case (if that's the size you created) and you can quickly find your images when you need them. 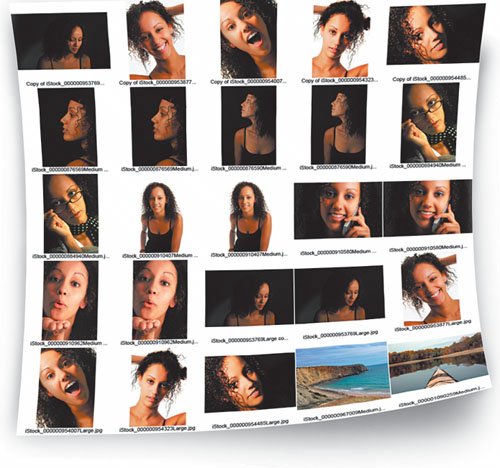 ©ISTOCKPHOTO
|


EAN: 2147483647
Pages: 113