Batch Processing from Scratch
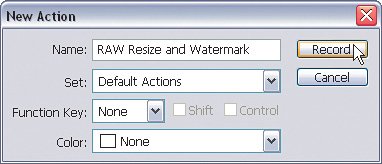
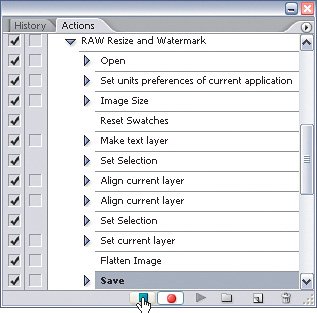
| At this point, we've covered every setting there is when it comes to the Batch dialog. But I didn't want to stop there because I think it's important that you see how to use batch processing from start to finish. Step OneOkay, let's start from square one. First, we'll record an action to use for batch processing. In the Actions palette, click the Create New Action icon at the bottom of the palette. Name the action "RAW Resize and Watermark" and click Record to start recording the action. Step TwoGo into Bridge and find a RAW file. Double-click on the file to open it. When you see the Camera Raw dialog, just click Open to open the image in Photoshop. If you look in the Actions palette, you'll see that this step was recorded. 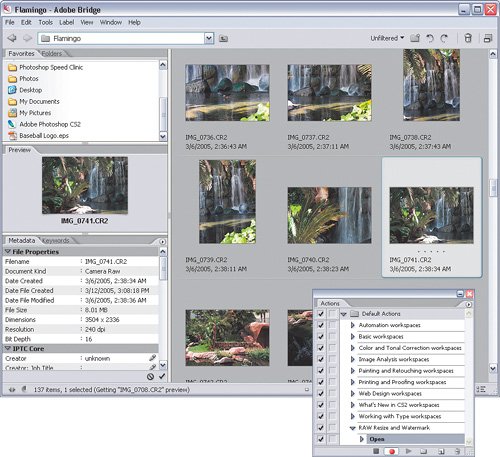 ©MATT KLOSKOWSKI
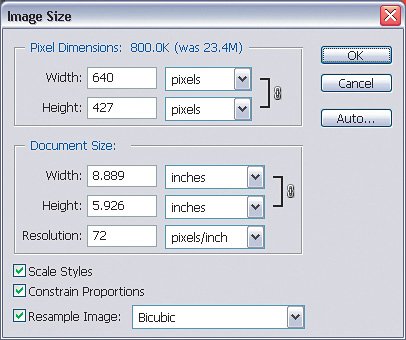
Step ThreeSince we'll be adding a watermark, press Command-K (PC: Control-K) to go into Photoshop's Preferences. Choose Units & Rulers from the first pop-up menu. In the Units section, from the Rulers pop-up menu, select Percent. Click OK to save the changes and now everything you do in Photoshop will be done in percentages of the overall image dimensions and not actual pixel coordinates. Step FourTo resize this image for the Web, choose Image>Image Size. First, change the Resolution to 72 ppi and then change the Width to 640 pixels. Click OK. Step FivePress D to set your Foreground color to black. To create the watermark, select the Type tool (T), click on the photo (do not create a text box), and type your initials. I chose Myriad Bold at 150 pt for this example. Then click the Commit checkmark on the right side of the Options Bar. Note: I'm just using some simple letters here, but you could also use a logo or a shape for this watermark. Refer back to the tutorial on adding a watermark in Chapter 3 to see how to do this. 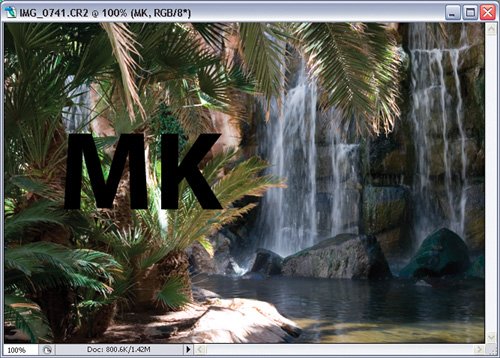
Step SixNext, to place the text in the exact center of the document, press Command-A (PC: Control-A) to Select All. Choose Layer>Align Layers To Selection>Vertical Centers. Then, choose Layer>Align Layers To Selection>Horizontal Centers. This will put the watermark in the exact center of the image no matter what the image dimensions are. Press Command-D (PC:Control-D) to Deselect. 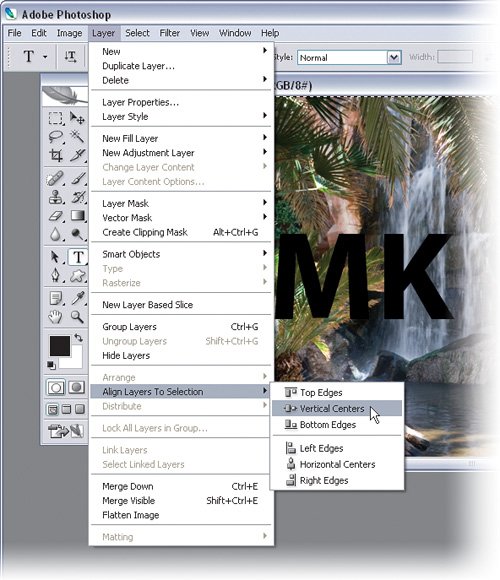 Step SevenNow, it's time to add the watermark style to this watermark. Double-click on the watermark layer to bring up the Layer Style dialog. Click on the Bevel and Emboss option on the left and leave the default settings. 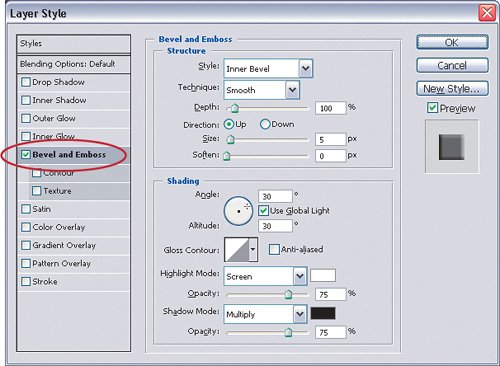
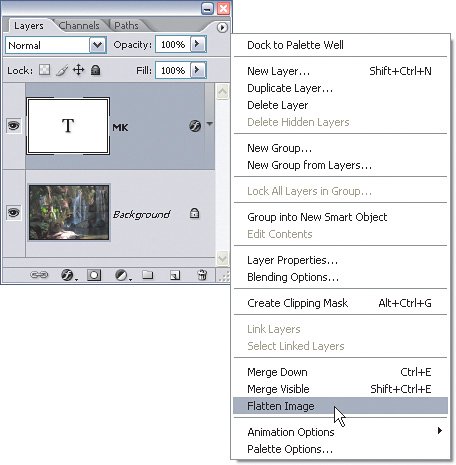
Step EightNext, under Blending Options, in the Advanced Blending section, drop the Fill Opacity setting down to 0%. This should remove all of the color from the watermark but leave the beveled see-through appearance intact. Click OK to close the Layer Style dialog. 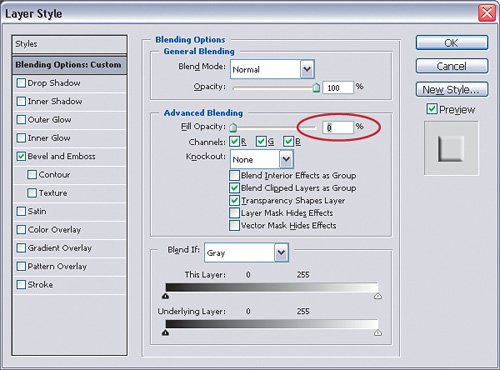 Step NineFrom the Layers palette's flyout menu, choose Flatten Image to flatten all layers.
Step TenSave this image for the Web by choosing File>Save As. It doesn't matter at this point what you name the image because you're just recording the save settingsBatch will take care of the real naming for you later. In the Save As dialog, choose JPEG as the file format and click Save. The JPEG Options dialog will then open. Set the Quality to 8 with Baseline Optimized selected. Click OK to save the image. 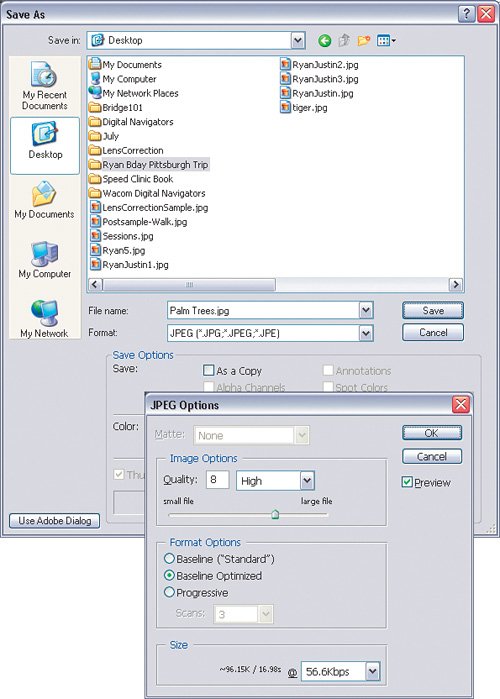 Step ElevenOkay, you're done with this part. Click the Stop Recording icon to stop recording the action.
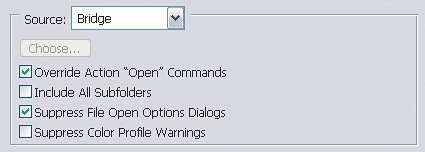
Step TwelveNow, let's batch an entire folder of images using this action. Open Bridge and select the images you want to batch. Then choose Tools>Photoshop>Batch. 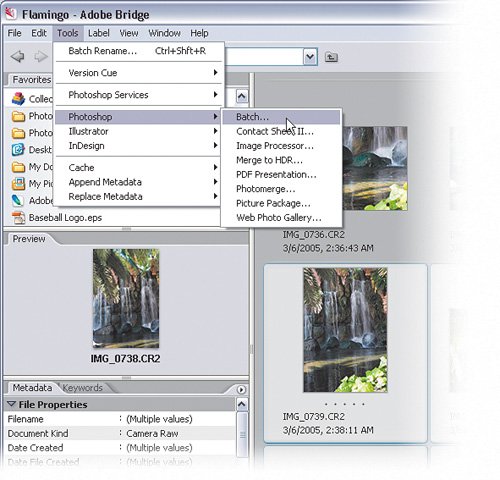 Step ThirteenFrom the Batch dialog, in the Play section, choose the set where you saved the RAW Resize and Watermark action that you just created. Then, from the Action pop-up menu, choose the action itself. Step FourteenThe Source setting will already be set to Bridge, so don't change that. However, make sure you check Override Action "Open" Commands and Suppress File Open Options Dialogs, so we don't see the Camera Raw window open each time.
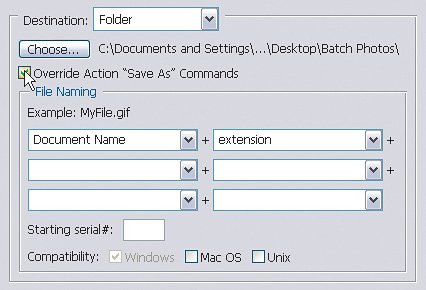
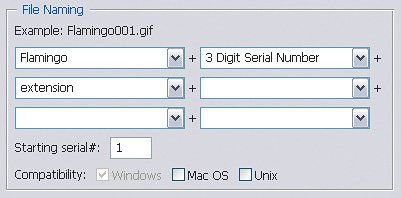
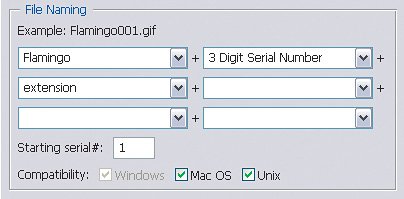
Step FifteenIn the Destination section, select Folder and choose a folder on your Desktop (or anywhere on your computer) to save these images into. Check Override Action "Save As" Commands here, as well. Step SixteenIn the File Naming section, click once in the field that reads Document Name. Enter a name that is descriptive for these images, such as the location where they were taken. I'll use "Flamingo" for this example, since I shot these in the back of the Flamingo hotel. In the pop-up menu to the right, pick 3 Digit Serial Number and in the second pop-menu down on the left, choose extension. Also, make sure to enter "1" in the Starting Serial# field. Step SeventeenTurn on all three Compatibility checkboxes to be sure these files will be compatible on both a Mac and a Windows PC.
Step EighteenIn the Errors section, choose Log Errors To File. Click on Save As and select a folder in which to save the error log. Name it something descriptive like "Batch Errors" so it's easy to find later. 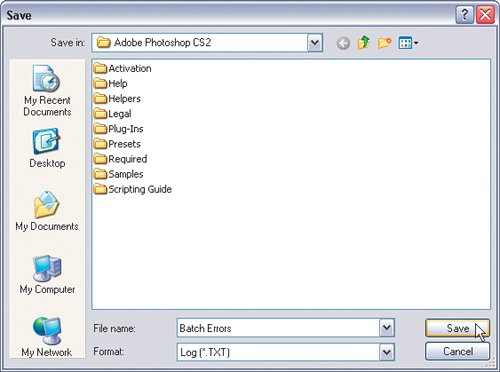 Step NineteenNow, you're ready to run Batch. Just click OK to start. This is when you'll want to go get that cup of coffee, as this may take a while depending on how many images you've selected, but it's worth it. When Batch is done, go into Bridge and find the folder with your new images. If you open one in Photoshop, you'll see that they are indeed resized JPEG images with a water-mark on them and with the file name you chose. The best part is that Photoshop did all the work for you. 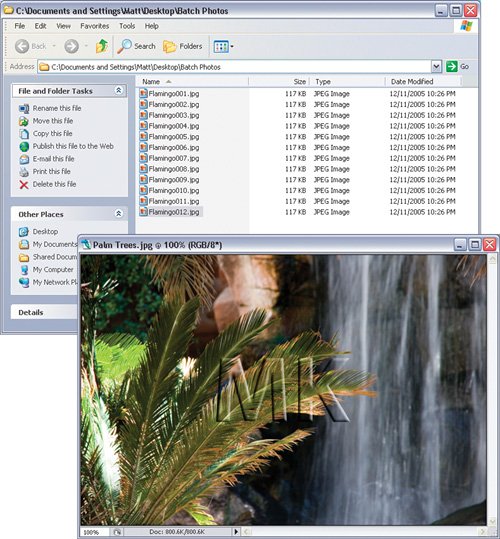
|


EAN: 2147483647
Pages: 113