| In Retrospect, if you want to make a bootable copy of your hard disk, you use the Duplicate feature. You can create a one-off duplicate by clicking Duplicate on the Immediate tab, but here, we're concerned with setting up duplicates as a regularly scheduled activity. To do so, follow these steps: 1. | Click the Automate tab, and then click the Scripts button. The Scripts window appears.
| 2. | Click New to create a new script, and select Duplicate in the dialog that appears. Click OK.
| | | 3. | Enter a name for your script (see Label Media and Files, page 162, for suggestions) and click OK. The Duplicate window appears (Figure 15).
Figure 15. The Duplicate window, like other script summary windows, provides an overview of the options selected for this script. 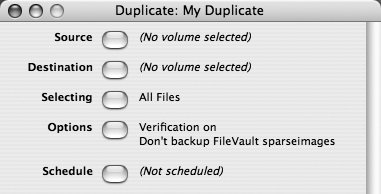
| 4. | Click the Source button. Select the volume you want to duplicate and click OK.
| 5. | Click the Destination button. Select the volume where your duplicate will be stored. Choose Replace Entire Disk (or Replace Entire Contents) from the pop-up menu at the top of the windownot Replace Corresponding Files!and click OK. Keep in mind that the destination volume, if a hard disk or partition, must be at least as large as the amount of data on the source volume.
Note You must choose a volume iconnot a subvolume or folder iconas the destination if you wish your duplicate to be bootable. Warning! Check to see that the destination volume does not ignore ownership; if it does, your duplicate will not be bootable. To check this, select the destination volume's icon in the Finder and choose File > Get Info. In the Ownership & Permissions portion of the window, make sure the checkbox labeled Ignore Ownership On This Volume is deselected.
| 6. | Optionally, click the Selecting button and make a selection from the pop-up menu to restrict which files are copied. You might, for example, choose All Files Except Cache Files or All Except Cache & Spotlight; these two choices will speed up the duplication while omitting non-critical files. If you're using Retrospect Desktop, you can click More Choices to access more-sophisticated selectors. When you're finished, click OK.
| | | 7. | Click the Options button. Make sure the Verification checkbox is selected, and click OK.
| 8. | Click the Schedule button and add in your desired schedule. (I talk more about setting up schedules in Schedule a Duplicate, ahead.) When you finish, click OK.
| 9. | Close the Duplicate window, and click Save when prompted.
|
Your Duplicate script is now ready to go, and will run on the schedule you seteven if you quit Retrospect. If you want to run it immediately, choose the script's name from the Run menu. After testing your duplicate (read Test Your Duplicate, page 165), you can repeat this procedure to set up Duplicate scripts for additional hard disks or other media. Schedule a Duplicate You can schedule duplicates to occur as frequently or as seldom as you wish, but I suggest running them at least once a week. Better yet, use two or more hard drives and alternate your duplicates between themdrive #1 one week, then drive #2, and so on. This scheme will enable you to keep one of the drives off-site at all times. In this example, I show how to schedule duplicates to run once a week, alternating between two drives. Feel free to alter these instructions to meet your needs if you're using a different number of drives or want to run duplicates at a different frequency. To schedule an alternating weekly duplicate in Retrospect, follow these steps: 1. | Select the Automate tab and click the Scripts button.
| 2. | Select the Duplicate script that you created for your first drive; then click Edit.
| | | 3. | Click the Schedule button, and then the Add button (Figure 16).
Figure 16. Retrospect's Schedule list (still empty in this example) appears when you click the Schedule button for a script. Add a new schedule by clicking the Add button in this dialog. 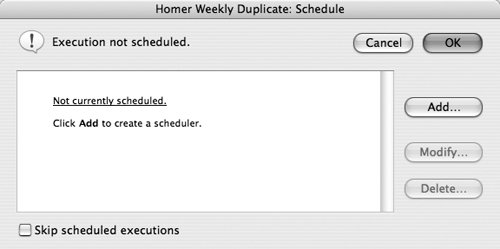
| 4. | For the kind of schedule to add, choose Repeating Interval.
| 5. | Enter today's date as the start date.
| 6. | Choose the day of the week on which you want the backup to occur, and select a time.
| 7. | From the Repeat pop-up menu, choose Every <x> Weeks on <day of week>.
| | | 8. | In the field labeled Weeks, enter 2 if you have two sets of media or 3 if you have three sets of media. Figure 17 on the next page shows an example of what the finished schedule may look like.
Figure 17. This repeating interval schedule in Retrospect runs every 2 weeks on Saturday. To change it to every 3 weeks, enter 3 in the Weeks field; to change the interval from weeks to days or months, use the Repeat pop-up menu. 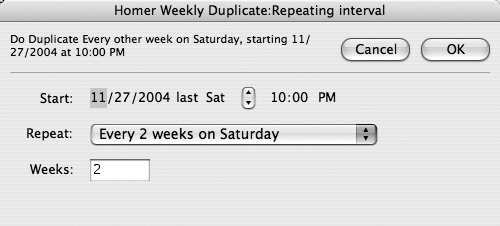
| 9. | Confirm that the text at the top of the dialog matches your expectations, as in "Do Duplicate Every other week on Wednesday, starting 12/01/2005 at 2:00 AM." Then click OK.
| 10. | Select your next Duplicate script and repeat Steps 38, but in Step 4, choose a start date 1 week later.
|
Your selected scripts will now alternate on a weekly basis. Note After you set up a schedule, you can quit Retrospect. Retrospect installs a small background application in your /Library/StartupItems folder called RetroRun, which monitors your scheduled backups and launches Retrospect, when necessary, to run them at the proper times.
|