Basic Types of Synthesis
When we talk about digital synthesis, we're really talking about the ability to make computers and digital hardware into playable musical instruments. Your digital audio workstation software can produce sound, but by most definitions it's not a musical instrument. (Applications like Ableton Live, which can be used onstage as well as for recording, are in a gray area.) A synthesizer is able to respond to MIDI input in real time, turning your performance on a MIDI keyboard or other controller into musical sound. With a synthesizer, the input is MIDI and the output is audio.
Instead of strings, hammers, reeds, pipes, membranes, and metal barsthe means by which acoustic instruments functionsynthesizers use the basic sound creation elements of the electrical and digital worlds . These can be used to mimic recognizable acoustic instruments or to create sounds you can get only from electronic instruments.
What Is Synthesis?
The term "synthesizer" was controversial among early instrument builders. They were concerned the moniker would imply that electronic instruments were "artificial" replacements for acoustic instruments rather than unique instruments in their own right. In fact, "synthesis" doesn't mean the creation of something from nothing or the creation of something fake. Synthesis is the process by which simpler elements work together to create a more complex, coherent whole.
A synthesizer is any musical instrument, either hardware or software, that creates sound by electronic means in response to input from a player. The input is often in the form of a live performance on a MIDI controller keyboard, but could also be from a sequencer track, a pattern generator, or some other control mechanism. The resulting sound could be highly artificial, or it could be a software-simulated orchestra. (Usually, the use of the term "synthesizer" also implies that the user can edit the sounds being created in significant ways by adjusting the settings of various synthesis parameters. An electronic instrument that plays only preset sounds is not usually considered a synthesizer.)
The method by which the synthesizer produces sound varies from one model to another. A synthesizer may rely on recorded audio samples (as is probably the case with instruments that specialize in electronic piano and simulation of orchestral instruments), or it may produce sound by generating and processing basic waveshapes and digital models.
Synthesizers can be called synths, soft synths (software synthesizers), or virtual instruments (a term that often refers to synths that mimic either acoustic instruments or specific hardware like an electric piano).
| | Lend a hand: It's best to explore synthesis with some kind of input that allows you to play music on the synthesizer. The most common, of course, is the MIDI keyboard, so in this chapter we'll refer repeatedly to a "keyboard" as an input. As we discussed in Chapter 8, you can use all kinds of other devices as MIDI inputs as well. So if you're playing a MIDI guitar, a MIDI trumpet , or a MIDI accordion, you can substitute those. |
Where You'll Find Synthesizers
Software-based synthesizers are found either as stand-alone applications or as plug-ins. (Many instruments can run in either mode.) As a stand-alone, a soft synth receives MIDI input and sends its audio output directly to your computer's audio interface. In plug-in mode, the synth appears inside your DAW of choice. External MIDI signals are routed into the synth by the DAW, which also sends the synth any MIDI messages that have been recorded into the track to which the synth is assigned. The audio output of the synth passes through the DAW's mixer, where it can be processed in various ways or even captured ("bounced") as a new audio track.
After capturing the output of a plug-in synth as an audio track, you can remove the synth from your DAW project, as the synth itself is no longer needed.
Many DAWs come with a collection of soft synths, and others can be added as third-party plug-ins. Other applications that contain synths (like Propellerhead Reason, www. propellerheads .se), although not plug-ins, can be coupled with your DAW for use as an instrument via ReWire. You can also build your own software instruments using modular programs like Cycling '74 Max/MSP (www.cycling74.com), Native Instruments Reaktor (www.native-instruments.com), and Synthedit (www.synthedit.com).
In this chapter, we'll focus on software for the sake of simplicity, but you'll find that most of the principles discussed apply to hardware as well. The primary difference is the user interface, although as some higher-end keyboards add large-screen LCDs and, conversely, soft synths allow for easier use of hardware controls, even that difference is eroding.
Elements of a Synthesizer Patch
Unlike an acoustic instrument like a piano or kazoo, the way a synthesizer sounds and behaves when you trigger a note isn't fixed. It's the result of a combination of settings on the synth. After adjusting various parameters to create a specific sound, you can store all of the instrument's settings together as a group called a program, preset, or patch.
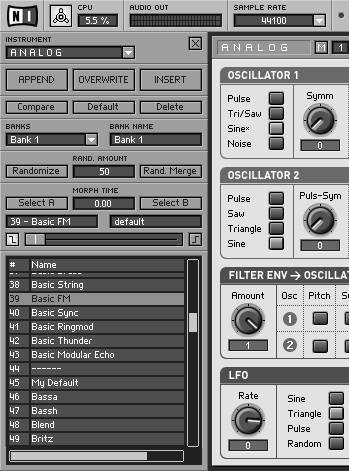
In Chapter 8, we looked at the concept of a program as it's termed by MIDI. The terms program, preset, and patch are generally interchangeable. All of these terms refer to some kind of stored instrument settings, a combination of a configuration that creates the sound itself with parameters for how the sound should behave when played ( Figure 9.1 ). On a software synth, these settings are stored in files on your hard drive. If the patches are sample based, they'll also include either the audio data or a pointer to an audio file somewhere on the hard drive. With a synth that isn't using sample playback, the patch is simply a record of the settings you've chosen . We'll use the term "preset" to refer to the "factory" patches installed with a soft synth, and more generally refer to these settings as patches.
Figure 9.1. SoundSchool Analog mimics a hardware instrument in that there are fixed memory locations in which you can store patches. SoundSchool calls patches "snapshots," hence the camera icon in the main toolbar (not shown). If you run out of empty slots in the active bank, you can switch to a new bank, so you're not limited to the 128 slots shown here. Just don't forget to choose File > Save All Banks when you're done. Since the synthesizer is running in the computer's RAM, all of your edits will be lost unless they are saved to disk.
Part of the point of using a synthesizer is to take advantage of the ability to change patches or programs so that they meet your musical needs. Creating your own custom programs is often called synthesizer programming . (Except in rare cases, synthesizer programming means editing parameters in a patch, not programming in the sense of writing lines of code.)
Making your synth your own
You can approach using synths in several ways. You can use the supplied factory presets simply by loading them from the list and not worrying about what the knobs and buttons do. This is usually the best way to become acquainted with what a synth can do, and if you're using something like a virtual piano, you may not have any desire to go beyond the factory defaults.
Most of the time, though, you'll find yourself wanting to edit the factory patches slightly, if not more radically . A preset might sound just a little too bright, for instance, in which case adjusting the filter will solve the problem. You may also want to go beyond tweaking, adding some effects to an instrument until it sounds quite different from the original.
In other cases, it's easier to work from scratch, building up the sound you want from basic elements rather than starting with a preset loaded with lots of options. In this case, you'll want to forgo the factory presets altogether.
Regardless of your approach, you should save your sounds and their settings so you can use them again later. To accomplish this, soft synths generally include at least some of the following functions for managing individual patches:
-
Load: Loading a patch replaces any sounds and settings (or those active on the current part, if the synth is multitimbral) with those stored in the patch. You usually won't be able to produce sound until a patch is loaded, although some synths automatically load a default patch for you on launch.
-
Save: Saving a patch stores all active sounds and settings for the current part, either overwriting an existing patch or saving to a new patch. (Some instruments, including SoundSchool, save to RAM for temporary use rather than to your hard drive, so there may be a separate option for storing your patch permanently.)
-
Create basic/empty patch: Many synths either include a basic patch with all the bells and whistles turned off or let you create one. This is especially useful for creating sounds from basic ingredients , focusing on individual elements without lots of built-in effects and filters kicking in. (Note that some synths, apparently anxious to show off all their features, include a fancier preset as the default. This is the case with SoundSchool Analog, as used in this chapter. Its "45 - My Default" preset enables many parameters by default, so later in the chapter we'll use more basic presets to begin plain- vanilla sound design.)
-
Duplicate: Duplicating creates a copy of an existing patch so you can edit it while leaving the original untouched. This is handy if you're frequently editing existing patches. If your synth lacks such a function, you can simply open an existing patch and save it with a different name after editing.
-
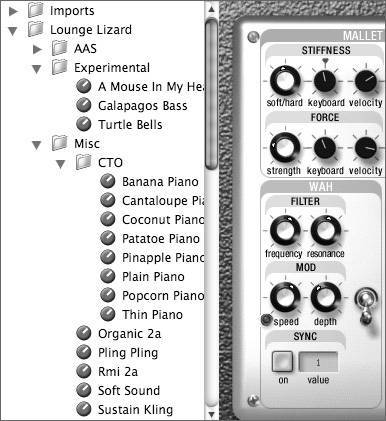
Organize: Many synths let you store patches in folders or banks to keep them organized, as in Figure 9.2 . It's a big improvement over storing everything in one giant list of patches, in which it can be hard to find the sound you want.
Figure 9.2. Applied Acoustics' Lounge Lizard basically functions as just one instrument, an electric piano. But by organizing factory and custom presets into folders and subfolders , the synth lets you save and recall every slightest tweak to its various parameters without having to hunt through an enormous list of presets.
Many of the edits you'll make in a synth are local patch settings, specific to the settings for an individual sound program. On multitimbral instruments, several individual programs can be combined into a larger unit called a multi or combi a patch that combines a bass and piano, for instance, or one that layers several sounds at once. The edits made in a multi/combi are usually made in a separate area, and won't affect the data in the individual presets. Most synths also have some kind of global settings for storing parameters that affect all patches loaded on the instruments.
| | Why are patches called patches? In early analog synths, sounds were constructed using combinations of patch cords, which interconnected the various modules of the synthesizer. Since there was no software to save these custom instruments, musicians would have to either remember or write down the locations of the tangle of cables they had set up. Literally, their sound design was a patch: a mess of cords that produced certain sounds and behaviors. |
Nearly all synths have at least load and save capabilities. Your best strategy as you're experimenting with a synth is to save variants of sounds frequently, storing them in a specific folder so you can go back later and choose your favorite tweaks.
Oscillators
On an acoustic instrument, there is typically one component that is the source of the actual sound. On a piano, guitar, or violin, it's a string. On a clarinet or sax, it's a reed. On a drum, it's the membrane of the drum head. This source vibrates and produces the sound, which is then modified by the body of the instrument into the sound we hear.
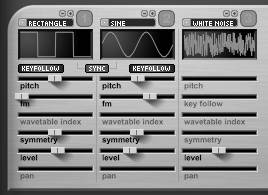
At the core of any electronic instrument are one or more oscillators ( Figure 9.3 ). In true analog synthesis, the oscillator produces a continuous electrical signal that translates directly into sound (that is, the oscillation of the electrical signal is translated directly by the transducer into vibrations). In digital synthesis, the oscillator produces a digital signal. Analog synths have a limited repertoire of signal shapes , based on the capabilities of electrical circuits, but digital synths can use more complex models of sound and can use recorded audio waveforms (samples) as a signal source. ( Virtual analog synths are digital synths that replicate the waveshapes and other features of analog synths, as we'll see later in the chapter.) Whether analog or digital, this signal can be combined with signals from other oscillators, processed through filters and amplifiers , or processed through effects.
Figure 9.3. Oscillators are the source of the sound in any synth, whether they're generating sound using a previously recorded sample or some other waveform. Here in MOTU's MX4 synth, the three oscillators being mixed are using basic "virtual analog" wave sources, the same waveshapes you'd find on a 30-year-old hardware synth.
Voices and polyphony
A voice is usually considered to be a single channel of audio in an instrument; a four-voice synthesizer, for instance, can play four distinct sounds at once. If each note triggers only one sound, a four-voice synthesizer can also play four notes at once.
Instruments capable of playing multiple notes at once are called polyphonic . Early synthesizers like the original Minimoog were capable of playing only one note at a time, and thus were called monophonic instruments. Although it's impossible to play chords on a monophonic instrument, they are useful for bass and solo lead lines. Many polyphonic instruments today can be set to a monophonic mode to let you play them like the early monophonic instruments popular in jazz and rock; others can reduce the number of available voices to decrease the resource load on your computer system.
So why do we refer to both voices and polyphony, since they seem to have similar meanings? Voices relate to sounds, whereas polyphony relates to notesthe number of keys you're pressing at one time. If each note triggers one voice, the two terms mean the same thing. But if each note triggers more than one voice, the amount of polyphony will be less than the number of voices. For instance, if a synth preset layers four sounds to each note, four voices will be used for each note played, so an eight-voice synth playing that preset will yield only two-note polyphony. Most (although not all) software instruments allow the total number of available voices to be set to a higher or lower value. Reducing the voice count can be useful if your CPU is working too hard.
Pitch and tuning
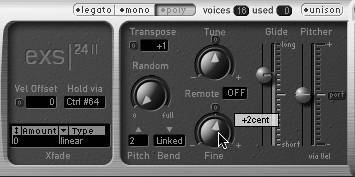
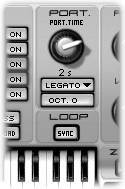
As mentioned in Chapter 8, MIDI has no conception of pitch; notes are simply numbers that the synth converts into musical pitch. You'll typically find overall settings for how the synth turns MIDI notes into pitches among the other settings for a patch ( Figure 9.4 ).
Figure 9.4. Typical pitch parameters, as found in the EXS24 sampler included with Apple Logic Pro (www.apple.com/logicpro). The Transpose, Tune, and Fine controls determine overall pitch, and the Glide setting lets the synth slide between pitches. Note the legato/mono/poly and voice settings at the top, for determining polyphony and available voices.
The simplest setting is a transposition setting, which transposes all pitches up or down in half-step. This can be handy on days when your singer has a cold and can't quite reach the high notes. Sometimes this parameter is labeled "pitch" or "coarse."
For finer tuning, which may be necessary to keep in tune with another instrument, there may be a "fine" adjustment or a "master tuning" setting. The master tuning acts like a digital tuning fork against which the instrument's pitches are determined. (This isn't just for power users, because different countries tend to use different references for tuning. Orchestras in the United States often tune to the pitch A at 440 Hz, for instance, while ensembles in countries like France prefer a slightly higher A at 444 Hz.) The global tuning parameter is typically set to either +/- values in cents or a global setting in Hz. Sometimes there's even a "random" pitch amount, as shown in Figure 9.4 , which is designed to introduce fluctuations in pitch. This supposedly mimics the drift on dirty or unreliable vintage analog oscillators. In reality, it tends to sound very unlike that, but it can be useful for special effects.
| | Tuning outside the lines: The best solution for tuning tables is to use Scala files, a standard file format that can be loaded by a variety of soft synths and even some hardware. For microtonal control of synths that lack tuning tables and can't import Scala files, there are several free and shareware tools available online for micro-tuning; they usually fake these tunings by sending pitch wheel adjustments. Scala file information: www.xs4all.nl/~huygensf/scala Mac (LE version for Windows): Max Magic Microtuner (http://launch.groups.yahoo.com/group/16tone) Mac-only: Open Tuning (www.open-tuning.com) Little Miss Scale Oven (www.nonoctave.com/tuning/LilMissScaleOven) Windows: Algorithmic Arts MicroTone (www.algoart.com/microtone.htm) |
When the portamento or glide feature is enabled, the synth can move smoothly between pitches, like a slide trombone, instead of jumping from one discrete pitch to another, like a piano. Glide is equivalent to what's usually called a glissando in musical terms. Rocker Keith Emerson helped popularize the sound of a gliding synth, most famously in the Moog synth solos in the Emerson, Lake, and Palmer song "Lucky Man." (To try it yourself, see the sidebar "Hands-on: Glide Through SampleTank FREE.")
Generally, synths tune the relative pitch of notes within the scale according to the system used on modern pianos, which is called 12-tone equal temperament. If you're interested in exploring other tunings, such as historical tunings or foreign tunings, some synths support the use of tuning tables . These act as lookup tables that translate MIDI note numbers into other pitches. (Korg's OASYS instruments and several Native Instruments synths support this feature, for instance.) Why would you want to do this if you're not a student of ancient Pythagorean tunings or Indonesian pathet ? Alternative tunings can add variety to a synth sound by producing unexpected pitches.
Basic Methods of Synthesis
Before you begin working with instruments and designing your own sounds, it's helpful to understand some of the taxonomy of electronic instruments. Different synths are grouped by how they produce sounds and by how they're used. Each method has varied in popularity over time, but thanks to soft synths, all of them are readily available for mixing and matching on a computer.
|
Analog subtractive synthesis
The first synthesizers were called analog instruments because the regular, continuous signal output by their oscillators is an analog to the vibration of real-world sound sources like an instrument's strings, as well as to the pressure variations in the air as sound travels . Part of the reason for their enduring popularity is that their sound is unique. Since there aren't acoustic instruments capable of producing anything resembling a sawtooth wave, early instruments like the Moog have become beloved for their distinctive sounds. Just as the first saxophones sounded unique and ultimately found their way into the orchestra (at least in Europe), analog instruments have become part of the language of music.
| | Analog subtractive synthesis: Aliases: "Analog"; "modular" What it's good at: Distinctive, electronic sounds; expressive playing with full timbral control; retro street cred What it's not good at: Sounding like acoustic instruments Hardware examples: Moog Minimoog (including the modern Minimoog Voyager); Buchla 100- and 200-Series; Dave Smith Evolver Software examples: Reason SubTractor; Arturia's Moog emulations ( Figure 9.6 ) Figure 9.6. Arturia's emulation of the 1960s-era Moog Modular reproduces the way it works down to the tangle of patch cords necessary to connect separate modules, a configuration that gave rise to the term "modular synthesis."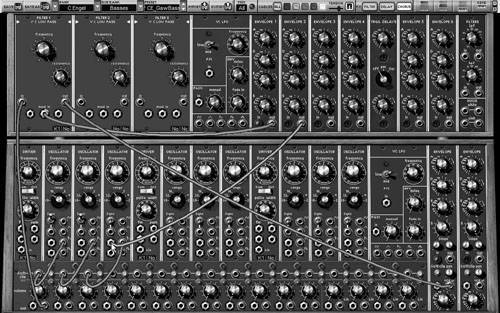 Try it out on the disc: Native Instruments SoundSchool; Green Oak Crystal |
When people refer to "analog synthesis," they're generally talking about a specific synthesis method known as subtractive synthesis . It's so named because the oscillators produce simple waveforms with rich harmonic content. Filters on the synth shape that harmonic content over time by removing certain harmonics, much as the body of an acoustic instrument colors the sound the instrument makes.
The earliest analog synthesizers, designed by Robert Moog on the East Coast of the United States and Don Buchla on the West Coast, were called modular synthesizers, because they were constructed using independent modules that could be bolted into a rack. By interconnecting modules via patch cords in different combinations, it was possible to create different sounds and performance setups for a somewhat custom instrument. This approach survives in software-based modular music production environments like Csound, Max/MSP, and Reaktor. Most analog instruments aren't truly modular, but the division of different parts of the instrument by functionoscillators, envelope generators, filters, low-frequency oscillators (LFOs), and the likeremains, even if the connections between these parts is relatively fixed.
When they first became available, analog instruments were large, heavy, and meticulously assembled by hand, and cost as much as a house. Most "analog" instruments now are really digital instruments that inherit the basic sound design principles and timbral qualities of their analog predecessors. Since digital synths don't generate real analog signals, they're technically virtual analog synths; they replicate the signal characteristics of analog circuitry using digital oscillators.
You'll find subtractive principles in a number of guises in today's soft synths:
-
Analog emulation: Some instruments directly mimic the look, feel, function, and sound of vintage analog gear.
-
Analog-style synthesis: Because the technique of subtractive synthesis is so popular, many synths re-create this basic working method but with an interface of their own contrivance.
-
Modular design: Even some instruments that aren't analog-style synths per se still inherit elements of their design from the original modular layout. Nearly all synthesizers have remnants of the early modular synths' envelope generators, filters, modulation sources, and other features.
FM and additive synthesis
Subtractive synthesis isn't the only means of combining oscillators and producing sounds from simple components . Two others we'll look at in this chapter take a different approach. Frequency modulation (FM) synthesis uses two or more oscillators to modulate one another, all within the audible frequency range, resulting in complex, bell-like timbres. Additive synthesis sums individual overtones (which may or may not be produced by separate oscillators) to produce new, complex timbres in a manner roughly equivalent to the way drawbar organs work, producing a composite sound from multiple basic components. The Hammond Organ operates on this principle.
| | FM synthesis: What it's good at: Rich, bell-like timbres and unique sonic effects; broad sonic palette What it's not good at: Realistic strings; providing quick results for newcomers to sound design Hardware examples: Yamaha DX7 (and DX series) Software examples: Native Instruments FM7 ( Figure 9.7 ); Oxe FM synth (free Windows-only VSTi; www.oxesoft.com); Logic's EFM1 Figure 9.7. Native Instruments' FM7, a modern reinterpretation of the Yamaha DX7, uses six oscillators for its frequency modulation. Filtering and distortion in the FM7 allow for thick, morphing tones, and multisegment envelopes allow for rhythmic effects.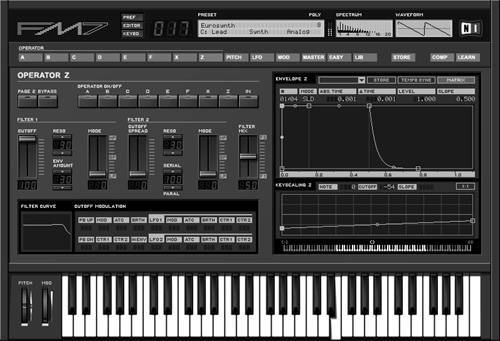 Try it out on the disc: Ableton Operator (part of Ableton Live demo); Green Oak Crystal; basic functionality in Native Instruments SoundSchool |
Basic FM and additive techniques were possible in analog synthesis, although they were used far less often than subtractive synthesis. FM was less popular with early analog synths because it requires finely tuned oscillators for the best results. The tuning inconsistencies common in early oscillators get in the way of reliable FM sounds. FM and additive have grown in popularity with the advent of digital oscillators and with faster CPUs and DSP chips.
| | Additive synthesis: Alias: "Fourier synthesis" What it's good at: Producing rich, organlike, complex sounds What it's not good at: Much less common than subtractive synthesis; less fruitful in sonic possibilities; processor- intensive in the digital domain Hardware examples: Kawai K5 and K5000 Software examples: Camel Audio Cameleon 5000 (www.camelaudio.com, Figure 9.8 ); White Noise Additive (Windows-only, www.whitenoiseaudio.com/additive) Figure 9.8. One advantage of additive synthesis is that it lends itself to morphing and individual harmonic control, both of which are exploited in Camel Audio's Cameleon 5000. A "morph square" lets you morph between different sounds, and the program lets you control individual harmonics via a graphical interface (shown here) or even by importing an image file.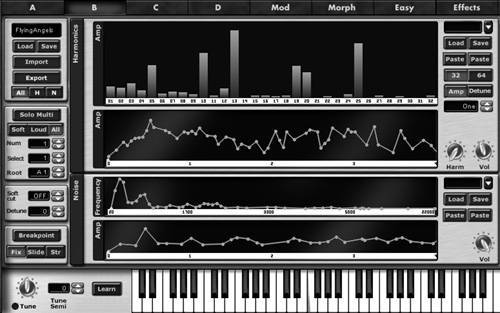 |
Even though the techniques of additive synthesis programming are beyond the scope of this book, we will look at some of the basics of FM synthesis in the context of subtractive synthesis, since basic FM is supported in SoundSchool.
| | Splitting hairs on "samplers": Many instruments marketed as samplers really aren't. Technically, an instrument is a sampler only if it's capable of recording sound from a live audio input. If not, it's a "sample playback synth," not a sampler. Nowadays, you can record audio into your DAW and drop it into the synth or otherwise import audio. For that reason, the term "sampler" is usually used to connote a sample playback synth into which the user can load any new sample as needed. |
Samplers and sample playback
Analog subtractive, additive, and FM synthesis are great for producing distinctive sounds, but you can go only so far with basic waveforms when it comes to mimicking the complexities of real-world sound. Rather than finding electrical or digital substitutes, the obvious way to make an instrument sound as if it incorporates real-world sound is to simply use recorded sound as a signal source. When you play a note, a sample playback instrument reproduces the recording, which can then be routed through envelopes, filters, and effects as with other synthesis methods.
The limitation of using recorded sound is that you sacrifice control over the sound source when you trigger a static recording instead of a mutable waveform. Sound designers have attempted to compensate by adding more recorded waveforms, with additional sounds triggered in different regions of the keyboard and played at different velocities. But that increases the memory requirements of the patch, since it requires additional sounds to be played back from RAM or the hard disk. Also, the effect of playing sample-based instruments can feel less expressive than instruments using other synthesis techniques. Despite the loss of some expressive control, the sound is lifelike, since it uses actual recordings.
| | Sampling/sample playback: What it's good at: Reproducing the sound of acoustic instruments; incorporating real-world sounds What it's not as good at: Can be less expressive to play; high RAM requirements Hardware examples: Akai S-series samplers; Korg Triton keyboard (sample playback) Software examples: Native Instruments Kontakt; MOTU MachFive ( Figure 9.9 ); Steinberg HALion; TASCAM GigaStudio; Audio Key Rig (basic sample playback) Figure 9.9. Samplers and sample playback synths map audio files to the keyboard, triggering those recordings when notes are played, as shown here in MOTU's MachFive sampler.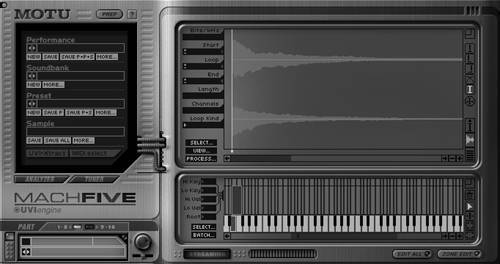 Try it out on the disc: SampleTank FREE (sample playback) |
Sample-based instruments aren't limited to mimicking acoustic instruments. Sampling can be a way of creatively reworking recordings (as hip-hop musicians have done with vinyl) and of creating new instruments (for instance, creating a drum kit from sampled pots and pans).
You'll find sample playback in all kinds of virtual instruments. Instruments designed to replicate hardware and acoustic instruments are the best-known example, covering territory ranging from guitars to full orchestras. Sample playback is also used on several software percussion instruments like Native Instruments Battery and audio groove boxes like Spectrasonics Stylus RMX (www.spectrasonics.net), among many other examples.
You'll also find many commercially available libraries of sampled sounds, either in audio file format or specially designed for specific sampler formats. These collections of sounds are often called soundware, or sound libraries, because the focus is on downloading or installing a library of sounds instead of purchasing or downloading a dedicated software instrument.
Other Synthesis Methods
Sound designers in search of new sounds continually develop variations on the synthesis methods discussed in the previous sections, and exploit other techniques as well. If you're familiar with the basics of sample playback and virtual analog synthesis in particular, you'll find some familiar landmarks in most synths, including similar use of filters, effects, and modulations, although other techniques may require learning some new skills.
Granular synthesis
Inspired by particle physics and the thinking of experimental composer Iannis Xenakis, granular synthesis conceives of the sound world as composed of tiny sonic grains instead of the repeating waveforms discussed elsewhere in this book. Thanks to research by Curtis Roads and others, and developments in digital technology, it's now possible to produce thousands or millions of the tiny sound grain events and turn the theory into sound.
Greatso what does it sound like? Although it's not terribly useful for producing, say, the sound of a trombone, granular synthesis is capable of some unusual sounds. It can create complex organic waves of tiny sound particles or resynthesize live audio. In fact, granular techniques are behind many of the time-stretching and pitch-shifting algorithms in commercial software applications.
Delving into granular synthesis isn't for the faint of heart, but here are some places to begin:
-
Native Instruments Reaktor: Reaktor has built-in granular capabilities; with Reaktor 5, load GrainStates SP from the Ensembles > Classics > Sample Transformer directory.
-
Csound (free): The text-interface, cross-platform modular environment of Csound (www.csounds.com) is appealing for granular synthesis because of the relative simplicity of its grain opcode; see the tutorial on the subject at www.csounds.com/mastering/em_04.html.
-
Max/MSP: There are various externals for Max for granular synthesis; a good place to start is the cross-platform ~mdegranular (www.michael- edwards .org/software/mdegranular).
-
Further reading: Curtis Roads's The Computer Music Tutorial (MIT Press) has an excellent chapter that explains the underlying concepts behind granular synthesis technology.
Generally speaking, simple granular synthesis involves describing a particle type as a tiny envelope of sound and defining the parameters of the grain "cloud," based on random distribution of grains in sonic space. Other granular synthesis techniques (like those employed by some of the Reaktor ensembles and the ~mdegranular object for Max/MSP) require two audio inputs, meaning you can input your own audio file.
Physical modeling
Unlike granular synthesis, which as a synthesis technique has been largely limited to the avant-garde, physical modeling is gaining popularity in the mainstream. It's not new, but it previously required high-end hardware and had unpredictable results. Recent computer developments have made it more practical.
Physical modeling is a way of replicating the physical properties of instruments via mathematical models. These models describe the properties of a vibrating string, the traveling waves through the instrument, the wooden body resonating, and so on. Physical modeling is sometimes called component modeling because conceptually it divides instruments into the various components that produce sound.
Using physical models, it's possible to more accurately represent phenomena that are otherwise difficult to reproduce, like the effect of overblowing a flute or imagining what a glass-stringed violin would sound like resonating in an aluminum tank. Physical models work well for bowed string instruments, wind instruments, and plucked instruments like Clavinets, guitars, and harps, as well as for imagined instruments combining these principles.
Physical modeling is found in a growing number of instruments:
-
Hardware synths like the Korg OASYS (www.korg.com) and Alesis Fusion (www.fusionsynth.com) keyboards
-
Sculpture in Apple Logic Pro (Mac)
-
String Theory , a free VST plug-in (Windows, www.cortidesign.com/ugo)
-
String Studio from Applied Acoustics (Windows/Mac, www.applied-acoustics.com), as well as their Tassman synth studio
These instruments vary in scope. Sculpture, although capable of producing some traditional sounds, specializes in extensive timbral controls and effects for far-out imaginary sounds. String Theory specializes in reproducing real instruments from Clavinets to guitars and violas; extensive presets and musical labels like "string" and "damper" make it a bit more accessible.
Here are some tips for creating and editing physical modeling patches:
-
Make small adjustments: Because of the nature of physical modeling, tiny changes to one parameter like string density can have sudden, dramatic impacts, so adjust one parameter at a time in small increments .
-
Work with components: Adjusting the model for the string or resonating object is nearly always the best place to start, but on its own this model may sound devoid of personality. That's true of all forms of synthesis, but wave sources can sound especially naked with physical modeling. Both Sculpture and String Studio, for instance, have extensive EQ banks for mimicking the way the body of an instrument changes its sound, and distortion for further altering its character.
-
Think about real instruments: Even if you're creating an underwater glass bassoon played by aliens , consider the properties that make real instruments function when played. Parameters like the mass of the terminating or damping object are pretty abstract, until you think about the way your finger stops the strings on a guitar.
-
Try morphing parameters: If your physical modeling synth allows it, try changing the nature of the physical material being modeled during the course of a sound by assigning material parameters to an envelope. This allows some distinctive effects not possible with other techniques.
For instance, a typical workflow in Sculpture ( Figure 9.10 ) would be to choose a basic material first, adjust the first object for the primary means of exciting the object (like bowing), add a second and third object for additional details (like adding noise to the sound and damping upon release for the KeyOff value), fine-tune the material, and then add effects and modulation.
Figure 9.10. Physical modeling synths like Apple's Sculpture provide new control over sounds that mimic acoustic instruments or imagine new ones. Sculpture looks a bit like an alien spacecraft cockpit at first. The best way to approach it, true to its underlying design, is to think of it in terms of its different components. (You'll see many similar editing sections in other synths, like String Studio, although in somewhat simplified form.)
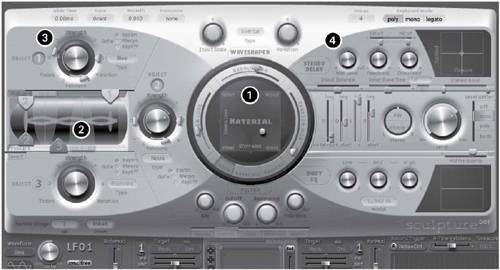
The Material control determines how the vibrating body of the instrument behaves, based on how resistant it is to being blown, struck, or bowed (its stiffness), and how long it resonates once excited (its "inner loss" and "media loss").
This preview of the string in action shows what's happening to the resonating body as notes are played.
Objects numbered 1, 2, and 3 on the Sculpture panel itself are the objects that excite or "play" the virtual instrument. For instance, with object 1 set to Blow, we can create a virtual woodwind of our own design. Other options include settings like Bow, for bowed string instruments, and Pluck . (One advantage of physical modeling is that you can break the rules, blowing and bowing steel at the same time, for instance.)
Many of the other controls, although intimidating at first, are actually traditional effects sections. (Apple simply chose to include every effect they could think of in the main interface!) The various controls at the bottom of the interface are modulation and envelopes.
As with any instrument, successful sound design and performance with physical modeling synths takes practice. In 1994, when reviewing the first commercial physical modeling synth (Yamaha's VL1), Ernie Rideout wrote in Keyboard that the instrument was one on which you'd want to practiceboth programming and playing.