Create a Backing Track (GarageBand)
When you need accompaniment for practicing, backing tracks to fill in missing players for performances , or a way of quickly turning musical ideas into sketches , loop libraries like the one found in GarageBand are invaluable. GarageBand ships with a vast collection of ready-made musical materials, including selections from many different musical genres. You can make music in GarageBand without ever using these loops , but they can easily complement other recorded parts or stand on their own. Using sounds included with GarageBand, we'll create a country/folk rock arrangement, then record audio parts , and mix to create a completed song.
| | On the DVD: You'll find a completed GarageBand project created via the steps here. If you're on Windows or don't own GarageBand, MP3 files are also included so you can hear the results. |
Since GarageBand matches the tempo of loops automatically, it's possible to combine loops even if they had a different original tempo. GarageBand doesn't match the rhythmic feel of materials, so you may have to audition a few clips to find one that sounds right.
GarageBand at a Glance
GarageBand is at its core a full DAW without a complex user interface ( Figure 5.4 ). It combines basic multitrack recording, editing of audio and MIDI, a complement of effects and instruments borrowed from Apple Logic, and a loop browser and loop library.
Figure 5.4. Basic Garage- Band 2.0 interface.
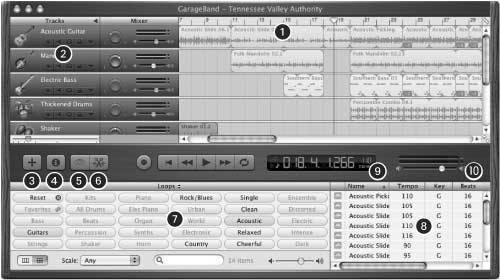
Multiple tracks combine audio and MIDI, including linear material, loops, and patterns
Record-enable, mute, solo, lock tracks, and hide/show automation of volume and pan
Add instrument
Edit instrument settings
Open loop browser
Edit track/region
Select loop category
Audition loops
Master transport and tempo
Master volume
| | Want more loops? You can find loops and instruments to suit any taste, from classical-sounding and jazz to rock and electronica, from Apple, third-party companies, and even free online. Before using a loop in a commercially released song, it's important to read the fine print, as some loops are sold with licensing restrictions. Apple Jam Packs (www.apple.com/garageband/jampacks) Big Fish Audio (www.bigfishaudio.com) East West (www.soundsonline.com) iCompositions: tools guide, third-party products, and free loops (www.icompositions.com/tools) SmartLoops (www.smartloops.com) |
|
| | ACID-compatible: ACIDized WAV files commonly found on the Web (and included on this book's DVD) can be used with GarageBand. The only disadvantage is you can't browse and search them with the Loop Browser; otherwise , they'll work just like Apple Loops. |
Optional Hardware
You can complete this GarageBand walkthrough with just a computer (see Figure 5.5 ), but additional hardware offers other options:
-
An audio interface will enable additional inputs. With GarageBand 2 or later you can record multiple inputs simultaneously (depending on how capable your computer is).
-
A MIDI device like a keyboard or MIDI guitar will let you play in parts.
-
An iPod or other playback device will let you take your backing track with you.
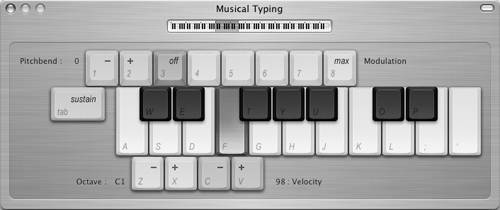
Figure 5.5. If you don't have a MIDI keyboard handy, you can enter notes with your mouse by selecting Window > Keyboard. Better yet, in GarageBand 2 or later, select Window > Musical Typing to use your computer's QWERTY keyboard to input notes.
Tutorial 1: Start a Song and Choose Loops
We'll begin this walkthrough by using loops as they're found in the Loop Browser, and then walk through the steps to add them to the process.
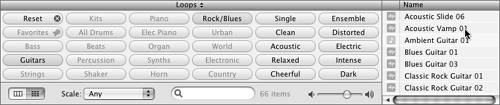
To select loops, click the appropriate categories in the Loop Browser. For example, click Reset in the upper-left corner of the loop categories to ensure all categories are deselected, then click Bass > Rock/Blues > Edgy Rock Bass 01.
To make sure we're placing the loop in the right place, we'll refer to measure (bar) numbers (using the abbreviations "m" and "mm" for measure numbers). You can find bars and beats on the ruler at the top of GarageBand: the numbers are bar numbers , and each tick is a beat.
-
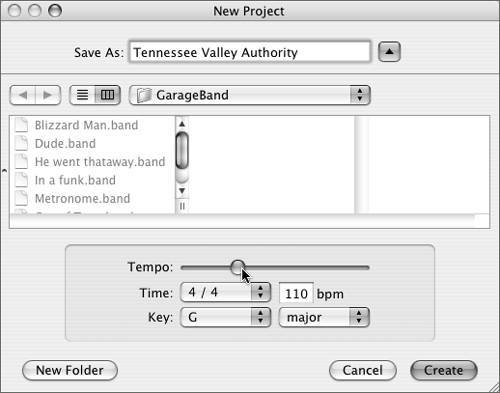
Choose the tempo, time signature, and key: Start GarageBand and either respond to the prompt when the program starts or select File > Create a New Project. For this tune, choose 110 bpm (beats per minute) 4/4 time, in G Minor. (If you're using GarageBand 1.x, you can't specify major or minor.)
Loop ingredients :
Guitars > Rock/Blues > Acoustic Vamp 01
GarageBand tools:
Loop Browser
Automatic Loop Placement
Cycle
-
Clear the piano: We don't need a piano track right now, so let's delete it: select it and press Command-Delete. GarageBand Tracks can use processor cycles even when they're inactive, so deleting them reduces the load on your CPU.
-
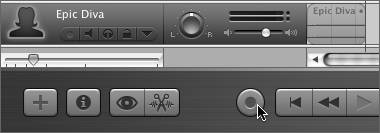
Browse loops: The Loop Browser at the bottom of GarageBand's window lists the available loop categories by instrument and genre . If it's hidden, click the blue eye-shaped icon to display it. Clicking on categories or searching lets you choose loops; you can click on any loop to audition it before you add it to your arrangement. The Reset button clears selected categories.
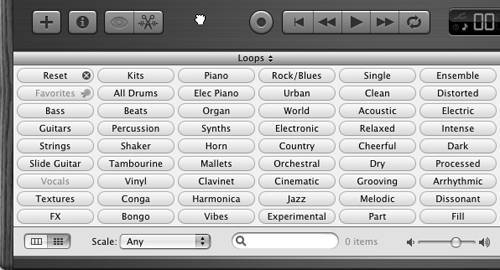

Tip: Not all the loop categories are shown. To view even more options, mouse over a blank part of the toolbar (your cursor should change to a hand) and drag up to expand the window.
-
Find a "starter loop" you like: You want your backup band to provide you with some musical inspiration, so find a loop that immediately makes you want to play. Typically, you'll choose the instrument you want first and genre/style second to narrow your choices. For this tune, click Guitars > Rock/Blues> Acoustic Vamp 1 to set the mood.
-
Add the loop to your song: Once you've found the loop you want, drag it to the empty space below the time ruler at the top, making sure your position (indicated by a vertical line) matches up with the "1" on the ruler for the beginning of the song (m. 1). GarageBand automatically configures a track to play your guitar loop. A loop that's been added to a song is called a region .
Tip: In cycle playback, you can adjust how much of your song is looped by dragging the yellow bar. Drag the center to move it around or the edges to change the loop start and end points.
-
Try out the mix: You could simply click Play at this point, but to loop the playback, click the Cycle button first. GarageBand automatically sets cycle points for the first four measures, indicated by a yellow bar on the top timeline. This makes it convenient to jam with your instrument or vocals as the loops play, or audition new loops you're considering adding. Click Cycle again when you're done to return to nonlooped playback.
Tutorial 2: Create a Basic Arrangement
One loop repeating indefinitely is a long way from a full song. By dragging additional loops from the Loop Browser to new tracks, we'll create new parts and add some musical structure to our song. This will mimic the entrances of live musicians .
Loop ingredients:
Shaker > Shaker 01, Shaker 02
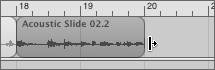
Slide Guitar > Acoustic Slide 06, 01, 02
Slide Guitar > Acoustic Picking 21
Guitars > Country > Folk Mandolin 02
Kits > Country > Southern Beat 02
Bass > Country > Southern Bass 02, 03
Kits > Rock Blues > Ensemble > Percussion Combo 08
GarageBand tools:
Loop placement and stretching
-
Extend the loop: If you position your mouse over the upper-right edge of the Acoustic Vamp 1 region, your cursor changes from an arrow to a loop. Drag to the right, and you can seamlessly repeat the audio. Too many repetitions can become boring, so repeat it just once, ending it at m. 9. (You can see where a loop repeats by observing where its edges curve, as at m. 5.)

-
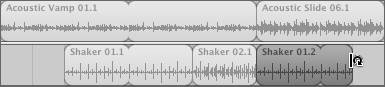
Add another instrument: Staggering the addition of new sounds helps shape the song, so before we bring in our drummer , let's get the groove going with just a shaker: try Shaker 01. Drag it into the empty area below the guitar track to create a new track, lining up the shaker entrance two bars after the guitar at m. 3.

-
Mix it up: Since real musicians (we hope) don't play exactly the same part ad infinitum, we'll add some variation: Drag to repeat Shaker 01 once more (ending at m. 7), then add a bit more intensity to the end of the guitar phrase by adding Shaker 02 (mm. 79), then add Shaker 01 once more (mm. 911). The acoustic guitar can switch patterns, too. Place Acoustic Slide 06 at m. 9 next to the previous loop. We'll leave two bars of silence in the shaker part; a drummer also playing shaker would need time to pick up her sticks.
-
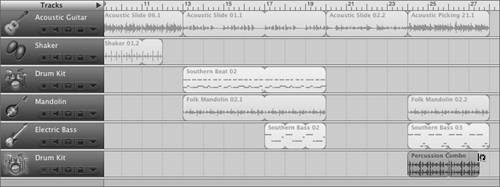
Get the song rolling: Adding multiple instruments gives us the sense of an ensemble and makes this piece start to sound like music. Create new tracks by adding and extending drums and mandolin parts. Add another Acoustic Slide region to the existing acoustic guitar track. Since we can shape the music as much by what we leave out as what we put in, create a bass track but have the bass enter four bars later than the other parts. Then add more musical variety by giving the acoustic guitar a solo: add a different Acoustic Slide at m. 20, dropping out the other parts.
Get the song rolling:
mm. 1320: Southern Beat 02, Folk Mandolin 02, Acoustic Slide 01
mm. 1720: Southern Bass 02
mm. 2024: Acoustic Slide 02
-
Thicker ensemble: After the guitar break, we'll thicken things up a bit with more instrumental layers in measures 2428. For a fuller percussion pattern, we'll add a new percussion track to the bottom ( Percussion Combo 08 needs its own track because it's an audio region, not MIDI, like the Drum Kit track). We'll also have the guitarist switch to picking and bring back mandolin and bass (switching to Southern Bass 03 for variety). Now click the leftmost transport button (single left-pointing arrow) to return the track to the beginning, then click Play to hear the results. (The arrangement will end a bit abruptly, but it's a start!)
Thicker ensembleall in mm. 2428:
Percussion Combo 08
Acoustic Picking 21
Folk Mandolin 02
Southern Bass 03
Tutorial 3: Develop a Song Structure
To further mimic the way real musicians play, we'll make the repetitions tighter and less mechanical, and add chord changes so the song doesn't get stuck in one harmony for its duration.
Loop ingredients:
Strings > Ensemble > Orchestra Strings 02
GarageBand tools:
Region duplication
Region transposition
-
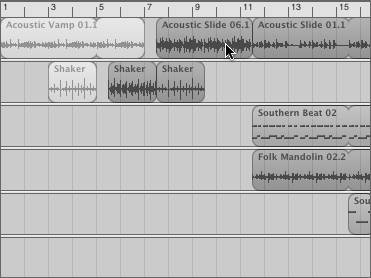
Tighten it up: By removing unneeded repetition, we can make this song a little more exciting. First, remove two bars each of the first acoustic vamp and shaker regions: drag the right edge of the acoustic vamp so that it ends at m. 7 (instead of m. 9) and the right edge of Shaker 01 so it ends at m. 5 (instead of m. 7). Second, move the rest of the song arrangement left by dragging across the other regions to select them and dragging them until they line up again with the acoustic guitar and shaker regions . (There shouldn't be any gap between them.)
-
Halve the Acoustic Slide: Because Acoustic Slide 02 has an internal repetition in it, we don't really need it to last the full four bars. To divide it in half, drag its right edge: mouse to the center of its edge so that your cursor changes to a straight line with a right arrow (instead of the loop), then drag left so that it ends at m. 20. Once again move the remaining regions: move the remaining four loops left from m. 22 to m. 20 to fill the gap. It's a lot of work, but it's worth it. Listen to how much tighter the arrangement sounds.
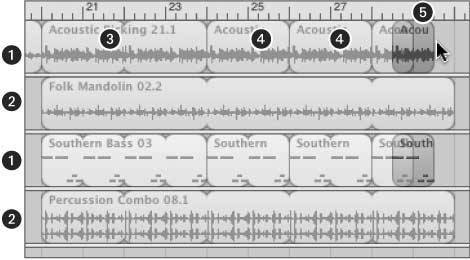
We'll create individual duplicates of the guitar and bass (1) so we can change their pitch and leave the mandolin and percussion (2) loop as is. We'll create a four-bar pattern (3), two two-bar patterns (4), and two one-bar patterns (5) by Option-dragging them into place.
-
Duplicate and divide regions to add chord changes: By dividing separate regions, we can create a song structure. Duplicate the bass and acoustic picking regions: Shift-click to select both regions, then hold down the Option key and drag them to m. 24. Shorten the copied regions so they're only two bars in length, extending them from m. 24 to 26 (you'll need to use the center edge of the acoustic picking region, just as in step 2). Then Option-drag the new two-bar regions to mm. 2628 and 2830 to duplicate and move them two more times. Shorten the regions at mm. 2830 so they're only one bar in length, and Option-drag one last time so you have one-bar regions at m. 28 and 29. Finally, extend the last folk mandolin and percussion combo regions so they extend from m. 20 to m. 30. (We won't transpose either of these regions.)
Why so many steps? GarageBand's loops tend to get stuck in one key. By dividing regions, we can create a harmonic structure (chord changes) by applying pitch changes to the loops. We'll have chord changes that last 4 bars, then 2 bars + 2 bars, then 1 bar + 1 bar.
Transpose regions:
mm. 2024: Not transposed
mm. 2426: 7
mm. 2628: Not transposed
mm. 2829: 5
mm. 2930: 7
-
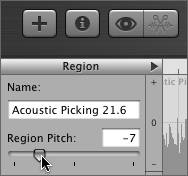
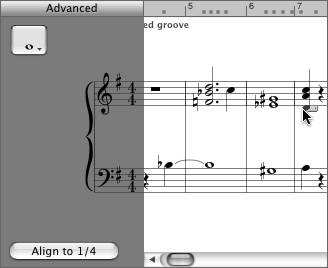
Transpose regions: Now that we've divided the regions, we can transpose them. Select the second and final guitar and bass regions (mm. 2426 and m. 29); hold down the Shift key and click each region to select them simultaneously. Click the track editor button (the one that looks like a pair of scissors cutting a waveform), and slide the Region Pitch fader (under Track, on the left) to transpose the regions' pitch to 7. (For those with some musical background, the fader works in semitones or half steps, so 7 is equivalent to the musical interval of a perfect fifth downward.) Select the guitar and bass in m. 28 and transpose them to 5. (We'll leave the other parts alone: the mandolin sounds fine where it is, and you obviously wouldn't transpose the drums.) Listen to the song: it should sound like a standard blues/rock chord progression. When you're done, switch back to the Loop Browser by clicking the "eye" icon again.
-
Finish the song: To give this short excerpt a sense of wholeness, we'll add one more Acoustic Slide 02 before bringing back the percussion combo and bass (mandolin and more slide guitar). Sparing no "expense," add one final ingredient: Orchestra Strings 02 an element your real band probably can't afford. (If you are wondering why there are so many repeats, sit tight: we're going to fade out the end, so we'll need some extra repetitions.)

Finish the song:
mm. 3248: Percussion Combo 08
mm. 3252: Southern Bass 03
mm. 3644: Folk Mandolin 02
mm. 3536: Acoustic Slide 02
mm. 3652: Acoustic Slide 01
mm. 3252: Orchestra Strings 02
Tutorial 4: Mix and Record
With the basic elements in place, it's time for some fit and finish. Adjusting the panning, volume and fades, and effects of the mix will help get the exact sound you want. At this point you can also record your own vocals or acoustic instrument, adding them to the computer-generated tracks.
-
Adjust pan and volume: At this point, all the tracks are panned center and mixed at exactly the same volume, so it's hard to differentiate parts. To adjust settings for an entire track, open the Mixer panel by clicking the triangle next to Tracks (if it's not open already). Adjust the pan knob and volume until they sound right to you. To begin with, adjust the volume fader for the strings so that they don't overwhelm the other parts; adjust its volume fader slightly to the left.

Effect ingredients:
Master Track > Rock/Pop > Folk Rock
GarageBand tools:
Volume and pan for tracks, volume/pan automation
Effects presets
Master track
Real instrument, software instrument
Recording
Editing
-
Sweeten the sound: GarageBand offers various built-in effects for modifying your sound. Select the second of the two Drum Kit tracks (the one with the audio drums) and click the Track Info button (the one with the letter "i" on it). Click "Drums" in the left column and a number of presets appear in the right column; try selecting different settings and auditioning the sound. (These effects work in real time as your project plays, so simply click Play and try different settings.) If you want to fine-tune the preset or see how it was created, click Details. You can save your own presets as Instruments. For now, let's leave the drums with no effects. To change the master effects through which all the tracks are routed, select Master Track. Try the setting Rock/Pop > Live Gig.
-
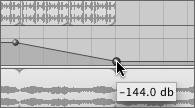
Fade out the end: S o the song doesn't end abruptly, we'll fade out the tracks. You could fade out the whole mix by adjusting the Master Track (Tracks > Show Master Track), but for more subtlety we'll adjust them individually. To bring up pan/volume automation for a track, click the triangle below the track name . Click once on the blue or green filled-in area in the Track Volume lane where you want the fade to begin. Then click where you want the fade to end, and drag the ball down so the volume is lowered . Repeat this process for each track. GarageBand automatically adjusts the volume gradually between these two points for a smooth fade. Continue to fine-tune these adjustments until your fades sound just right. Try letting the drums just drop out, creating gradual fades of several bars for the remaining parts.
-
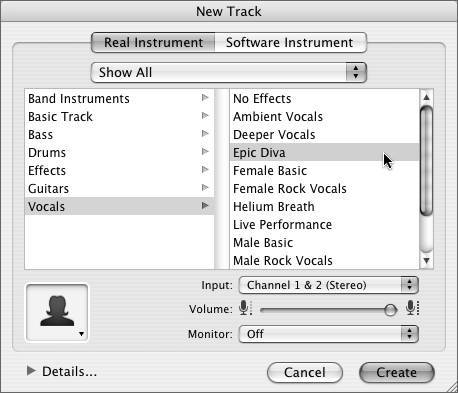
Add your voice or instrument: Now that the "backing" part of our backing track is done, the rest of the music is up to you. (If you just want to play live over the GarageBand track without recording yourself, you can skip the remaining steps and continue to the next section.) Set up your recording by clicking the New Track button. If you're recording your voice or instrument through an audio interface, select Real Instrument and the setting you want. Choose the instrument preset and appropriate input, and turn on monitoring to check the input through GarageBand. If you're recording via a MIDI keyboard or other controller and want to use your computer to generate the sound, select Software Instrument. (If you're using a guitar, you can plug in directly and take advantage of GarageBand's built-in amp simulations, or mike your guitar's amp.)
-
Record and edit: In GarageBand 1.x, simply select the track on which you want to record. In GarageBand 2 and later, you can arm one or more tracks (enable it for recording) by clicking the Record button under the name of the track(s). In all versions, once you're ready, click Record or press the R key to begin. When you're done, you can edit your recorded track (or any of the tracks in the song) by selecting the Edit Track button. If the track is a green MIDI track, you can directly edit notes, either via a graphical view or, in GarageBand 2 and later, in traditional music notation.
Share Your Work: iTunes
Once your mix is done, you're ready to save and share your work. File > Export to iTunes will automatically mixdown or bounce your audio to a single stereo mix and include it in an iTunes playlist. Some strategic use of GarageBand and iTunes, however, can make this feature even more useful:
-
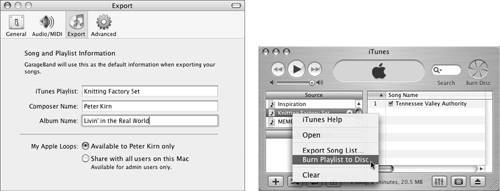
Choose a playlist name: From the GarageBand menu, select Preferences > Export ( Figure 5.6 ). By changing the playlist from the default, you can manage projects more effectively in iTunes.
Figure 5.6. By customizing GarageBand's export settings (left), you can create a custom playlist, so your next rehearsal session will have all your current backing tracks. From iTunes, you can listen to your tracks, burn a CD, or drop songs on your iPod (right).
-
Make iTunes your personal musical assistant: Create a playlist of songs-in-progress you're working on, for instance, or store rehearsal sets, performance sets, or albums, by setting different playlist names . Using iPod preferences, you can selectively load these on your iPod, too.
-
Export to a CD: By right-clicking on a playlist title in iTunes, you can burn a CD.
-
Compress to AAC in iTunes: By default, GarageBand saves to the uncompressed AIFF file format, so even the short tune we just created is a whopping 20.5 MBtoo big for e-mail or the Web. Right-click on the song in iTunes, and you can convert your song to the high-quality compressed AAC format, the format used by the iTunes Music Store. Drag that file out of iTunes to the desktop or a folder for emailing or uploading. (Unlike music store songs, it's not copy-protected .)
Getting More Advanced with GarageBand
GarageBand may be considered a "beginner" application, but it's advanced enough to be used by pros like John Mayer, punk rocker and BBC Radio 6 host Tom Robinson, and Barenaked Ladies' Ed Robertson, who uses it for backup tracks during performance and for sketching. Here are a few of the more advanced features you can utilize once you outgrow the basics of fiddling with loops:
-
Use notation and editing: Record your instrument or MIDI device in your own tracks and edit them, adjusting pitch, timing, and MIDI events where needed. Using GarageBand 2 and later, you can even view your work as a score. (See Chapter 8 for more on using MIDI; GarageBand has some powerful MIDI editing features.)
-
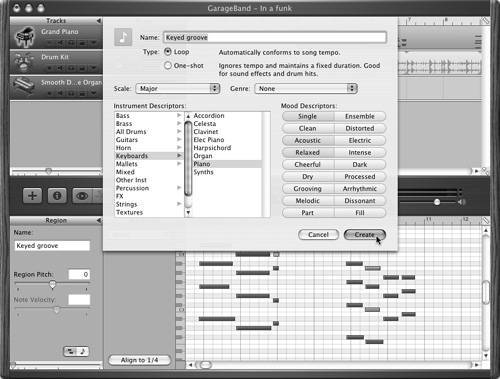
Make your own loops: Just because you're working with loops doesn't mean you can't use original material. With GarageBand 2 and later, you can save any region as a loop: drag it to the Loop Browser or select it and choose Edit > Add to Loop Browser. You can even categorize it for later use ( Figure 5.7 ). Since Apple Loops can be used with any digital audio program (even the Loop Browser in Logic), you can easily move short segments of audio to other projects.
Figure 5.7. When you create a new loop, GarageBand lets you add category information.
Learn more: Writer/producer/musician Francis Preve has written a book devoted to advanced GarageBand use. Check out Power Tools for GarageBand: Creating Music with Audio Recording, MIDI Sequencing, and Loops (Backbeat Books, 2004).
-
Work with Logic and other software: Since the audio quality of programs like GarageBand is basically the same CD-quality digital audio you'll get from other applications, there's no reason you can't sketch in GarageBand and then move to another program for additional editing options. Logic will open GarageBand projects. You can also export audio tracks or loops to other programs, but you'll need to recreate your song arrangement from scratch, as other programs can't load GarageBand song files.
| | On the DVD: Follow along with these steps using a 30-day demo of Kinetic; the project you save can be used with the purchased version. In addition to a finished version of the project, you'll find an exclusive sample project from Cakewalk. (Mac users, if you want to hear the results, MP3 files are provided, as well.) |