| DJing by just shuffling records can be a little boring, but triggering grooves interactively and playing over them, well that's more fun. Software like Kinetic makes this easy: you can manipulate, mix, and even create grooves from drums, beats, bass, and instrumental sounds. Kinetic is packed with audio and MIDI loops, just like GarageBand. But unlike GarageBand, instead of painting loops in one at a time, you can trigger groups of them all at once, locking them to beats so that the dance floor doesn't miss a beat.  | ACID support: Kinetic supports the popular ACIDized loop format used by many PC programs, so you can choose from a wide variety of loop libraries. |
Kinetic at a Glance Kinetic's interface is inspired by physical hardware ( Figure 5.8 ). Its central interface element is a 16-part mixer with traditional channel strips and faders , plus a 4x4 grid for triggering grooves. The top of the screen is dedicated to mixing, the middle to editing parts , and the bottom to arranging songs (although if you're DJing, you're likely to ignore the bottom and trigger grooves live, using the arrangement feature to record your set). Figure 5.8. An overview of Kinetic's interface. 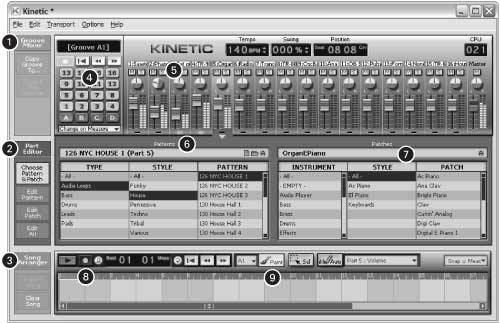
 Section for mixing grooves Section for mixing grooves  Section for editing parts Section for editing parts  Section for arranging songs (or recording a set) Section for arranging songs (or recording a set)  Groove picker for triggering grooves Groove picker for triggering grooves  Mixer for setting volume and pan for parts of grooves Mixer for setting volume and pan for parts of grooves  Select a pattern or audio loop, grouped by genre Select a pattern or audio loop, grouped by genre  Select an instrument to play the pattern Select an instrument to play the pattern  Play/record arrangements Play/record arrangements  Draw in arrangements Draw in arrangements Kinetic is a groove box, loop library, and software synth (with virtual instruments from Cakewalk and Roland) all in one. Since it integrates all these elements, you can use it to build a groove, starting from the smallest element and working up to the song: 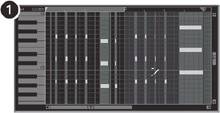
-
Patterns and Audio Loops: Patterns and loops are the basic musical elements of your song. Just like GarageBand, Kinetic can handle both MIDI data and audio, although all of the audio loops shipped with Kinetic are drums (other drum patterns and all of the other instrument parts are MIDI). 
-
Patches: Patches include the settings for instruments that will play your patterns, plus (via the Audio FX Bin) effects for both patterns and audio loops. 
-
Parts: Once you've selected an audio loop, or a pattern and a patch, you can assign it to one of the 16 available partsthat is, the slots on the mixerto create a groove from multiple parts (patches). 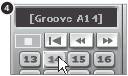
-
Grooves: Those 16 parts (complete with mixing, panning, and effects) can be combined into a single groove selected by the Groove Picker. A groove might include just one simple part or a combination of drums, bass, leads, and padsup to 16 parts at once. Up to 64 grooves can be used in a song. Sixteen parts may not seem like much, but typically you'll only layer 45 parts at a time. Multiply 16 parts times 16 grooves in the Groove Picker, then multiply those times four (the A, B, C, and D selectors), then add the ability to play synths over top of the mix, and you have enough music to carry you through the night.  | Basic Kinetic Workflow Here's a typical way to work with Kinetic to create your own project: -
Create a new project, either using a blank file or a template. -
Press Play to start the grooves. -
Edit grooves by browsing and selecting pre-built patterns and patches, or record or draw in your own patterns, edit them, and add effects. -
Create grooves by combining up to 16 parts into a groove. -
Choose different grooves by selecting banks AD and buttons 116 to trigger grooves, or paint them into the Song Arranger. | |
Optional Hardware You can complete this walkthrough with just a computer (and Kinetic is unusually well-suited to jamming on an airplane with your laptop and headphones), but using additional hardware does have advantages: -
A keyboard allows you to play virtual instruments over the top of your grooves. -
A control surface (or keyboard with knobs and/or faders) makes it easy to trigger grooves and effects without laboring over your laptop and mouse. Tutorial 1: Patches, Patterns, and Grooves We're going to begin our Kinetic walkthrough with the ingredients at left. By adding musical elements to the Groove Picker, we'll gradually assemble a basic arrangement with bass, drums, and keyboardsour first "groove." -
Create a project: Choose File > Project to start your set. You can use a set that's already configured by choosing File > Project From Template File, but we'll start ours from scratch. Groove ingredients: Patch 1: Bass > 101 Bass 3 Pattern 1: Bass > US Hard House > USHardHse2_bs Patch 2: Drums > Kits > Hip-Hop 1 Pattern 2: Drums > Hip-Hop > HipHopEast1_drm Patch 3: Pianos > El Piano > Cuttin' Analog Pattern 3: Leads > Trance > Trance2_lead Kinetic tools: Groove Picker MIDI Patterns and Sounds Choosing Pattern & Patch Part mixer (volume and pan) -
Start playback: To audition beats in Kinetic's browser, Play must be activated first. (You may have noticed the Play button pulsing to entice you to click it!) Select a tempo (and, if you like, a swing setting) from the top of the screen, then click the Play button in the Groove Picker keypad. Try 126 bpm. Note that you can use the Spacebar to play and stop. If channel 1 isn't selected in the mixer, select it by clicking in an empty part of that channel.  -
Pick a patch, then a pattern (Groove 1, Part 1): Kinetic assumes you're creating a traditional dance music track with bass, drums, leads, and pads. Building up the groove one element at a time can be more interesting and musically useful, so we'll start with bass. You won't hear anything until you choose an instrument, so select your Patch first. Then, find a pattern you like, browsing by genre. (You may want to adjust the Patch so it works well with the pattern.) Let's try 101 Bass 3 (patch) playing USHardHse2_bs (pattern). 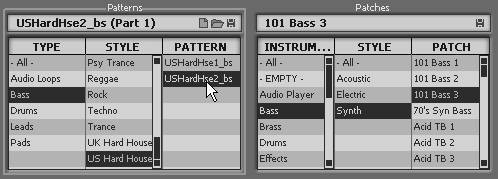 -
Add a drum part (Groove 2, Part 2): We want more than just bass, so right-click on groove A1 and choose Copy Groove 1 To: > Next Preset [A2]; the bass pattern appears in both A1 and A2. Now we can add another part. Click part 2 in the mixer to highlight it, and again pick a patch and pattern. In honor of Cakewalk's Boston roots, we'll add some East Coast hip-hop drums with Drums > Kits > Hip-Hop 1 playing Drums > Hip-Hop > HipHopEast1_drm.  -
Add some keyboard (Groove 3, Part 3): As before, right-click on Groove 2 and choose Copy Groove 2 To: > Next Preset [A3]; the bass and drum patterns will now be heard in grooves A2 and A3. Click part 3 in the mixer to highlight it, and again pick a patch and pattern. This time, try Pianos > El Piano > Cuttin' Analog playing the pattern Leads > Trance > Trance2_lead. 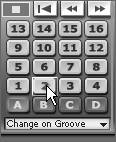 | | Ignore these directions: Part of the fun of MIDI is the ability to quickly hear a pattern on a different instrumentsometimes with radical results. Try playing patterns on the wrong instruments. Even experimenting with drums on keyboards and the reverse can produce interesting results. These alternative selections aren't just useful in Kinetic: sometimes trying this technique on your own MIDI recordings can free up your creativity. | -
Switch between grooves (Groove 1, 2, 3): Here's the fun part: you can now bring the drums and lead part in and out, locked to tempo and phrase, by clicking on Groove Picker buttons 1, 2, and 3. Set "Change on Measure" in the Groove Picker to "Change on Groove" so it will automatically change at the end of a groove (two bars here) instead of just at the end of the bar. -
Mind the mix: Try adjusting the mix of your three parts: adjust the volume faders if you're not happy with their blend, and adjust the pan pots off center (make one part a little to the left, one to the right) to give this mix more space. 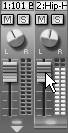 Tutorial 2: Build Up a Set of Grooves To build up the Kinetic song, we'll add the patterns and patches at left. After each addition, right-click on the pattern button in the Groove Picker and copy the groove to the next preset. This will allow you to switch back and forth, cueing different elements in and out of the mix with a single mouse-click. Groove ingredients: Patch 4: Pianos > Keyboards > Vintage Clavi Pattern 4: Pads > Jazz > Jazz2_pad Pattern 5: Audio Loops > Tribal > 129 TRIBAL LOOP 1 Patch 6: Synth Pads > Analog > --..---..- (think Morse Code) Pattern 6: Drums > Dream Trance > DreamTnc1_drm Kinetic tools: Audio FX Included effects Audio Loops Muting
-
Add effects (Groove 3, Part 3): The keyboard part (which should be in mixer channel 3, if you've been following the list of parts given above) is working fairly well, but it's a little dull. After selecting this mixer channel, click Part Editor > Edit Patch to add effects. Right-click under Audio FX, then choose Effects > Project5 > Modfilter. You'll see four of Modfilter's most commonly adjusted settings on the right (for more settings, double-click the Modfilter to see its full interface). Above those four knobs, click the drop-down list to choose a preset like Little Engine or Sweep, Med. 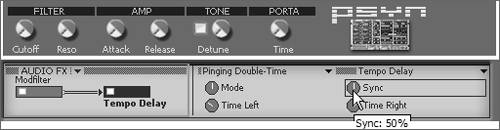 Now add a second effect to the chain by selecting Effects > Project5 > Tempo Delay. If necessary, drag the Tempo Delay to the right, so it will process the output of the Modfilter. Try the Pinging Double-Time preset, but set Sync to 50% to tighten it up, and increase the Time Right setting to add more stereo delay. Now you have a tempo-synced delay effect for a richer groove. -
Add Clav (Groove 4, Part 4): The tune is sounding a little mechanical, so let's add some funk. Copy A3 to A4, then add Jazz2_pad on the Clavi to part 4. It already sounds like a Hohner Clavinet, but it'll cut through the mix better if it's routed through a swirling phaser effect as is popular with real Clavs (see Chapter 7 for more on phasers ). Select Part Editor > Edit Patch > Audio FX and choose Effects > Project 5 > Classic Phaser , then choose the Phatty Quad preset. Slightly increase the Sync setting to your preference. (Notice that although we have two sounds that are technically keyboards, they're different enough in pitch range to sound good together.) Again, copy your groove (from A4 to A5).  -
Add an Audio Loop (Groove 5, Part 5): So far, we've been using MIDI parts only. Try Audio Loop Tribal Loop 1 on part 5. You don't need to select a patch; Kinetic automatically selects the Groove Player (although, just as with a MIDI patch, you can add effects by clicking Edit Patch). This overlaps with our original Hip-Hop drums, so mute them by clicking the M button just below its name on part 2. Muting, pan, and volume are all specific to grooves, so muting the drums on groove 5 won't mute them on grooves 14. 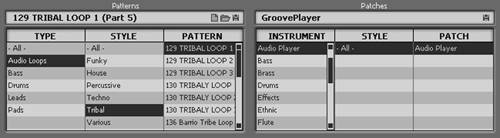 -
Create more grooves: From here on, you can copy your grooves to wherever you like. Remember to copy the groove each time so you can make changes in the Groove Picker one step at a time. To quickly round out this particular tune, we'll switch the Clav in part 4 to a new pattern (Trance1_pad) on groove 6, add another part on groove 7 (Part 6, DreamTnc1_drm), and gradually mute parts to thin out the texture and round out the song. Then remove the part 5 drums in groove 8, the part 1 bass in groove 9, the part 4 Clav in groove 10, and the Trance1 beeps in groove 11. 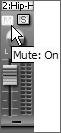 Tutorial 3: Ready for the Dance Floor With the grooves in place, you're set to turn your home studio (or club, if you want) into a dance inferno. The key to producing this result is real-time, tempo-locked triggering of the grooves we've just assembled . -
Change grooves: Try out your custom groove box by clicking on different buttons in the Groove Picker. Thanks to the Change on Groove setting, everything will sync up nicely . Move sequentially through grooves to build up or remove parts of the mix, or try jumping through the structure out of order for changes with more contrast. If you have a keyboard, add an instrument on another part and jam over the top. Kinetic tools: MIDI Remote Control Para-Q Song Arranger, Export MIDI Controller (optional) -
Thin out the mix: Try switching back to groove 1 with just the bass for four bars (perhaps between grooves 5 and 6)the sudden sparseness makes for some dynamic contrast. Notice that we've covered ourselves by assigning the Tempo Delay effect to the analog keyboard patch. This traditional DJ trick ensures that when other parts drop out, delay spills over the silence rather than the sound stopping abruptly. -
Control grooves: If you have a MIDI devicea keyboard or any other controlleryou can use that instead of a mouse to control the grooves. Just right-click on the button or knob in the Kinetic interface you want to assign. For example, right-click one of the grooves, select MIDI Remote Control, and click Learn. Press the button or key you want to use to switch to that groove, then click Stop Learning. (Alternatively, enter the information manually with Control Source, although Learn is generally easier.) Repeat this procedure for the other grooves, and you can "play" your grooves using your keyboard or other device. 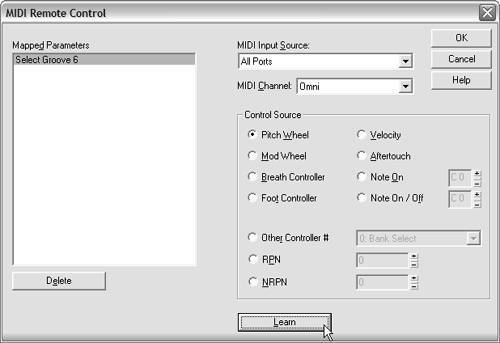 -
Control a filter sweep: A must-have physical control is a DJ-style filter sweep: it's no fun with a mouse, but it's perfect for a fader, mod wheel, or (best of all) a knob. (See Chapter 7 for more on equalization and filtering, but you'll probably recognize the sound.) Select part 5 (the Groove Player) and select Edit Patch. Right-click Audio FX and add a 2- band parametric equalizer: Effects > Project 5 > Para-Q. Increase Gain 1 to 100%, then assign a MIDI knob or slider to Frequency 1 (right-click, select MIDI Remote Control, and follow the Learn procedure in step 3). Now, using your knob or slider, gradually sweep through the filter with this groove playing. 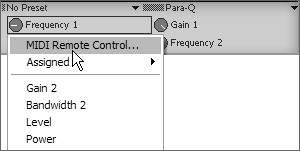 -
Play, record, share: Using the Song Arranger, it's possible to paint grooves into the arrangement with the mouse, but instead ( especially if your live MIDI controller performance is hot) click the Record button in the Arranger or hit the R key before triggering the grooves. Click Stop when your set is done, and your whole set is recorded. Click Export Song to save it as a WAV file and burn it to disc or convert it with iTunes, Windows Media Player, or another program. (The MP3 converter in Kinetic costs extra, but you can convert your songs to MP3 or OGG for free in Audacity.) 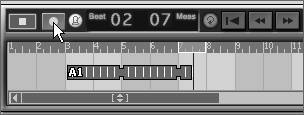 Getting More Advanced with Kinetic Kinetic may be an entry-level app, but as a groove station it integrates perfectly with other parts of a software studio. Here are some of the more advanced features Kinetic offers: -
Make your own patterns: With a MIDI keyboard (or simply by painting in notes or drum hits), you can create your own beats and melodic materials for the patches. You can even paint or record right over the top of the patterns we used in the preceding sections, because the pattern loops as it plays. Just select a pattern and click Edit Pattern. -
Paint over the groove: Using the Auto (automation) tool ( Figure 5.9 ) in both the Part Editor and Sound Arranger, you can paint over your patterns and grooves to automatically adjust volume, pan, MIDI controllers (see Chapter 8), and even effect and instrument settings. Figure 5.9. Record, paint, and edit your own patterns, then paint automation and MIDI data over the top of them using the Pattern Editor. 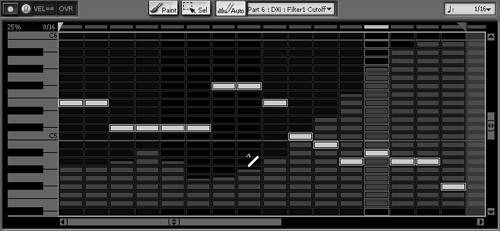 -
Save as Template: By choosing Save as Template, you can build a custom groove toolkit for yourself for easy modification, so you don't have to repeat some of the steps we performed in this walkthrough. -
Export audio loops, work with Project5: Aside from exporting a song as audio, you can also export a single groove (complete with effects) for use in a program like Ableton Live (also included on the DVD). In addition, you can save files as Project5 files for use with Kinetic's "pro" sibling. Project5 is a more extensive program that is also based on hardware-style synth patches and pattern editing. Using Project5, you can expand the possibilities of what you can do with Kinetic alone. -
ReWire Kinetic to other programs: Since Kinetic is essentially a collection of virtual hardware plus some pattern editors, you can use ReWire to incorporate Kinetic into other programs you're using, like SONAR, Live, and Cubase. ReWire will automatically route audio from Kinetic into any of those programs, syncing to its tempo, a perfect setup for live performance with Ableton Live or studio sessions with other programs. |