S-Tools Tutorial
|
Figure 6.15 shows the S-Tools main working windows. The dark gray background area is used for dropping the image or sound files into. This area is for insertion and extraction of the secret message. The lighter gray "Actions" window shows the status of tasks taking place.
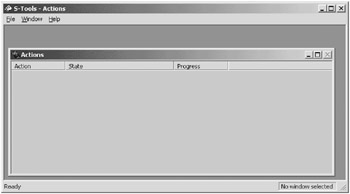
Figure 6.15
After opening S-Tools (S-Tools.exe) and Windows Explorer, drag Cover File.gif into the main working area of S-Tools. Figure 6.16 shows this cover file GIF in the main working area. Note the text that appears in the bottom right corner. S-Tools analyzes the GIF and outputs the approximate number of bytes available for storage. For this example, there are 44,984 bytes available for hiding data (Figure 6.16).

Figure 6.16
To hide the secret file, drag secret file.doc into the S-Tools working area and over the cover file as shown in Figure 6.17.
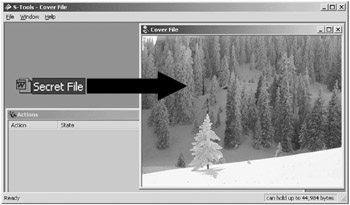
Figure 6.17
At this point S-Tools prompts for a pass phrase. The pass phrase is used in generating the pseudorandom number that is used to insert the bits into the cover file. S-Tools gives a choice between IDEA, DES, TripleDES, and MDC encryption algorithms. Figure 6.18 shows the pass phrase box.
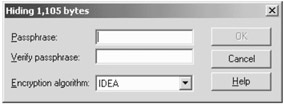
Figure 6.18
The pass phrase and encryption algorithm must be remembered in order to extract the secret file. If IDEA was used during the hiding process and DES is selected during the extraction process, the secret file will not be extracted. Enter a pass phrase and select IDEA as the encryption algorithm.
To have S-Tools process the GIF file, a dialog box prompts for choices to be made. The choices affect how the cover file will be processed during the insertion of the secret file. The picture options box is shown in Figure 6.19.
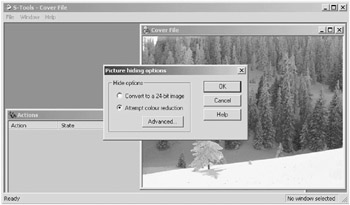
Figure 6.19
Accept the defaults and now S-Tools will begin the process of hiding the secret file within the cover file. The ACTION sub-window will display the status of the processes (Figure 6.20).
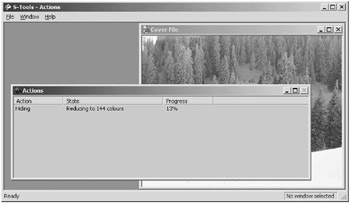
Figure 6.20
When S-Tools finishes inserting the data, the output image will display with the marker "hidden data" at the top. This GIF is the product of inserting the secret file into the cover file. In order to save this new file, right click and select Save As. The new output file can be named anything you like at that point (Figure 6.21).
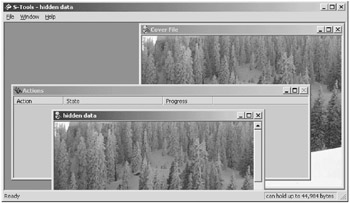
Figure 6.21
Similar to the method used in the stego file system, S-Tools will spread the file bits out throughout the free space on the floppy. This is undetectable in the normal Windows viewer, but the file is there.
S-Tools Version 3 has the ability to embed information in unused tracks of a floppy disk. While this program is not widely available on the Internet these days, it is still possible to find it and you may encounter this particular function.
How It Is Done
S-Tools will allow you to hide files in the unused space on floppy disks. To understand what is meant by unused space, look at the way DOS organizes the files on a disk. Every floppy disk, when formatted, is divided into sectors. Each sector on a disk can hold 512 bytes of information. On a 1.44-Mb disk, there are 1440 1024/512 = 2880 sectors. When you write a file to the disk, DOS computes how many sectors it will need to hold the file and writes this information into the file allocation table (FAT).
S-Tools' FDD module will look at the FAT to decide which disk sectors have not been used, and will allow you to hide information on them. S-Tools will not hide information in consecutive sectors on disk because this would be too easy to detect. Instead it uses a random number generator to choose which free sectors to use. S-Tools will add additional security by allowing you to fill all other unused sectors on the disk with random data.
Using This Module
There are a few tips that you might want to be aware of when using the FDD module. If you want to be able to plausibly deny having any concealed data on your disks, it would make sense to fill the unused space on all your newly formatted disks with random data. This way any concealed data will appear to be "lost in the noise."
One point to remember with this feature of S-Tools: Do not write any ordinary files to the disk after you have concealed information on it. Depending on the amount of space you have left on the disk, it is very likely that DOS will overwrite your hidden information. This point can also work in your favor because there may be a situation where you want the hidden information destroyed.
Analyze Disk
This option displays a usage map of the floppy and tells you how much information you can hide on it. S-Tools will work with any capacity of disk that DOS can use, up to a maximum of 1.44 Mb. Sectors marked in red are the ones that S-Tools cannot use because files are already stored there. The status bar at the bottom of the screen will tell you how much information you can hide on the disk (Figure 6.22 through Figure 6.24).
Fill Free Space
This option allows you to fill the unused sectors on a disk with random data. This will mask the presence of any file that you want to hide on the disk. S-Tools automatically asks you whether you want to fill the free space after hiding a file.

Figure 6.22
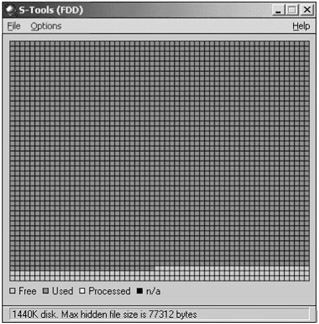
Figure 6.23
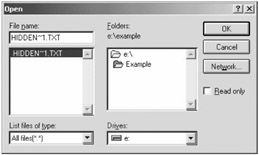
Figure 6.24
A Word of Warning
If you fill the free space on a disk after hiding a file, you will lose that file. After hiding, S-Tools will forget about its presence until you use the reveal operation. If at any time you decide you want to stop the process, hit the Escape key.
Hide File
This is the option that you use when you want to hide a file on disk. If you are not sure whether the disk has enough free space to hold the hidden file, then you can use the Analyze Disk option to find out.
First you are asked to choose the file that you want to hide. If you have asked to be prompted for encryption options, you will be asked whether the file should be encrypted before hiding. Using encryption is recommended even if the file is already encrypted because the pass phrase that you enter is also used to seed the random number generator that is used to choose the sectors that will hold the hidden file. Again, if you want cancel the operation press the Escape key (Figure 6.25 through Figure 6.27).
Reveal File
This is the option that you should use to reveal a file that has been hidden on a disk. Simply insert the disk into the disk drive and select this option. If encryption was selected as an option when the file was embedded, then you must supply the correct pass phrase in order to reveal it. If everything works as planned, S-Tools will look at the disk and decide whether a file is hidden on it. If there is a hidden file, the program will tell you the size of the file and give you the option of viewing it or saving it.
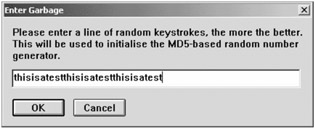
Figure 6.25
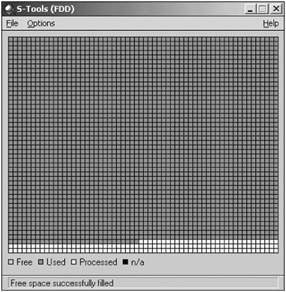
Figure 6.26
Conclusion
S-Tools is roughly 589 kb in size, small enough to fit on a floppy. As is the case with many steganography programs, S-Tools leaves little in the way of a footprint. However, there is a known signature of S-Tools. S-Tools reduces the number of colors in the cover file to a minimum of 32. In doing so, grayscale images are affected. There exists a more detailed explanation of this, but it goes beyond the goal here. In sum, a true grayscale image may no longer be a true grayscale image due to the change in the palette indexes. So this palette signature becomes a way to distinguish one image from another with a secret file embedded. However, because of the strong encryption that can be set, the secret data still has a very good chance of remaining a secret.
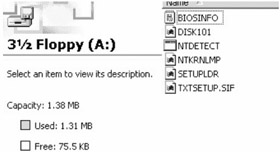
Figure 6.27
|
EAN: 2147483647
Pages: 220