Audio Compression and Optimization
Once you have sorted out all these issues surrounding your project, you should be ready to get started. There are three rules to follow:
-
Reduce outside/background noise
-
Use professional equipment
-
Record digitally (DAT, Minidisc, miniDV)
Equipment
Depending on your location, you might need different equipment. If you are indoors, for example, you will have much better control over the quality of audio you can capture because you can control environmental noise factors. If you are outdoors, you might have to implement some additional hardware to better your chances of getting clean audio.
| Equipment Quality Matters Whenever you capture audio or video, use the highest-quality equipment you can afford for the job. Nothing is worse than recording bad audio or video only to find this out after the shooting or recording session is over. |
For starters, you will want to record at least at CD quality using a Digital Audio Tape (DAT), Minidisk, or miniDV device. CD quality is defined as audio that is captured at 16-bits and 44,100 samples per second in stereo. If you are recording outside, you will want some type of field recording unit, such as a Sony TCD-D10PRO2 Professional DAT Recorder with XLR inputs for attaching a professional-quality microphone. If you are in a studio, you will want a professional TASCAM DA-60MKII. Both of these are top-of-the-line DAT players.
Microphones also are available in indoor and outdoor models, and you have many choices, from shotgun (for focused recording) to lavalier (clip-on mics). For outdoor options, look at brands such as Sennheiser or Beyerdynamic.
In addition to recorders and microphones, you will need audio patch cables. When you are working with professional audio equipment, you will be working with balanced XLR patch cables. Balanced audio interconnects utilize two conductors, while standard RCA audio interconnects use only a single "unbalanced" conductor. This enhanced design gives balanced audio interconnects the power to provide greater resistance against sources of noise. This results in purer signal transfer.
Level Matching
One important thing to know is that your audio's volume is referred to as levels. The levels (the term is plural because there are two sound channels: left and right) basically tell you how loud your sound clips are recorded. If you digitize your audio with the same computer all in one continuous block, you shouldn't have to worry about the levels too much.
In some cases, you will need to adjust your audio clips so that they sound either louder or quieter than each other. This is when you need to make a levels adjustment. The best way to understand the levels adjustment process is to imagine wearing headphones with the volume (or levels) set to 8. You hear the audio at a specific decibel level when it is set at 8 as opposed to 4.
When your audio source is plugged into your computer and you are digitizing your audio, your computer is "listening" to the sound much in the same way that your ears listen to sound. This means that if you record 30 seconds at a volume of 8 and then record 30 seconds at a volume of 4, your second clip is going to be half as loud. This is bad, because your audio will instantly get louder or quieter.
If you are planning on playing back your digitized audio clips together, you are going to have to make some adjustment to the levels either before you digitize (by making sure they are all the same) or after you have digitized (by adjusting the normalization settings). You learn more about this in the "Normalization" section that follows .
In addition to making sure that your levels are consistent, you also need to worry about the levels for each independent stereo track. If you are recording with two mics, this could be an issue.
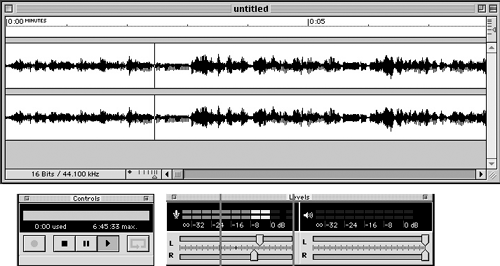
When you record with two microphones, you have two separate audio streams and each has its own levels setting during recording. Under normal situations, you want the levels setting of the right and left channels to be exactly the same. However, you might run into a situation in which the left channel after digitizing sounds is lower than the right. In this case, you will have to adjust the levels of the left channel. By boosting the left channel level setting, you can better balance the stereo between both channels (see Figure 13.2).
Normalization
What do you do when you are recording your audio subject and either the sound that is being recorded changes volume or the person you are recording begins to speak more loudly? Don't you hate that? Unless there is some contextual reason for the change in volume, you normalize your audio.
Normalization is the process of "looking" at your audio and finding the loudest point; then resetting that point to be (for example) 90 percent of maximum loudness.
Take a look at Figure 13.3. This figure shows the waveform of a digitized audio clip, set at approximately 20 percent of its maximum level.
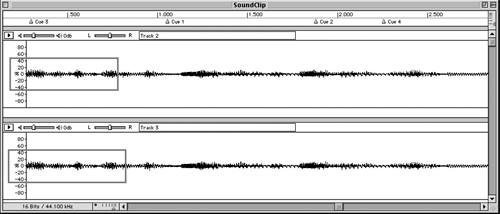
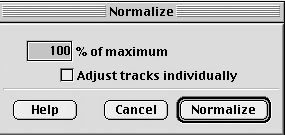
The fact that the audio clip is set to 20 percent of maximum could be caused by recording it at a lower level. This means that for any given volume setting on the playback device, this piece of audio will be playing only at 20 percent of its loudness. You can fix the loudness problem by adjusting the levels of the clip. The simplest way to do this is to use a Normalize command (see Figure 13.4).
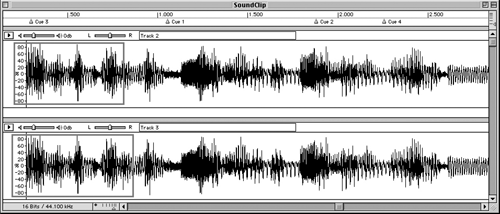
Normalization looks at your audio sample, finds the loudest segment, and pulls it up to 100-percent capacity for that given volume. After your normalization setting is applied, you will see your audio waveform fill more of the amplitude. In Figure 13.5, you can see that the audio is now playing at or close to 100 percent of its volume level. This means that when someone turns the volume up to 5, for example, the audio will sound like audio that is set to a volume level of 5, instead of 20 percent of a 5 level. Keep in mind that normalization also amplifies any noise in your audio tracks, so make sure that you have a clean signal.
The most important thing about this entire lesson is that you must apply the same normalization setting to all your clips that will be playing together! If you don't, your customer will hear audio that is quiet one moment and too loud then next . This is the biggest mistake a novice audio developer can make.
Audio Compressors
Not to be confused with file compression, audio compressors compress an audio signal to smooth out any extremes. A compressor alters the dynamics or difference between low and high volume within an audio signal. Compressors are useful for taking out the sharp peaks in the audio and maximizing the volume going to the recorder, without adding any distortion caused by having the levels turned up too loud.
Compressors also can be used as an effect to make voices sound bigger and fuller , increase loudness, and smooth out mixes . Have you ever wondered why ads on TV sound louder than the programs and why DJ's voices on the radio sound so full? These are effects produced by compressors.
Here are some common functions on a compressor that you need to know:
-
Threshold This is the volume level above which the compressor begins compressing. Everything above the threshold will be brought down in volume.
-
Ratio This setting controls how much the volume above the threshold will be reduced. For example, at a setting of 1:1, the signal will not be compressed; at 3:1, the volume will be brought partly down; and at Infinity:1, the volume will be brought down to match the threshold.
-
Attack & Release Attack controls how fast the compressor reacts to signals passing over the threshold point. Release is how quickly it stops reacting once the signal moves under the threshold.
-
Output Gain This setting amplifies the signal after it has been compressed to compensate for the reduction in high volumes .
-
Over Easy or Soft Knee This functions smoothes out the threshold point and moves it around, rather than placing it exactly at a particular point.
-
Contour This function is less sensitive to low frequencies and comes in handy when you are compressing an entire mix.
-
Limiter A limiter is built into many compressors to catch any extra volume peaks that escape compression. This stops the signal from going over a particular volume and distorting.
-
Gate This function fades your audio to silence if the volume passes under the gate threshold point. This is useful for removing hiss from the quiet sections.
Useful Compressor Settings
The compressor is a creative tool. There is no one right way to use it. The best way to work out what to do is to use your ears (using headphones is best, of course). Keeping this in mind, this section provides some settings I have found useful.
To correctly install a compressor, you need to put it in-between your input device (such as a microphone or DAT player) and your computer. That is, when you would normally run a wire from your DAT to the input of your computer, you would now run the wire from your DAT to the compressor, and then run a wire from the compressor into the computer.
The following lists give you the best general use settings for cleaning up your audio before it goes into your computer for recording.
Best compression:
GATE: OFF
THRESHOLD: 15dB
RATIO: 3:1
OVEREASY: ON
ATTACK: FAST
RELEASE: MEDIUM SLOW
LIMITER: +5DB
OUTPUT: +6dB
Or try the deep radio voice settings:
GATE: OFF
THRESHOLD: 20dB
RATIO: 6:1
OVEREASY: ON
ATTACK: FAST
RELEASE: SLOW
LIMITER: +5dB
OUTPUT: +10dB
Encoding
In order to deliver your audio content, you must compress its size so that it can be successfully streamed (or downloaded) to your target audience. Encoding is the process by which this compression happens, and it is full of tough, interdependent decisions. Some of these decisions include:
-
Streaming media format QuickTime versus RealMedia versus Windows Media.
-
Supported playback platforms Microsoft Windows versus Macintosh, or both.
-
Delivery method True real-time streaming versus HTTP streaming.
-
Overall data rate Compression versus quality versus bandwidth required.
-
Audio quality Mono versus stereo.
To meet your goals, you may end up encoding multiple versions in different formats and data rates.
Figure 13.6 shows the current king of encoders, Cleaner, which is made by Discreet (http://www.discreet.com).
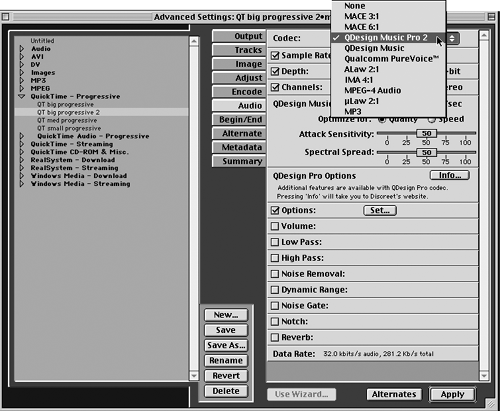
With audio encoding, you have to make a basic tradeoff: Quality versus file size. This tradeoff is often very hard to make because you always want your finished piece to look and sound as good as possible but also be as small as possible. Unfortunately, there isn't a magic setting for this; each audio and/or video clip is different.
To get an idea of the capabilities of these audio formats, see Table 13.1.
| Raw Audio | MP3 | MP4 | QPV | QDX | |
| File Size | 900K | 128K | 108K | 47 to 100K | 9K |
| Quality | High | Medium | High | Low-Med | Medium |
EAN: N/A
Pages: 135
- An Emerging Strategy for E-Business IT Governance
- Linking the IT Balanced Scorecard to the Business Objectives at a Major Canadian Financial Group
- Technical Issues Related to IT Governance Tactics: Product Metrics, Measurements and Process Control
- Governance in IT Outsourcing Partnerships
- Governance Structures for IT in the Health Care Industry