Use Shorthand Properties
Shorthand properties allow you to specify the values of several properties with a single property. They combine multiple property definitions into a shorter, more abbreviated form. In most cases, any omitted values are assigned an initial value automatically. Combined with grouping, shorthand properties let you shrink your styles to the bare minimum. There are six types of shorthand properties defined in CSS: font , background , margin , border , padding , and list .
The font Shorthand Property
The font property allows you to set all font- related properties with one abbreviated property. The syntax is based on traditional typographic shorthand notation. The syntax is font followed by values separated by spaces, in the following order:
{ font: weight style variant size/line-height font-name(s) inherit } A valid font value must contain the size and font-name values in that order or the value will be ignored. The other values can appear in any order before these required values.
To define all the font properties for an element, you use something like this:
h1 { font-style: italic; font-variant: small-caps; font-weight: bold; font-size: 1.5em; line-height: 1.2; /* this form is shorter than 1.2em = 120% */ font-family: arial, helvetica, sans-serif; } A much more efficient way to specify font properties for the same selector is to use the shorthand font property. Here are the same properties expressed in shorthand:
h1 {font: italic small-caps bold 1.5em/1.2 arial,helvetica,sans-serif} Leaving out the unnecessary styles, it becomes even shorter:
h1 {font:bold 1.5em arial,helvetica,sans-serif} Even better:
h1{font:bold 1.5em sans-serif} The background Shorthand Property
Like the font property, the background shorthand property groups all the background-related values into one shorthand property: background . The background is the area behind the content plus any padding. "Border colors and styles are set with the border property. Margins are always transparent so that the background of the parent box always shines through." [3] Background properties set either the background color or the properties of a background image. Here's the shorthand syntax:
{ background: color image repeat attachment position inherit } Background properties do not inherit, but the parent's background shines through by default because background-color defaults to "transparent."
The values may be in any order, except the position values must appear together: horizontal, and then vertical. Position values can be percentages, pixels, or keywords ( top , left , right , and bottom ). Percentages are shorter than keywords, but remember that the default is 0% 0% or the top-left corner of the screen. Here's a longhand example:
body { background-color: white; background-image:url(http://domain.com/logo.gif); background-repeat:no-repeat; background-attachment:fixed; background-position:0% 0%; color:black; } The longhand example becomes this in shorthand:
body { background: white url(http://domain.com/logo.gif) no-repeat fixed 0% 0%; color:black; } Even better, avoid the image entirely, and save an HTTP request, like this:
body{background:#fff;color:#000} Here are a couple of caveats for the background property. Netscape 4 understands only the background shorthand property, not background-color . Netscape 4 also doesn't properly apply the background property to the entire content box and padding, but only behind the text itself. To get around this, you can set the border of the element. For example:
body {background: white} p {background: gray; padding: .5em; border: 0.1px solid gray} By setting a border with a style, Netscape 4 colors the entire background, not just the area behind the text. Of course, Netscape 4 then botches the padding, which adds a gap, but that's a story for the "The padding Shorthand Property" section.
It's a good idea to set the foreground color when you set the background color; otherwise , user style sheets could render your text illegible. For example,
body {color: white; background: black;} /* user styles */ body {color: black} /* author styles */ would result in the following:
body {color:black; background: black} /* combined styles */ Hey, it's your funeral.
Now that we've got the background down, let's think inside the box. The CSS element box, that is. Figure 7.1 gives you a look at the CSS box model.
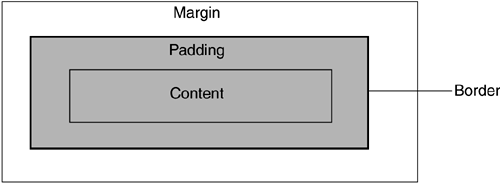
CSS treats every element as though it were surrounded by a series of boxes, consisting of a rectangular content area that is surrounded by padding and enclosed within margins. The border is a line that surrounds the element's contents and any padding.
The margin Shorthand Property
The margin shorthand property groups the margin-top , right , bottom , and left margin properties into one shorthand property. The margin properties set the width of blank space around an element's content. You can set any padding , border , and margin values as length units, a percentage, or auto. The syntax is as follows :
{ margin: top right bottom left inherit } Value Replication
Like the border and padding shorthand properties, margin values replicate themselves to fill in any missing values. These shorthand properties have shorthand values! You can specify from one to four values, and any missing values will be provided. For example:
-
Set one value, and it applies to all sides:
body {margin:2em} = { margin: top/right/bottom/left } -
Set two values, and the first sets the top and bottom margins, while the second sets the right and left margins:
body {margin: 2em 4em} = { margin: top/bottom right/left } -
Set three values, and the first sets the top, the second sets the right and left, and the third sets the bottom:
body {2em 4em 3em} = { margin: top right/left bottom } -
Set all four, and it sets the top, right, bottom, and left margins:
body {margin: 2em 4em 3em 5em} = { margin: top right bottom left }
Here are some examples:
body { margin: 2em } /* all margins set to 2em */ body { margin: 2em 4em } /* top & bottom=2em, right & left=4em */ body { margin: 2em 4em 3em } /* top=2em, right&left=4em, bottom=3em */ You can use this value duplication to your advantage. In most cases, you can set one margin for all sides. If you need to set only one side for all but margin-bottom , you will find that setting the longhand property is more efficient. So instead of this:
div {margin:0 0 0 2em} Do this:
div {margin-left:2em} /* set left margin to 2em */ If you are setting margins on two or more sides, it is always more efficient to use the shorthand property.
The border Shorthand Properties
The border properties have eightcount 'em, eightshorthand properties. This is because each border has a width , style , and color , and there are four sides to a border. Finally, there's a shorthand for the shorthands: the border property. Generally anywhere there's a dash, there's a shorthand equivalent.
The border properties set the width , style , and color of a line that surrounds the content and padding of an element. The background extends up to the outer edge of the border. In order for a border to exist, it must have a style, because it defaults to none .
Border colors default to the element's foreground color. Unless explicitly set, borders get the foreground color, which may be explicitly set or inherited. The border-style , border-width , and border-color all have the same syntax:
border-style/width/color { top right bottom left inherit } Let's take the border-width shorthand as an example for all three.
The border-width Shorthand Property
Once you've assigned a style, you can set an optional width for your border. The border-width shorthand property sets the width of each of the four sides of an element's border. The values replicate like the margin and padding properties. So instead of this:
p { border-style:solid; border-top-width: 1em; border-right-width: 10px; border-bottom-width: 2em; border-left-width: 20px; } Do this:
p { border-style:solid;border-width: 1em 10px 2em 20px } Even better, use the same width all around:
p {border-style:solid;border-width:1em} The shorthand border property is better suited here, because it sets all four sides at once.
The border-top, border-right, border-bottom , and border-left Shorthand Properties
Although there may be some cases in which you'll want to style four borders by style , width , and color , there is a better way: border shorthand properties. These properties group width , style , and color into one property for each of the four sides, and the entire border. They all have the same syntax:
border-top rightbottomleft { width style color inherit } So instead of this:
div a { display:block; border-top-width: thin; border-top-style: solid; border-top-color: black; } Do this:
div a {display:block;border-top: thin solid black} This rule sets only the top border to a thin black line, leaving the others to their defaults of none. The other border side properties work exactly the same.
You can leave out values that have defaults ( width and color ) to create shorter rules. So instead of this:
div {border-left: 2px dashed black} Do this:
div {border-left: dashed} The border will inherit the foreground color of the div (say, black text), and use the default of medium for width (usually around three or four pixels). Once again, you give up some control to gain some flexibility and efficiency.
As it turns out, there is even a better waythe ultimate shorthand property: the border property.
The border Shorthand Property
The border shorthand property sets the same values for width , style , and color for all four borders. It is a great way to shrink the size of your border styles to the bare minimum. The syntax is as follows:
border { width style color inherit } So instead of this:
p { border-top: thin solid black; border-right: thin solid black; border-bottom: thin solid black; border-left: thin solid black; } Do this:
p {border:thin solid black} Even better, inherit the foreground color, like this:
p{border:1px solid} Or leave off the width entirely and default to medium :
p{border:solid} Like the other border properties, you can use the cascade to your advantage. Suppose that you want a solid border around a paragraph with the top border dashed. You could do the following:
p { border:solid; border-top:dashed; } | Border Gotchas Netscape 4 once again screws up the way it interprets borders and backgrounds. In order to force Netscape to display a background behind the entire content and padding (not just the text), you can set an invisible border: border {.1px solid none} This will force Netscape to display the background around the entire box. Of course, it then adds extra space between the border and the padding, but there seems to be no way to get rid of this odd behavior. |
The padding Shorthand Property
The padding shorthand property lets you set the padding on all four sides of an element. The padding properties set the width of the padding area around an element's content. The border is applied to the outer edge of any element's padding. Padding values replicate in the same way margin values do. Here's the syntax:
{ padding: top right bottom left inherit } The default padding value is 0. You can use any length unit or a percentage value for padding. Watch out for percentages, however, because they are based on the width of the parent element. Percentage- sized padding changes with the screen size, not the font size. You're better off with em or pixel units for padding.
Here's the longhand way to set padding around four sides of a div . Instead of this:
div { padding-top: 1em; padding-right: 2em; padding-bottom: 3em; padding-left: 4em; } Do this:
div {padding: 1em 2em 3em 4em} Even better, spread the same padding all around with this command:
div{padding:1em} Similar to the margin property, when you are setting padding on only one side, it is more efficient to use the longhand property, except for padding-bottom . When you are working with two sides or more, it is always more efficient to use the shorthand property.
| Padding Gotchas Because Netscape 4 doesn't extend padding out to the border, you'll get a gap between any background and the border. Use the thin styled border trick you learned in the "The background Shorthand Properties" section to force Netscape 4 to color the entire box, not just the area behind the text (see Figure 7.2). Figure 7.2. The Netscape 4 box model. 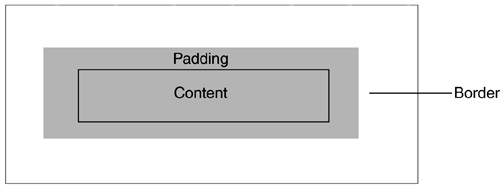 Padding and widths in the same element don't mix well in Internet Explorer 4+. You are better off separating these two properties into nested div s to avoid the problem entirely. |
The list-style Shorthand Property
The list-style property sets the three list properties ( list-style-type , list-style-image , and list-style-position ) in one shorthand notation. These properties are used to affect the bullet type, image, and placement for a list. The syntax is as follows:
{ list-style: type position image inherit } The list-style values can appear in any order. Any missing values will be filled in with their defaults of disc , outside , and none . Here's an example:
ul li { list-style: url(http://domain.gif/b.gif) square outside } When you are using a bullet image, it's a good idea also to specify the list-style-type value because the image may not load. Because outside is the default, this could be written as:
ul { list-style: url(http://domain.gif/b.gif) square } Be careful with nested lists because list styles are inherited.
CSS2 adds a number of new values to the list-style-type property, and " inherit " to all three properties. CSS2 also adds the marker-offset property, which allows more sophisticated lists but doesn't give us anything as far as optimization goes.
EAN: N/A
Pages: 135