28. Use and Customize Preset Camera Moves  BEFORE YOU BEGIN BEFORE YOU BEGIN
58 About Preset Effects 67 About Keyframing
 SEE ALSO SEE ALSO
29 About the Timeline and Video Layers 65 Create and Save a Preset 70 Pan and Zoom Still Images a la Ken Burns 71 Make a Variable-Speed Pan and Zoom
Premiere Elements offers several presets that create motion paths for you. (See 70 Pan and Zoom Still Images a la Ken Burns to learn how to add more elaborate, custom motion to your photos.) The good news is that these presets are automatic and easy to use: You just drag them onto your images on the Timeline. The bad news is that one size doesn't always fit all, and it's rare that you'll find a preset that works perfectly for your photo right out of the box. On the other hand, all these motion presets are, in reality, simply motion paths created using Premiere Elements's keyframing feature. In other words, after you've applied them to your clip, you can adjust them, add to them, remove what you don't want, and tweak them until you get exactly the effect for which you're looking.  NOTE NOTE
After you've created or customized your keyframed movement or effect, you can save it as a permanent preset, and it will be automatically added to your preset collection. Just select Save Preset from the Properties panel's More menu.
1. | Add a Preset Motion Effect to a Still
Before you add motion to your photo (or to any raster image for that matter), ensure that you have adequate resolution to allow for any scaling you have planned. See 22 Prepare a Still for Video for some important considerations and methods for maintaining your image's quality when scaling.
28. Use and Customize Preset Camera Moves 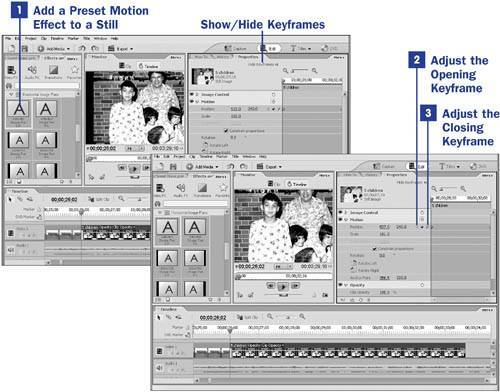
KEY TERM Raster image Images or graphics composed of pixels, such as photos and other Photoshop images. Usually these pixels are small enough that they aren't perceived as individual blocks of color. However, over-scaling a raster image reveals the pixels, making the image appear jagged or pixilated.
Open the Effects and Transitions panel and drag a preset pan (such as the 640x480 L-R Image Pan) onto a still in the Timeline. This effect is located in the Presets collection in the group of Horizontal Image Pans.
NOTE The various tools of the Effects and Transition panel can be isolated and displayed according to category by clicking the four category icons at the top of the panel. Click Video FX to display the presets and video effects; click Audio FX to display only the audio effects; click Transitions to display only the video and audio transitions; and click Favorites to display only the effects and transitions you have designated as favorites. The selected motion is automatically timed to the duration of the still. Play the clip and watch how the preset affects the clip. Unless your image is the exact dimensions of the preset, it's likely that this preset will either show too little of your image or the motion will extend beyond the edges of it. The 640x480 L-R Image Pan preset begins and ends off the edges of my photobut it's easy to customize it to fit my unique needs.
NOTES The Effects and Transition panel offers four sets of motion presets, each with several preset options. The Horizontal Image Pans, as you might guess, pan from the right to left or from the left to the right of your image, the Vertical Image Pans pan up and down, and the Vertical Zooms and Horizontal Zooms zoom in or out. The resolution values listed with each preset designate how the pan or zoom will move across, into, or out of your image. In other words, because you're working with a horizontal pan, the 640x480 preset pans as if your image were 640 pixels wide. If you are using an image that is larger than 640 pixels across, this preset pans across only a 640-pixel portion of your image. If the left-to-right pixel measurement of your image is greater than the size of the preset you've applied, you'll pan across only a portion of the image; if the left-to-right measurement of your image is smaller than the size of the preset applied, your image appears smaller than the screen size, and the pan motion might even begin off the edge of your image. To remove a preset or any motion path from a clip, select the clip in the Timeline and click the stopwatch icon next to the Motion effect in the Properties panel. A window appears warning that this action will delete existing keyframes. Click OK. | 2. | Adjust the Opening Keyframe
With the clip selected, click Show Keyframes in the Properties panel to reveal a small timeline to the right of each property, an area where you can set up keyframes for this clip. Click on the triangle to the left of the Motion property in the Properties panel to reveal the details of the keyframe properties. Notice that, because this preset has been applied to the selected clip, a small diamond, or keyframe point, has been placed at each end of the Properties Panel Timeline to the right of the Position property. These keyframe points represent the starting and ending positions of the horizontal movement the preset has applied.
NOTE The settings for any Motion property apply to the anchor point of the image on the screen, which is by default the image's center. However, in the Properties panel, the anchor point can be designated as another point (so that, for instance, you can rotate your image around a corner rather than around the center). Adjacent to the Motion listing in the Properties panel, just to the left of the Properties Timeline, is a little diamond with an arrow pointing left on one side and an arrow pointing right on the other. This diamond is the keyframe creator. (See 70 Pan and Zoom Still Images a la Ken Burns.) Click the left arrow, and the CTI jumps back to the position of the opening keyframe point.
With this keyframe point selected, you can change its Position and Scale settings by typing in new coordinates or percentages, by dragging across the numerical settings so they increase or decrease (the effect is displayed in the Monitor panel), or by clicking the image in the Monitor panel and dragging it to a new position or resizing it by pulling on the corner handles.
Adjust these settings to create a more accurate opening position for your screen image in the Monitor panel.
NOTE When you apply a pan or zoom preset to a clip, the duration of the motion is automatically set to the duration of the clipbeginning the motion at the beginning of your clip and ending it at the end. | 3. | Adjust the Closing Keyframe
Click the arrow to the right of the keyframe point creator; the CTI jumps forward to the position of the closing keyframe point.
Likewise, adjust this point's settings for Scale and Position to a more accurate closing position for your screen image in the Monitor panel.
Keyframes can be added, moved to different positions on the Timeline, and even deleted completely.
Finally, you can save the new positions you've created as a custom preset (see 65 Create and Save a Preset).
|
TIP You don't have to create a keyframe at the exact position on the Timeline you want the effect to occur. After the keyframe is set, you can drag the keyframe point to any desired position on the Timeline.
|