27. Change Slides to the Beat of Music  BEFORE YOU BEGIN BEFORE YOU BEGIN
14 Add Media with the Adobe Media Downloader 22 Prepare a Still for Video 23 Scale and Position a Still 26 Make an Instant Slideshow 29 About the Timeline and Video Tracks
 SEE ALSO SEE ALSO
17 Sort the Media Panel by Different Characteristics 19 Trim Clips in the Media Panel 44 About Transitions 70 Pan and Zoom Still Images a la Ken Burns 114 Set DVD Chapter Markers
Video is a medium of motion ("movies move"). It is also a medium of both visuals and sound. Ideally, neither should happen independently of the otherrather, both should work together to tell the story you want to tell. 27. Change Slides to the Beat of Music 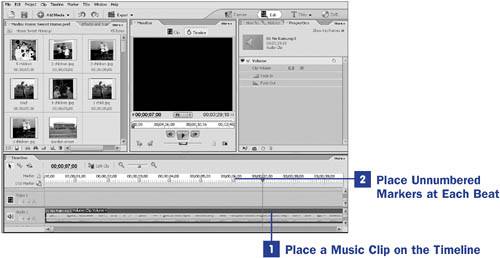 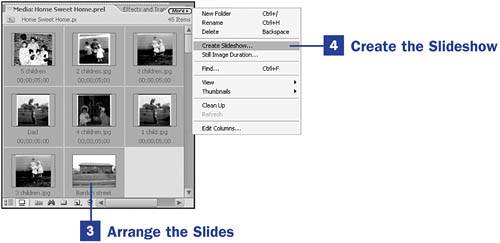 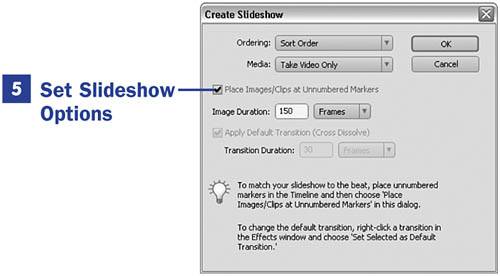
Just as there should be meaning to the motion added to your still images on screen (see 70 Pan and Zoom Still Images a la Ken Burns), any marriage of your visuals to your sound makes the experience of watching your video much more interesting. One simple way to marry sound and visuals is to synchronize the cuts in your video or your slideshow to the beat or rhythm of a music track. Although this can be and often is done manually on the Timeline, Premiere Elements contains tools in its Create Slideshow dialog box that enable you to sync the cuts in your slideshow to your music almost automatically. 1. | Place a Music Clip on the Timeline
Drag your desired music clip from the Media pane to the Timeline. The audio track is displayed as a series of sound peaks and valleys. Occasionally, it's possible to actually see the beat displayed in these peaksmost likely, though, you'll have to find the beat manually.
Click the Play button in the Monitor panel or press the Spacebar on your keyboard to play the audio clip. As the music plays, watch the movement of the current time indicator (CTI). By listening for a drum beat, guitar riff, or other repeating element, you'll soon get a feel for the rhythm of the music. By watching the CTI, you can soon estimate the time interval between each beat.
In the example shown here, Blind Melon's "No Rain," I noted that rhythmic slide changes should happen approximately every second.
| 2. | Place Unnumbered Markers at Each Beat
You want to place an unnumbered marker at each beat in the audio file. The markers indicate where the slides will change. To place an unnumbered marker, click the Marker icon at the top-left corner of the Timeline. (The DVD Marker is used in 114 Set DVD Chapter Markers.)
Create a series of unnumbered markers by clicking the Marker icon and moving the CTI down the Timeline. The markers can be easily repositioned and don't have to be in their final positions when you create them. Create markers on the Timeline until you have one for every slide you plan to add to your slideshow.
Slide the markers into position on the Timeline at the approximate locations of the beats in your music. Reset your CTI and play the music clip again, watching the movement of the CTI over your markers and adjusting their positions as necessary.
You might find it more intuitive to play the music, clicking on the Marker icon at each beat. The program will drop an unnumbered marker at the CTI position each time you click the icon.
Spend some time getting these markers positioned as accurately as possible. Doing so will save you a lot of tweaking and trimming of your clips later on.
| 3. | Arrange the Slides
Ordering your slides in the Media panel assures that they'll be in the correct order when you create your slideshow. You might want to create a new folder in this panel and move your still images into the folder so you can better manage the image files.
Rearrange the order of your slides by dragging and dropping them in the Media panel while in the Icon view. The order the slides are in the Media panel when you select them for your slideshow is the order they will appear on the Timeline when you create your instant slideshow.
 NOTE NOTE
Although we usually think of slides as still images, the Create Slideshow feature can also load video clips that play at the intervals and duration you designate. You can also set your video clips to change in time with the rhythm of a music clip just as you can still images. | 4. | Create the Slideshow
Select the stills or clips you want to use in the slideshow by either holding down the Shift key and clicking the first and last clip (the first, last, and those clips in between are selected) or by holding down the Ctrl key and clicking to select one clip or image at a time.
When all the clips are selected, click the Media panel's More button and select Create Slideshow. The Create Slideshow dialog box opens.
| 5. | Set Slideshow Options
Enable the Place Images/Clips at Unnumbered Markers option.
You can also place the default transitions between your clips, although doing so might minimize the effect of cutting the images in rhythm to your music clip.
NOTE You probably don't want to position transitions between your slides if you're setting up your slideshow to change to the beat of music but, if you do use transitions, you can easily change the default transition that is used (see 44 About Transitions). Click OK to close the dialog box; your slideshow is created. Beginning at the first unnumbered marker, each slide changes in rhythm with the beat of the music.
Play your musical slideshow; if you're a little off the beat, you can lengthen or shorten the individual slides accordingly on the Timeline by dragging the edge of each slide to make it a bit longer or shorter as needed (see 34 Trim a Clip on the Timeline). You might find it helpful to use the slider at the top of the Timeline to zoom in so you can make precise adjustments.
If the whole slideshow is off the beat slightly, adjust its entire position by dragging to lasso the entire range of slides as a group and then dragging to move the group of slides up or down the Timeline a frame or two. You might find it helpful to use the + key to zoom into the Timeline as close as possible when making very fine adjustments.
|
|