108. Output an MPEG File  BEFORE YOU BEGIN BEFORE YOU BEGIN
4 About Video Capture 14 Add Media with the Adobe Media Downloader
 SEE ALSO SEE ALSO
18 About Troubleshooting Media Additions 107 Output a Windows Media (WMV) File 110 Archive Your Project
 WEB RESOURCE WEB RESOURCE
www.chiariglione.org/mpeg This is the homepage for the Moving Picture Experts Group, which can provide information about the MPEG file format.
The Moving Picture Experts Group (MPEG) format is available in a number of flavors: MPEG-1, MPEG-2, and MPEG-4. MPEG files are more compressed than DV-AVI files and cannot be edited as easily in Premiere Elements. Depending on the codec used to encode the MPEG, Premiere Elements might not be able to edit these files at all. By default, Premiere Elements uses the MainConcept MPEG codec for encoding and decoding MPEG files. Premiere Elements can export your movie as either an MPEG-1 or MPEG-2 file. For the best quality, choose the MPEG-2 format. If you want to put your movie onto a CD so people can view it on computers and some DVD players, this is the format you should choose. These CDs are called VCD (Video Compact Disc, MPEG-1) and SVCD (Super Video Compact Disc, MPEG-2). WEB RESOURCES www.videohelp.com/vcd www.videohelp.com/svcd If you want to learn more about VCDs and SVCDs, check out the resources at www.videohelp.com.
108. Output an MPEG File 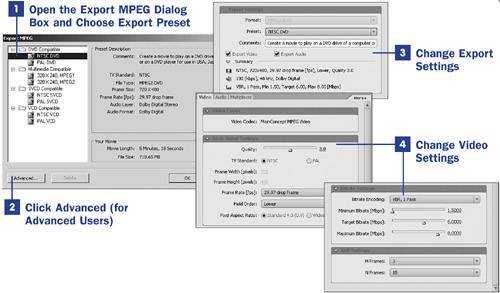 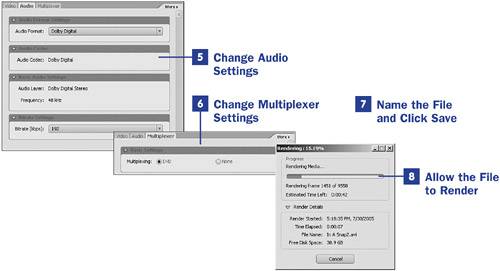
1. | Open the Export MPEG Dialog Box and Choose Export Preset
Choose File, Export, MPEG from the menu bar at the top of your screen. If you want to output an AVI file (as explained in 104 Output to an AVI Movie), you know that AVI files are much too large for email or website use; therefore, the output process does not ask you to make choices to establish the size (or compression and quality) of the output file. WMV, MPEG, and QuickTime formats, however, all provide you the ability to choose how the file will be viewed most often; you make a selection by choosing a preset.
When you choose one of the presets in the left pane of the Export MPEG dialog box, Premiere Elements automatically sets all the defaults based on that preset. The preset options are, broadly, DVD Compatible, Multimedia Compatible, SVCD Compatible, and VCD Compatible. Each preset has an additional number of options based on NTSC and PAL or on MPEG1 and MPEG2.
After you choose a preset, continue with step 2 to change the advanced options. If you do not need to make any changes to the advanced settings, skip ahead to step 7.
| 2. | Click Advanced (for Advanced Users)
If you have a need to change your output settings, click the Advanced button at the bottom of the Export MPEG dialog box to open the Export MPEG Settings dialog box.
| 3. | Change Export Settings
MPEGs have the most modifiable settings of all four output file types. The Export Settings options include the Format (not changeable) of the file you are exporting, the Preset (which you chose in step 1), Comments (type a note explaining what purpose you plan to use these settings for), Export Video (exports the video tracks; deselect this option to prevent exporting video tracks), Export Audio (exports the audio tracks; deselect this option to prevent exporting audio tracks), and a summary of the current format settings.
| 4. | Change Video Settings
Under the Export Settings area in the dialog box are three tabs, Video, Audio, and Multiplexer. The Video options you can change are Video Codec, Quality, TV Standard (NTSC or PAL), Frame Width in Pixels, Frame Height in Pixels, Frame Rate, Field Order, Pixel Aspect Ratio (4:3 or 16:9), Bitrate Encoding, Minimum Bitrate, Target Bitrate, Maximum Bitrate, M Frames, and N Frames. For additional information on most of these settings, see 104 Output to an AVI Movie.
| 5. | Change Audio Settings
Click the Audio tab to change the following options: Audio Format, Audio Codec, Audio Layer, Frequency, and Bitrate in kbps. For additional information on most of these settings, see 104 Output to an AVI Movie. The default audio option is Dolby Digital. You can take advantage of Dolby Stereo and AC-3 support when importing and exporting video; these options give you full quality sound and leave more space on your DVD for the high-quality video.
| 6. | Change Multiplexer Settings
Click the Multiplexer tab to choose either the DVD or None option. The DVD option creates one MPG file that contains both video and audio; such a file is known as a program stream. Selecting the None option creates separate video (.m2v) and audio (.ac3) files; such files are known as elementary streams. Use the None option if you are going to author a DVD from the resulting MPEG files. Some authoring programs prefer program streams while others prefer elementary streams. If you plan to use the MPEG files in a third-party DVD authoring application, consult your DVD authoring software documentation to determine the proper settings.
If you have made changes to the advanced settings that you want to save, click the Save button at the bottom of the Export MPEG Settings dialog box. If you have not made any changes or do not want to save the changes you have made, click Cancel.
| 7. | Name the File and Click Save
After clicking Save or Cancel, you return to the Export MPEG dialog box (back where you selected the preset). Click the OK button. The Save File dialog box opens. Choose the destination location for the file, type the name of your file, and choose the Export Range. You can choose to export the Entire Sequence (project) or just what is under the Work Area Bar.
Click the Save button to begin saving your movie as an MPEG file. After you click the Save button, the Rendering dialog box opens.
| 8. | Allow the File to Render
The file must be rendered, just as if you were burning it to a DVD. The rendering process varies in time depending on the size of your project and the speed of your computer. The Rendering dialog box shows you the progress and estimated time remaining. If you decide not to continue rendering the file, click Cancel; the MPEG file will not be created.
The resulting MPEG file can be put onto a CD (size permitting), used on a website, or even emailed to friends and family. The MPEG file can also be played in most media players and imported into third-party editing and DVD authoring software.
|
|