105. Output to DV Hardware or Export to Tape  BEFORE YOU BEGIN BEFORE YOU BEGIN
4 About Video Capture 14 Add Media with the Adobe Media Downloader
 SEE ALSO SEE ALSO
107 Output a Windows Media (MWV) File 112 Create an Auto-Play DVD
Sometimes you might have a need to put your movie back onto a DV tape or even a VHS tape. Even in the year 2006 and beyond, not everyone has a DVD player, but most people have a VCR. So for those family members and friends who can't seem to jump into the twenty-first century, you can put your movie onto VHS tape or DV tape as easily as you can put it on a DVD. Another good reason to put your movie projects onto camcorder tape is for archiving purposes. Moving your completed video to one or two tapes will get those huge files off your computer, leaving them only a capture away from being used again. The hardware setup for this procedure is no different from capturing video (see 4 About Video Capture). The only changes might be in the set up of your camcorder or digital converter. See the user's manual for your device for instructions on recording from your computer. 1. | Open the Export to Tape Dialog Box and Set Device Control
Choose File, Export, Export to Tape from the menu bar at the top of your screen. The Export to Tape dialog box opens. Notice that there are three sections: Device Control, Options, and Export Status.
105. Output to DV Hardware or Export to Tape 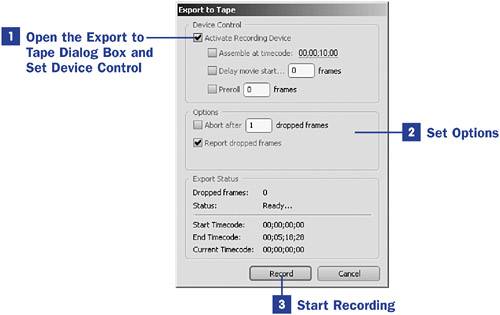
In the Device Control section are the following options:
- Activate Recording Device If you have a digital camcorder, this option starts the camcorder in record mode automatically.
- Assemble at timecode Indicates the place on your DV tape that you want the recording to begin. You can stripe a tape by first recording only black video. (Record black video by recording any length of tape with the lens cap on.) If your tape is not striped, leave this option disabled. The recording begins at the current tape location.
 NOTE NOTE
Opinions vary as to whether striping a tape is beneficial. Striping the tape places a continuous timecode on your tape, which is good in theory because no spaces on the tape are missing a timecode and your editing is much easier when this information is available. For one thing, it is the way that Premiere Elements determines scene changes when capturing video to your project. Some camcorders might have a problem with striping when footage is recorded over the existing timecode and for some reason the timecodes don't match. It is always best to consult your camcorder manual before deciding to stripe your tapes. - Delay movie start Specifies the number of quarter frames to delay the movie so it can be synchronized with the DV device's recording start time.
- Preroll Specifies the number of frames to back up on the recording deck before the specified Assemble at timecode. Specify enough frames for the deck to reach a constant tape speed. Many decks operate fine with a 5-second or 150-frame preroll.
For most purposes, there is no need to change these settings.
NOTES If you are exporting to a digital converter such as the ADS A/V Pyro Link, be sure to disable the Activate Recording Device check box. If you are exporting to a digital converter instead of to a camcorder, check your user manual. The device might require additional set up, cables, or another device before being able to perform the digital-to-analog conversion. | 2. | Set Options
The Options section of the Export to Tape dialog box includes two items: Abort after (number) dropped frames and Report dropped frames. If you check the Abort after box and enter a number into the text box, Premiere Elements stops the recording if it drops that number of frames. If you check only the Report dropped frames box, Premiere Elements keeps a running total of all dropped frames. You can see this total in the Export Status section.
TIP Dropping a frame or two is not necessarily a bad thing. Because your eye cannot see each individual frame at 30 frames per second, one or two dropped frames won't likely be noticeable. So don't sweat a few dropped frames. If you encounter many dropped frames, however, check all your cables and your setup in general because something is not working properly. | 3. | Start Recording
When all the settings are just the way you want them, click the Record button. A Rendering dialog box appears for a few seconds to a few minutes, depending on the size of your movie and the speed of your computer. Generally, the audio portion of your video is the only thing that has to be rendered at this point unless you have added transitions or effects to your clips. After the rendering is completed, the recording will start automatically.
If you selected the Activate Recording Device option, your camcorder will start recording automatically as well. If not, you will have to activate your recorder manually.
In the Export Status section of the Export to Tape dialog box, notice whether the export is experiencing any dropped frames (this value should remain at 0 but will grow if frames are being dropped); the status (during export, it should say Recording); and the Start Timecode, End Timecode, and Current Timecode (the starting and ending points of your movie on the Timeline, and the position on the Timeline at which recording is currently taking place; when the current timecode reaches the end timecode, the recording stops).
|
TIPS It is a good idea to have a television monitor hooked up to view the output from Premiere Elements. That way, you can easily view what is being recorded. If there are any problems, you will be aware of them when it is happening, not when you attempt to watch the tape. Refer to your camcorder or digital converter manual to set up a television monitor for viewing the output. After you click Record, Premiere Elements renders the audio portion of your video. This takes a few seconds; if you are using a digital converter rather than a camcorder, don't be too quick to press the record button on your VCR.
|