99. Create Rolling and Moving Credits  BEFORE YOU BEGIN BEFORE YOU BEGIN
96 Use and Customize a Title Template
 SEE ALSO SEE ALSO
98 Customize a Title Text Font 101 Create a Star WarsStyle Credit Roll
Just like in Hollywood, you can create rolling credits for your movie. I can't even think of a movie that doesn't have rolling creditsit's an unwritten law that you have to have them! 99. Create Rolling and Moving Credits 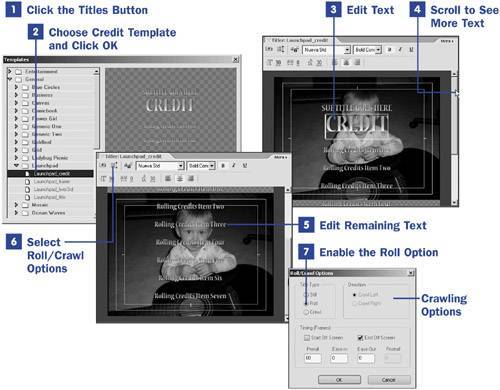
 NOTE NOTE
Moving panoramas have been in use since the days of Lewis and Clark. The moving panorama, or diorama, consists of a series of paintings on canvas which were then joined together to form one very long canvas sheet. This sheet was wound onto a vertical roller and moved across the stage and wound up on a similar roller on the other side. The canvas could be lighted from behind, front, or both, using oil or gas lamps. Smaller panoramas were placed in a box that someone could look into. If these dioramas had stationary objects inside the box while the canvas moved from behind, the result was a kind of modern video effect. In those days, moving panoramas were used primarily for advertising, but the same principle is still with us today in rolling credits.
Obviously, rolling credits are a good way to display a lot of information in a little space. I say "obviously" because the idea has spanned decades of film and is used constantly by the film industry. Seeing that this type of title has stood the test of time and that no one has seemingly come up with a better idea, I am sure that you will find a need to use rolling credits in your projects at some time. With Premiere Elements, you can not only roll your title, you can also crawl your title. Crawling moves the title across the screen from right to left or from left to right. Rolling moves the title from the bottom of the screen to the top. No matter what type of motion you use, rolling or crawling, I am sure that you will find dozens of uses for this type of title. This type of title always has a transparent background so you can view the title over a color matte, a clip, a still image, or just a black background. TIP To run your title over a color background instead of black, use a color matte. You can add a color matte to a track from the Media panel by clicking the New Item icon and selecting Color Matte. After the matte is created, you can drop it on a track below your title. For more details on color mattes, see 15 Add Special Media Clips.
1. | Click the Titles Button
In the main taskbar, click the Titles button to open the Title Templates dialog box.
| 2. | Choose Credit Template and Click OK
For this example, I used the title type Launchpad_credit, found in the General, Launchpad category. You can choose any other category of titles and look for title types that end in _credit to achieve similar results.
When you have selected the credit title you want to use, click OK to open the title in the Titles workspace.
TIP You can have your title move over a black background, a color background, a still image or video clip. Click the More button and select Show Video; the CTI controls what video is visible behind the title. You can view the image behind the title exactly as it will appear if, when finished, you place your title on a video track above the selected image on the Timeline. | 3. | Edit Text
This particular credit title template provides you with many lines of text. The text even continues below what you see in the Titler window. Click each section of text and make the appropriate changes to create a meaningful credit list for your movie project.
| 4. | Scroll to See More Text
When you have edited all the lines of text you can see in the Titler panel, drag the scrollbar on the right side of the Titler panel to reveal additional text boxes.
| 5. | Edit Remaining Text
Make changes to the remaining text. If there are more text lines than you need, you can delete the text boxes altogether: Click in the text area and press Backspace or Delete to clear the existing text. If you don't have enough lines of text, you can add more text by clicking the Type tool (see 95 About Titles) and then clicking the space in the title where you want the text to be. This action creates a text box into which you can enter your additional text. You can also add additional text to an existing text box. Using the Type tool, select the text box you want to add text to and then position the cursor where you want to start typing. When you get to the end of a line, press the Enter key to create a new line.
| 6. | Select Roll/Crawl Options
Click the Roll/Crawl Options button at the top of the Titler panel to open the Roll/Crawl Options dialog box.
| 7. | Enable the Roll Option
Considering that in this example we have chosen a credit type title, the Roll option should already be selected. If you want your title to crawl horizontally across the screen instead of roll from top to bottom, enable the Crawl option.
|
TIP If you chose the Crawl option in step 7, the Direction options become available. Choose Crawl Left to make the text move from the right side of the screen and off the left side; choose Crawl Right to make the text start on the left side of the screen and move off the right side.
This dialog box also offers options under the Timing (Frames) section: Start Off Screen The title starts rolling or crawling from off the screen. If it is a rolling title, the title appears first at the very bottom of the screen. End Off Screen The title continues moving off the screen until it disappears from view. If it is a rolling title, the title disappears off the top of the screen. If neither of these options is selected, the title will not roll or crawl. To start a title somewhere other than off screen, position the title where you want it to start and select only the End Off Screen option. To end your title somewhere other than off the screen, position your title where you want it to end and select only the Start Off Screen option. Preroll The number of frames that will play before the roll or crawl begins. Only available if the Start Off Screen option is not checked. Ease-In The number of frames to move at a slowly increasing speed at the beginning of the roll or crawl, increasing to the normal crawl or roll speed. Ease-Out The number of frames to move at a slowly decreasing speed at the end of the roll or crawl, decreasing from the normal crawl or roll speed. Postroll The number of frames that will play after the title has finished its roll or crawl. Only available if the End Off Screen option is not checked.
Make any changes you want to the settings in the Roll/Crawl Options dialog box and click the OK button. The rolling title has already been added to the Media panel for use in your movie. To use the credit clip as either opening or closing credits in your movie project, drag the credit title clip off the Media panel and drop it on an upper video track on the Timeline. Position the clip so it aligns with the clip you want to show through the transparent background of the credit title clip. |